.webp)


Want to record an audio or video podcast on your Mac?. Your default options are QuickTime and GarageBand, but they’re limited, missing key features and pro-quality audio for remote interviews.
Riverside is a more professional and flexible solution: high-quality audio and video, right in your browser, with no complicated setup.
In this guide, we’ll walk you through all three methods with detailed, step-by-step instructions so you can start recording fast—whether you’re keeping it basic or going all in.
How to record a podcast on Mac using Riverside (the easy way)
Riverside is a dedicated podcasting platform to record studio-quality audio and video with up to 9 guests. Don’t worry though—it’s just as easy to use as QuickTime or GarageBand, but far more powerful.
You get uncompressed, locally recorded WAV audio (up to 48kHz), 4K video, automatic transcripts, and text-based editing, all in a single, browser-based app.
Let's walk through the steps to record your podcast on Mac using Riverside.
Step 1: Sign up or log in to your Riverside account.
Step 2: From your dashboard, select a Project or create a new one, then click “Record” (top centre of the screen).

Step 3: Choose your camera, microphone, and speakers, then click “Join Studio.”

Step 4: Invite up to 9 people to join the studio by copying and sharing the link or inviting them by email.

Step 5: From the right sidebar, select “Brand” to customize your studio by adding your logo, branding colors, background and fonts.
.webp)
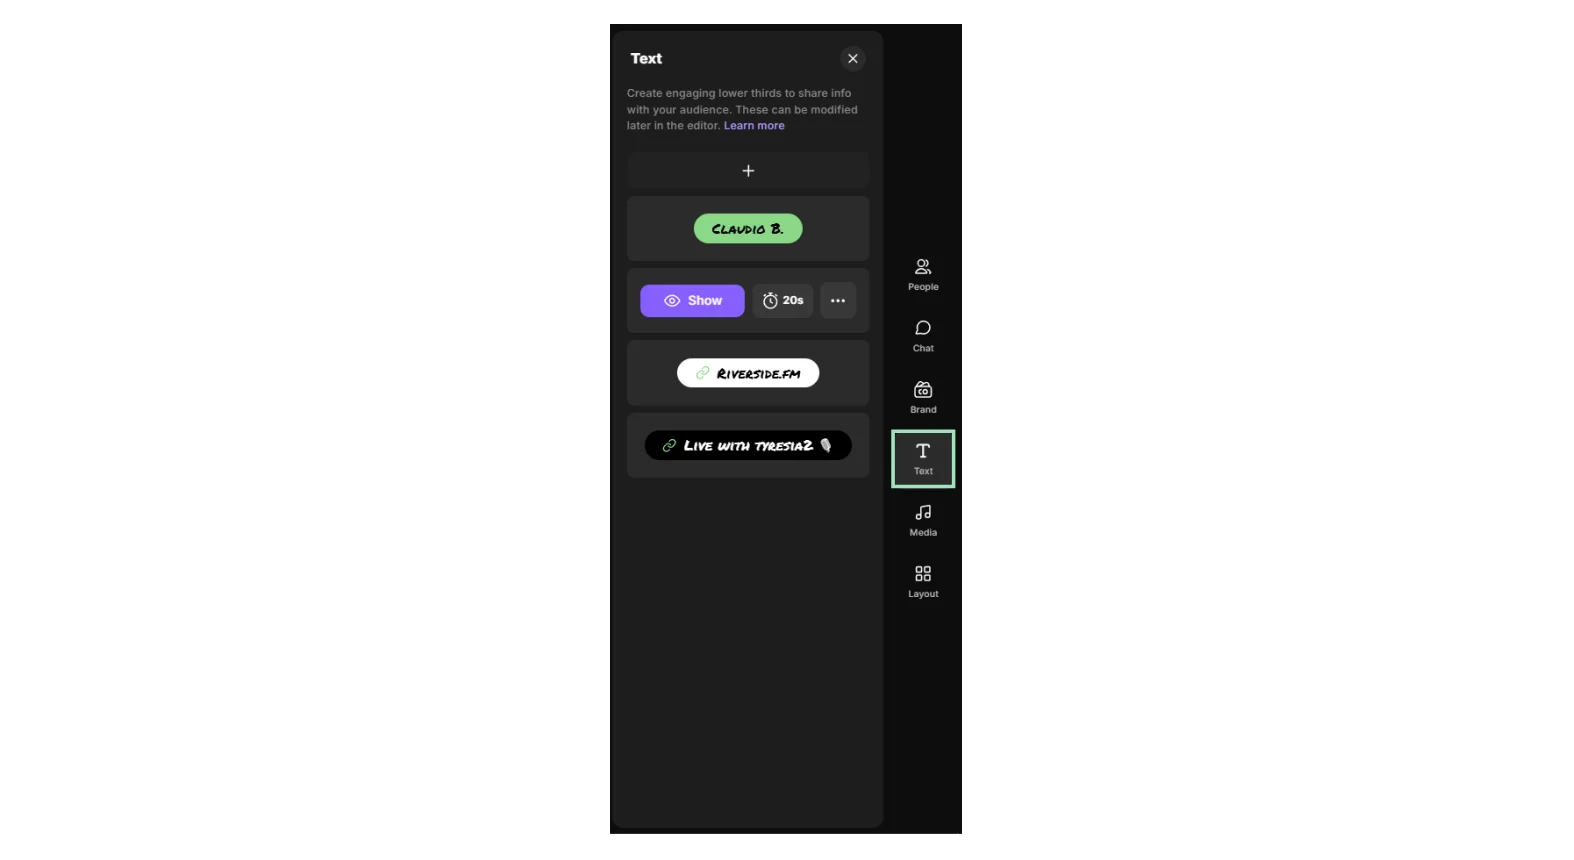
Step 6: Select “Text” to create lower thirds for promos or calls to actions during recording.
Step 7: Select “Media” to play audio and video files from our library during recording, or upload your own.
.webp)
Step 8: Select “Layout” to choose how to display you and your guest from split screen, speaker full screen, etc.
Step 9: At the bottom of the screen, select “Script” to display your written script or use the teleprompter feature (ideal for podcast intros, guest introductions, or outros).

Step 10: When you’re ready, click the “Record”button then wait for the 5 seconds countdown to start your recording.

Step 11: If you’re livestreaming, you can use the “Chat” feature to communicate with your audience from all platforms.
Step 12: When you’ve finished, click the “Stop” button. When each participant's recording has been uploaded 100%, everyone can exit the studio.

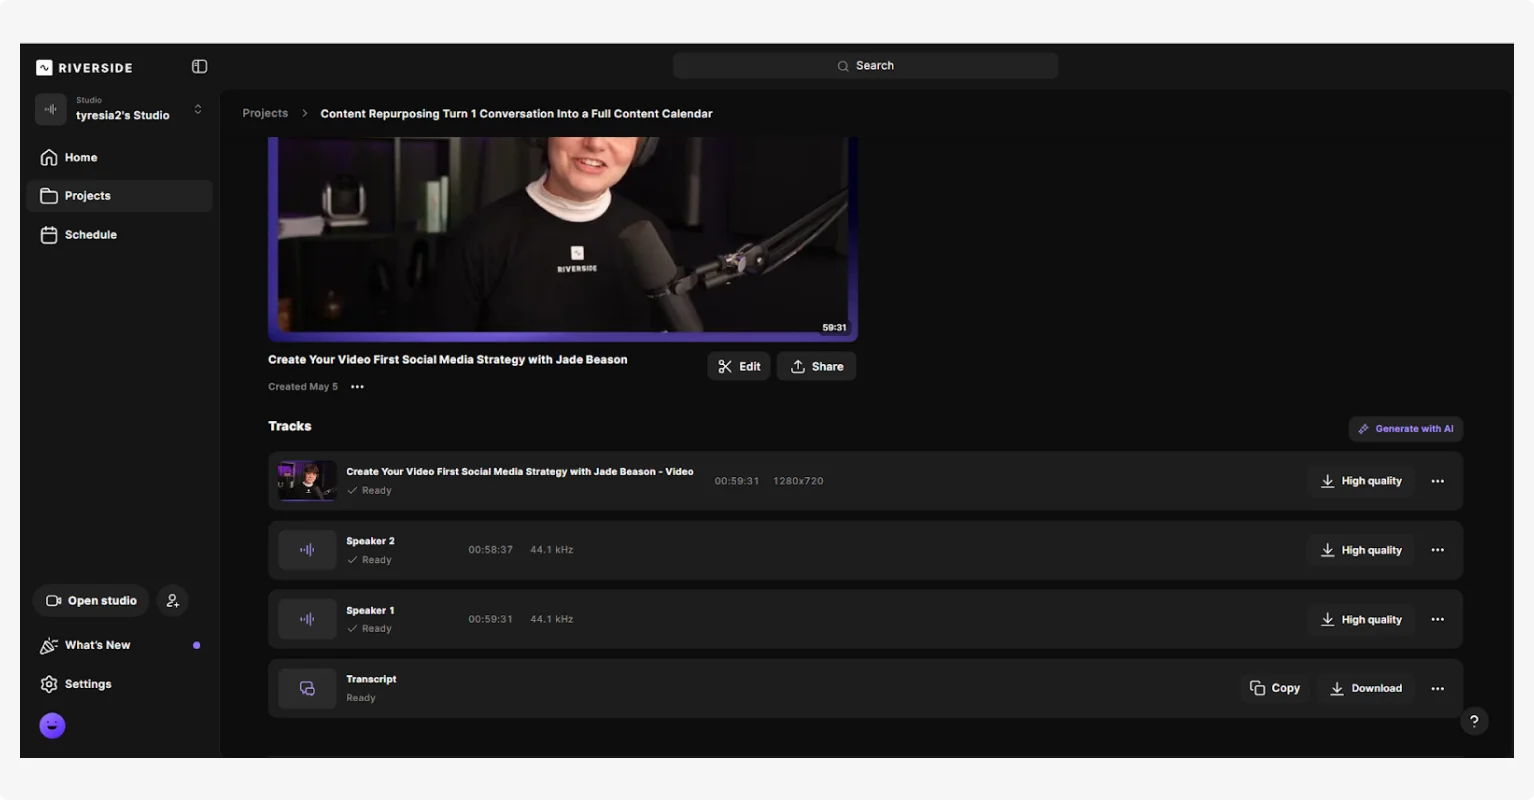
Step 13: Go back to your dashboard and access the recording by going to “Projects.”
Step 14: Select the correct recording, and scroll down to view and download each separate video and audio track for each participant. You can also download an accurate, AI-generated transcript of your recording.
Step 15: Click “Edit” to polish your recording to perfection. Use the text-based editor to easily edit your podcast episode like you’re editing a word document.
Here you can also add branding, captions, music, b-rolls, and more. With Riverside’s “AI Producer”you can enhance your audio, remove filler words and pauses, and enable smart layouts for auto-switching camera views.
.webp)
Step 16: Once you’ve finished editing your recording, click “Export” on the upper right corner of the screen to export your file. You can also choose your video/audio quality, normalize audio levels, and remove any background noise.

How to record a podcast on a Mac using GarageBand
GarageBand is a free in-built recording studio that comes pre-installed on macOS.
Although it doesn’t support video recording or remote interviews, it’s a straightforward solution for recording audio-only solo podcasts. It even packs some features, albeit basic: you can layer in music or sound effects, use it on mobile, and edit your recording with a limited (but functional) editor.
Here’s how to record a podcast on your Mac using GarageBand:
Step 1: Launch Garageband from your Applications folder.
Step 2: In “New Project”, select “Empty Project.”
Step 3: From the window that pops up, select the “Record using a microphone or Line” option under “Audio” and then click “Create” on the lower right corner.

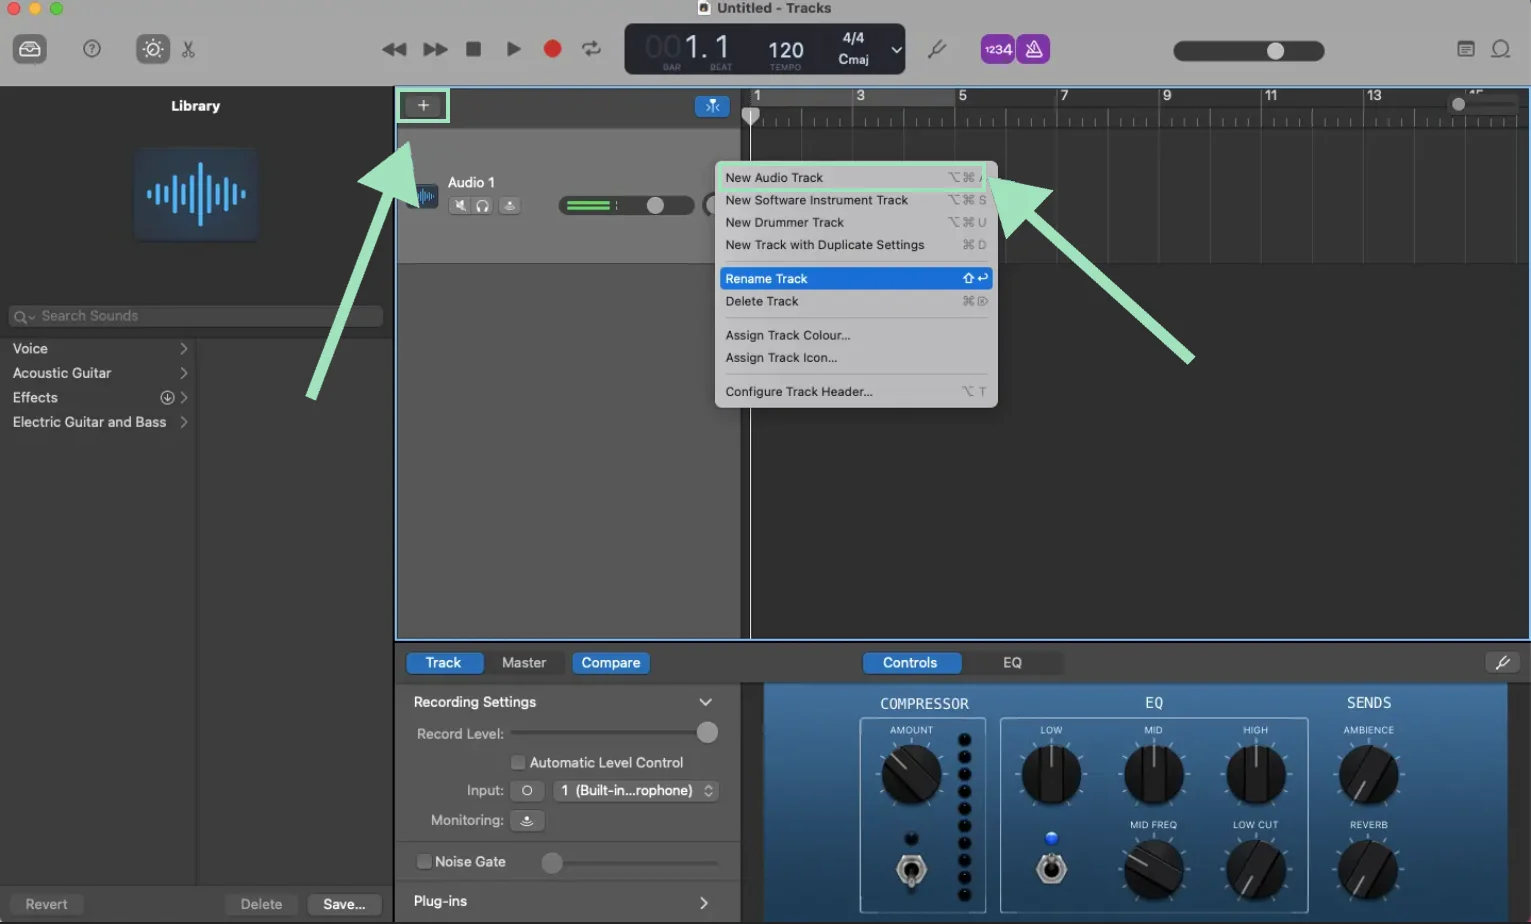
Step 4: GarageBand’s dashboard will then open with your first track set up, usually named “Audio 1”. You can double click to rename it if you want.
If you’re recording with multiple mics, you can create a separate track for each one of them by clicking on the “+” button and selecting “New Audio Track”.
Step 5: Connect your headphones to your Mac. Click the small headphone icon to enable monitoring for each track, and check for any issues.
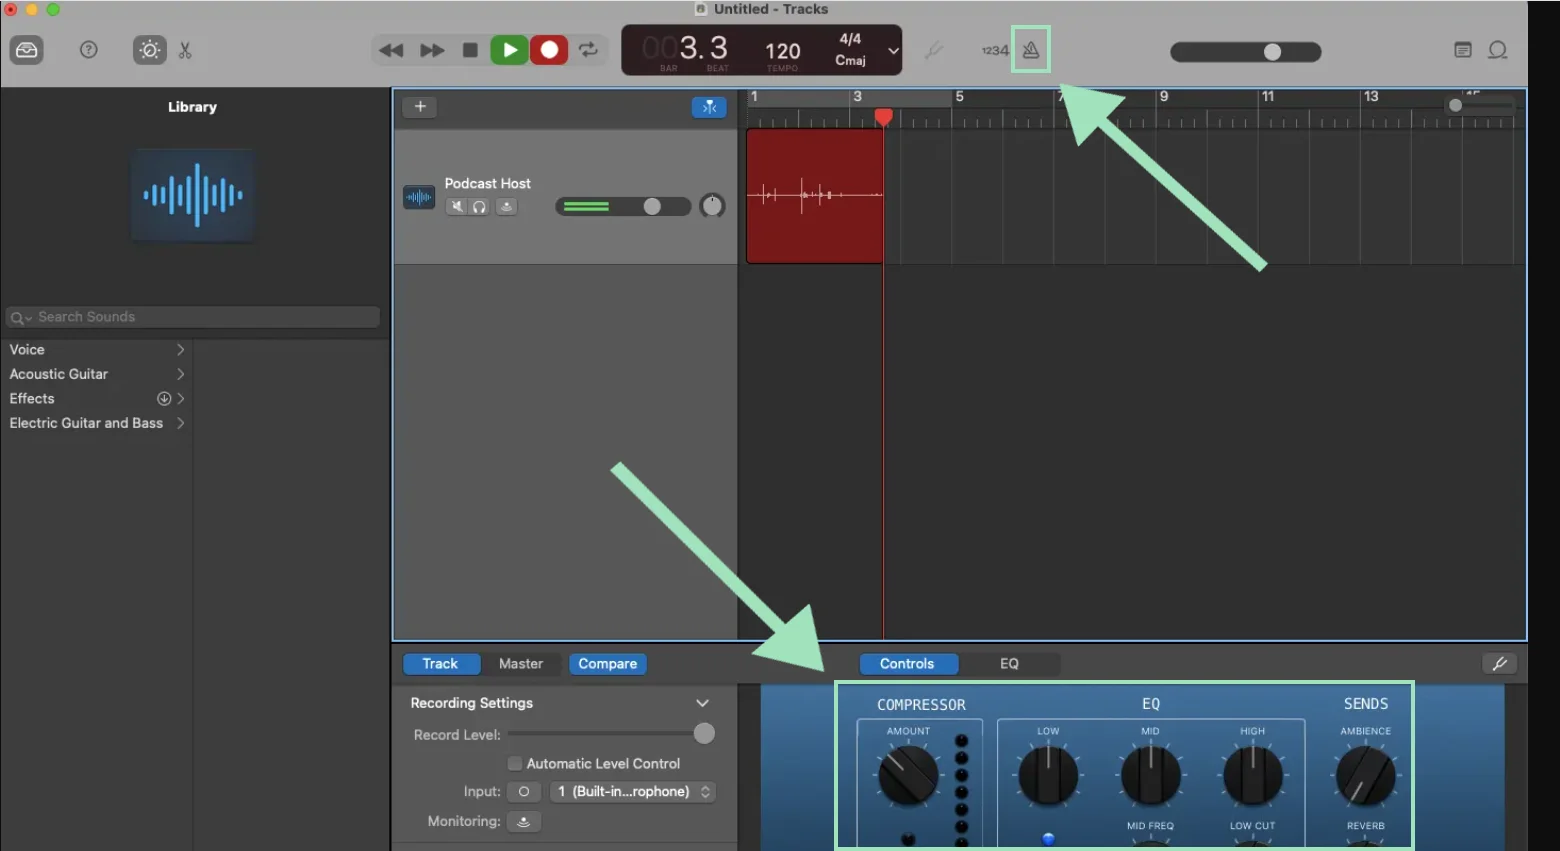
Step 6: Switch off the metronome icon at the top of the screen since you won’t need it, then choose your required recording level, noise gate and other compression and EQ settings.
Step 7: Once you’re ready to record, click the record button at the top. When you’ve finished, click the same button again to stop recording.
Step 8: You can edit your recording using the inbuilt tools. You can rearrange segments, trim and split your recording, and add fades.
Step 11: After editing, go to “Share,” select “Export Song to Disk,” give it a name, choose your save location, and export in your preferred format or quality.
Need more help? Check our full guide for recording and editing on Garageband.
How to record a podcast on a Mac using QuickTime Player

QuickTime Player is Apple’s simple built-in media app, and while it’s definitely not ideal for podcasting, it’s fast and can handle basic video recording. You can record your microphone, screen, or webcam, and even apply some very simple edits, like manually trimming or clipping your video.
While QuickTime is probably sufficient for recording episodes in a pinch, its lack of remote recording, post-production tools, and multitrack support makes it a limited option.
Here’s how to record a podcast on your Mac using QuickTime:
Step 1: Launch QuickTime Player from your Applications folder.
Step 2: At the top left-hand side of the screen click “File” and then select either “New movie recording” (for video podcasts) or “New audio recording” (for audio-only podcasts).
Step 3: Click the dropdown icon next to “Record” to select the correct microphone and camera.
Step 4: When you’re ready, click the “Record” button to start recording. When you’ve finished, click it again to end the session.
Step 5: Go to “File” and either select “Save” and choose the destination, or “Export” to select the quality and format of your file.
Audio Hijack and Loopback for advanced in-person podcasts
If you want more control over your in-person recording setup (and have a budget to invest), tools like Audio Hijack and Loopback can level up your workflow.
With Audio Hijack, you can record multiple audio sources at once, including microphones, your browser’s audio, and Zoom calls. Loopback lets you create virtual audio devices, so guests can hear media (like sound effects or video clips) played from your Mac in real time.
Coupled with Riverside’s Media Board, they're a great addition if you want more creative control—like routing live sound effects or backing tracks directly into your recording.
Want to see how it all works? Check out our easy video tutorial below:
What equipment do I need to record a podcast on a Mac?

To get high-quality results from your setup, software is only half the equation. Here’s the essential equipment you need when recording a podcast on a Mac.
Essential hardware
Microphone: Technically, your Mac comes with an in-built microphone that could work if you got nothing better, but for podcast-quality audio,an external one is a must.
- Budget pick: The Samson Q2U is priced under $100, and it’s both USB and XLR compatible.
- Pro pick: The Shure SM7B is an XLR dynamic microphone built for professional podcasting. It costs around $300.
Headphones: Always use headphones to monitor what is being picked up and recorded by your microphone. Closed-back headphones are preferable, as they help reduce external noise bleed into the mic.
- Budget pick: Basic Sony over-ears are always a solid pick for just $20.
- Pro pick: The Audio-Technica ATH-M20X are a dedicated option for $50-$100.
Camera or webcam: Just like with mics, your Mac’s built-in webcam won’t cut it if you’re aiming for professional quality. For a crisp, clear picture, use an external webcam that records in 1080p or 4K or a mirrorless camera. Many smartphones also have excellent cameras and can be used as high-quality webcams if you don’t want to buy extra equipment.
Optional accessories
Here’s the optional additional equipment you don’t necessarily need but can help enhance your podcast:
Boom arm: Attach your microphone to a boom arm to free up your hands, reduce handling noise, and keep your microphone in the ideal position for clear, professional audio.
Pop filter: A pop filter helps reduce plosive sounds (p’s and b’s) that can cause harsh peaks in your audio. You can easily pick one up from Amazon for under $20.
Shock mount: For less than $40, a shock mount suspends your microphone to protect it from vibrations, bumps or desk movements, causing unwanted noise.
Acoustic panels or foam: Acoustic panels or foam help reduce echo and reverb, especially in rooms with hard surfaces or large windows. If you don’t have a budget, even soft furnitures, tents or carpet will work.
Lighting: Good lighting makes a huge difference to improve visual quality. When positioned correctly, it reduces shadows and brightens your face. You can pick up a ring light from Amazon for less than $30 or a softbox for under $50.
Audio interface: If you’re using an XLR mic, you’ll need an interface to connect it to your Mac. The Focusrite Scarlett 2i2 is a popular, reliable option that offers excellent sound quality and ease of use.
Mixer: For multi-mic, in-person setups, a mixer lets you control multiple audio inputs,adjust volume levels, add audio effects, and generally have more audio flexibility. The Rodecaster Pro II is a popular option.
Read more: Need more tips? Check our full guide on the best podcast equipment for beginners and pros.
FAQs on mac podcast software
Can you podcast with a Macbook Pro?
Yes you can record a podcast with all Macbook models, including the Macbook Pro. It is a powerful and versatile device with built-in tools like GarageBand and QuickTime Player. Alternatively, Riverside is a powerful web-based app that’s fully compatible with Macbook Pro and gives you more flexibility, especially for remote interviews and high-quality video.
How to record a podcast on mac for free?
To record a podcast on a Mac for free, you can use built-in tools like GarageBand or QuickTime Player. For more advanced features, Riverside also offers a free tier that’s great for remote interviews and recording with multiple guests
Does Mac have audio recording?
Yes you can use both GarageBand and QuickTime Player to record an audio podcast on your Mac. If you need more features like separate speakers tracks, remote recording, and built-in editing, Riverside also offers a free plan with powerful podcasting tools.
Is GarageBand good for podcasts?
GarageBand is a good starting point for beginners. It’s simple, free and gives you the basic tools needed to record and edit podcasts. A better alternative is Riverside, which provides many advanced recording and editing features without sacrificing simplicity and user-friendliness.
Does Mac have a podcast app?
Strictly speaking, Mac doesn’t have a dedicated podcast app. GarageBand is available on macOS, iPadOS, and iOS, and even though it can be used for basic podcast recording and editing, it was originally designed for music production.
If you’re looking for a software that is specific for your podcasting needs, look no further thanRiverside. It’s available in your browser and as a mobile app, so you will be able to record high-quality podcasts from any device.


%20(1).webp)
.webp)

