%20(1).webp)


Key takeaways:
- To record a podcast, start by choosing the right method between remote, in-person, or mobile.
- Prepare your studio by setting up your microphone, headphones, camera, and recording software.
- Record your episode, then edit and polish it. You can repurpose it into clips, blog articles, newsletters, or social posts to increase your reach.
- Publish your edited episode to directories like Spotify and Apple Podcasts.
You don’t need a high-end studio or years of audio engineering to create a professional podcast.
I'm Stephen Robles, co-host of the Primary Technology show, a regular in Apple Podcasts' top 100 tech shows. I’m also a YouTube content creator with over 220,000 followers and 15+ years of experience.

I’ll walk you through exactly how to record a podcast professionally. We’ll break down all the main recording methods: remote, in-person, mobile, and more. And, don’t worry, it’s easier than you think.
3 ways to record a podcast: remote, in-person, and mobile
The best way to record a podcast will depend on your setup, guests, and gear. Use this simple breakdown to decide:
- Choose remote if your guests are in different locations.
- Choose in-person if everyone is in the same room.
- Choose mobile if you need a lightweight setup on the go.
Here’s a quick recap of each method:
How to record your podcast online (remote recording)
Remote recording lets you get studio-quality audio and video from guests anywhere, without ever being in the same room.
There are three main ways to record remotely:
- Local recording software: Each person records locally on their device, and everything uploads automatically online as you record. This means you get synced, high-resolution files in one place.
- Call recording software: You record directly from an online call. It’s the simplest setup, but your resolution depends on your connection speed.
- Manual double-ender recording: Each person records directly to their device and sends you their files later. It’s high quality, but it’s also a hassle.
Read more: If you want to explore the methods more, check our guide on how to record a podcast remotely.
I suggest using local recording software like Riverside which strikes the best balance between quality and ease of use.
Let’s get to the simple steps:
Step 1: Log in to your Riverside account
If you don't have an account, you can sign up for free, or start a subscription to get the most out of the platform.
Step 2: Set up an online podcast recording studio
In your dashboard, click on “Record” to start a new recording session.

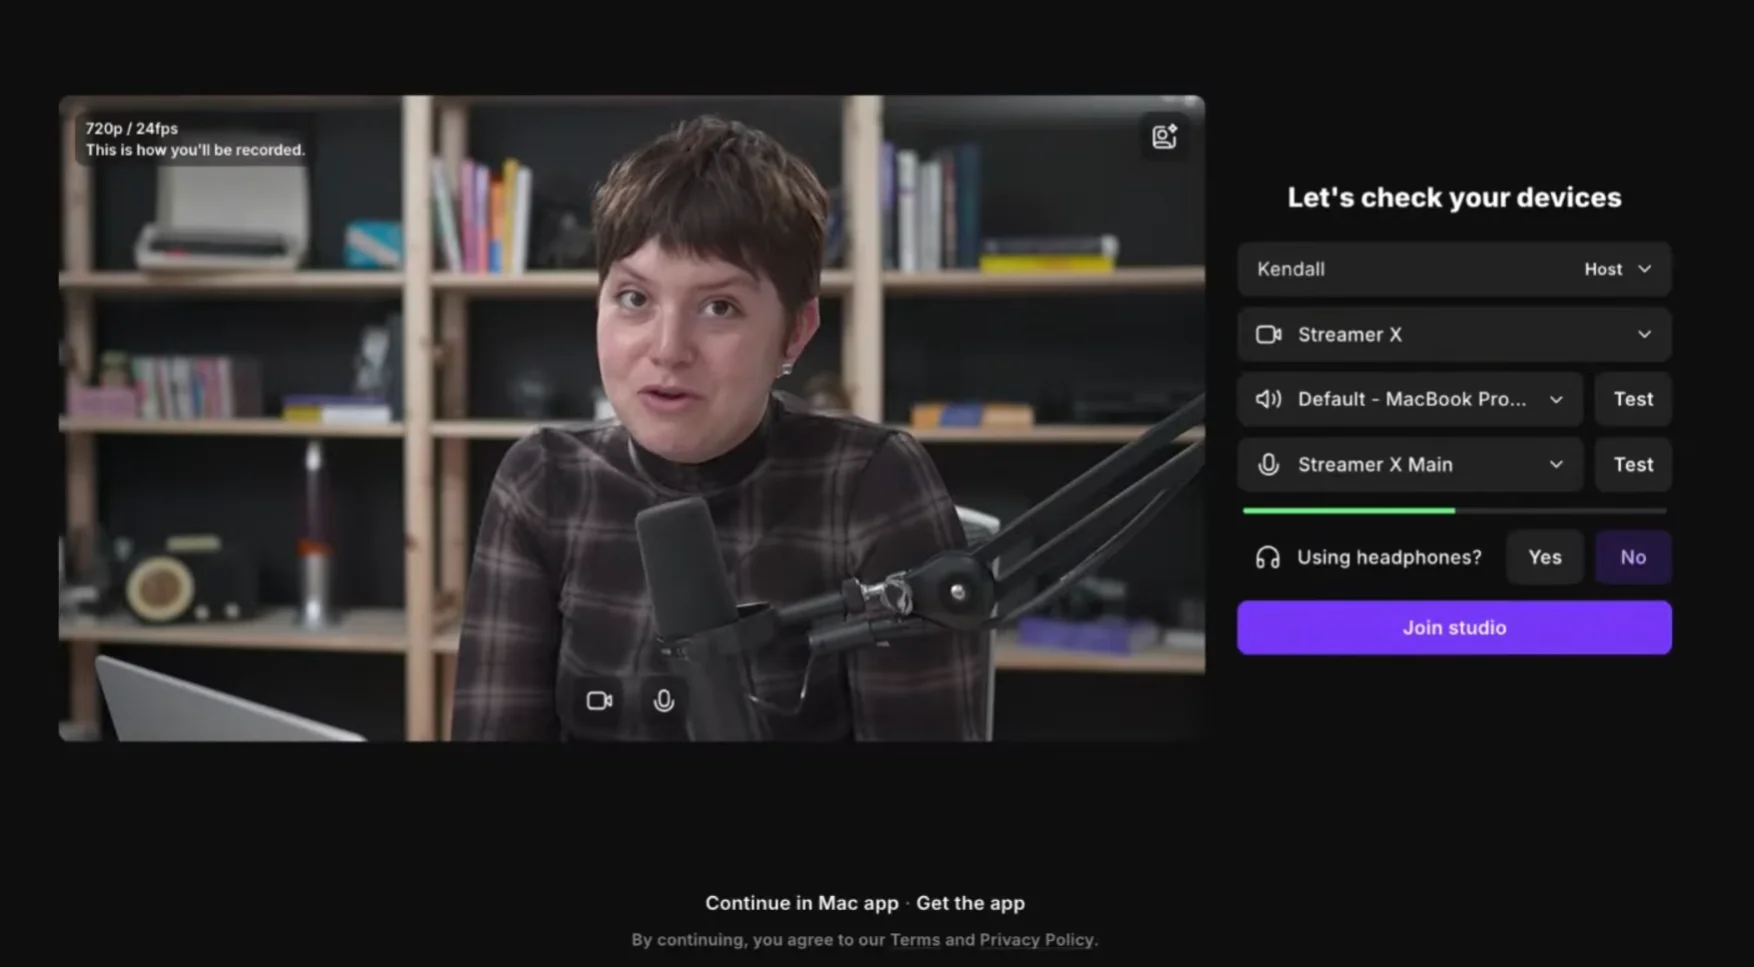
Step 3: Test your recording equipment
In your lobby, select your mic, speaker, and camera, then test your equipment.
When ready, click “Join studio”.
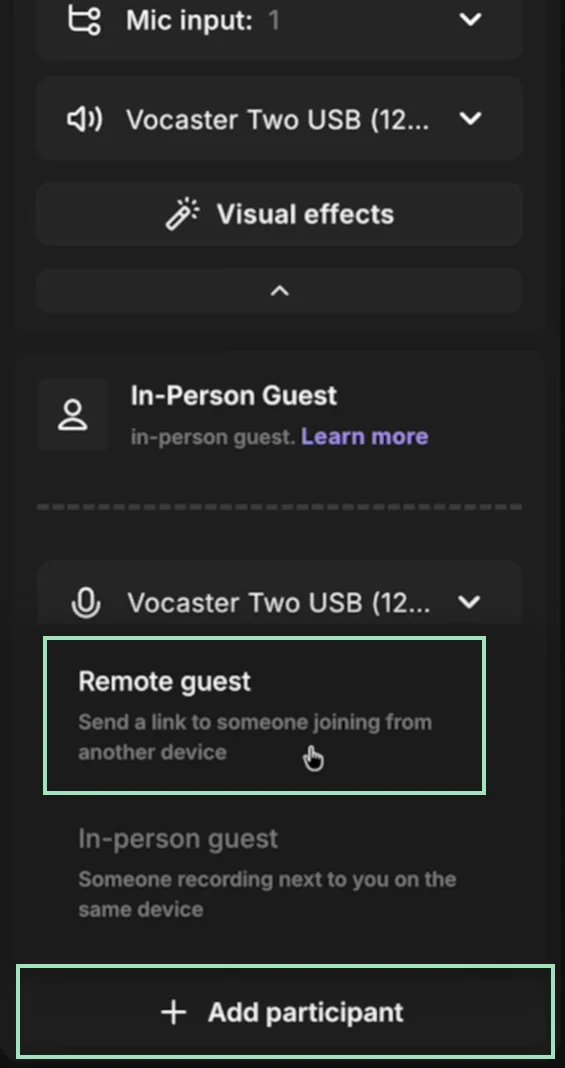
Step 4: Invite remote guests
Inviting your remote guests is super simple.
From the “People” tab in your right sidebar, click on “Invite via link or mail”, then on the purple “Copy link” button.
Share the link with them, and they’re in. You can also invite them via email.

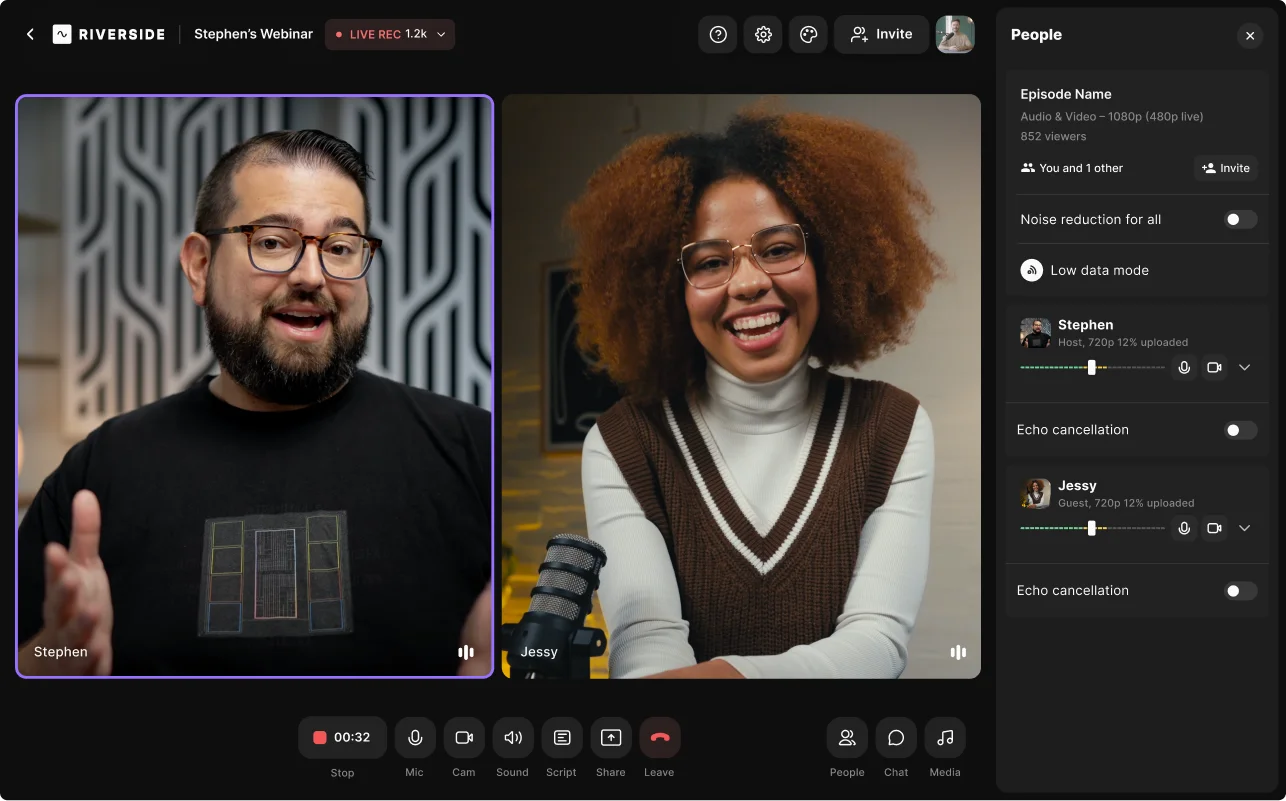
Step 5: Record your podcast
It’s finally time to hit the big red “Record” button now.
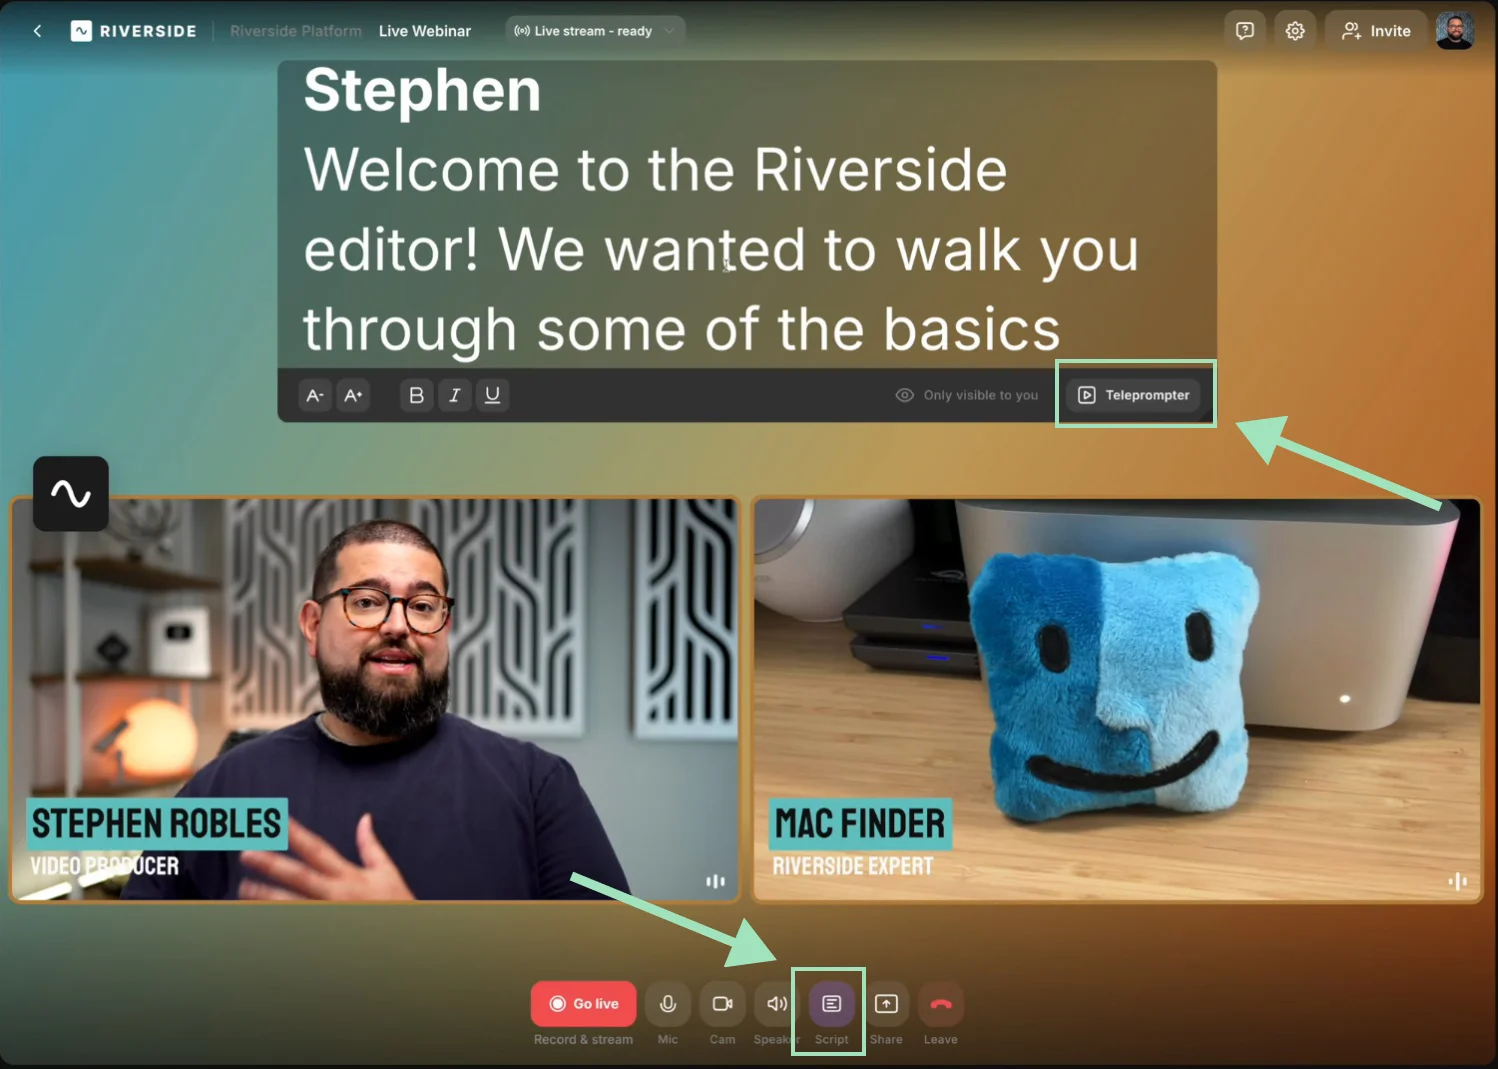
And that’s the basics of it. From the bottom toolbar, you can also click:
- “Script” button at the bottom to open the script window and type or paste in your script in the Teleprompter.
- “Share” to share your screen during your recording.
And on the sidebar, you’ll have access to the media board or branding which may come handy if you’re recording a live podcast.
Step 6: Export your podcast recording
Everything uploads to the cloud as you record.
So, once you’re done recording, click the “Stop” button, and your files will be ready for export quickly. Click “Go to project” to view them.
How to record your podcast in person
Recording with in-person guests gives you more control. But it can become tricky with multiple guests or a hybrid in-person and remote setup.
Here’s how to record a podcast offline:
Step 1: Set up your audio input and output
To record clean, clear audio with in-person guests, you need two things:
- A way to hear each other (audio output)
- A way to capture each voice separately (audio input)
Here’s what you need to know:
Audio output: Choosing headphones
Headphones help you monitor sound and avoid mic bleed, which is when one mic picks up someone else's voice.I suggest choosing closed-back headphones because they’re better at blocking out background noise.
You’ll also want to go for wired headphones, which reduce latency.
If you're recording with multiple people, use a headphone amplifier. It's a device that lets everyone plug in their own headphones and hear the same audio with clear volume and no signal loss.
Audio input: Recording with multiple mics
For optimal results, I recommend using a microphone for each person. This can get tech-heavy, so head to our full guide on how to record a podcast with multiple mics for all the know-how.
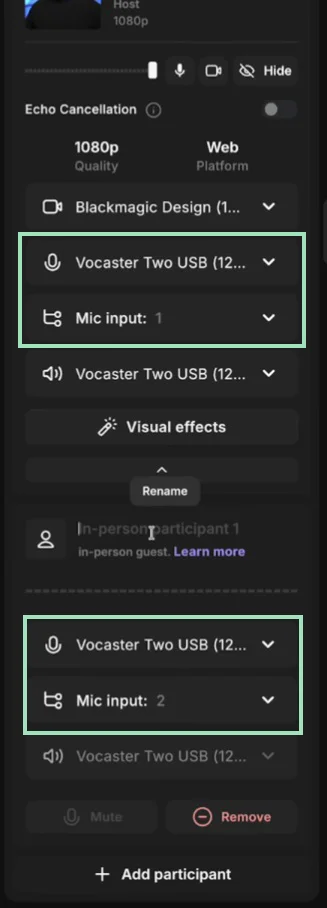
If you’re recording 100% in-person, I suggest using a USB interface with multiple inputs like the Focusrite Scarlett 2i2.
Plug your microphones and headphone amplifier into your USB interface. Then, on your recording software, select the interface as both your microphone and speaker setting. On Riverside, just select the device, then assign one individual channel to each participant.
Recording separate tracks
If you want to record separate tracks and you don’t use software that allows for that like Riverside, you may need a workaround. In this case, to record each track separately:
- Skip the audio interface and get each person to join from their own device.
- Record locally to each device or your interface with an SD card, then upload later.
Step 2: Set up your camera and video input (video podcasts only)
If you’re only using one camera, use a wide-angle lens that can capture you and all your guests.
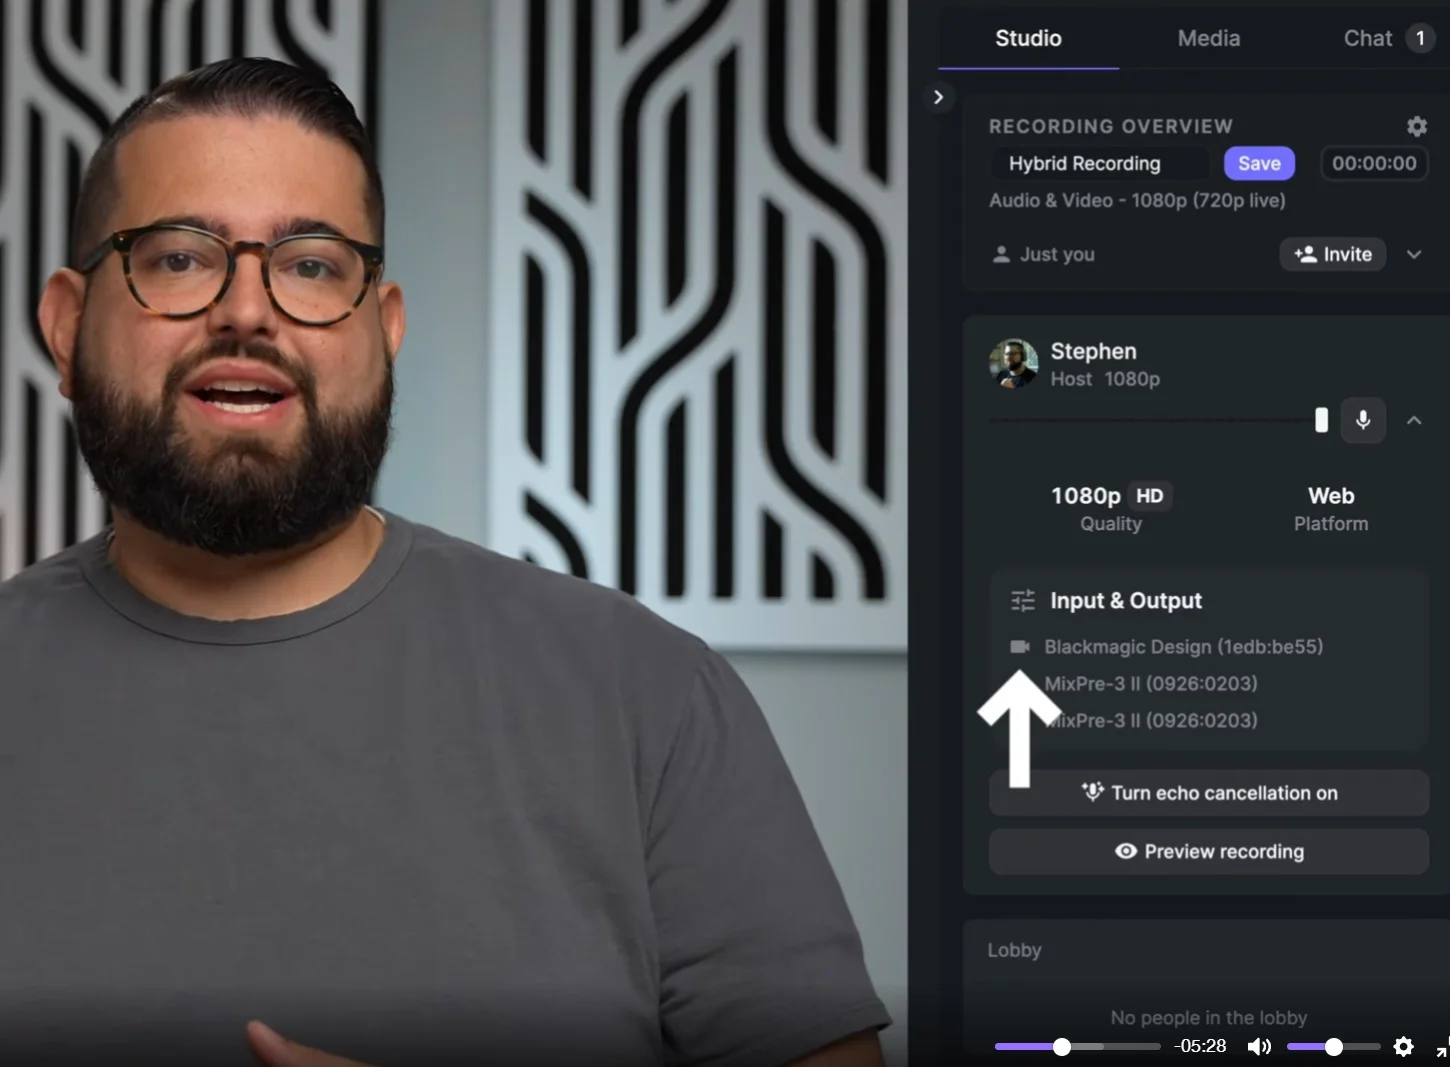
For multiple cameras, you can add a video switcher like the Blackmagic ATEM Mini. Just set the switcher as your video input, and switch between angles in real time. On Riverside, AI will automatically focus on whoever’s talking, so you won’t even need to switch between different cameras.
Just like with mics, each person can also join Riverside from their own device, using their own camera. The benefit here is each guests’ video records on a separate track. With a switcher, it’ll be one input.
Another option is to record everything locally on your camera with an SD card.
Read more: For more on recording video, check our guide on How to start a video podcast.
Step 3: Record your podcast
When you’re ready to start, you can get recording. This might mean clicking “Record” on your actual devices, or on the software you’re using.
If you’re using Riverside’s recording software, you can follow the same steps above for remote recording.
Hybrid setups
If you’ve got both in-person and remote guests, you can set up a hybrid recording session where each person uses their own device.
To do so, you need software that supports hybrid recording, like Riverside. Then it's as simple as:
- Setting up your in-person participants and connecting them to the software.
- Inviting remote guests using an invite link.
To dive into the whole process, check our video on in-person multicam recordings, which covers hybrid setups as well.
How to record your podcast on your phone
Your phone can double as a podcast studio. But to get good results, you should use an external microphone. While many phones record high-quality video, their built-in mics are not up to par.
For video podcasts on your phone, consider getting a tripod to stabilize your phone’s rear camera. It’s usually much more powerful than the front one.
Then, all you need is a podcast recording app. Here’s how to record a podcast from your phone, using the Riverside mobile app:
Step 1: Log in as a host in the Riverside app on your iPhone or iPad. Log in as a Host using your account details.
Step 2: Join one of your studios or create a new one by tapping the “+ Create” button and selecting the “Record” button.

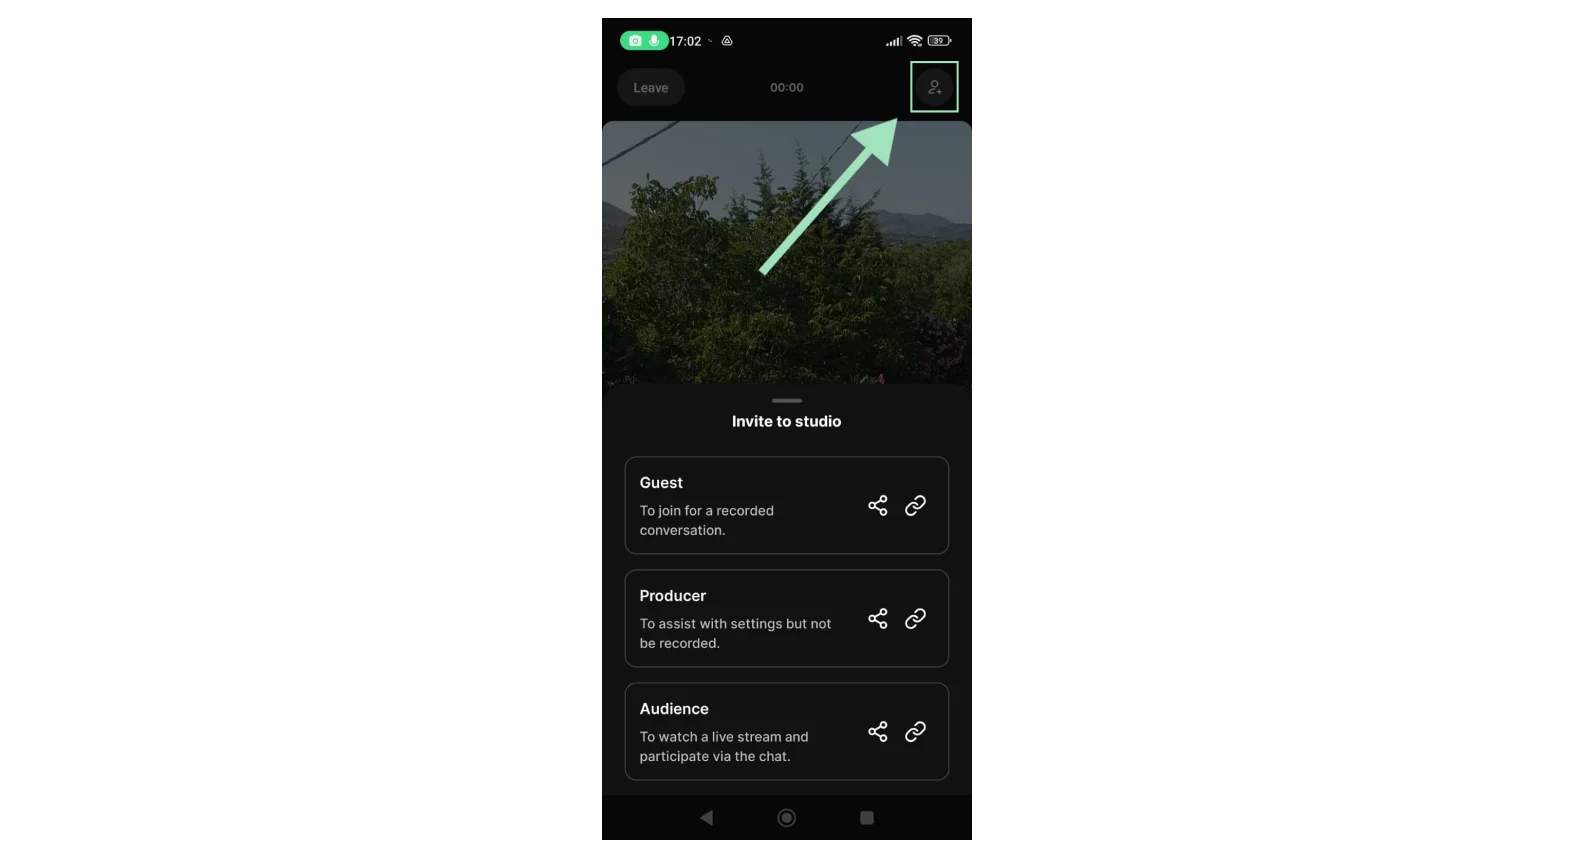
Step 3: From your studio, invite your guests, co-hosts, and producers by tapping the People icon in the top right corner and sending them an invite link or an email.
Step 4: Start by tapping the red recording button. Your recording is automatically synced to your Riverside account. So it’s ready and waiting on your desktop for editing.
For a more in-depth tutorial, check out our guides:
- How to record a podcast on your iPhone
- How to record a podcast on your phone (Android included)
Using your phone as a camera for video podcasts
Most modern smartphones, especially the latest iPhones and Galaxy models, have cameras that rival pro gear. The trick is using the back camera, which is sharper.
Here’s my hack for high-resolution video without the expensive camera:
- Connect your iPhone’s camera to your recording software with Continuity Camera.
- Clip your phone to your laptop or monitor to keep it steady.
- Use your back camera and attach a mirror so you can still see yourself clearly.
- Attach lighting for a full video kit.
This also works for a secondary camera to capture extra angles. If you’re using Riverside:
- Log into Riverside on both your desktop and phone.
- Start a session from your desktop and join using your phone.
- On your mobile app, tap “Create”.
- Tap “Connect device as second camera”.

What equipment and software do you need to record a podcast?
If you’ve got the budget, these are the podcast equipment essentials to focus on:

Microphones
We’ve got a full podcast microphone guide that goes into the technicalities.
To keep it simple, this is what you need to know:
- Don’t use your built-in laptop mic. According to Riverside’s own data, more than 80% of podcasters prefer not to use it because the quality of the audio is too low.
- Dynamic microphones are better at handling background noise.
- Condenser microphones capture more detail but pick up everything, so you need a very quiet studio.
- USB vs XLR: If you’re just starting and want a quick plug-and-play setup, go for a USB microphone. If you’re recording with multiple people live, XLR mics offer more flexibility and higher fidelity.
I suggest the Samson Q2U for beginners, which delivers great sound with minimal setup. It works with both USB and XLR, so you can start simple and upgrade your gear later.
Ready to level up? The Shure SM7dB is your go-to for pro-quality sound with maximum noise rejection.
Podcast cameras
A budget-friendly quality camera like the Logitech C920 webcam can work just fine when you're starting out. Or, as we already discussed earlier, you can use your smartphone’s back camera.
If you’re willing to spend, the Sony ZV-E10 can launch you in the pro league. It has excellent image quality, interchangeable lenses, and works great in lower light.
Headphones
Aim for a frequency response range of 20-20,000 Hz, which is the range of sounds the headphones can reproduce.
And as mentioned above, I suggest wired headphones. There’s less latency or lag between the audio you’re recording vs hearing.
I suggest the Audio Technica ATH-m20x headphones. They’re discreet and sound-isolating, so they will help you hear your own voice and your guests. Plus they’re under $100.
If you’re on a tighter budget, your AirPods or other basic headphones will work fine.
Read more: The 9 Best Podcast Headphones [2026 Guide]
Recording software
Even the best equipment won’t matter if your software doesn’t record in high quality. When choosing software for a podcast recording, here’s what you should look for:
- High-Resolution: Record your podcast in up to 4K and uncompressed 48kHz audio.
- Local recording: For remote podcasts, record each guest’s audio and video directly on their device, so bad Wi-Fi doesn’t ruin your quality.
- Separate tracks: Capture each person on their own track for easier editing and less crosstalk.
- Ease of use: Nobody wants to troubleshoot or install new software before every recording.
- Fast editing: Post-processing shouldn’t take hours. From text-based editing to chat-based repurposing and podcast clips, post-production is fast and easy.
- AI-powered tools: Automatic editing tools like audio enhancement, eye correction, filler word removal, and layouts save you a lot of time.
Other equipment
Besides the essentials, if you’ve got the budget, I recommend you get:
- A mic arm: Getting a mic stand makes a big difference. Nobody wants to hold their mic for hours, and a still mic means better-sounding audio.
- Pop filters: This small screen that sits between you and your mic softens annoying "p" and "b" sounds.
- Shock mounts: These mic attachments keep your mic steady and isolated from vibrations. No need to cut desk bumps and keyboard clicks out of your audio track.
- Lighting: Natural window lighting is workable, but it’s best if you have some form of kit. You’ll have much more control, and you’ll be able to record anytime of day.
Read more: How to Start a Video Podcast in 2025 (Full Setup + Gear)
Podcast recording tips for better audio and video
Want crisp, clear audio every time? Follow my simple tips:
- Set a professional podcast setup at home: Pick the quietest room in your house, use soft furniture like carpets and tents, and stay away from noisy windows, fans, or appliances.
- Get the best out of your mic: Keep it 3 to 8 inches from your mouth at a slight 45-degree angle to avoid distortions and harsh sounds. Even better, use a windscreen or pop filter to save hours in editing.
- Wear headphones: Headphones prevent audio bleed and feedback, especially in remote interviews. When you choose them, focus on comfort, as you'll be wearing these for hours.
- Prep your guest beforehand: Walk your guests through the episode structure, set expectations, and answer any questions. A prepared guest makes for smooth conversations and great episodes.
- Don’t sweat the mistakes: If a slip-up happened, leave yourself an audio cue (like a clap) so you know exactly where the blunder happened in post-production.
- Create your podcast cover art: Cover art reflects your podcast’s theme and personality, and first impressions do count. For new listeners, your cover art can tempt them to give your podcast a listen.
Read more: If you want to read more podcasting tips, check the full list here!
What to do after recording your podcast
After recording, it’s time to edit and polish up your episode.
Trim and remove filler
To make your podcast flow, cut anything that slows it down such as tangents, filler content, or long silences. Here’s how:
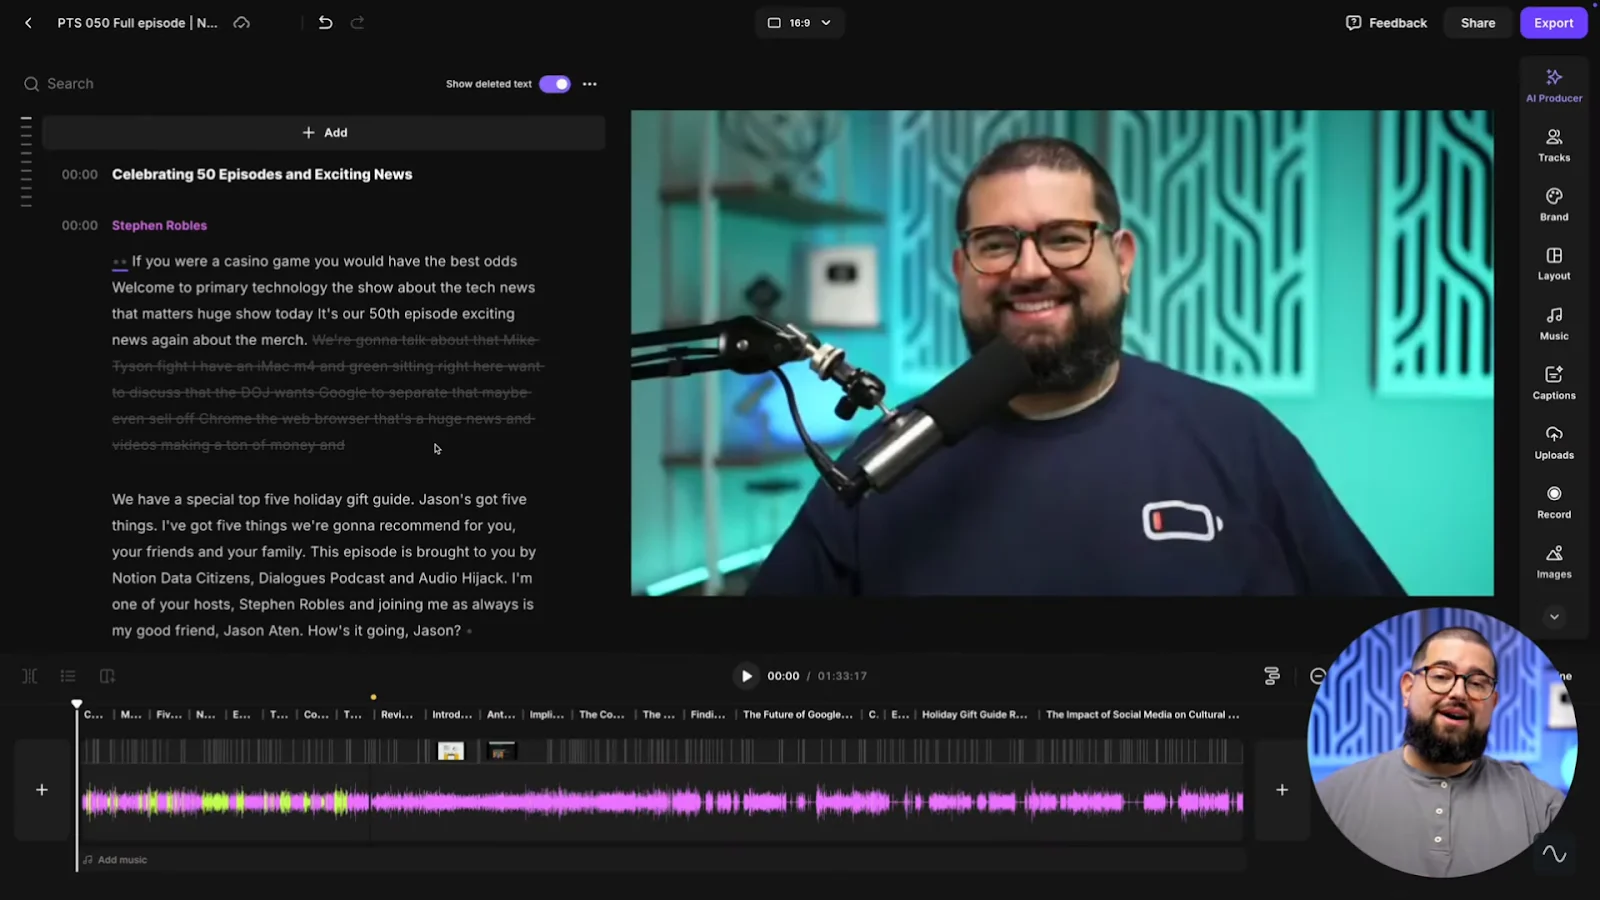
- Text-based editing: Riverside’s text-based editor allows you to edit by simply deleting text. No need to re-listen to what you just recorded.
- Fix mistakes: Just type what you meant to say and our AI voice generator will dub the line in your voice.
- Filler word removal: Easily cut all the “uhms” and “ahs” with our filler word removal tool.
Clean up audio
Even with a perfect setup, your raw audio can almost always benefit from some final polish.
When you’re editing audio, be sure to::
- Remove long silences to keep the pace
- Cut background noise
- Level out all your tracks’ volume
- Enhance your audio
If you’re using Riverside and don’t want to spend hours editing your episodes, go to “AI tools” in the left toolbar. You’ll find an array of AI tools to get this done in a few clicks.
For more intricate audio editing, try our equalizer for more control. Just click on “Tracks”, select a track to edit and then click EQ.
.webp)
Customize your podcast
Next, you want to give your podcast personality. You can customize your podcast by adding:
- Music and sound effects: Add an intro and outro, include some background music or consider adding audio for transitions.
- Visual overlays: From b-roll to images and text, make your podcast more engaging and give listeners more context.
- Captions: These are a must as they improve engagement and help make your show more search-friendly.
In Riverside’s editor just head to the left toolbar, and you’ll see options to add captions and text, draw from our vast library of stock media or upload your own. Our videos and images even come with AI generation, so you can create your own.
.webp)
Repurpose your podcast
If you want to grow your show faster, I recommend repurposing it. The best thing is, with Riverside’s Co-Creator this is as easy as typing in a prompt.
You can find the Co-Creator chat on the right side of your dashboard. Here you can ask it to create:
- Shareable clips for social media
- Blog posts, emails and textual posts
- Trailers, and much more!
Read more: Check our full guide on how to edit your podcast for more in-depth workflows and guidance.
FAQs about recording podcasts
How long does it take to record a podcast?
Generally, recording a podcast doesn’t take much longer than your episode length. A 30-minute episode might take 45-60 minutes to record, or a bit more if you want to add time for setup and retakes.
Timings vary from podcaster to podcaster. Some run a very tight and efficient operation. Others may prefer to take their time and get to the nitty gritty edits.
What's the easiest way to record a podcast?
The easiest way to record your podcast is using browser-based podcast software like Riverside. You can record on your browser or mobile device and invite up to 9 guests with just a click and zero tech setups. Just share an invite link, check your mic and camera, hit record, and you’re good to go.
Can I record a podcast for free?
Yes, there is a lot of software that allows you to record a podcast completely for free. Some options you can look into for free podcast recording software include:
- Riverside
- Audacity
- GarageBand
For more, you can view our large list of the best free recording software.
How much does it cost to record a podcast?
Recording a podcast can cost anything between 0-$2000+, depending on how much you’re willing to invest in your equipment setup.
You can start with free podcast software, your phone and a built-in mic. Or, most beginners spend between $100 and $500 on an entry-level microphone, headphones, and basic hosting software. Don’t worry though: you can start with a low-budget setup and let it grow with your show.
Do you need a computer to record a podcast?
No, you don’t need a computer to record a podcast but it’s generally easiest.
Instead, you can record on a phone or tablet using a recording app and an external phone microphone. A desktop computer gives you more flexibility for complex editing and multi-microphone setups.
How do I record a podcast with multiple people?
To record a podcast with multiple people, give each speaker their own microphone and use software that captures separate tracks. If your guests are remote, invite them to a browser-based recording studio like Riverside. For in-person podcasts, connect multiple microphones to an audio interface, mixer, or standalone recorder.
Do I need separate audio tracks for a podcast?
Yes, you need separate audio tracks for a podcast to maintain professional sound quality. Capturing each speaker on an independent track allows you to adjust volume levels, mute background noise, and edit overlapping dialogue without ruining the rest of the recording.


.webp)


