-(1)-(1).webp)


Key takeaways:
- Plan your live stream in advance by brainstorming the idea, choosing the right platform, and setting up your equipment.
- Always conduct a test run before to help eliminate issues during the actual live stream.
- On Riverside, you can live stream to YouTube, LinkedIn, Twitch, and more, all simultaneously.
Hosting a live session isn’t as simple as hitting the “Go Live” button.
To help, we spoke to Video Producer, Live Streaming Specialist, and YouTube creator Zephan Moses Blaxberg. He’s produced over 500 live events, has over 16K followers on YouTube, and hundreds of students. With clients including top Fortune 500 Executives, professional athletes, and universities, he knows what it takes to make a stream succeed.

Here’s the step-by-step guide.
How to live stream: Get started in 7 steps
Here are our tried-and-tested steps to help you build an airtight video streaming strategy and workflow. We’ll also cover what to do before and after your live stream session.
1. Plan your live stream
Planning your live stream comes down to 4 things: your goal, audience, topic, and promotion.
Brainstorm your goals
Start with your primary goal for the livestream, then build everything else around it. What do you want the session to help you achieve?
Are you trying to:
- Increase your reach to build a community?
- Nurture your audience to purchase a product or service?
- Build trust with your audience?
Other common goals include, educating users, showcasing a new product, or soliciting donations.
Define your audience
Next, answer these core questions to address your audience's needs head-on:
- Who’s the target audience for this live stream?
- What is the main value I want them to gain from the stream: entertainment or education?
Choose a topic and format that delivers on your goal
Your topic and format should focus on the value you want to give your audience.
For example, if you're a creator, you might go live to teach your audience a skill they’d benefit from. Or, if you're a gamer, you might stream around an entertaining challenge or game your audience has been asking you to play.
Your topic should then dictate your format. You could go for:
- A live interview or panel to cover expertise on a topic.
- A vlog to showcase a behind-the-scenes real life experience on your topic.
- AMA (ask me anything) to hear your audience's needs on the topic.
Schedule and promote your livestream
If you’d like to include guests, book them upfront and block off the specific time and date in everyone’s calendar. This will also help you know when to start promoting your live stream.

Promotion drives attendance and is just as important as planning it.
As Zephan explains:
“If you haven’t let people know in advance of an event and reminded them a bunch before the event, they’ll most likely forget to add it to their calendar. This leads to disappointing engagement.”
Instead of relying on a single announcement, mix up your promotional efforts. Here are a few easy ways to market your livestream:
- Create short teaser clips to build excitement.
- Send email invites and reminders before and on the day of the event.
- Post countdowns or behind-the-scenes previews on social media.
2. Choose your livestream platform
Successful live streaming hinges on choosing the platform your audience is most active on. Here’s a quick way to match your specific use case to the right platform:
It’s worth also looking at:
- Monetization options: Evaluate features such as subscription events, pay-per-view, and advertising integrations to monetize your content.
- Mobile compatibility: Ensure people can join your livestream from mobile devices.
- Interaction tools: Look for interactive features like live chat, polls, breakout rooms, etc.and similar to engagemake viewers feel more involved in the session.
- Analytics and reporting: Check whether the platform offers detailed insights about your live stream with metrics, like number of viewers, engagement rates, average watch time, and more.
You can usually stream natively on these platforms. But if you want more control, or would like to stream to multiple platforms at once it’s best to use third-party streaming software. We’ll cover this in our equipment section.

2. Setup your equipment: What do you need to live stream
Here’s an overview of the hardware and software you can use to run your livestream, along with some options I recommend.
Camera
Look for a camera with a 30 FPS frame rate and at least a 1080p or 4K resolution.
- For a low-budget option, try the Logitech C920 or just turn your phone into a webcam.
- For a higher budget option, try the Dell Ultrasharp Webcam. If you already have a DSLR camera, you can turn it into a webcam using the Elgato Camlink.
Check out more in our guide to the top streaming webcams!
And if you want to use multiple cameras to capture different angles, you can use your phone as a second camera.
Zephan also suggests using a mixer for more flexibility:
“I’m a huge fan of multi-camera productions where you can easily shift between different camera views, playback video files live, and even craft fun visuals that might have picture-in-picture layouts. A recent piece of gear I’m using for that is the RodeCaster Video.”
But, note using a mixer requires more tech experience.
Microphone
Using an external microphone completely upgrades your audio quality.
As a beginner choose a USB microphone for a quick and easy setup. Or, choose a cheap lavalier microphone for portability.
If you’re more tech-knowledgeable, then a XLR and condenser mic offer more crisp audio.
Here’s what we recommend:
- For a low budget option, try the Samson Q2U.
- For a higher budget option, try the Shure SM7B.
Headphones
A set of closed-back headphones helps prevent audio leakage, producing clearer recordings and reducing unwanted background noise. When buying headphones, you should also consider your comfort level and frequency response.
- For a low budget option, you can even make do with simple Airpods.
- For a higher budget option, the Audio-Technica ATH-M50x is a good choice.
Accessories
You can level up your video streaming setup with a few accessories, such as:
- A green screen for different backdrops during live sessions or video recordings.
- A tripod or mic stand to make your streaming environment more comfortable and practical.
- A lighting system with LED panels, ambient lights, or ring lights that can match your brand colors.
A wire organizer to clean up your desk.

If you want to save space, Zephan also uses a tension rod to mount accessories:
“The most unconventional tool that I use in my setup is the Varipole from Impact. It’s a tension rod, similar to a giant shower curtain rod that can be tensioned between two walls or from floor to ceiling. It’s the ultimate tool for mounting lighting, cameras, and accessories with a remarkably small footprint.
I highly recommend it for anyone wanting to save space and reduce the amount of tripods and stands you might need.”
Advanced live stream equipment
Check out these tools if you want a more professional-grade setup:
- Interaction tools: Look for interactive features like live chat, polls, breakout rooms, etc. to engage viewers.
- Encoder: An encoder converts your live video into a compatible format for online streaming. You can get a hardware encoder to free up your system’s resources and do other tasks simultaneously as you stream.
- Capture card: A capture card that supports your camera’s resolution and frame rate can make your live events smoother and lag-free.
- Mixing equipment: Control multiple audio sources and mix different inputs in real time with a complete audio mixer or soundboard.
Check out our livestream equipment guide for recommendations across every budget range.
Streaming software
Use third-party live streaming software if you want to maximize your quality and expand your reach. Streaming directly from a platform like YouTube or TikTok, limits your broadcast to a single destination and often compresses video quality.
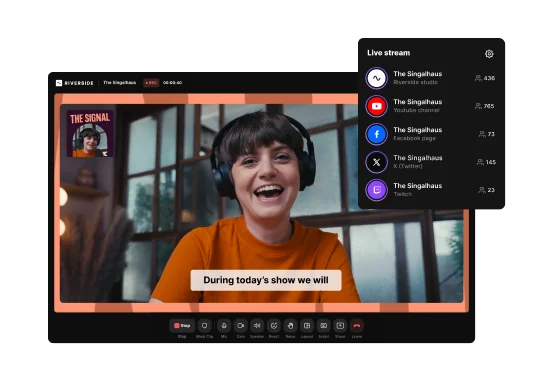
You also get more control. For example, with Riverside’s livestream software you can record in 4K, bring in remote guests, add custom branding, and stream to multiple platforms at once.
Here are some key criteria to pick the best streaming software for your needs:
- Compatibility: Your software needs to support the platform you want to go live on. Look for integrated setups for a smoother experience.
- Stream quality: It’s best to stream with software that supports at least 1080p.
- No. of multistream channels: Choose software that supports the number of platforms you want to stream to.
- Recording and playback: Record your live streams in high quality to repurpose the content later.
Content repurposing: Some software, like Riverside, automatically turns your live stream into clips, blogs, or newsletters to extend its life.
4. Set up your live stream
Now it’s time to set up your streaming software and configure it to your live stream platform destination.
As an example, here’s how you can do it on Riverside:
4. 1. Create a new studio
Sign up, or log into your Riverside account.
In the dashboard, find the “Go live” button to set up your live session.
If you specifically want to create a webinar type live event click the “Webinar” button to schedule one. This way, you can collect your attendees’ data with customized registration forms or run pre-recorded content. (If this is your focus, here’s our guide on how to run a webinar).

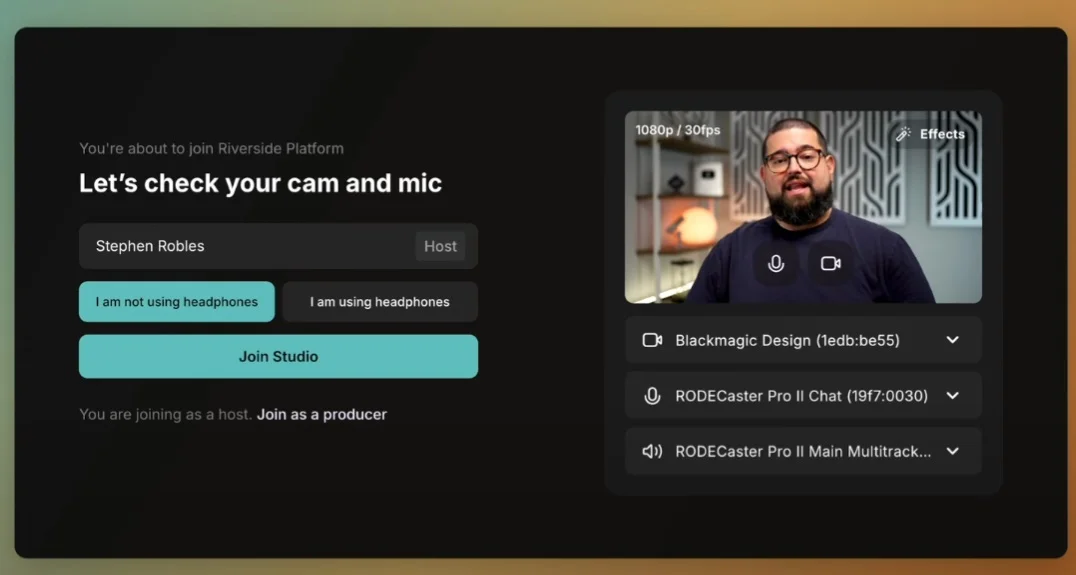
4. 2. Check your gear
From the lobby, you can pick your name and check your equipment. Click “Join studio” when you are ready.
4.3. Optimize your livestream settings
Before you start your live session, you can adjust settings to optimize your live streaming setup.
In the studio, click on the cogwheel at the top of the screen, then select “All settings.”

Go through the “General,” “Design,” and “Recording” tabs to:
- Add a relevant title for your studio.
- Customize your studio with branded presets, including backgrounds and logos.
- Select the optimal video quality, frame rate, layout, etc.
- Enable automatic noise reduction and echo cancellation.
Then, select the “Live stream” tab to designate your desired resolution and connect your livestreaming destinations.

In some cases, you may need to find your stream URL and stream key on the destination platform and add it to Riverside.
4.4. Prepare your studio
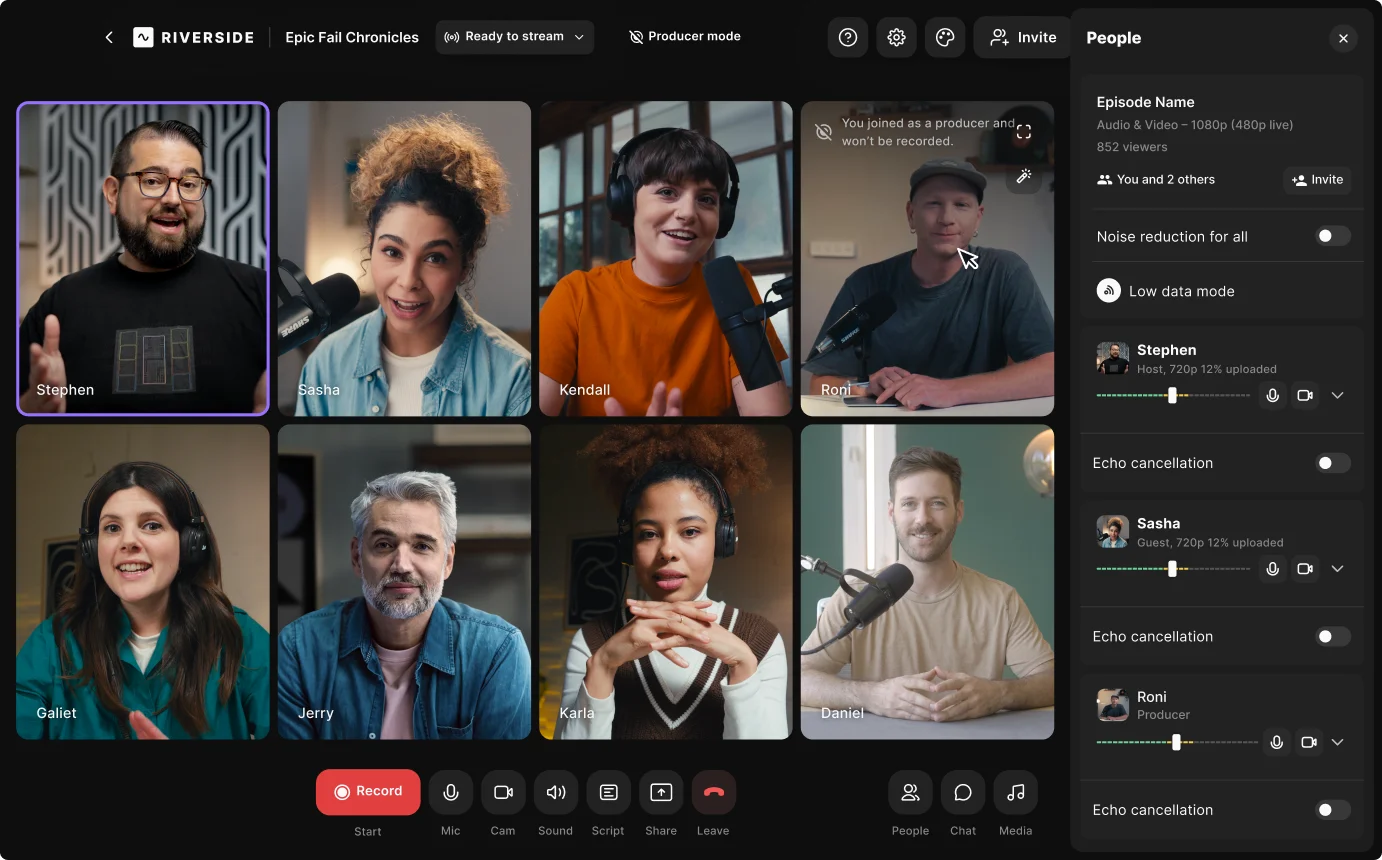
The last step before going live is preparing your studio. You can enhance your stream by customizing speaker layouts, overlays, lower-thirds, add logos, and text backgrounds.
Just click on the “Brand” button on the right sidebar to customize your session.

You can also check your timeline and script with a teleprompter during the live session.
Click on the “Script” button in the bottom bar, then select “Teleprompter.”

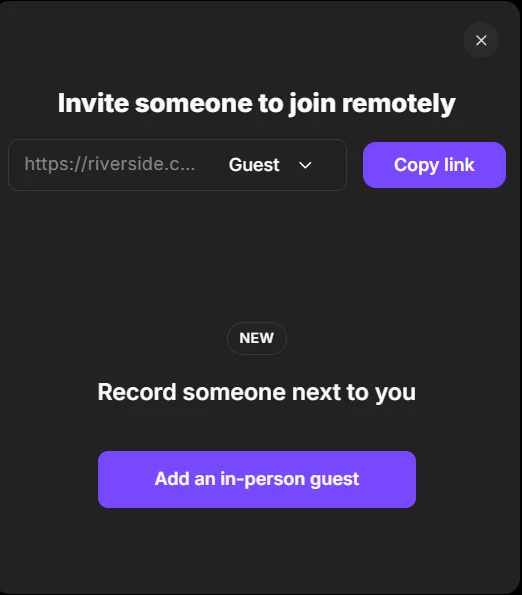
Click on the “Copy link” button to share your invite link to your guests.
You can stream with up to 10 participants, no matter where they are, and record each participant’s audio and video track separately for easy repurposing.
5. Conduct a test run
Do a quick test run to discover and fix any loose ends in your streaming setup, like errors in your audio and video input sources.
This trial run also ensures you’re more prepared to troubleshoot issues you’ve already faced.
That said, it’s best to have someone behind the scenes for any live help. If you’re using Riverside, you can invite them via Producer Mode.
But if not, Zephan suggests you use his “CALM” approach for tech troubleshooting:
- C - Check: Run through your checklist mentally and determine if the issue is hardware- or software-related.
- A- Align: Align with the client only if they need to be notified of the issue. If there’s no client, align with your audience.
- L - List: List possible solutions and the most likely issues you need to address (e.g., a bad or unplugged cable).
- M - Manage: Manage what you can and move forward with the best solution. If you can’t replace a cable right away, use the cameras or gear you do have available and working.
6. Go live
We suggest logging on at least 30 to 15 minutes before you go live. This gives you time for last-minute checkups to make sure everything is ready.
If you’re using Riverside, enter your studio using the steps above. Set up a stream by clicking on the “Live stream” button at the top and toggling the “Live stream to social” button on.

You can multistream to several destinations simultaneously by simply toggling the buttons for each respective platform.
Once you’re ready, hit the “Go Live” button to start streaming.
.webp)
During the live stream, you can add live background music or sound effects with the live soundboard by clicking on the “Media” tab.

You can also:
- Send messages to all your audiences in the unified Omnichat.
- Invite your attendees on stage with live call-ins.
- Engage viewers with interactive elements like polls and Q&As.
7. Review, promote, and iterate for continued ROI
Once your livestream ends, there are some crucial tasks to complete to get the most value from it as possible.
Review performance metrics
Almost every social media platform offers analytics to monitor your livestream performance. Access this data to identify when engagement peaks or drops off.
You can also track metrics like:
- View count: The number of people that watched the livestream.
- Watch time: The amount of time viewers spent watching your stream.
- Retention rate: The percentage of viewers retained till the end of the stream.
- Engagement rate: Likes, shares, comments, and other user interactions.
- Demographics: Information about viewers’ age, location, and gender.
Track these numbers for each live session to assess your progress.
And if you didn’t get as much engagement as you wanted the first time around, it happens. You can always turn your stream into other content. As Zephan says:
“Just because people didn’t show up live, doesn’t mean that you don’t have an opportunity to create tons of shorter pieces of content to recycle later. They could easily lead to increased engagement in the future.”

Promote your livestream by repurposing it
Don’t limit your stream only to the folks who joined the live session.
Identify highlights from the session and create several short clips to promote the replay. You can distribute these clips as social media posts, add them to blog posts, or reuse them on your website.
You can also turn your transcript into social posts or articles that help your episode’s SEO, or use it as the basis for a newsletter.
And some streaming software has repurposing tools built in. For example if you’re using Riverside, you can create clips, or repurpose live streams into blogs and other content automatically with our chat-based editor, Co-Creator.
Here’s how:
To create clips use Magic Clips:
Step 1: From your “Projects” page, select your recording and scroll down to the “Magic Clips” section under the “Made for you” tab.
Step 2: Click “Personalize” to choose the aspect ratio, layout, and duration of your clips. The AI will automatically select the best moments from your recording.

To create other content, use Co-creator:
Step 1: Next, go to the “Recordings” tab and open the editor by clicking on the “Edit” button.
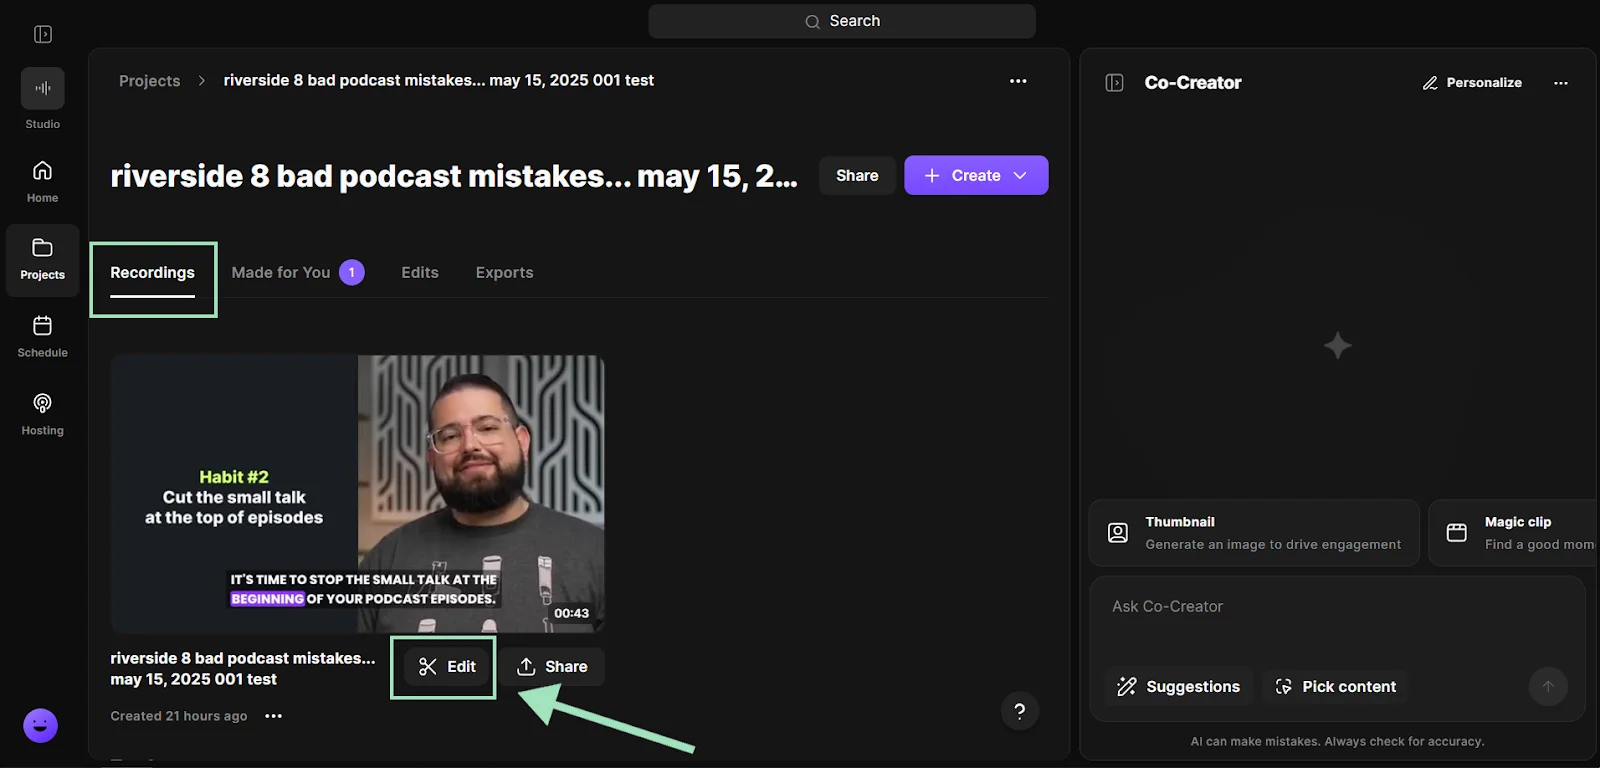
Step 2: Click the “Co-Creator” button (in the right sidebar) to open Co-Creator.
.webp)
Step 3: Go to the “Promote” tab and select the type of content you want to generate. Co-Creator will turn your recording into blog articles, social posts, newsletters, thumbnails, and more.

You can also polish your recordings using our text-based editor to create on-demand videos for your audience.
Just edit the automatically-generated transcript like a document to cut and trim your video, add captions, and enhance audio with a click!

Collect audience feedback
Getting direct feedback from your viewers will tell you what to improve and how to make your sessions more successful in the future.
You can get quick feedback by adding a short survey at the end of your livestream. Another approach is to send follow-up emails with a link to the stream and specific questions for viewers to respond to.
Analyze the feedback your viewers provide and bake it into your process for new sessions.
How to live stream on different channels
Each platform has a slightly different setup, but the core flow is the same:
- Create your stream.
- Add event details.
- Go live.
Here’s a quick guide to going live on all major social channels:
How to live stream on Twitch
Twitch is open to everyone with no minimum requirements to start streaming. Just create your account for free and get started.
Here’s how to livestream on Twitch via computer or your mobile device.
From computer
Step 1: Log in, click your profile icon, and open the “Creator Dashboard.”
Step 2: Connect streaming software (e.g., OBS, Twitch Studio, StreamElements). For this example, we’ll use Twitch Studio.
Step 3: Download the Twitch Studio app and authorize your device for streaming. It’ll require an activation code.
Step 4: Set up your camera and scenes, then hit the “Start Stream” button.
.webp)
From mobile
Step 1: Open the Twitch app and tap "Create" in the top right.
Step 2: Select the "+" icon and choose between "Stream Games" to broadcast your screen or "Stream IRL” to use your camera.
Step 3: Customize your stream setup, then tap “Go Live.”
Learn more and check out our full guide on how to stream on Twitch.
How to live stream on YouTube
You need a verified channel to go live, which takes 24 hours to activate. Desktop streaming requires no minimum subscribers, but mobile streaming requires at least 50.
From computer
Step 1: Open YouTube and click “Create” (camera icon), then “Go Live.”

Step 2: Choose to stream right away or schedule it for later in the YouTube Studio Live Control Room.
Step 3: Add your title, description, and thumbnail, then click "Go Live."
From mobile
Step 1: Open the YouTube app and tap the "+" icon at the bottom.
Step 2: Select "Live."
Step 3: Enter your stream details and tap "Go Live."
For a full step-by-step overview, check out our guide on how to livestream on YouTube.
How to live stream on Instagram
Your account needs to be at least 30 days old to go live on Instagram (even with zero followers).
But, livestreaming on Instagram is available only on mobile devices. To broadcast from your desktop, you’ll need third-party software.
From mobile
Step 1: Tap the "+" icon on your profile and select "Live."
Step 2: Choose your audience (followers or close friends) or select practice mode.
Step 3: Add your title and tap the center button to start.
From computer
Step 1: Log into Instagram on the web and click "Create," then "Live Video."
Step 2: Copy your stream key.
Step 3: Enter the stream key into your third-party streaming software.
How to live stream on Facebook
Facebook Live lets you broadcast on mobile and desktop with no restrictions.
From computer
Step 1: Click the “Live Video” button from your personal profile, page, group, or event.
Step 2: Select whether you want to “Go Live” or “Create live video content.”
Step 3: Choose your camera and audio sources, and add your stream details.
Step 4: Click "Go Live" in the bottom-left corner to start the stream.
From mobile
Step 1: Tap the "+" icon or "Live" button on your feed.
Step 2: Go to "Tap to add a description" to add details about your video. You can also:
- Invite guests or other pages
- Add a poll and location.
- Use stickers and other filters.
Step 3: Tap “Go Live” once you’re ready.
For a full guide, check out our blog on how to go live on Facebook.
How to live stream on TikTok
TikTok has the following eligibility criteria for livestreaming:
- You need at least 1,000 followers
- You must be at least 18 years old.
From mobile
Step 1: Open the app and tap the "+" icon at the bottom.
Step 2: Swipe to the "LIVE" option on the bottom menu.
Step 3: Add an image, title, and topic.
Step 4: Tap "Go LIVE."
From desktop
Step 1: Go to "Creator Tools" and download the TikTok LIVE Studio app.
Step 2: Apply for access (if eligible).
Step 3: Once approved, log in, set up your camera and audio, and start streaming.

Check our full guide on how to go live on TikTok.
How to livestream on LinkedIn
On LinkedIn, you can livestream from your personal profile or a company page. You need to meet these eligibility criteria:
- More than 150 followers or connections.
- Located outside of mainland China.
- Account or page must be at least 30 days old.
- Adherence to LinkedIn's Professional Community Policies.
LinkedIn does not have a native broadcaster, so you must use third-party software.
From desktop and mobile
Step 1: Create a new post and click the calendar icon to create an event.
Step 2: Select "LinkedIn Live" as the format and fill in your event details.
Step 3: Connect your LinkedIn account to a third-party streaming platform like Riverside.
Step 4: When you are ready, launch the stream directly from your Riverside studio to broadcast live to your LinkedIn audience.
FAQs on How to Live stream
How can I avoid internet connection problems during live streams?
To avoid internet connection problems during live streams, start by connecting your streaming device directly to your router via Ethernet. This provides a more stable connection than Wi-Fi.
Then, run a speed test to check your upload bandwidth and aim for a speed of at least 3 to 6 Mbps. You should also optimize your platform settings and ensure your video bitrate matches your upload speed.
Can I schedule my live streams in advance?
Yes, it’s possible to schedule a live stream for a later date on every streaming channel. When you use a streaming platform like Riverside, you can connect all your destinations beforehand, and then simply schedule your live stream for later.
Is it possible to collaborate with others during a live stream?
Yes, you can invite guests to collaborate with you on your livestream. Most channels let you add collaborators when setting up the event.
With Riverside as your streaming platform, you can invite up to 9 guest speakers before going live.
How much does it cost to start streaming?
You can start live streaming for free using just your phone or laptop, but quality will be limited. For anything beyond casual streaming, expect to spend between $50 and $200 for a good external microphone, basic lighting, and a webcam.
Can you make money from livestreaming?
Yes, you can make money from livestreaming through ads, subscriptions, donations, brand sponsorships, or selling products and services.
Most platforms offer built-in monetization options, and your earning potential will grow as you build a consistent audience.


.webp)


.webp)

