-(1).webp)


Key takeaways:
- The best all-around live streaming software is Riverside with high-quality streaming, 4K recordings, and editing tools for repurposing lives.
- The best free live streaming software includes OBS Studio and Streamlabs.
- The best beginner-friendly live streaming software includes Lightstream Studio and OneStream Live Studio.
- The best professional live streaming software for gaming and broadcast-style includes vMix and OBS Studio
Your live streaming software can be the difference between a high-quality broadcast and a stream plagued by lag, audio issues, or dropped connections.
As someone who hosts live streams every week, I’ve tested a wide range of tools. Below are my recommendations for the best live streaming software in all categories.
Best live streaming software: My top picks
Some streaming tools offer lots of control but take time to learn. Others are easier to use but offer little flexibility. The right choice comes down to the type of content you’re creating and how hands-on you want to be.
Below are my top live streaming software nominees, covering a variety of use cases and expertise levels.
Let’s dive a little bit deeper to give you a better idea of what to expect with each of these live streaming platforms.
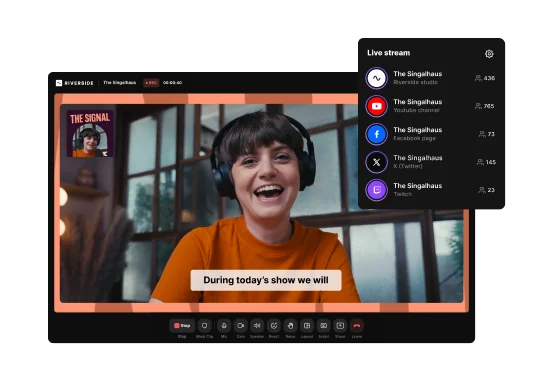
Riverside: Best overall live streaming software
Price: Free plan available. Paid plans start at $24/month.
Compatibility: Chrome, Edge, Safari. iOS & Android apps.
Riverside is best for creators and podcasters who want to run their entire live streaming workflow in one place. It covers streaming, recording, editing, and repurposing without switching tools.
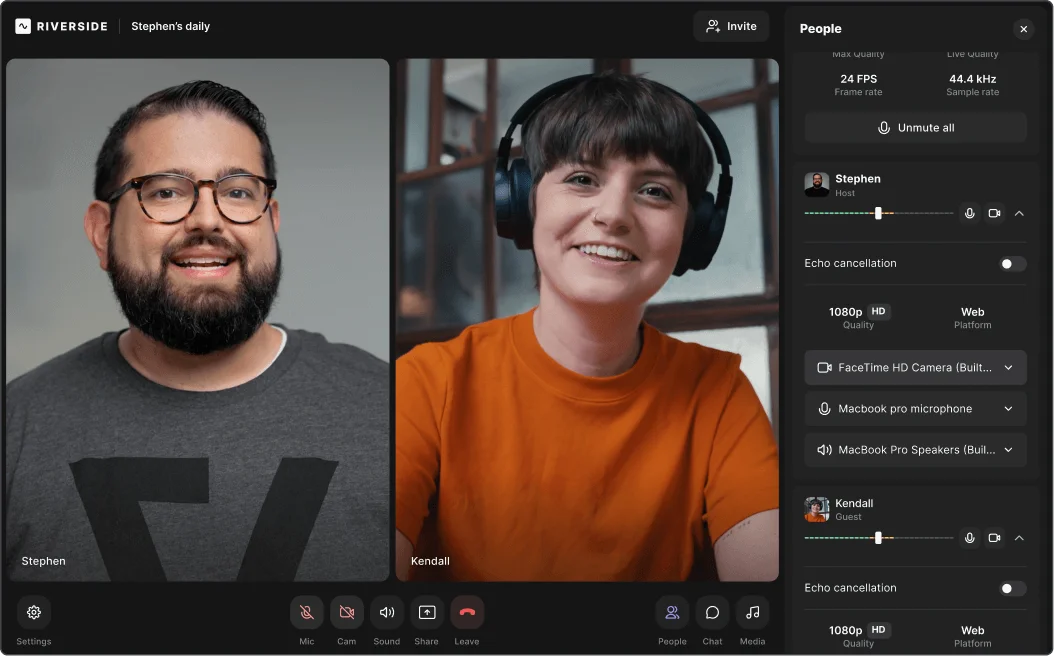
Unlike other software, Riverside lets you multistream to unlimited platforms, including YouTube, Twitch, and custom RTMPs. All while keeping track of audience messages in one unified Omnichat. Viewers can also call in live, which makes streams feel more interactive and less one-way.
To style up your lives, add lower thirds, overlays, backgrounds, and your own logo. You can also include sound effects using the media board.
Every stream records locally in up to 4K resolution, making it easy to share on demand or repurpose into other content later.
All it takes is minutes to clean up your show. Prompt Co-creator, your new chat-based editing agent, to clean up your stream, add B-roll, and create a thumbnail for it. Or, ask it to repurpose it into a blog, newsletter, or social media clips. For a more hands-on experience, head to the editor with AI tools for audio clean up, filler word removal, captions, text-based editing, and more.
Pros
- Browser-based live streaming for maximum compatibility and ease of use.
- Multistream to Facebook, YouTube, Twitch, and more, including custom RTMP destinations.
- Omnichat to keep all your chats under control in one panel.
- Brand your studio with custom layouts, logo, and background.
- Local recording keeps video and audio clean even if Wi-Fi drops.
- Invite guests with a simple link (no downloads necessary).
- Chat with Co-creator to polish your recordings in seconds.
- Magic Clips produces effortless social media highlights.
- Mobile app lets you go live or record on the go.
Cons
- Less ideal for complex and heavy gaming streams
User review: “Riverside made post-production simple. We had the high-quality recorded live stream, and we could cut clips, repurpose into a podcast episode, create show notes, and use the transcription to make the content more accessible and extend its reach.” — Anders Larsen, Product Marketing Manager at Spotify
OBS Studio: Best free live streaming software

Price: Free.
Compatibility: Windows, Mac, Linux.
OBS Studio (Open Broadcaster Software) is a long-time favorite of creators who prioritize control. As an open-source program, it gives you full flexibility. You can layer video sources, switch scenes, add graphics, adjust bitrate, tweak encoding; basically build any stream layout you want.
There are thousands of community plugins that expand capabilities even more. Need animated alerts? Chroma key? Multistreaming? OBS can handle it.
But, OBS’s learning curve can feel tough. It’s not the kind of tool you open and instantly know your way around. If you’re willing to put in the effort, it’s professional and extremely customizable.
Pros
- Completely free with no feature-locking.
- Ultimate control over video, audio, and layouts.
- Plugin ecosystem unlocks endless customization.
- A .
Cons
- Steep learning curve.
- You may need a more powerful computer for advanced setups.
- Support mainly comes from community forums.
Lightstream Studio: Best for beginners and console streamers
Price: Free plan available. Paid plans start at $12/month.
Compatibility: Browser-based (Windows, Mac, Xbox, PlayStation).
If you find OBS complex, I recommend trying out Lightstream. Since it's browser-based, you don't need to download or install any software. Just pick a layout, add overlays, and go live. That’s why so many console gamers love it. You can stream straight from Xbox or PlayStation and still make the broadcast look professional.
Lightstream handles the heavy processing in the cloud, which means even older laptops can stream smoothly. It’s designed for quick setup, easy guest features, and fuss-free layouts.
Pros
- Extremely beginner-friendly and fast to set up.
- Ideal for console streaming without a capture card.
- Runs entirely in the cloud, which lowers hardware requirements.
- Clean overlays and scene switching.
Cons
- Limited control compared to some other tools.
- The best features require a paid plan.
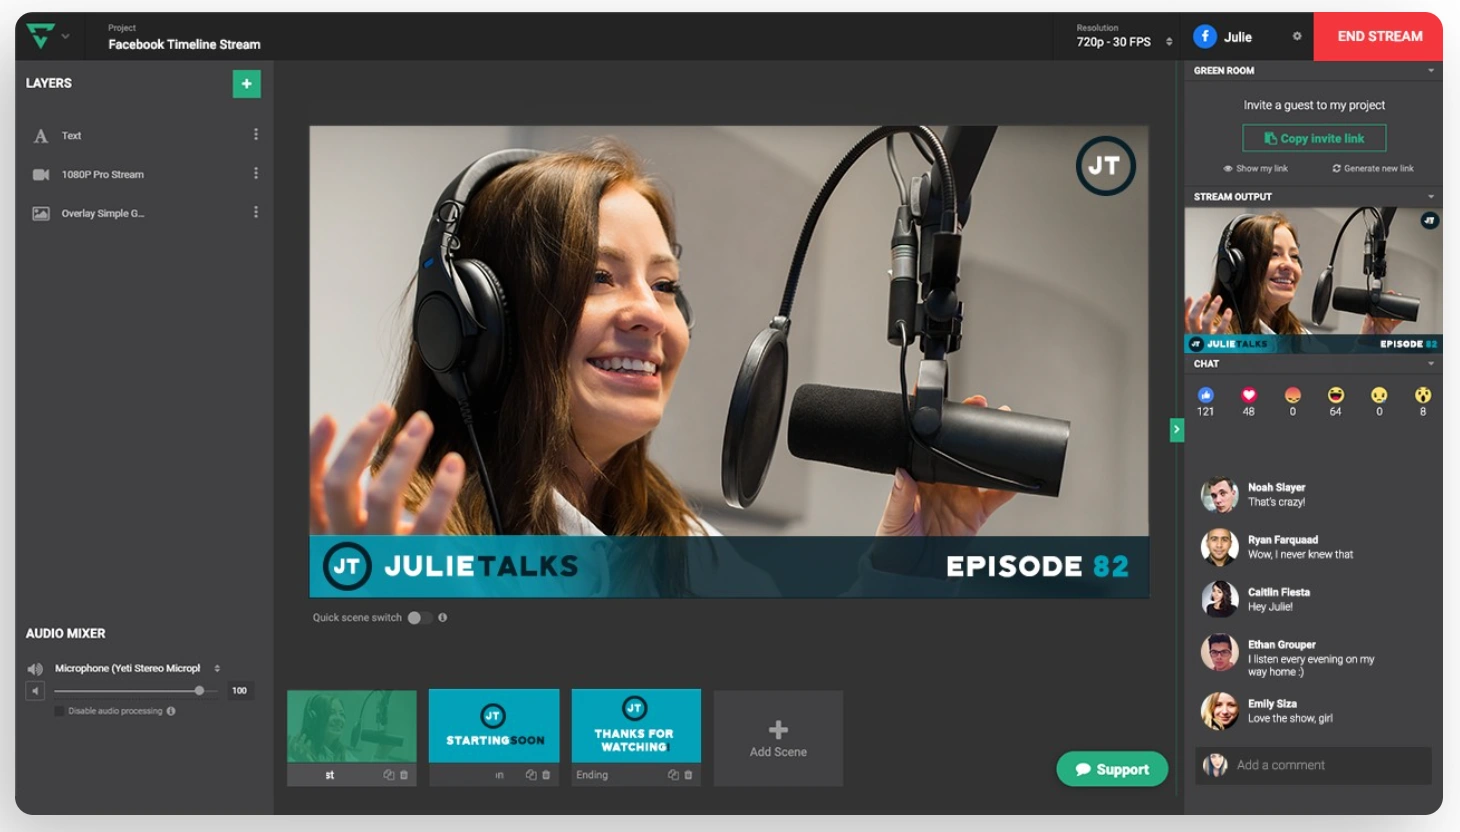
Streamlabs Desktop: Best for YouTube streaming
.webp)
Price: Free with optional premium upgrades (Streamlabs Ultra) starting at $27/month.
Compatibility: Windows, Mac (Apple silicon-optimized).
Built on top of OBS, I love how Streamlabs takes the flexibility of open-source software and makes it more user-friendly. Expect pre-built overlays, alerts, chat widgets, and lots of YouTube-specific tools. Connecting your YouTube account, scheduling streams, and managing chat feels smooth and intuitive. It can also import OBS scenes if you’re switching streaming platforms.
Because Streamlabs bundles many features into the app, it may require more resources from your device. But, the convenience is a worthwhile trade-off if you just want to start a YouTube live stream without installing plugins or setting things up manually.
Pros
- Beginner-friendly with polished overlays and templates.
- YouTube account integration for easier setup and streaming.
- Built-in widgets for alerts, chat, and viewer engagement.
- Smooth migration from OBS (if switching platforms).
Cons
- Higher CPU usage than standard OBS.
- Some features are locked behind paid upgrades.
vMix: Best live streaming software for gaming and esports

Price: One-time license starting at $50 (higher tiers offer advanced features).
Compatibility: Windows only.
If you’re streaming e-sports, fast-paced gameplay, or multi-camera setups, VMix is a good fit for you. When I tested it, the first thing I noticed was how many types of inputs it supports. For example, capture cards, webcams, mirrorless cameras, NDI feeds, and screen share. It can pull almost anything into a scene.
With the right PC, vMix handles 4K streams and high frame rates smoothly. This matters a lot for gameplay where motion blur can ruin quality. Tools like instant replay, advanced scene building, picture-in-picture layouts, animated graphics, and real-time effects are built right in. And, a handy vMix Call feature lets guests join your stream through a link.
However, I found the learning curve steep. Plus, you’ll want a robust PC setup when working with 4K inputs, multiple cameras, or fast motion. Overall, vMix feels closer to broadcast production than casual streaming software, but that’s the appeal if you want precision and power.
Pros
- Supports a huge range of video and audio inputs.
- Built-in instant replay and advanced production effects.
- Handles high-resolution and high-FPS streams smoothly.
- vMix Call makes bringing in guests simple.
- One-time purchase instead of ongoing subscription.
Cons
- Windows only.
- Requires a capable PC for 4K or multi-camera setups.
- Takes time to learn if you’re new to live production.
Ecamm Live: Best live streaming software for Mac

Price: Free trial; plans start at $16/month.
Compatibility: macOS only.
If you’re on a Mac and want something that feels native, Ecamm Live just makes sense. The drag-and-drop interface is built for creators who don’t want to dig through menus. You can plug in a mirrorless camera (or use your iPhone), add overlays, and share screens. Plus, go live to YouTube, Facebook, Twitch, or any RTMP destination.
One standout feature is Interview Mode. Your guests join from a link via their browser and you can keep them backstage until you’re ready to bring them on live. Ecamm also integrates with NDI and offers a virtual camera output. This means you can send your Ecamm setup directly into Zoom, Teams, or Meet.
With the Pro tier, you get isolated audio tracks, 4K streaming, and deeper production controls. It feels powerful without being overwhelming.
Pros
- Optimized for macOS and Apple silicon.
- Drag-and-drop interface makes setup quick.
- Smooth interview workflow with guest backstage.
- Works with virtual camera mode for Zoom and meetings.
Cons
- Mac only.
- The best features (e.g., 4K streaming, audio isolation) require upgrading to a higher plan.
Dacast: Best live streaming platform for private audiences

Price: No free plan. Paid plans start at $39/month based on bandwidth.
Compatible with: OBS, vMix, Wirecast, hardware encoders.
Dacast is different from most tools on this list. It’s not just streaming software, it’s a full hosting and distribution platform. For streaming services, classes, and private events, I found that Dacast gave me a level of control that platforms like YouTube don’t.
You can embed the video player on your website, set passwords, enable pay-per-view, and decide whether viewers can replay or download the content. Many churches and schools choose Dacast because privacy matters more than social reach for their organizations.
Dacast also uses adaptive bitrate delivery and global CDNs. As a result, your streams stay stable for viewers in different locations. The software also works with most encoder tools, and once connected, can handle playback, archiving, analytics, and access settings.
Pros
- Full control over your player and viewer access.
- Embed streams on your own website.
- Supports password protection and monetization tools.
- Analytics and cloud recording for archiving.
Cons
- No free plan.
- Pricing tied to bandwidth, so usage matters.
OneStream Live Studio (Chrome extension): Best live streaming option for Chromebook
.webp)
Price: Free plan available. Paid plans start at $10/month.
Compatibility: Chromebook, browser-based devices.
If you're streaming from a Chromebook (or a low-power laptop), OneStream Live can be a lifesaver. Rather than running everything on your device, it handles the hard processing in the cloud. This enables even basic hardware to produce a solid stream.
Setup is simple. Just install the Chrome extension, join the studio, and you’re ready to stream with a webcam, share your screen, or invite guests to go live with. The interface is beginner-friendly with preset layouts, basic branding tools, and straightforward scene controls.
OneStream is especially known for multistreaming. You can push your broadcast to multiple platforms, including YouTube, Facebook, Twitch, and LinkedIn, at the same time. Since everything runs in the browser, stream stability depends more on your internet connection than your device’s power.
Pros
- Cloud-based processing is excellent for Chromebook and low-spec laptops.
- Easily multistream to 45+ platforms.
- Simple, beginner-friendly layout and setup.
Cons
- Some advanced editing and customization limits.
- Requires a strong internet connection for stable streams.
How to choose the right live streaming software in 2026
Consider how you’ll actually use the streaming tool. Your setup, your content style, and your computer determine what works best.
Here’s the framework I use to choose the right software:
Start with ease of use
Ask yourself how quickly you want to go live. If you don’t want to spend hours configuring settings or learning a new interface, choose software with a simple studio layout, presets, or guided setup.
If you're newer to streaming or you’re training a team, browser-based studios feel less intimidating than traditional encoders. Traditional encoders, like OBS, offer more control, although they require a little patience and experimentation before workflows feel natural.
My rule of thumb: if you open the software and immediately feel lost, that friction will show up every time you stream.
Check device and platform compatibility
Make sure your shortlisted tool is compatible with your current stack. For instance, some tools only work on Windows, some only on Mac. Others run right in the browser with no installation needed.
If you’re using a Chromebook or a lower-power machine, a cloud-based studio is usually the best fit. Since all the heavy processing happens online, your device doesn’t have to carry the full workload.
Make sure the platform streams to your preferred channels
Create a short list of your publishing destinations. That could be YouTube, Twitch, Facebook, LinkedIn, or a custom RTMP setup. Most tools support major platforms, but the experience of going live can vary.
Some streaming platforms let you connect to destinations with a simple account login. Others require copying and pasting stream keys. Neither method is wrong, but the extra steps can feel annoying if you’re running a recurring show or multiple live events.
If you want to go live on more than one platform at once, check whether the tool supports multistreaming natively or if you’ll need another service to do it.
Consider guest and co-host support
If you host interviews or live stream panels, the guest workflow matters. Look for software that lets guests join through a link without installing anything or creating an account.
Features like a backstage area, host controls, and private chat during the stream make live production much easier. These small features help you run things smoothly, even if plans change while you’re live.
Evaluate production features with respect to your show’s format
Think about the type of stream you’re creating and choose features that match that format. Production tools control how your stream looks and feels, but you don’t need every feature.
For example:
- For teaching or walkthrough content, tools like screen sharing and simple captions can make things clearer.
- For gaming, smooth performance capture, chroma key support, and fast scene switching usually matter more than anything else.
- For building a show format, reusable layouts and visuals that match your brand help create consistency.
Confirm video and audio quality options
The software should support the quality you’re aiming for. Many streamers target 1080p. Some platforms support higher resolutions if your hardware can support it.
Also, check whether your platform includes local recording. Local recordings give you a clean copy of your stream that isn’t compressed by the live stream platform. This is helpful if you plan to reuse clips or release it as a podcast.
Assess editing and repurposing workflows
Streaming doesn’t end when your broadcast ends. If you want to turn live content into short-form clips, a podcast, or a replay, choose a platform that supports the way you work.
Some studios include built-in clipping tools, transcription, or automatic highlight generation. These features save a surprising amount of time when turning one live stream into multiple assets.
Tips for setting up your live streaming software
Even the best live streaming software needs a bit of setup before it behaves the way you want. The good news is that once you dial in a few basics, you can avoid most technical surprises and focus on the actual show.
Start with a clean, minimal setup
When you’re about to stream, treat your computer like a stage: the fewer distractions, the better.
Streaming already asks a lot from your CPU and memory, so be sure to close any unnecessary apps. If you’re gaming or running heavy software at the same time, every extra process increases the chance of lag or dropped frames.
A simple mental checklist helps:
- Streaming software.
- Your game or main app.
- Anything you absolutely need for the show.
And before you go live, turn off notifications that might pop up on screen. You do not want a private message or random alert appearing in the middle of your broadcast.
Choose the right video and audio sources
I always double-check my inputs before going live because using the wrong mic or camera is one of the easiest ways to ruin a good stream.
In your streaming software:
- Select your exact camera, whether it's a webcam, a DSLR through a capture card, or your laptop camera.
- Select the specific microphone you want to use and avoid choosing "Default." Sometimes the software selects the wrong mic.
- Check the audio mixer to make sure the same mic isn’t added twice (this can cause echo).
- Do a quick test. Say a few lines and make sure your audio peaks around −6 to −3 dB instead of hitting the red.
While you’re at it, frame your shot and confirm focus. Check that the correct window is being captured for screen or game capture.
Set your output resolution and bitrate
Your output settings control how good your stream looks and how stable it feels for viewers.
First, choose a resolution and frame rate that matches your setup. Most streamers use 1080p or 720p. If you have a strong computer and fast upload speed, 1080p looks great. If things lag or your computer struggles, switching to 720p often fixes it without a big drop in quality.
Then, set your video bitrate:
- For 1080p, many streamers use around 4,500 to 6,000 kbps.
- For 720p, 2,500 to 4,000 kbps usually works well.
Your upload speed should also be higher than the bitrate you choose. For example, if your upload speed is around 5 Mbps, using a bitrate closer to 2,500 kbps is safer than pushing the maximum.
If you notice buffering or stream drops, lower the bitrate or resolution. A smooth 720p stream is always better than a glitchy 1080p one. Some platforms also cap bitrates for certain accounts, so double-check so you know what to expect.
Use hardware encoding when you can
Most live streaming apps let you choose between software encoding (CPU) and hardware encoding.
When your system supports it, I usually recommend hardware encoding. It uses dedicated components on your GPU or CPU specifically built for video compression, which lightens the load on your main processor.
In your settings, look for options such as:
- NVENC for NVIDIA GPUs.
- Quick Sync Video for Intel integrated graphics.
- AMF or VCE for AMD GPUs.
Software encoding with x264 still has its place if you have a very strong CPU and weaker graphics, or if you need a niche feature that only x264 offers. For most setups, though, switching to hardware encoding lowers CPU usage and reduces the risk of dropped frames in both your stream and your gameplay.
Run a private test stream
I treat test streams like dress rehearsals. They are the fastest way to catch problems before an audience sees them.
Most platforms make this easy:
- On YouTube, set your stream to Private or Unlisted.
- On Facebook, change the audience to Only Me.
- On Twitch, you can use a short off-peak stream or a separate test setup.
Use your real layout, your real mic and camera, and the same game or slides you will use in the actual broadcast. When you finish, watch the playback.
Listen for:
- Voice clarity versus game or music levels.
- Echo, buzzing, or uneven volume.
Look for:
- Smooth motion and readable text.
- Clean scene transitions without black frames or weird cuts.
If you can, preview the test stream on both a computer and a phone. Sometimes fonts that look fine on a monitor turn into tiny lines on a smaller screen.
Most issues show up in that first short test. Fixing them in a private run is much less stressful than troubleshooting while chat is already filling up with messages.
Record locally if you can
Whenever your setup allows, record a local copy of your stream.
Live platforms can glitch, internet connections can drop, and some services may mute portions of your VOD after the fact. A local recording gives you a clean backup unaffected by stream hiccups.
You can also repurpose that recording later. Cut highlight clips for social media, upload a polished replay for people who missed the live session, or extract audio for a podcast episode.
In OBS, this usually means hitting “Start Recording” as well as “Start Streaming.” Riverside and similar tools record each participant locally in studio quality, which is useful for podcasts and interview shows.
FAQs on live streaming software
How do I record a podcast while live streaming?
The easiest setup to record a podcast while live streaming looks like this:
- Use a platform that can stream and record simultaneously. With Riverside, each participant is recorded locally in high quality, preventing network hiccups from affecting the final episode. Tools like OBS can record, too, but they won’t give you separate tracks or automatic remote recording.
- Use a proper mic and headphones. You want clear audio with no echo so your edited podcast sounds intentional, not like a post-live stream afterthought.
- Treat the stream as the live audience experience while structuring the core conversation like a podcast. This lets you react to chat, take questions, or add moments of interaction without derailing the episode.
After you wrap, edit the recording. Since Riverside records each speaker on separate tracks, you can easily remove off-topic chatter and tighten the pacing for a clean, polished podcast episode. Check out my guide on how to live stream to learn more.
What software do most people use to stream?
It depends on the content format. If you're running interviews, podcasts, or webinars with remote guests, Riverside makes things easy. You can live stream and record high-quality files at the same time without using multiple tools.
Creators who focus on gaming or heavy scene switching often start with OBS since it’s flexible, customizable, and free. Many creators later switch to tools that make recording and setup easier once their workflow gets more consistent.
Can I live stream for free?
Yes. Platforms like YouTube, Twitch, Facebook, LinkedIn Live (with approval), and TikTok Live (if eligible) allow you to stream at no cost. There are also free tools like OBS as well as limited free tiers in browser-based studios.
Is Streamlabs or OBS better?
Neither is universally “better.” Each live streaming software is optimized for different types of streamers.
- OBS gives you full control over sources, encoding, plugins, and scenes. It’s popular with creators who want a custom layout or need performance efficiency.
- Streamlabs feels more guided. It includes built-in alerts, themes, and a dashboard-style interface that helps beginners get set up faster.
Both are free, so you can try each one and see which matches your workflow.
What’s the difference between Riverside and OBS for live streaming?
They’re built for different kinds of creators.
Riverside focuses on conversations, podcasts, and remote guests. You send a link, go live, and get high-quality local recordings of everyone after the stream.
OBS is a customizable broadcast tool. You build scenes and shape your show layout manually. It gives you flexibility, but expect more setup.
Here’s a simple way to choose:
- If you create podcast-style content with guests and want clean recordings for editing, Riverside is a strong fit.
- If your live stream relies on visuals, gaming, performance, or custom scenes, OBS gives you the control you need.
Some creators eventually use both together, but most don’t need to unless they’re producing advanced live formats.


-(1).webp)
.webp)