.webp)


If you’re new to podcasting, starting a podcast can feel overwhelming. I get it.
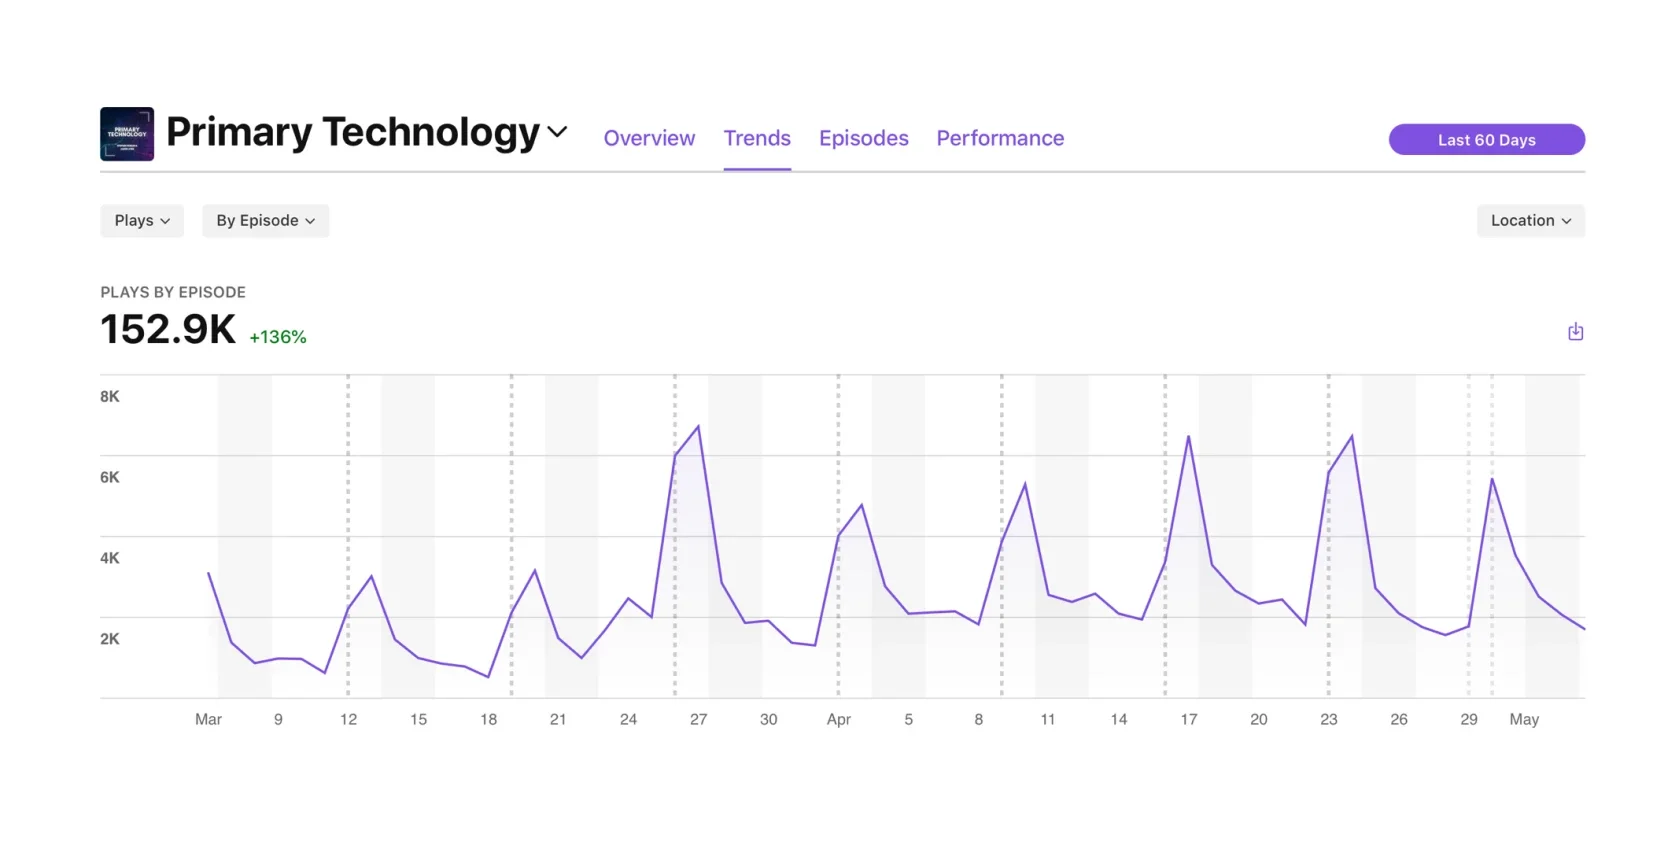
I’m Stephen Robles. I’ve been hosting podcasts for over 15 years, including Primary Technology, which gets over 60,000 plays per month on Apple Podcasts.
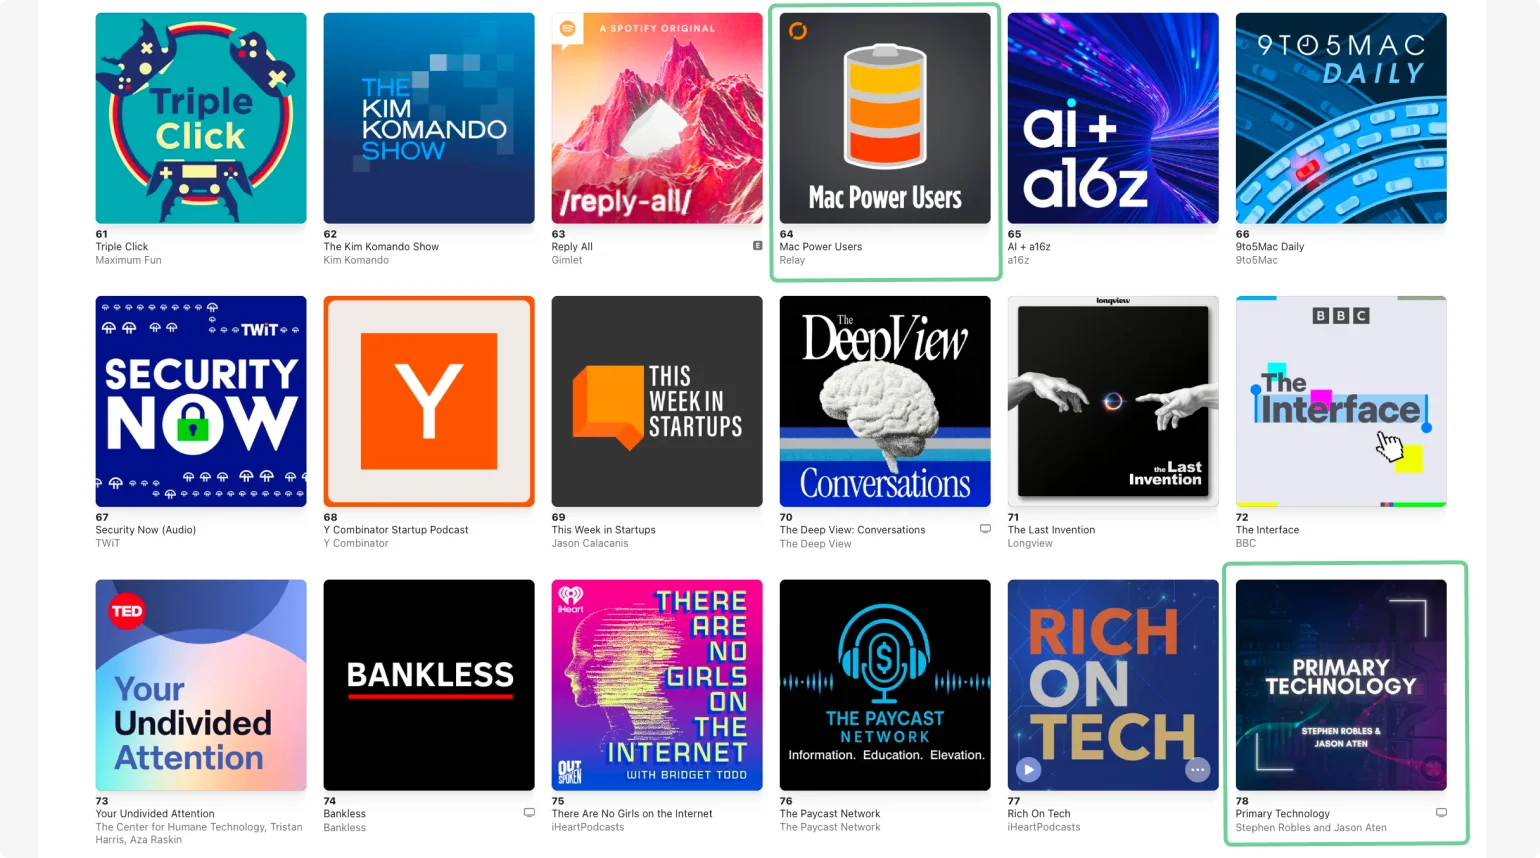
The podcasts I host, including Primary Technology, Mac Power Users, and Top 5 Tech, are also all in the top charts for Technology on Apple Podcasts.
For this guide, I asked other podcasters for their top tips on how to create a podcast and what they wish they had known starting out. I combined this with insights I learned along my own podcasting journey.
So, read on to learn how to start a podcast, step by step. This guide covers everything from planning your podcast to publishing episodes and tracking performance. No prior experience needed.
Quick-fire podcast launch checklist
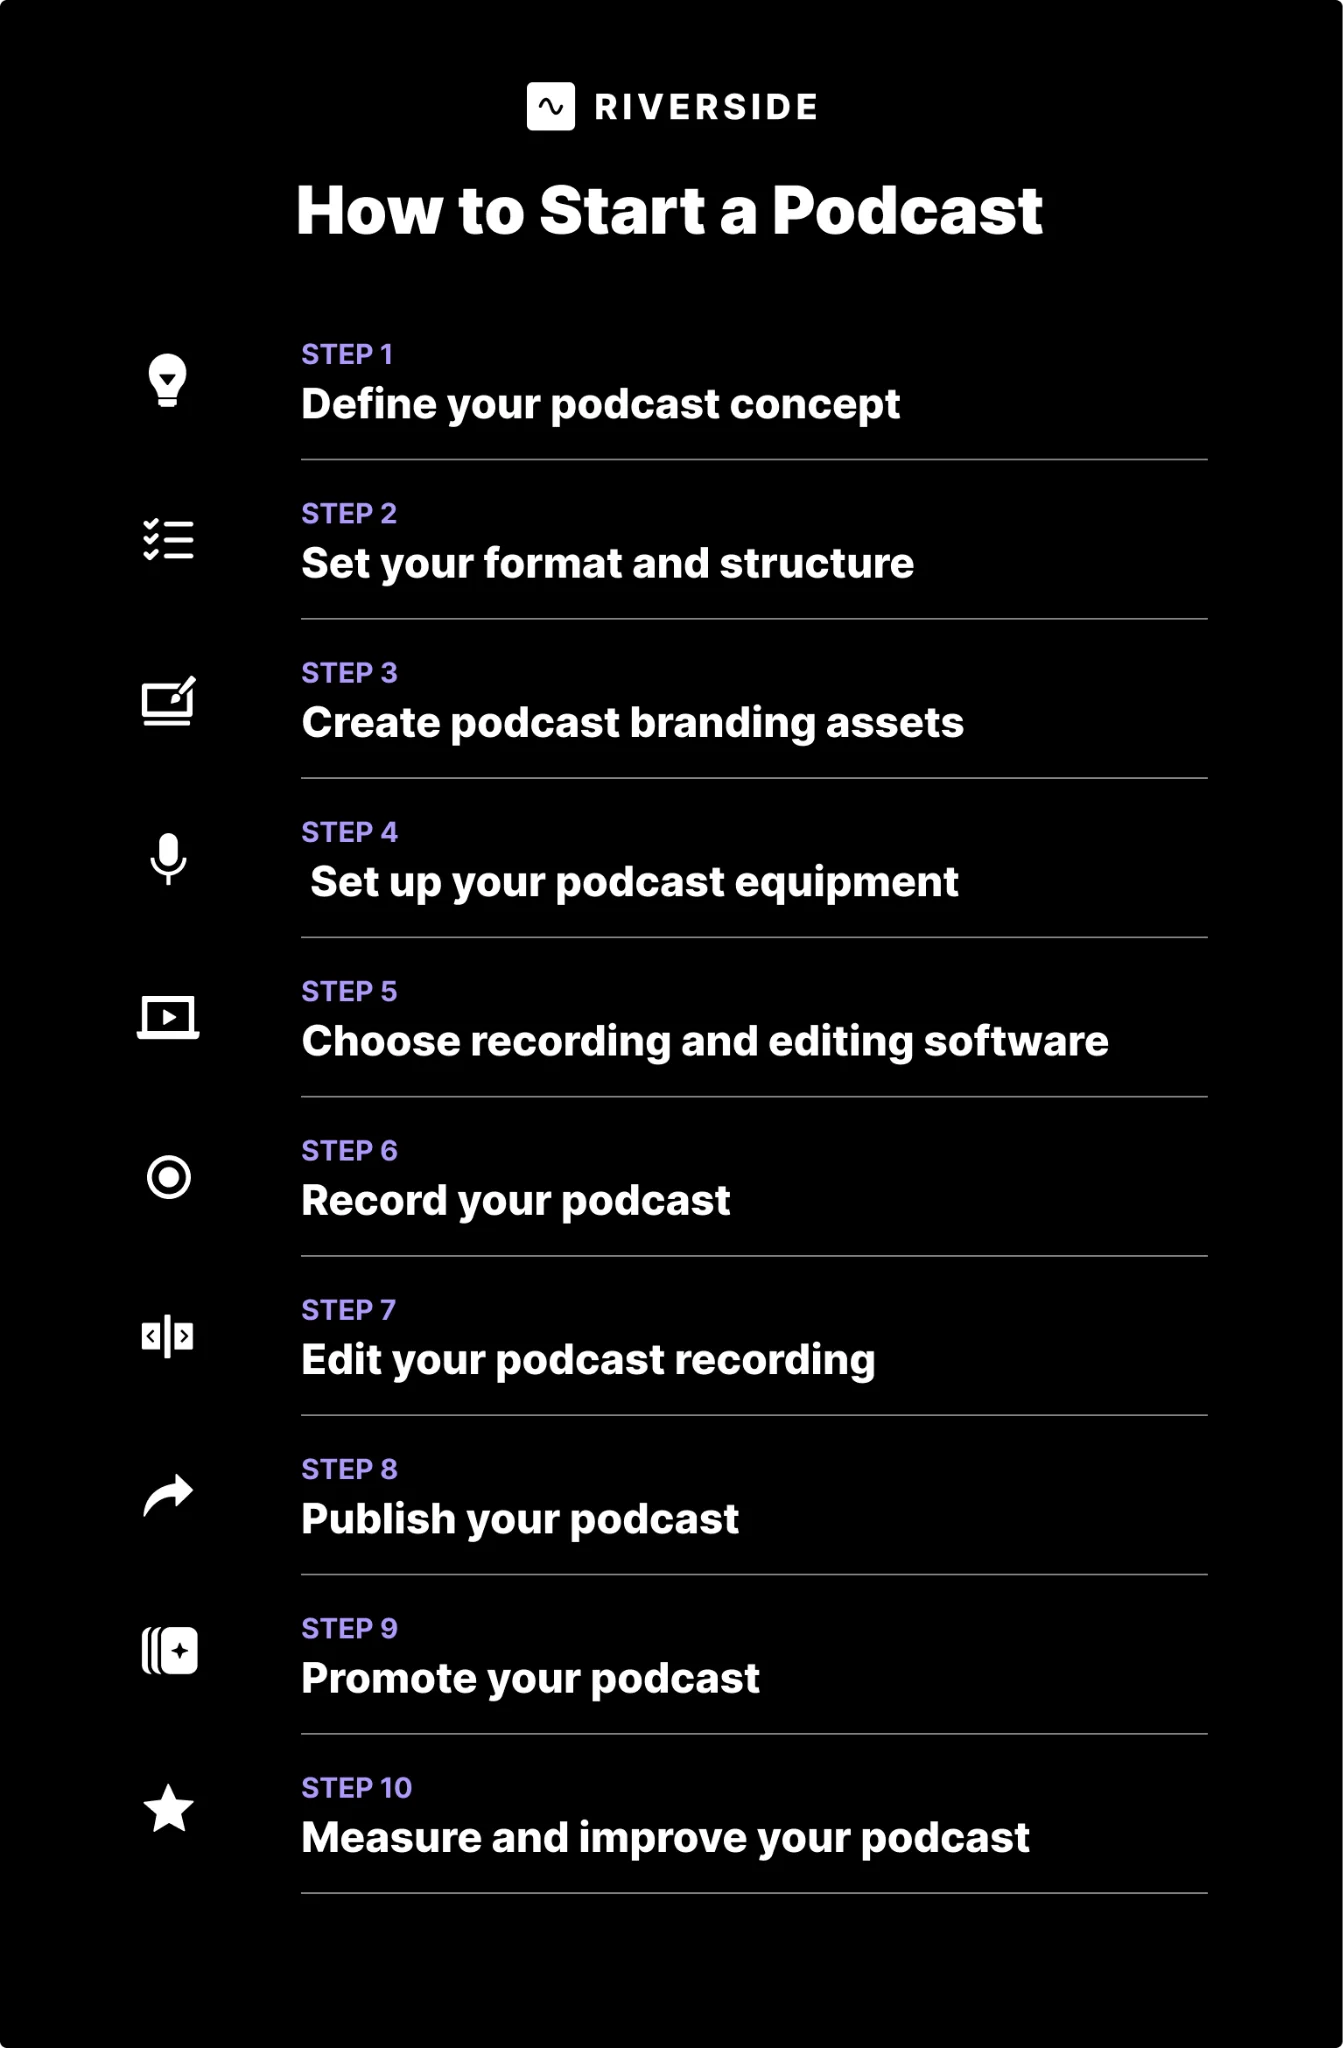
For an overview of how to create a podcast, click the image below to download a quick-fire podcast launch checklist.
How to start a podcast in 10 steps
Here's the full expert walkthrough on starting a podcast in 10 steps:
Step 1: Define your podcast concept
To define your podcast concept, get clear on:
- What you want to achieve from podcasting,
- Who you’re creating your podcast for, and
- Why your audience should listen to you.
Your answers to these questions help you nail down your podcast’s topic and how you’ll talk about it.
a. Find “what” your purpose for podcasting is
The goals you want to achieve from podcasting will influence what podcast topic to cover. For example, if you’re trying to attract customers, you should pick a podcast topic that will interest potential customers.
In contrast, if you’re podcasting as a casual hobby, your show could cover any topic you’re passionate about, even if others don’t care about it.
b. Define “who” your podcast’s audience is
Defining who your podcast audience is helps you choose a tone, format, and style that will resonate with them most.
Ask yourself:
- Who is my ideal listener?
- What do they care about?
- What are they struggling with?
- How can I speak their language?
Different audiences respond to different styles. A polished, high-end production show might resonate with executives. Meanwhile, a looser, unfiltered format could click with everyday listeners who value authenticity.
“You need to define your target audience first. Many people skip that step and focus on what they enjoy creating — and that’s okay, because your niche needs to be something you truly care about. But your content should be tailored to a specific group. Vague content won’t land with anyone, it won’t get you where you want to go.” - Jade Beason, podcast host and founder of The Creator Project
c. Identify “why” your audience should listen to you
Your value proposition, meaning why your audience should listen, is what will set your show apart.
Define what you offer listeners:
- A quick escape with humor?
- A smart solution to listeners’ problems?
- Educational content to teach listeners something new?
It's also worth thinking about what you're an expert in, or what experience you can bring, that adds credibility and gives listeners a reason to trust you.
Try summing up this value proposition in one sentence. It’ll be the core essence that describes your show.
d. Choose your podcast topic
Choose your podcast topic based on your reasons for podcasting, your audience, and what sets you apart from other shows.
.webp)
For example, look at my podcast Primary Technology:
- My co-host, Jason, and I started this podcast to build an audience around tech news. (what)
- Our audience is everyday people who want to understand the biggest stories in consumer technology and AI without the jargon. (who)
- We make complex topics accessible, which is something most tech podcasts don't do. Jason and I also have credibility on these topics. I have 15+ years of tech journalism experience, and Jason is a tech columnist at Inc.com. (why)
This explains why our topic is tech news, focusing on consumer devices, AI, and tech companies.
Once you have a few topic ideas, research them in Spotify Charts, Google Trends, and Reddit to validate if there’s actual demand for them.
Choose a podcast name
After deciding on your topic, choose a podcast name that aligns with your brand and uses words or phrases people commonly search online.
“Podcasts I see grow organically really well are podcasts that are trying to grab an actually searched keyword.” - Alban Brooke, Head of Marketing at Buzzsprout
Check that your podcast name isn’t already in use. This way, your podcast will be the only one that shows up when people search for its name.
When you’ve settled on a name, claim any domains or social media accounts containing it so nobody else snaps them up first.
Step 2: Choose your format and schedule
Your podcast format is how you’ll present your topic and what episode length you’ll stick to.
Choose from podcast formats such as:
- Solo-host monologue: Only one host presents the entire show.
- Co-hosted show: Two co-hosts present the show.
- Interviews: Host(s) invite guests to discuss a topic with them.
- Reporting: Host(s) cover and analyze the facts of events or news.
- Storytelling, scripted narratives: Host(s) tell or act out a story.
- Documentaries: In-depth discussions through interviews and research.
- Hybrid: A mix of podcast formats across your episodes.
You also want to think about whether you’re creating a video or audio-only podcast. While an audio-only podcast may be easier initially, video is becoming more popular. Riverside's own recording data shows this where looking at podcasters’ recordings over the last year, 80.5% record with video. Video also gives you more room to repurpose your content for video-first social media platforms.
Next, find an ideal podcast episode length, based on how much value you can deliver without filler, and how often you plan to publish.
If you publish:
- Daily: A 10-minute podcast is manageable.
- Weekly or several times a week: Stay within 30–60 minutes.
- Less frequently: You could go over an hour, but only if you offer value throughout.
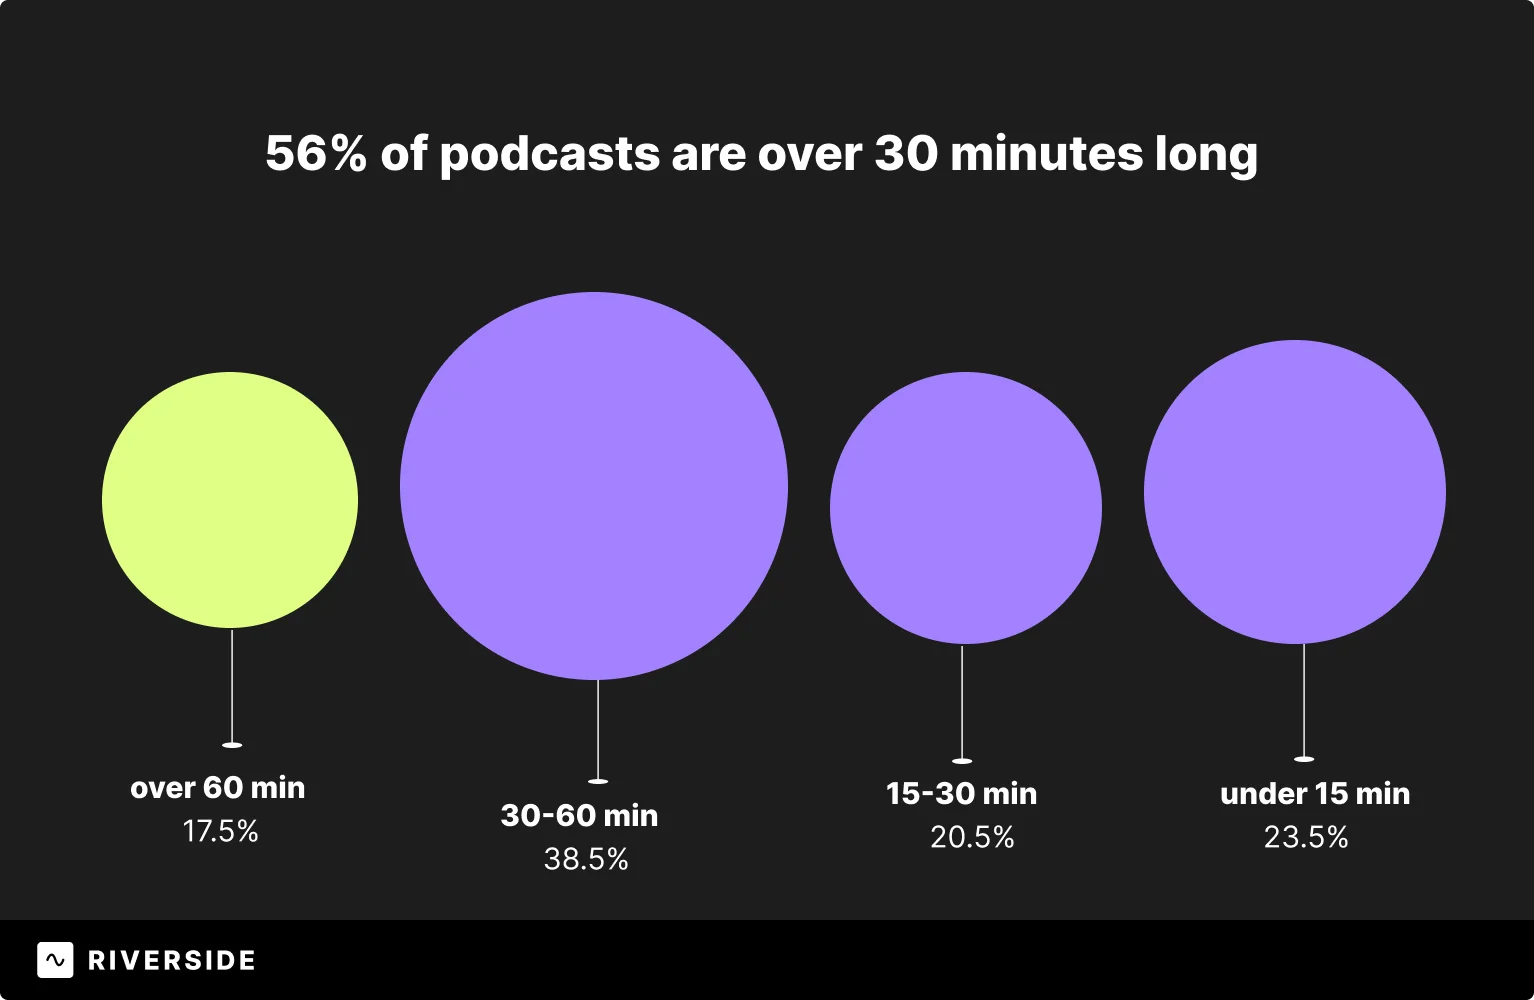
According to Riverside data from over 100K published episodes, long-form podcasts are more popular, with 56% of podcasts running 30 minutes or longer.
Consistency matters more than frequency. Your audience should know exactly when to expect your next episode. Choose a schedule that works for you and stick to it.
I also recommend recording at least 2 or 3 episodes before launch. This way, you’ll have a buffer that helps you publish consistently even when life gets busy.
Step 3: Create your branding assets
Your branding assets influence your audience’s first impressions of your show.
“Branding is about managing perception. It's not just a logo or a visual identity. It's how you make people feel, what they think of you, and how they talk about you when you're not in the room. Your brand is the promise you make and the experience you deliver.” - Chris Do, podcast host of The Futur
Branding assets to create include your:
- Podcast logo: Your logo represents your brand, and it’ll go on your cover art. Make your logo simple but eye-catching so that listeners will instantly recognize it.
- Podcast cover art: This visual represents your show on listening platforms. Keep it easily identifiable and tailored to what might attract your audience. For example, pixel graphics are perfect for a podcast on 8-bit retrogaming.
Instead of creating your branding assets from scratch, use an AI podcast thumbnail maker like Riverside’s Co-Creator to instantly generate polished designs from quick prompts.

Step 4: Get your equipment
Getting the right podcast equipment for high-quality audio and video can be as simple as a microphone, headphones, and a computer. With a bigger budget, you can upgrade to more accessories or higher-quality gear.
Essential podcast equipment includes:
Podcast microphone(s)
Your podcast microphone will have the biggest impact on your audio-quality.
For beginners, I suggest going for mics like the Audio-Technica ATR 2100X or the Shure MV7+. They have a cardioid polar pattern, which means they pick up sound mostly from the front, minimizing unwanted background noise.
Plus, they plug right into your computer’s USB port, so you don’t need to buy a separate recording interface.
Podcast headphones
Podcast headphones stop audio bleed or echo, and increase your editing precision since you’ll hear the audio your equipment picks up live.
I prefer to use wired headphones like the Sennheiser HD 280 Pro and the Audio Technica ATH-M20x because their audio lags less than wireless headphones. I also don’t need to charge them.
Computer
You’ll need a computer to install software that helps you record and edit your episodes. Any desktop computer or laptop will do as long as it’s compatible with podcasting software.
Try the MacBook Air if you need a laptop for podcasting.
Podcast camera
If you’re starting a video podcast, you’ll need a podcast camera to record visuals. While you can use your laptop’s built-in webcam, you’ll get much better results with an external webcam or a smartphone.
Nowadays, many iPhone and Android smartphone models shoot in 4K, which is perfect for filming high-quality video without buying extra gear.
Additional equipment
Other items worth considering include a podcast mixer, soundproofing materials, and video lighting. They aren’t must-haves if you’re just starting out, but they can make a noticeable difference to your show’s quality as it grows.
Based on your budget, this is where I suggest you start:
- No budget ($0): Start a podcast for free with your phone.
- Starter ($50–100): Get a decent mic and maybe headphones.
- Professional ($500+): Invest in premium gear for studio-quality production.
Use our free Podcast Budget Buddy to estimate the cost of starting your podcast (including getting software and optional add-ons like a website):
Step 5: Get your recording and editing software
You’ll need recording software to capture audio (and video), and editing software to turn these recordings into a finished episode.
Non-negotiable features include:
- Separate audio and video tracks for co-hosts and guests. This gives you more editing flexibility.
- High-quality audio and video recording. Aim for at least 4K video and 48 kHz audio.
- Easy editing, because you might not need half the tools in more advanced editors unless you’re aiming for studio-quality production.
- An all-in-one solution that provides essential podcast recording and editing features in one platform.
Here is podcast recording and editing software worth considering:
All-in-one podcasting platform: Riverside
.webp)
Riverside is a podcasting platform that lets you record, edit, and publish your podcasts in one place.
Record with up to 10 participants, where each person’s audio and video records locally from their respective device to keep the quality crisp, no matter everyone’s internet connection.
You’ll get separate audio and video tracks for each person, which lets you cut crosstalk and adjust one person’s recording track without affecting others.
After recording, conveniently edit your tracks in the AI-powered podcast editor. Prompt the chat-based editor to polish your episode for you with captions, music, an intro, and an outro. Or use your transcript to trim your recording manually with text-based editing. You’ll find other automatic tools for removing filler words, adding B-roll, and editing audio.
Free audio editor: Audacity

Audacity is a free audio editor that offers full-featured, granular audio editing controls.
Record audio in separate tracks, and then trim and assemble your clips. Remove background noise from your recordings, compress audio levels to balance them, and add reverb to give your audio a more natural, cohesive sound. There’s also free AI transcription via a plugin.
Audacity has a steeper learning curve, but it’s a good free option if you’re comfortable with audio mixing and won’t record video.
Professional digital audio workstation: Adobe Audition

Adobe Audition is a professional digital audio workstation (DAW) that's best if you're already in the Adobe ecosystem. It integrates directly with Premiere Pro, so once you've cleaned up your audio, you can drop it straight into your video edit.
The platform supports multitrack recording and provides industry-standard audio controls for fine-tuning audio to perfection. These controls include compression, equalization, background noise removal, and loudness matching.
You can get Audition as part of Adobe’s Creative Cloud suite, which also includes Premiere Pro and Photoshop.
Text-based editing: Descript
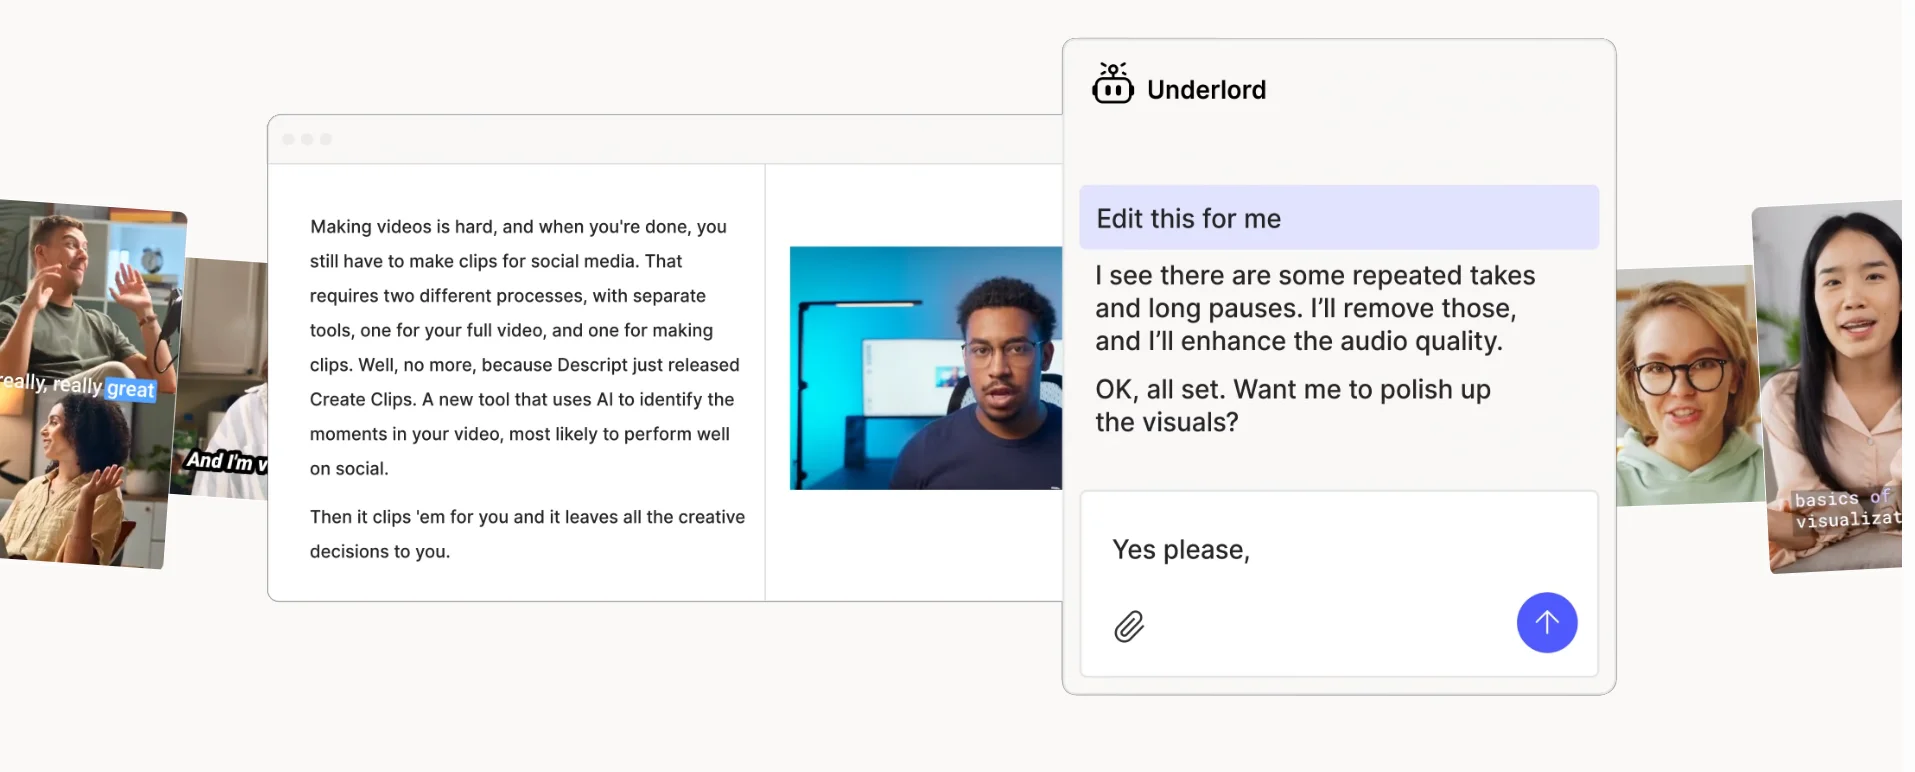
Descript is a video and audio editor that makes podcast editing as simple as editing text.
The platform automatically transcribes your video and audio files, which you’ll edit by updating their transcripts. For example, deleting text from the transcript will also remove the corresponding segment from your recording.
You can also edit your podcast by chatting with Descript’s AI video editor, Underlord. Underlord can remove filler words, adjust your gaze, remove background noise, and more.
Read more: Get more in-depth software comparisons in our guides to the best podcast recording software and best podcast editing software.
Step 6: Record your first episode
Before you record your first episode, schedule your guest interviews, plan your episodes’ content, and do a test recording.
Schedule guest interviews
Schedule interviews with guests who will feature on your podcast, so they’ll know when to show up for their recording and what they’ll talk about during it.
Platforms that match podcast hosts and guests, like PodMatch, are popular, but I usually find guests on social media.
“Tools like X and LinkedIn are great for discovering emerging voices, but I always make sure to engage with their content first, so the conversations feel more authentic and valuable. It’s all about building relationships over time, not just cold pitching.” - Jay Clouse, podcast host of Creator Science
I like to book guests for interviews under 45 minutes to help everyone stay sharp and on-topic. I also prep questions in advance so I don’t waste time thinking them up on the spot.
That said, if you're recording with a co-host or guests, expect your episodes to run longer. According to Riverside data, multi-person episodes have a median length of 40 minutes, compared to 18 minutes for solo episodes.
Plan your episode
Plan your episode by creating an outline that outlines what you want it to cover. You can also flesh out your outline into a full script that covers more about exactly what you’ll say. But don’t read from your script word for word, as you may sound unnatural.
A simple episode structure could be like this:
- Start with a hook and an intro.
- Cover the main content of your show. (If you’re interviewing a guest, add your interview questions to this part of your outline or script.)
- Wrap up with a conclusion, followed by an outro and a call to action.
“Doing any sort of preamble, like a warm-up or lead-up to the episode again, loses my listeners. So, I dive right in, especially when I have a guest, I don't do a reading of their bio or anything. A lot of their expertise comes out through my questions.” - Andréa Jones, podcast host of The Mindful Marketing Podcast
Record your episode
To record your episode, set up your equipment and podcast recording software, invite your guests, and do a test recording. Then, start the actual recording once everyone is ready to go.
The exact recording steps depend on your setup and podcast software. For example, if you’re using Riverside to record a video podcast, follow these steps:
1. Connect your equipment: Plug in your USB mic, headphones, and video camera.
Position your mic about 4 to 6 inches away from your mouth, but slightly off-axis to avoid picking up plosives. Experiment with different mic distances to get the best audio levels.
(If you’re using your phone as a webcam, add it as a second camera using the Riverside mobile app.)
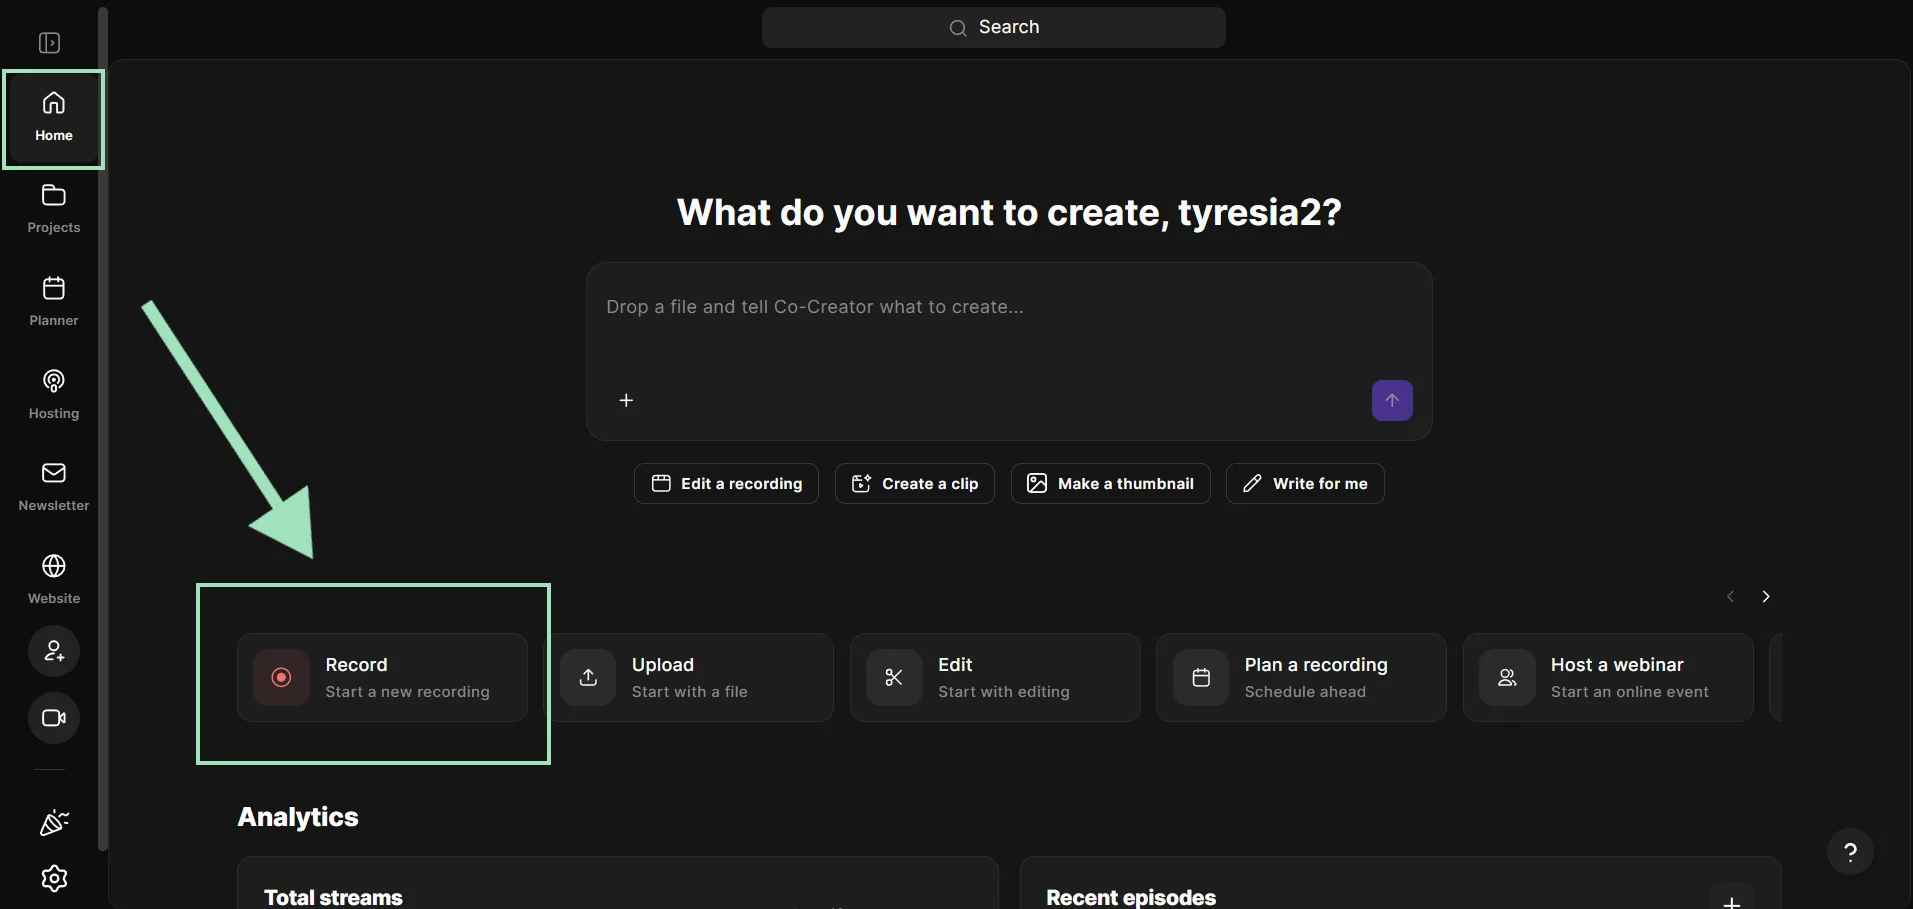
2. Create a new studio session: Log in to Riverside and from your personal home page, click “Record” to start a new session. You can also schedule a session and invite guests upfront by clicking “Plan a recording” on your homepage.
In the lobby, grant mic and video permissions, then select your mic and speakers. Click “Join studio” when you’re ready to enter your session.
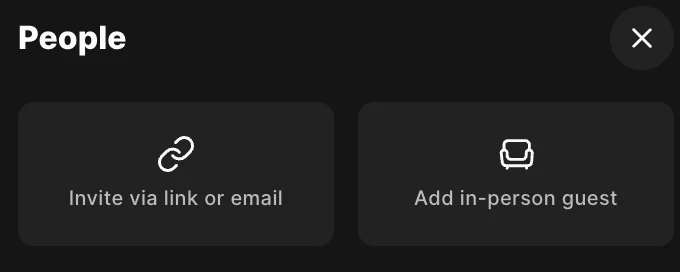
3. Invite guests: Send invites to remote guests from the studio using a link or email. Or, add in-person guests on separate audio tracks.
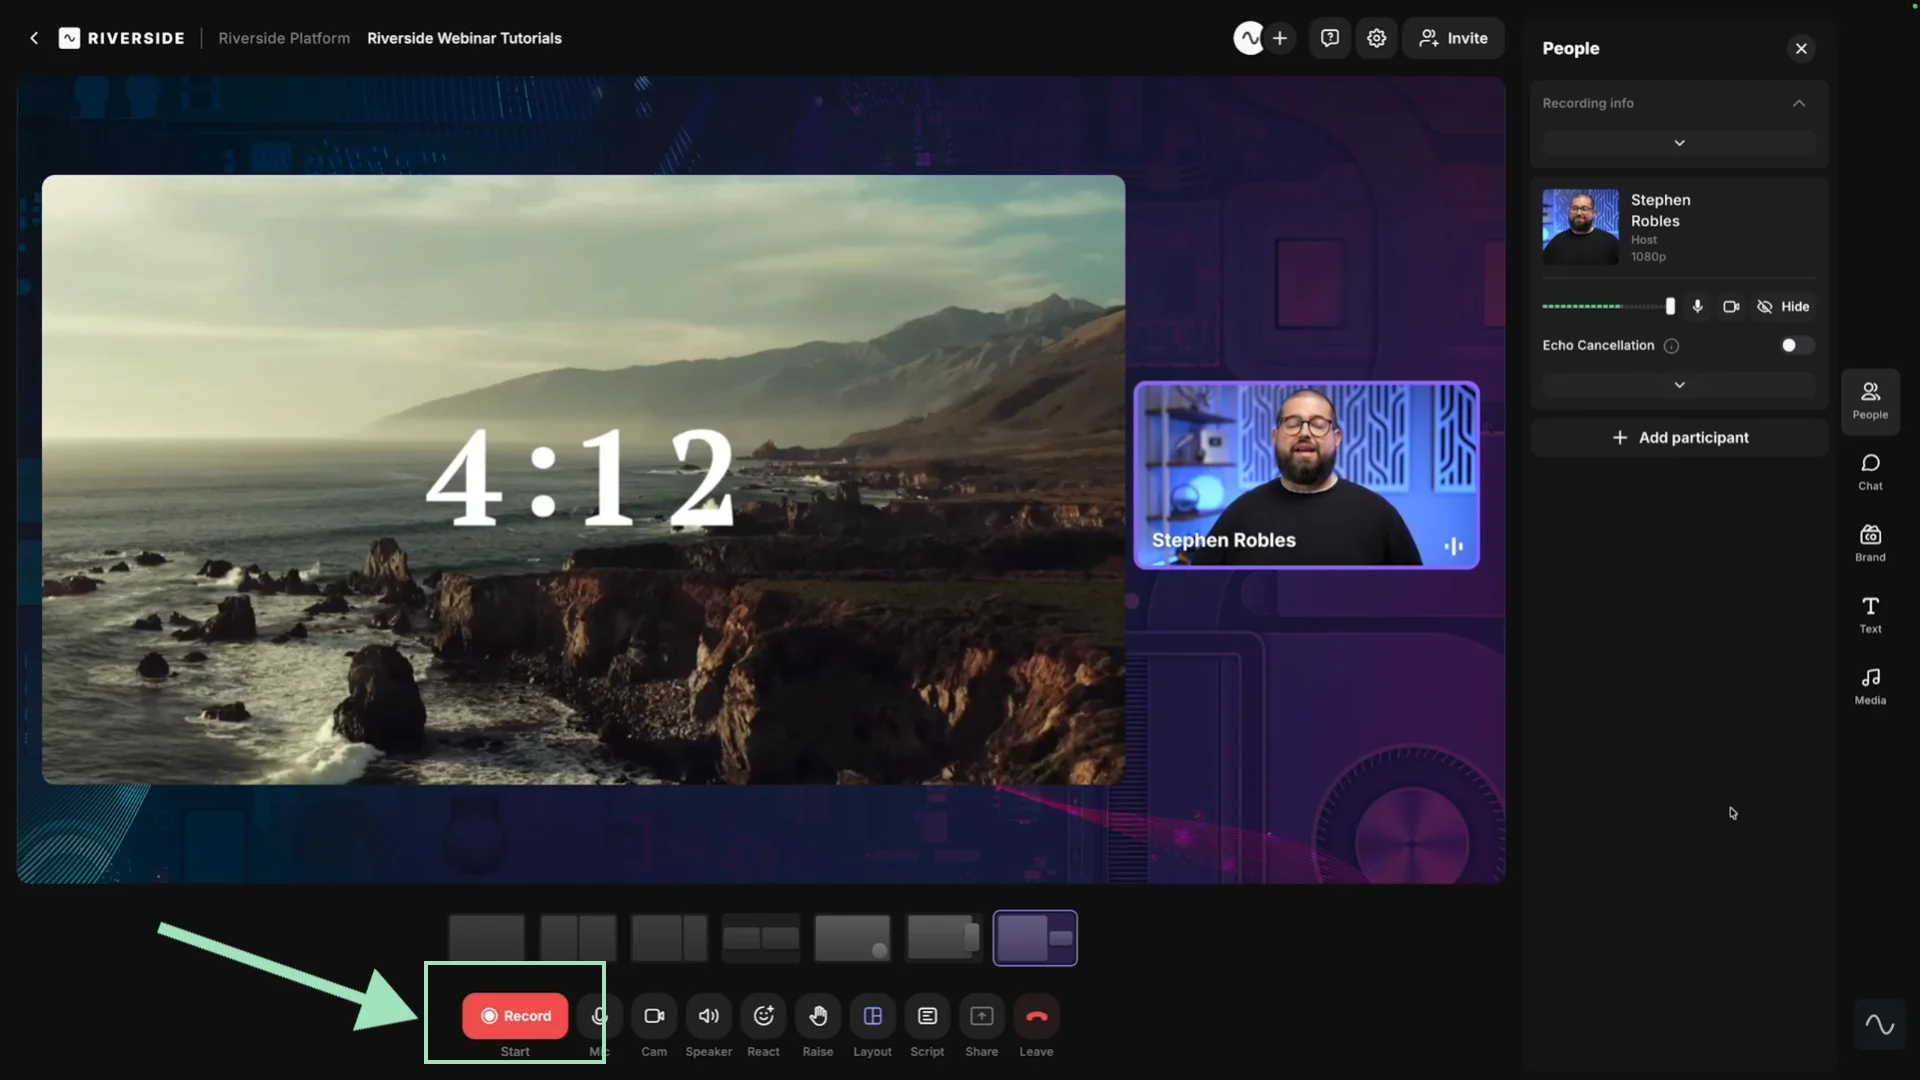
4. Do a test recording: To run a 15-second test recording, click the arrow next to the recording button in your studio. If anyone is too loud or soft, they should adjust their mic’s position. Ideally, everyone’s audio levels should peak at around -6 to -4 dB without clipping.
5. Record your episode: Click the recording button to start the actual recording. Riverside records separate audio tracks for each speaker, so you can fix one person’s audio later on without affecting others’.
As you record, speak like you’re talking to one person, not a crowd. You’ll sound more conversational this way.
“As I started my podcast recordings, I found myself sounding like I was reading from a script. Listening to other podcasters for guidance, it hit me that they didn’t sound like they were reading, but having a conversation with you. I then used my scripts as a reference only, and took that leap of faith to just speak with my audience. Engage with emotion, don’t rush, but engage with the listening. Pause at times to allow an important fact sink in… add emphasis.” - Rick Barron, podcast host of That’s Life, I Swear
Once you’ve finished recording, click “End Recording.” Riverside will automatically upload everyone's individual tracks to the cloud, ready for you to edit.
Read more: For an in-depth step-by-step, read our guide on how to record a podcast.
Remote recording tips
If you’re recording a podcast remotely, where you and other speakers record from different locations, you likely can’t be physically present to troubleshoot technical issues. So, you’ll need to take extra steps to ensure the recording goes smoothly.
Remote recording tips include:
- Record locally: Use a podcasting platform like Riverside that can record each speaker’s audio and video to their own devices. Recording files on the cloud can cause quality loss if any speaker has a poor internet connection.
- Have your speakers set up their equipment in advance: This way, they’ll have their gear ready to go when the recording starts. At the very least, they’ll need a good mic and headphones, and a camera if you’ll record video.
- Prepare a backup plan: Map out common things that could go wrong, especially technical problems, and what you’ll do in each situation. If these mishaps do happen, you can quickly switch to your backup plan to keep the recording on track.
Read more: Get more tips in our guide to recording a podcast remotely.
Step 7: Edit your podcast
Edit your podcast to deliver a strong narrative and keep listeners engaged.
Here’s the basic process for editing a podcast:
- Shape the narrative, cutting mistakes and tangents as you go along. If you’re using Riverside, trim your recording using its transcript or the editing timeline.
- Clean up the audio by removing background noise, harsh sounds, long pauses, and filler words. Then, equalize audio levels so all speakers speak with roughly the same volume. Do this automatically with Riverside’s audio enhancer and clean-up tools.
- Add an intro and outro for branding purposes.
- Add music to spice up your show. If you want to use music you didn’t create, use either royalty-free music or music you’ve gotten a license for. Some editors, like Riverside, come with free podcast music tracks built in.
- Add captions and a transcript to help users follow along even if they don’t listen to your podcast’s audio.
- Add branding (for video) by customizing your background or adding a logo.
- Merge tracks and export when you’re happy with your edit. Save videos as MP4s and audio as WAV files for uncompressed quality. (MP3s work if you need to reduce your audio file sizes.)
Read more: Check out our podcast editing guide for the full editing tutorial.
Your editing time depends on your podcast’s length and complexity. As a general rule of thumb, every minute of audio content could take 4 minutes to edit, while every minute of video content could take 8. You’ll also spend more time editing if your audio needs extensive cleanup.
Step 8: Publish your podcast
To publish your podcast, upload your podcast to a host, and then push your content from the host to a podcast directory with an RSS feed.
Here’s how:
1. Choose a podcast hosting platform: Your host stores your podcast audio and video files. Hosting platforms include Riverside, Buzzsprout, Libsyn, Podbean, and Spotify for Creators.
2. Set up your show: To create a new show, you’ll usually need to type in your show name and add your cover, categories, and a podcast description.
Your description tells listeners what your show is about and what they can expect from it. Keep these tips in mind when writing the description:
- Include a captivating hook that draws in listeners, like a shocking statement or thought-provoking question. This hook should appear within the first 150 characters of your description, as the rest might get cut off in search results.
- Keep your description clear and concise. A few sentences to introduce yourself and your show are sufficient.
- Incorporate keywords related to your podcast topic to increase your show’s discoverability in search engines.
3. Upload your first few episodes: Upload your recording files along with show notes, chapters, and a transcription for each episode. This also helps search engines rank your show for better discoverability.
Tip! If you’re using Riverside, ask Co-Creator to generate a podcast description, show notes, and a cover for you.
4. Submit your podcast RSS feed to directories. Podcast directories are platforms, like Apple Podcasts, Spotify, YouTube, and Amazon Music, that distribute podcasts to listeners.
To submit your podcast to them, you’ll need to provide your RSS feed. This is a web feed that contains information about your podcast’s episodes. You’ll find your RSS feed URL in your hosting platform.
When the directory approves your podcast, new episodes you upload to your podcast hosting platform will automatically get pushed to the directory. Submit to multiple directories to widen your audience base.

Publish at least 3 episodes when you launch your podcast to encourage binge listening. The more listeners listen to your show, the more they might look forward to future episodes. Strong listener engagement may also prompt podcast directories to feature your podcast more prominently.
Also, don’t stress about making your episodes perfect before publishing them. You likely won’t stick to the same format you started out with, so treat your first few episodes as experiments, which you’ll refine based on listener feedback and engagement data.
“New podcasters think that they need to jump right in with absolute perfection. And I just don't think that's possible. That breeds imposter syndrome…Typically, it takes some time to build up a listenership. So, consider those first episodes as practice and just publish them.” - Andréa Jones, podcast host of The Mindful Marketing Podcast
Step 9: Promote your podcast
Promote your podcast to get it discovered faster than waiting for listeners to stumble across it.
Methods of promoting a podcast include:
- Repurposing your episodes into short-form content, like video clips, image quotes, and audiograms, for sharing with your audience. Use Riverside’s Magic Clips to automatically create clips of your episodes’ highlights for posting online.
- Cross-promoting with other podcasters by shouting out each other’s shows.
- Applying search engine optimization (SEO) tactics by adding keywords to your podcast descriptions, show notes, titles, and transcripts, to help search engines surface your show for relevant queries.
“Use your content to create content that creates even more content. From one podcast episode, you can generate blog posts, pull the transcript into Jasper or Distribution.ai, and break it down into new ideas. Then, tools like ChatGPT and Canva help turn those into micro assets and visuals.” - Ross Simmonds, podcast host of The Ross Simmonds Show

Quick checklist: Download a checklist of the best podcast promotion strategies, courtesy of marketing agency The Social Snippet.
Step 10: Measure, improve, and grow
Measure your podcast’s performance regularly so you can improve its content, grow your audience, and eventually monetize it.
Wait until you’ve released at least 5 to 10 episodes before reviewing your podcast’s metrics. This way, you’ll have enough data to draw meaningful conclusions.
Key metrics to track are:
- Downloads: The number of times listeners have downloaded your episodes.
- Audience retention: The percentages of listeners who continued to listen as your episodes progressed.
- Reviews: Your podcast’s reviews, including the number of them, their star ratings, and their content.
- Subscriber growth: Changes to your podcast’s subscriber numbers over time.
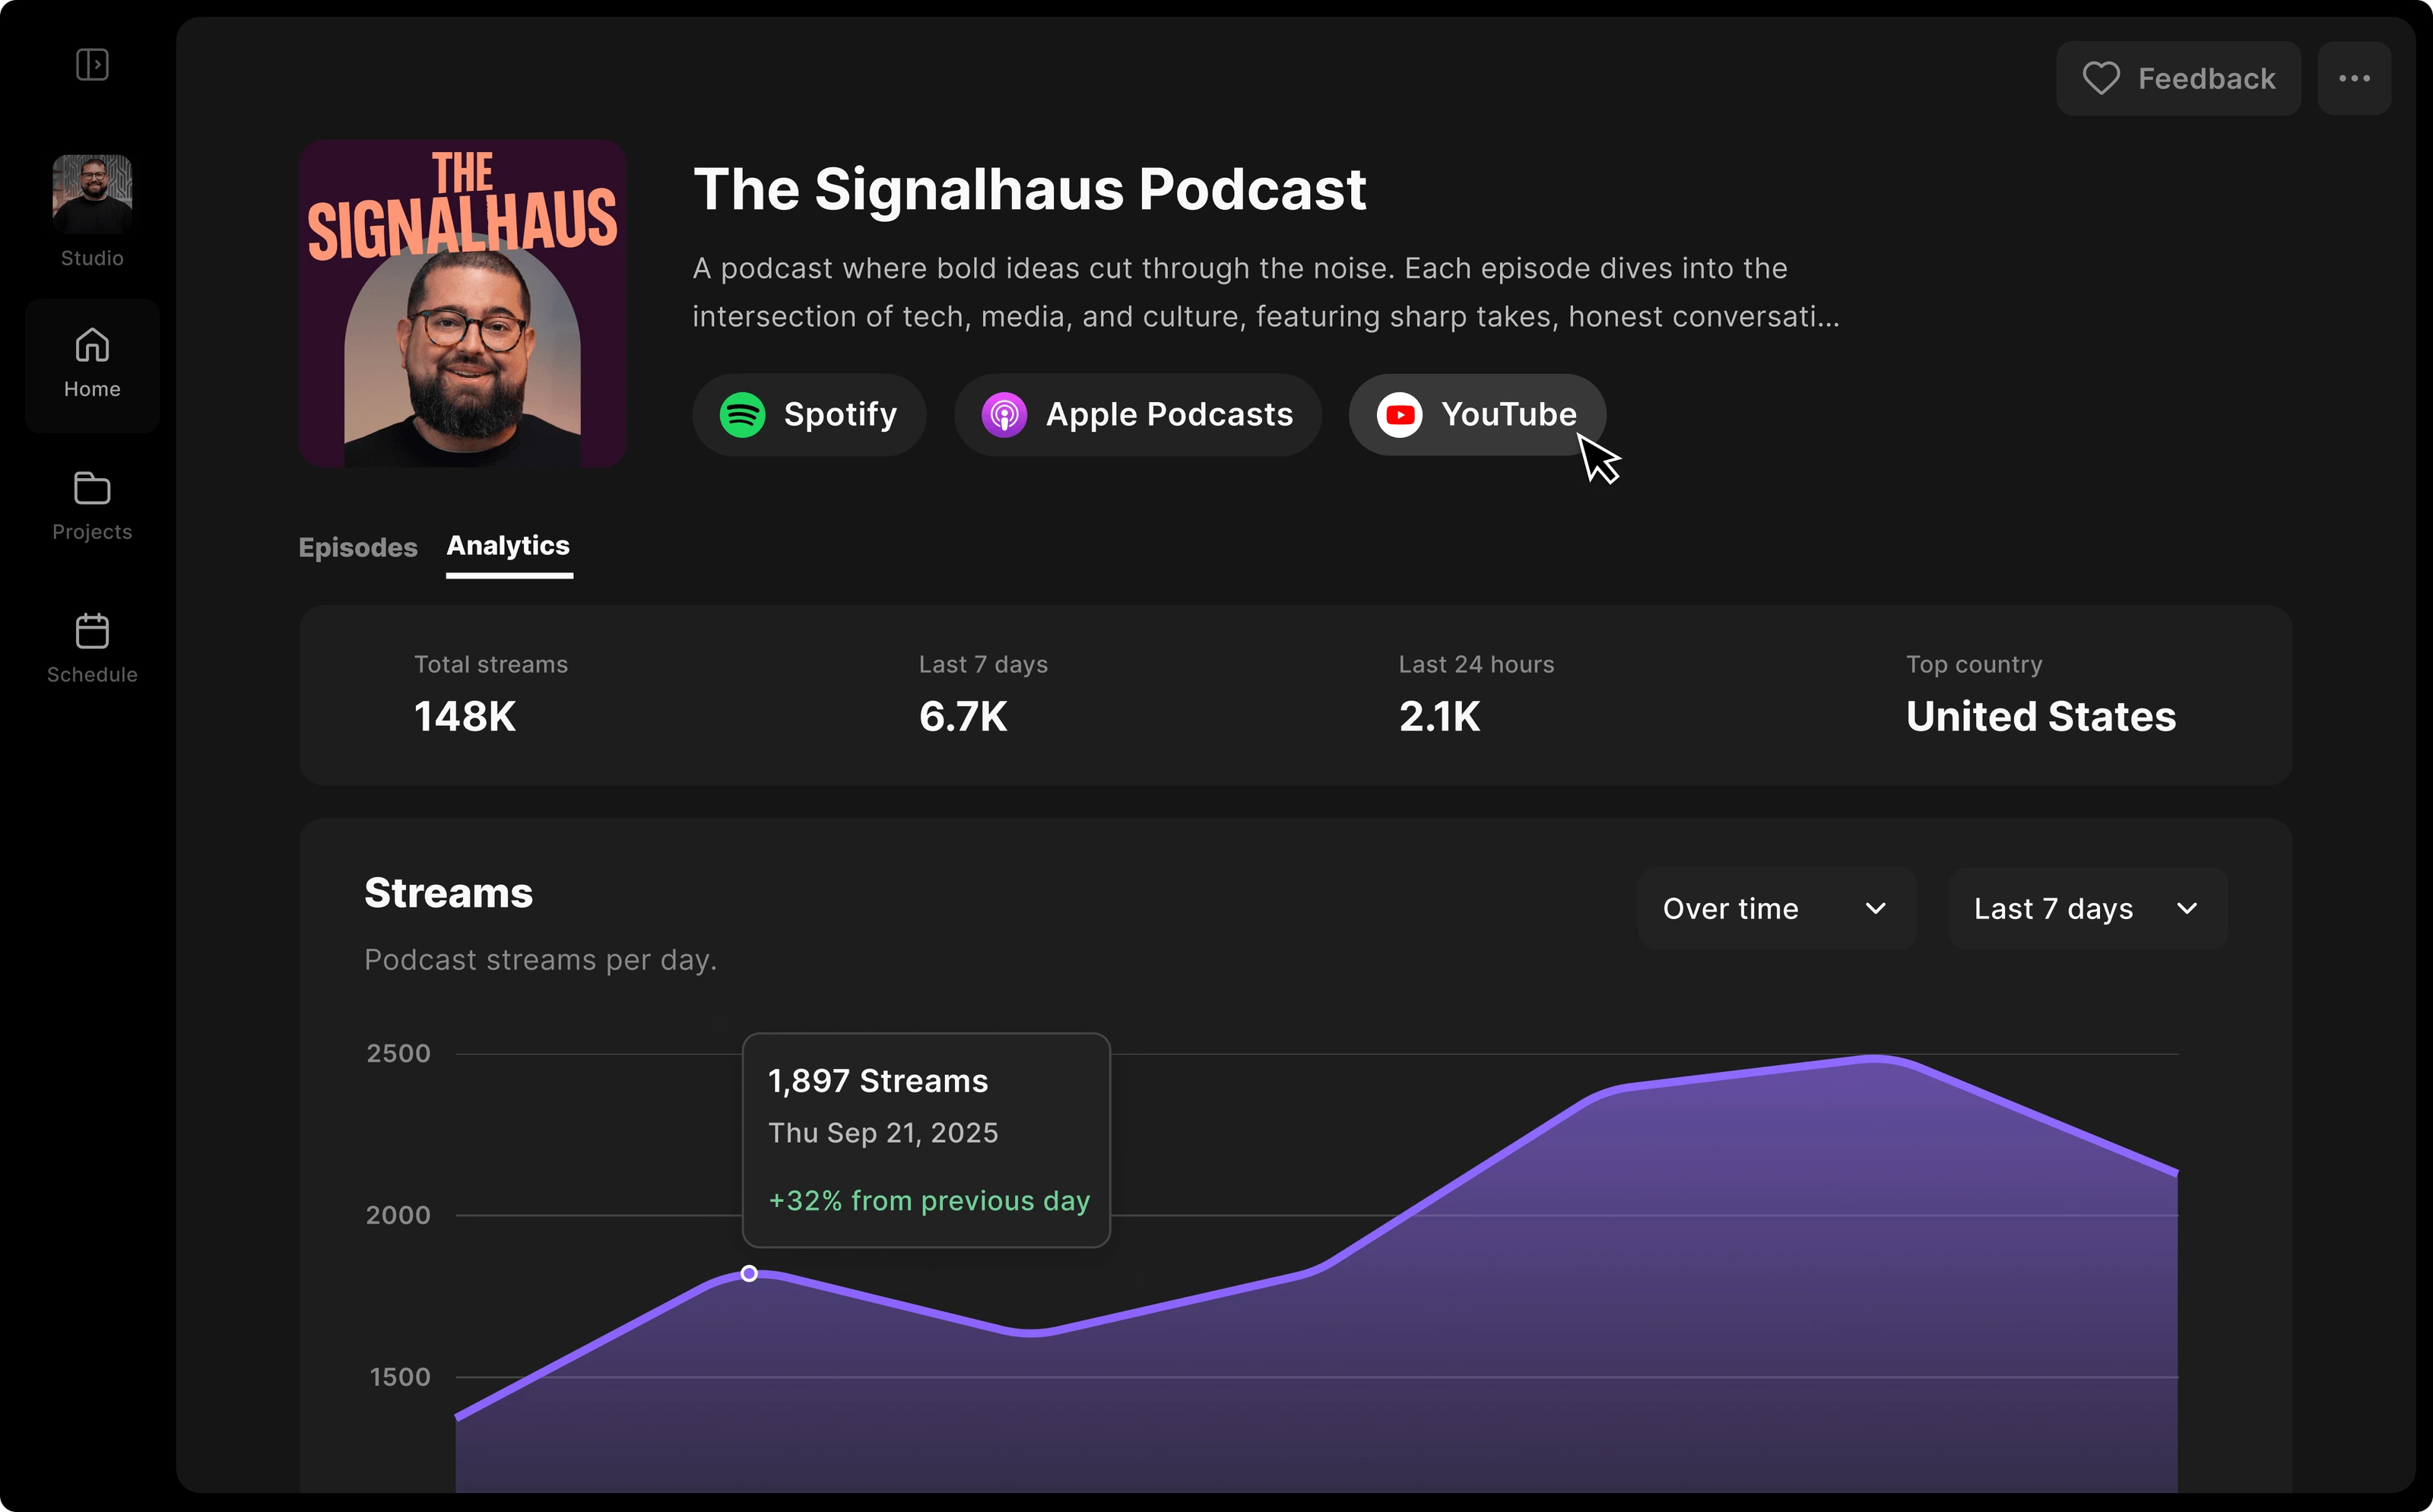
Use the data to sharpen your podcast’s format, length, and topics. For example, if many listeners stop listening within the first two minutes, your episodes may need a stronger hook.
Then, once your podcast starts getting traction, consider monetizing it. Options include running ads, selling subscriptions and merchandise, asking for tips and donations, and promoting products in exchange for affiliate commission.
Read more: Check our guide on how to make money podcasting.
Resources for new podcasters
Here are resources for you to dive deeper into launching and running a successful podcast:
- Master the Art of Podcasting with Rebecca Sananès: Award-winning producer Rebecca Sananès shares her secrets to creating a compelling podcast.
- Conversation Creators by Riverside: Riverside’s official Facebook group, where you can connect with other podcasters and ask your burning questions.
- Riverside YouTube channel: We have 100s of videos, including a 1-hour guide on How to Start a Podcast.
Finally, download this quick-fire podcast production checklist from the Focus and Bloom Studios for easy reference as you work on getting your podcast off the ground.
FAQs on starting a podcast
How much does it cost to start a podcast?
The cost of starting a podcast can range from $0 to thousands of dollars, depending on your goals, setup, and promotion plan. For example, you can start a podcast for free with just your phone, free editing tools, and free hosting platforms. In contrast, if you’re going for studio-quality production, premium gear alone can cost $500+.
What equipment do I need to start a podcast?
The equipment you’ll need to start a podcast includes a microphone for capturing audio, headphones for monitoring audio, and a computer for installing podcast software on. You’ll also need a camera for recording visuals if you’re starting a video podcast.
Other nice-to-have equipment is soundproofing materials to help you record in a quiet environment, and video lighting to ensure you’re well-lit on camera.
Can I start a podcast with no audience?
Yes, you can start a podcast with no audience. Many successful podcasters started with zero followers. Just be patient and build your listeners over time through consistent publishing and promotion.
Starting your podcast without an audience also takes away the pressure of getting your episodes right the first time around, because no one will criticize you if you mess up.
How long should a podcast episode be?
A podcast episode’s length should be as long as you can deliver value without filler. Your episodes’ duration should also match your publishing frequency. For example, your episodes could be 10 minutes long if you publish every day, or within 30 to 50 minutes if you publish weekly.
How do podcasters make money?
Podcasters make money by running ads, selling subscriptions and merchandise, promoting products in exchange for affiliate commission, and asking for tips and donations. Depending on your audience’s size and publishing frequency, your podcast can earn anywhere from a few hundred dollars to a few thousand dollars per month or more.
Is it too late to start a podcast in 2026?
No, it isn’t too late to start a podcast in 2026. Podcasts are now a widely accepted content format, and they’re convenient for listeners to listen to even if their hands are busy. So, you could see a lot of success with your podcast if you consistently publish high-quality episodes and promote them.
Plus, with tools like Riverside making podcast creation as simple as recording, editing, and publishing in one platform, the barriers to entry have never been lower.
Do I need a website for my podcast?
While you don’t need a podcast website, I recommend setting one up. It’ll serve as an authoritative online source of information about your podcast if listeners want to know more about it.
Having a website also improves your podcast’s online visibility, because it gives search engines one more search result they can show to listeners looking for your podcast.


.webp)
.webp)
%20(1)%20(1).webp)