


Key takeaways
Recording a podcast at home is easier than you think, no matter your budget. Once your gear is set up, you can forget about studio bookings and record from the comfort of your own space.
I’m Stephen Robles, and after more than 10 years of podcasting, I’ll show you step by step how to build a home studio. From choosing the right room and treating the sound, to picking the best gear, this guide covers everything you need to get started.
How to set up a podcast studio
My podcast studio setup is quite simple. Let’s start with the basics.
Disclaimer: Please see our help site guidelines to check the compatibility of any equipment with Riverside.
Step 1: Choosing a room for a podcast studio
Before considering any equipment, your first decision is choosing your recording space. The room you record in has the single biggest impact on your audio quality.
If you’ve only got one spare room, then go with that; it’ll be just fine. But, if you have the choice, the ideal home recording studio will be:
- As small as possible to minimize echo.
- Any shape except for perfectly square. The parallel walls can create standing waves that generate unnatural sounds. A rectangular room is a better choice.
- With no walls that are external or joined to your neighbor’s house.
- With as few windows as possible.
- Without appliances that may occasionally make unwelcome noises (a boiler, an air conditioner, a fridge, a dishwasher, etc.).
- With no hard, reflective surfaces like tiles, ceramics, glass, or metal (like a bathroom or a sink).
- Filled with carpeted floors and soft furnishings like tents and pillows.
In other words, a walk-in closet filled with clothes is often the perfect starter studio, but a spare bedroom or a well-furnished living room may also do. Just make sure not to record in a bathroom, a kitchen, or a large, empty warehouse!
Read more in our guide on the best places to record at home.
Step 2: Soundproofing and sound-treating your studio
When recording, your microphone can’t distinguish between your voice and the sound of your voice bouncing off the walls. The goal is to maximize the direct sound from your mouth while minimizing echo and reverb from the room’s surfaces.
To do this, you’ll need to understand soundproofing and sound treatment.
What’s the difference between soundproofing and sound-treating?
Soundproofing means isolating a room completely (or as much as you can) from any external sound.
Here, you’d use heavy, dense building material and seal up any air gaps in windows or doors. It’s expensive, complicated, and usually not necessary for a home podcast studio.
Sound or acoustic treatment means controlling sound inside your studio. It’s about improving acoustics and preventing unwanted sound reflection.
A room with lots of soft and furnished surfaces will prevent excessive reverb or echo, so it’s already sound treated (to a degree).
For podcasting, your priority should be sound treatment. It has a much bigger impact on your recording quality and is far more affordable.
How to soundproof your podcast studio
Full soundproofing is a major house renovation project, and definitely beyond your scope and needs of podcasting. Instead, you can reduce unwanted external sounds to prevent background noise.
Here’s what works for me:
- Turn off any sources of noise in the room, like fans, air conditioners, or heaters, before you hit record.
- If your computer has a loud fan, try to move it into a closet or in another room during recording.
- Choose a room that's naturally quiet and away from street traffic or noisy neighbors.
- Place a rolled-up towel at the bottom of your door to block drafts or noise from other parts of the house.
How to sound treat your podcast studio
Sound treatment for a podcast studio primarily focuses on absorbing sound waves, to prevent them from bouncing around the room and creating echo.
I focus on three main elements to sound treat my studio:
Acoustic panels
These foam tiles are mounted on walls to absorb mid- and high-frequency reflections. Beware, though: they can become expensive. You can wind up needing a lot more tiles than you initially thought.
Auralex SonoFlat Panels: $160.99 (box of 14 sq ft)
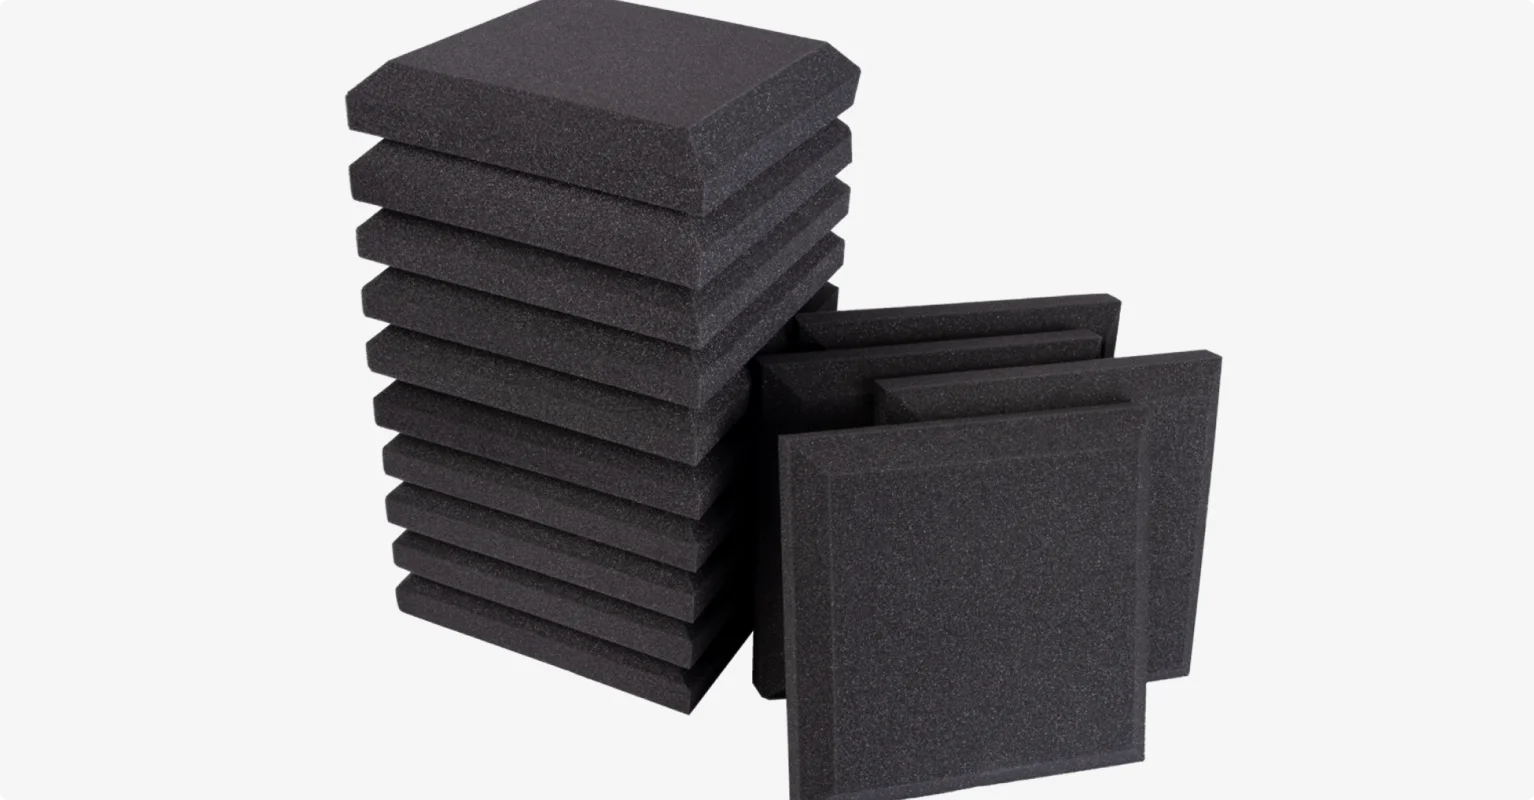
Some of them can be detached from your walls, if you want. You can find temporary, semi-permanent, and permanent options.
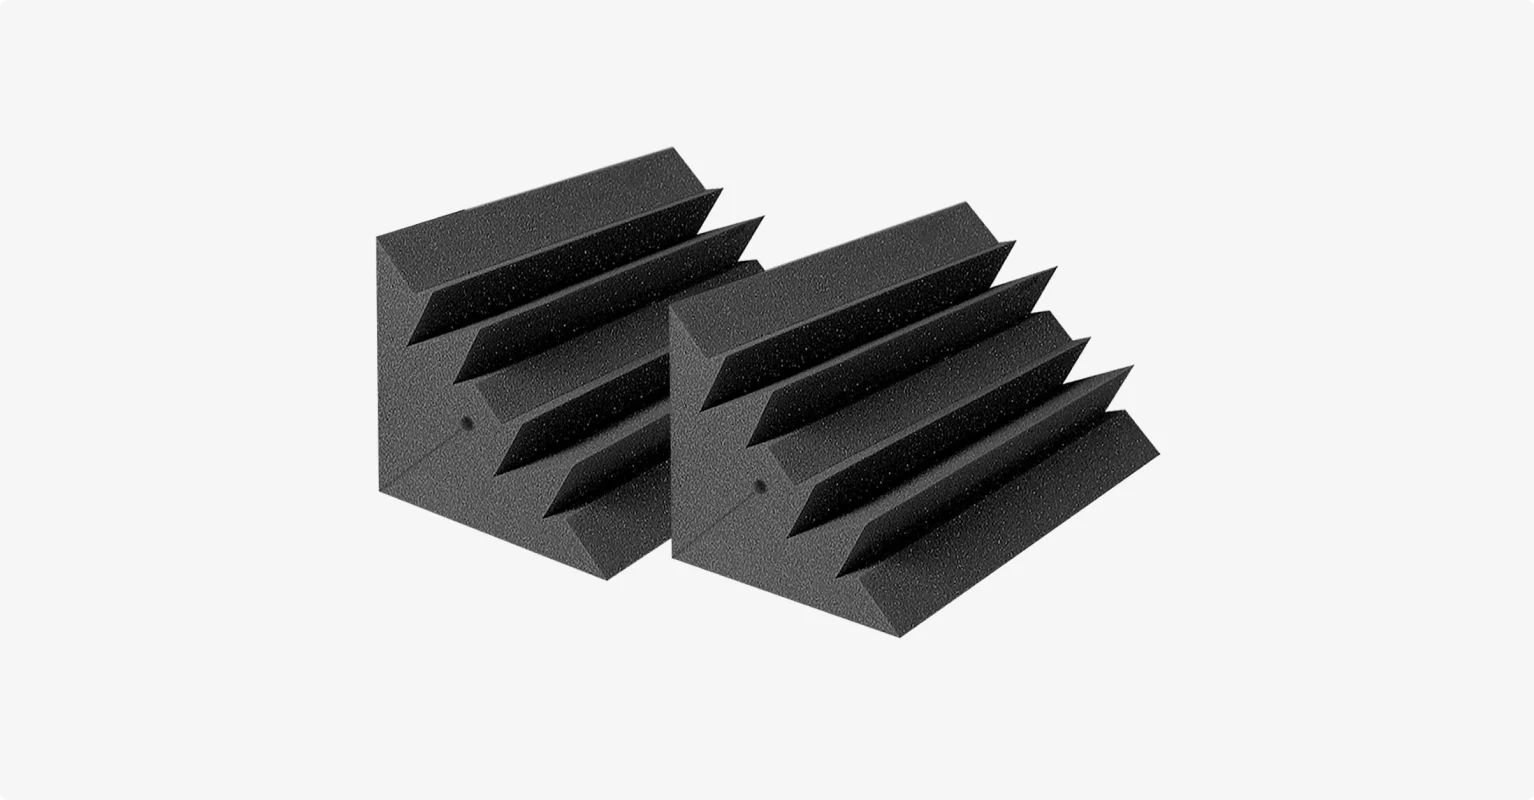
Bass Traps
Bass traps are placed in the corners of a room where low-frequency sounds tend to accumulate. They are thick enough to absorb them.
Auralex LENRD Bass Traps: $191.99 (4 pack)
Diffusers
According to some schools of thought, absorption works best if you also include diffusers that hang from the ceiling. Diffusers scatter reflected sound, preserving the natural tone and creating a sense of liveness. Others would argue that they aren’t strictly necessary for a home studio setup or a spoken-word podcast.
T’Fusor 3D Sound Diffuser: $37.99 (single)
Budget-friendly DIY sound treatment
If you have no budget to sound treat your studio, here are some surprisingly effective DIY solutions:
- Vertical sound treatment: Cover as much bare wall space as you can with soft materials. Heavy curtains work best, but thick blankets or duvets hung on curtain rods (or even nails) can do the job. A bookshelf filled with books doubles as a natural diffuser and absorber.
- Horizontal sound treatment: Fill the space with soft furniture. Couches, upholstered chairs, pillows, and area rugs all help soak up sound reflections. The more soft surfaces will cover the floor, the cleaner your audio will be.
Step-by-step sound treating your home recording studio:
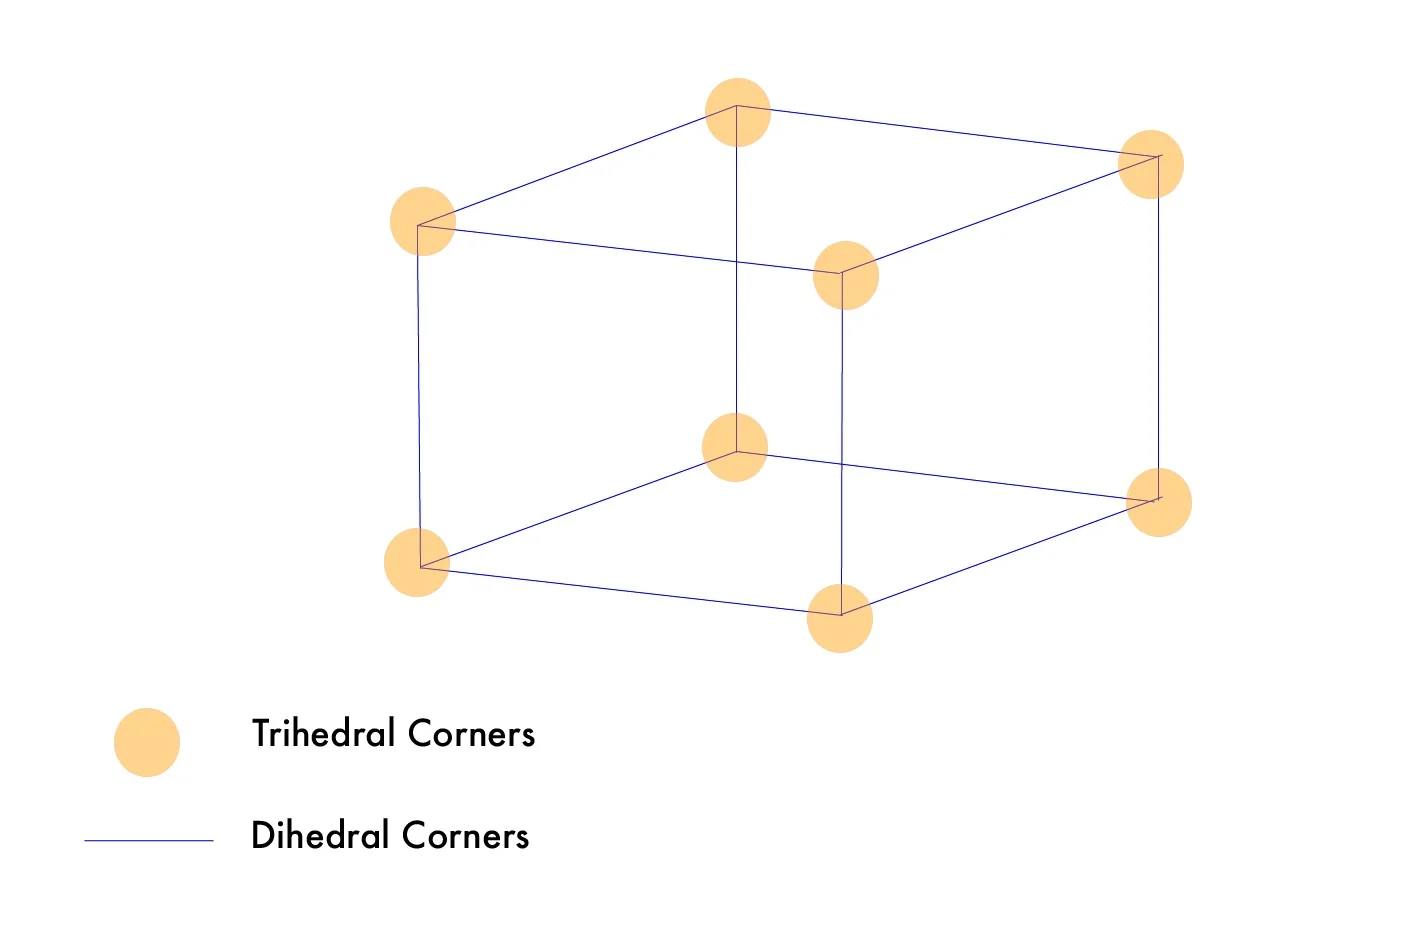
- Place the bass traps in the trihedral corners (see picture).
- Place the acoustic panels across the dihedral corners (see picture).
- Place the other acoustic panels on the walls and space evenly around the room, especially on the walls directly facing your microphone.
- If you do choose to purchase diffusers, mount them high on the wall or near the ceiling to break up sound waves without deadening the room too much.
The Ideal Podcast Studio Equipment List
#1 Computer or laptop
If you’re on a budget, or you’re happy with what you have, stick with it. But if you have a bigger budget and are ready to spend, invest in a more up to date model.
- You’re looking for a reliable computer with a fast processing speed and a good amount of storage. This is because the audio (and possibly video) files you’ll be recording will be large.
- The Digital Audio Workspace (DAW) you choose may influence the type of computer you need. For example, Logic Pro X is only available for Macs.
Budget:
- Stick with what you have!
- Asus VivoBook - $348
Mid-Range:
Professional:
#2 Digital Audio Workspace / Audio Interface Combo
DAW is the software you use to record, edit and mix the audio on your computer. It is essentially recording and editing software which you use to fine-tune your audio, edit out mistakes and any awkward silences.
Budget:
- Audacity - a free, open-source DAW which works with all operating systems, although does not have the option for multi-track recording.
- Garageband - included free with all Apple computers.
Mid-Range:
- Reaper - lightweight and affordable DAW at a $60 (discounted) one-time license fee. (For professional licenses it is $225)
- Hindenburg Journalist - designed specifically for podcasts, interviews and radio. $99 for the basic version. Note: multitrack recording is only available in the pro-version.
Professional:
- Logic Pro X - available only for Macs. Arguably slightly overkill for podcast productions. $199
- Adobe Audition - $20.99/month
- Hindenburg Journalist Pro - Multitrack recording, and enhanced editing capabilities. $399.
Remote Friendly & Professional:
It looks like remote working is here to stay, which is no bad thing if you’ve got a podcast recording studio at home. Plus, in the podcasting world, this has opened up an endless world of opportunities to work with international guests.
That’s where Riverside comes in - a browser-based software, Riverside locally records each of your participants and progressively uploads the recording to the cloud. That means you get studio-quality recordings of each and every one of you - no internet interference - and no risk of losing your data.
.webp)
All you need is a computer and a microphone, and you’re good to go. You won't even need a podcast editing software for post-production due to the platform's editor. With one click, you can automatically stitch together the locally recorded, separate tracks that Riverside gives you.
For a professional recording studio right at home, start recording with Riverside today!

#3 Microphones
There are two types of microphones: dynamic and condenser, and two types of connectors: XLR and USB. All of these have their potential advantages and disadvantages. With the wide range now available, price is not always directly correlated to the quality of the microphone.
Dynamic Microphones
Dynamic Mics are often the best choice for home studio podcast mic setups because they pick up less ambient noise and are often more affordable. They are also more durable and can handle high volumes without distortion.
Condenser Microphones
Condenser Mics are more sensitive to ambient noise - not so good if your home studio is not completely soundproofed. However, this heightened sensitivity delivers top-tier audio quality and the ability to record crisp and detailed sounds.
Which microphone is better for podcasting?
The reason for the difference in capability and suitability between the two types is the size and weight of the diaphragm: condenser mics have a small and light diaphragm, whereas dynamic mics have a weightier one. Heavier diaphragms tend to be sturdier and more resistant to moisture meaning they last longer.
It’s actually hard to say definitively which type of mic is better. It mostly comes down to personal preference, budget, and finding one that works for you. However, dynamic mics are often designed with hosting, general voice recording, and interview settings in mind.
Related article: Choosing a Podcast Microphone
USB Microphones
USB microphones connect directly to your computer, meaning they are extremely easy to use. For this reason, USB mics are increasingly popular for home studio settings. Note that USB mics are usually condenser mics.
XLR Microphones
XLR microphones have to be connected to a mixer which is connected to your computer. This means you need more equipment on hand. These are often the best option when you have multiple hosts or guests because you are able to toggle audio levels directly during the recording using the mixer.
Budget
- Samson Q2U -$126, XLR/USB, meaning it is versatile. Comes as a pack with microphone accessories.
- Sontronics Podcast Pro -$119, XLR, Dynamic
- Blue Yeti USB Microphone - $132, USB connection, Condenser
Mid-Range
- Rode NT-USB - $165, USB, Condenser
- Audio Technica AT2035PK - $199, XLR, Condenser
Professional
- Rode Procaster - $229, XLR, Dynamic
- Shure MV7 - $249, USB, XLR, Dynamic
- Shure SM7B - $439, XLR, Dynamic
- Earthworks Ethos - $399, XLR, Condenser
#4 Audio Interface
This is the hardware that connects your computer to your equipment. If you choose an XLR microphone you’ll need one of these to digitalize the analog input. You may also want an audio interface with at least two XLR inputs in case you want to connect more than just one mic.
Important note: If you’ve got a USB microphone you don’t need one.
Budget
- PreSonus AudioBox USB 96 - 2 XLR inputs, $99.99

Midrange
- Rode AI - 1 USB - 1 XLR input - $122
Professional
- Zoom PodTrak P4 - 4 XLR inputs, $199.99
The Zoom PodTrak P4 is podcast-specific and also doubles up as a USB audio interface. You can record up to four local participants and remote guests.
#5 Audio Mixers
Mixers are an audio board which can send and receive multiple audio inputs. Mixers allow you to alter the audio of each individual input.
Tip: Look out for a mix-minus feature, this means you can split your audio signals into two separate channels, one for you and one for your guest. This gives you total control over your individual tracks.
Budget:
Don’t skimp on a mixer, if you really can’t squeeze your budget any further, don’t get one at all.
Mid-Range
- Zoom PodTrak P4 - $199.99 - As we said above, this versatile product is an audio interface and mixer all-in-one.
- Yamaha MG10 XU - $212
Professional
Need more information? Watch the video below to learn whether you should buy an Audio Interface or Audio Mixer
#6 Headphones
Headphones allow you to monitor your audio closely whilst also canceling out any interfering background noise.
There are two types of headphones: closed back and open back.
- Closed Back Headphones - optimal isolation with lesser sound quality. These are the preferable option for podcasters because they have minimal sound leakage.
- Open Back Headphones - optimal sound quality with lesser isolation
What to look for in a pair of headphones:
- Comfort: You’ll be spending hours wearing these headphones, so you’ll definitely want them to be comfortable.
- Sound isolation: Your headphones should block out external noise. To note: some active noise cancellation headphones capture outside noise and invert it inward to cancel it out. This can leave you with distorted compressed audio - not ideal for editing.
- Frequency response: This makes a big difference in how your audio sounds when you’re listening back.
- Wired or Wireless: This is down to personal preference. If you often find yourself wandering around your home studio, you should probably opt for wireless headphones to avoid tripping yourself up!
Budget:
- Skullcandy Grin Wireless - $55 - closed back
- LyxPro HAS-10 - $55 - closed back
Mid-Range:
- Sony MDR7506 - $108 - closed back
- Sennheiser HD280 Pro - $112 - closed back
- Audio Technica ATH-M50x - $149 - closed back
Professional:
- DT 770 Pro - $159 - closed back
- Bose QuietComfort 35- $179 - closed back
#7 Cables
You can never have enough extension cables. Make sure not to skimp on cables for your home studio, cheaper cables can seriously compromise your audio quality.
XLR Cables:
- Mogami Silver - $39
USB Cable:
- AudioQuest Pearl - $24
#8 A Mic Stand
You may think that once you’ve got the rest of your equipment a mic stand is one of the items you can overlook. Don’t be mistaken! A mic stand holds your microphone in place and ensures it doesn’t pick up vibrations, knocks, and bumps.
Rode DS1 Desktop Micstand- $26
#9 A Camera
If you're recording an audio-only podcast, a camera is not required, but with an increasing popularity of video podcasts, we suggest you jump on the trend. If you're recording video, you can use a webcam, a dedicated DSLR or even your phone. It all depends on your budget and your needs, but we do recommend using a camera that can at least capture 1080p HD quality.
Some great options are:
- Sony ZV E10
- Lumix S5
This video covers more on creating a video podcast setup:
Some (nice but not necessarily essential) extras:
Boom arm
A boom arm can free up a lot of space on your desk, and honestly? It looks and feels much more professional. Because your mic is suspended, you can get that perfect mic placement easily, meaning your voice will sound its best.
It’ll also work to reduce any handling noise, vibrations, and knocks that your mic will inevitably pick up.
- Rode PSA1 - $99
Desk Work Station with a good chair
You may end up spending a lot of time editing in your home studio, so taking care of your back and your comfort is essential! If you’re on a tight budget, repurpose some of the furniture you already own. However, if you have the extra dollar, we’d recommend investing in an ergonomic chair.
- SIHOO Ergonomic Home Office Chair - $309
Shock mount
A shock mount is essentially a cradle for your microphone. It further protects your mic from vibrations, so if, for example, a heavy vehicle goes by the noise interference and disturbance will be minimized.
- Rode PSM1 - $41
A pop filter
A pop filter helps to reduce popping sounds like p’s or t’s - thus minimizing the risk of audio peaking and distorting. It can also help stop spit hitting your microphone.
Pop filters clip right onto your microphone, they’re very easy to use, affordable, and highly effective.
- Nady MPF-6 - $24.95
Ear training software
This may sound like overkill, but never underestimate the value of being able to intricately discern sounds. Train your ears, so you can level up as a sound engineer and get your audio sounding the best.
- Tenuto - $3.99 on the App Store
Reflection Filter
If acoustic foam tiles are too expensive, a reflection filter can do a good job instead. A reflection filter is a semi-circle absorption panel that attaches to your mic and wraps around it, essentially doing what acoustic foam would to your home studio.
Headphone amp
If you’ve got multiple hosts, you might want to invest in a headphone amp. This allows you to plug in multiple headphones and give everyone control over their own headphone volume
- HeadAmp4 - $73
Some tips to make up for what you don’t have:
Close miking. Without getting too close, placing the mic close to the source of the sound (i.e. your mouth) can increase the portion of sound reaching your microphone, thus decreasing reflected sound
Household Absorbers. Think pillows, blankets, sofas, clothes, mattresses. These can work just as well as specialist absorbers. Many swear by mattresses as the ultimate DIY method of recording vocals.
Top tip: use a heavy solid core mattress, not light inner-spring mattresses for the best podcast setup results.
How to set up your podcast studio:
Step 1. Prepare the room
Clear the room and its walls, take everything out, make sure to remove anything that vibrates.
Step 2. Sound Proof (as far as possible).
Soundproofing is a massive endeavor, which requires a huge investment of energy, time, and money. A lot of home studio setups give it a miss entirely.
There are four ways to soundproof your room:
- Add Mass or Density. This increases the amount of material within your space, which means the walls don’t vibrate as much. You can use materials like mass loaded vinyl.
- Damping - this helps dissipate and slow the vibrations. You can use Green Glue.
- Decouple - this stops sound vibrations from transferring between objects. You can do this by building a floating floor or building double walls for example.
- Filling Air Gaps using Green Glue and Foam Gaskets.
Step 3. Sound Treat the Room
How to Sound Treat your Home Recording Studio:
- Place the bass traps in the trihedral corners.
- Place the acoustic panels across the dihedral corners.
- Evenly place the acoustic panels across the walls.
- If you do choose to purchase diffusers, place them towards the ceiling or the upper part of the wall.

Step 4. Consider your equipment setup and format
- This will vary greatly depending on personal preference, the shape and size of your room, and the equipment you’ve chosen.
- Make sure to consider signal flow, it’s essential to understand how all your equipment fits to form a single working system and to accommodate for this in your home studio setup.
Start Recording!
And just like that, you’ve got your very own home podcast studio setup! Congratulations. We’re confident that a home recording studio is a long-term and fail-safe investment for all podcasters - your recording environment is greatly improved and you’ll get studio quality every time. It’s a win-win.


