.webp)


Key takeaways:
- Podcast editing starts with trimming your recording, cutting it into segments, and then creating a seamless narrative.
- Next is sound design, where you’ll add music, your intro and outro, and other sound effects.
- Touch up your audio with filters and effects so it sounds clear. Remove background noise and level out your audio volume.
- If you’re editing a video podcast, end off with captions, layouts, and a custom background.
The Tim Ferriss Show, How I Built This, The Daily … What do these podcasts have in common? Quality podcast editing.
I’m Stephen Robles, host of Primary Technology podcast, and I’ve been creating and editing podcasts professionally for over 15 years. My YouTube channel has nearly 200,000 subscribers, and my latest podcast gets about 15K downloads per month.
In this blog, I’ll teach you how to edit podcasts from start to end. We’ll cover trimming, sound design, mixing, and mastering.
Let’s get started.
What is podcast editing?
Podcast editing is the process of cutting, arranging, and turning your raw recordings into a focused, engaging episode. Your main goal is to hold the audience’s attention by removing distractions without losing the natural flow of the conversation.
Good editing starts by removing unwanted material and arranging the strongest moments into a clear narrative. From there, mixing balances and processes the audio tracks, and mastering prepares the final mix for consistent playback. Lastly, video editing refines elements such as layouts, captions, overlays, and B-roll.
What good podcast editing actually sounds like
The best podcast editing should feel almost invisible. Listeners should never notice your cuts and feel completely engaged in the story.
Here’s a quick summary of my best insights into good podcast editing:
- Put the story first: Every edit must serve the narrative and improve clarity without making the conversation feel artificial.
- Don’t over-edit: Make every cut sound natural. Conversations need emotional pauses and short silences to feel human.
- Match the pacing to the format: I use a balanced pace for full podcast episodes but remove more silence from short-form clips to keep the energy high.
- Preview your edits: Listen back after removing a mistake or pause. A small imperfection like a sigh usually sounds better than a clean cut that creates an abrupt jump.
- Fix problems before you record: I always wear wired headphones in the studio to prevent echo. If someone mispeaks during the show, I tap the "M" key to drop a marker and know where to edit without having to search later.
- Leave hints for your future self: I usually end episodes with the same phrase, such as “see you next week.” Searching for a phrase that signals the end of a chapter or the episode in the transcript will make it easier to find that endpoint during editing.
Choosing your podcast editing workflow
How you should edit your podcast episode depends on how hands-on you want to be.
You don't have to pick just one method. I often combine workflows, using AI tools for a fast first pass, then jumping in manually for fine tweaks.
Here is how the primary editing options compare:
- Manual editing: You usually work with a waveform or multitrack timeline in a digital audio workstation (DAW) such as Audacity or Adobe Audition. You trim, clean, and arrange the audio and video yourself. This gives you full control, but can take several hours per episode.
- AI-assisted editing: Use automated AI features to handle repetitive first-pass tasks like cutting filler words, audio clean up, and adjusting color balance. This can save a lot of time, but you should always review the results.
- Text-based editing: You delete a sentence in the transcript, and the corresponding audio and video gets cut. It’s a very efficient method for interviews and solo shows, but I always couple it with a timeline editor for precise cuts.
- Chat-based editing: Create a fully polished edit just by giving instructions to your AI chat-based editor. You tell the AI agent what you want, like shortening an interview, and it handles the edits for you. This works best if you want speed or you’re new to editing, but you won’t have as much control over fine details.
- Hire a professional editor: A professional editor may be worth the investment if you want to fully focus on the creative rather than technical aspects of your show. This will provide the highest quality result, but it comes at a cost.
My personal workflow: I use the Apple Pencil on an iPad during the recording to cut away mistakes with waveform editing. I also apply some cuts in post-production with text-based editing, especially to get rid of long tangents. Then I let AI do a first pass audio and video cleaning before switching to manual editing, usually in Final Cut Pro to maintain precise control over multi-cam switching.
Pro tip: Riverside gives you manual control but also provides chat-based editing and several AI tools to make editing faster and easier.
How to edit a podcast step by step
Editing a podcast can be divided into 3 stages: the basics, sound editing, and video editing.
Here’s the full step-by-step to editing your podcast:
Free checklist: Download our free podcast editing checklist to follow along while you edit.
Stage 1: Podcast editing basics
The first steps to editing your podcast involve slicing your recording and arranging it in a way that creates a compelling story for your listeners.
1. Define the length of your podcast episodes
Before you start making any edits, have a clear idea of how long each episode will be.
Free guide: Download this Riverside community guide on how to plan your podcast episodes.
Podcast episodes can be anywhere from 15 to 60 minutes in length. According to Riverside’s internal data, the average finished, edited podcast episode is about 37 minutes long.
If you're just starting out, 20-30 minutes is probably enough. This gives you time to convey a full narrative, but reduces the risk of listener dropoff.
Read more: How Long Should a Podcast Be?
2. Cut your podcast and sequence it
Besides just reducing length, your goal is to sharpen your episode’s focus.
So, how do you edit with intention?
As you cut, keep asking: Does this add to the story I’m trying to tell?
For example, if you’re interviewing someone from the movie industry, focus on what your audience came to hear. Keep sections that explain how they broke into entertainment, behind-the-scenes stories, celebrity run-ins, and so on. Cut out off-topic tangents that detract from these powerful moments or anything that dilutes the narrative.
My best advice is to use markers while recording to flag important moments you’ll want to keep (or cut) later. If I find a funny, surprising, or especially engaging moment later in the conversation, I may copy it to the beginning as a cold open. It gives the audience a reason to keep listening before the actual introduction begins.
3. Timeline editing vs. Text-based editing vs. Chat-based editing
Now that you’ve planned what to cut and what to keep, it’s time to start trimming .
There are 3 main ways to edit: visually via a timeline, by editing the text transcript, or by chatting with an AI agent.
Timeline editing

Timeline editing is the more traditional way to edit a video.
On most editors, to trim a section:
- Move the cursor to the outer edges of your timeline, then click and drag the arrow to shorten it.
- Use the “Split” tool to create a cut: place the playhead at your cut point, click “Split,” then select the clip and delete or move it.
Pro tip: With Riverside, your timeline is color-coded by speaker and includes automatic chapters to help you navigate quickly.
Text-based editing

Text-based editing lets you edit your podcast by deleting words in the interview transcript. Simply highlight and delete the text you don’t want, and the audio and video will go right along with it.
Software using text-based editing automatically transcribes all recordings and displays the transcript, so you can start cutting straight away. It’s a massive time-saver, and I love using it when I need a fast turnaround.
However, make sure to listen back after removing a word or section. If the edit clips the beginning of the next word or interrupts a breath, it may create an abrupt jump that you’ll need to smooth out using the timeline editor.
Read more: Check our guide on how to edit video with text.
Chat-based editing
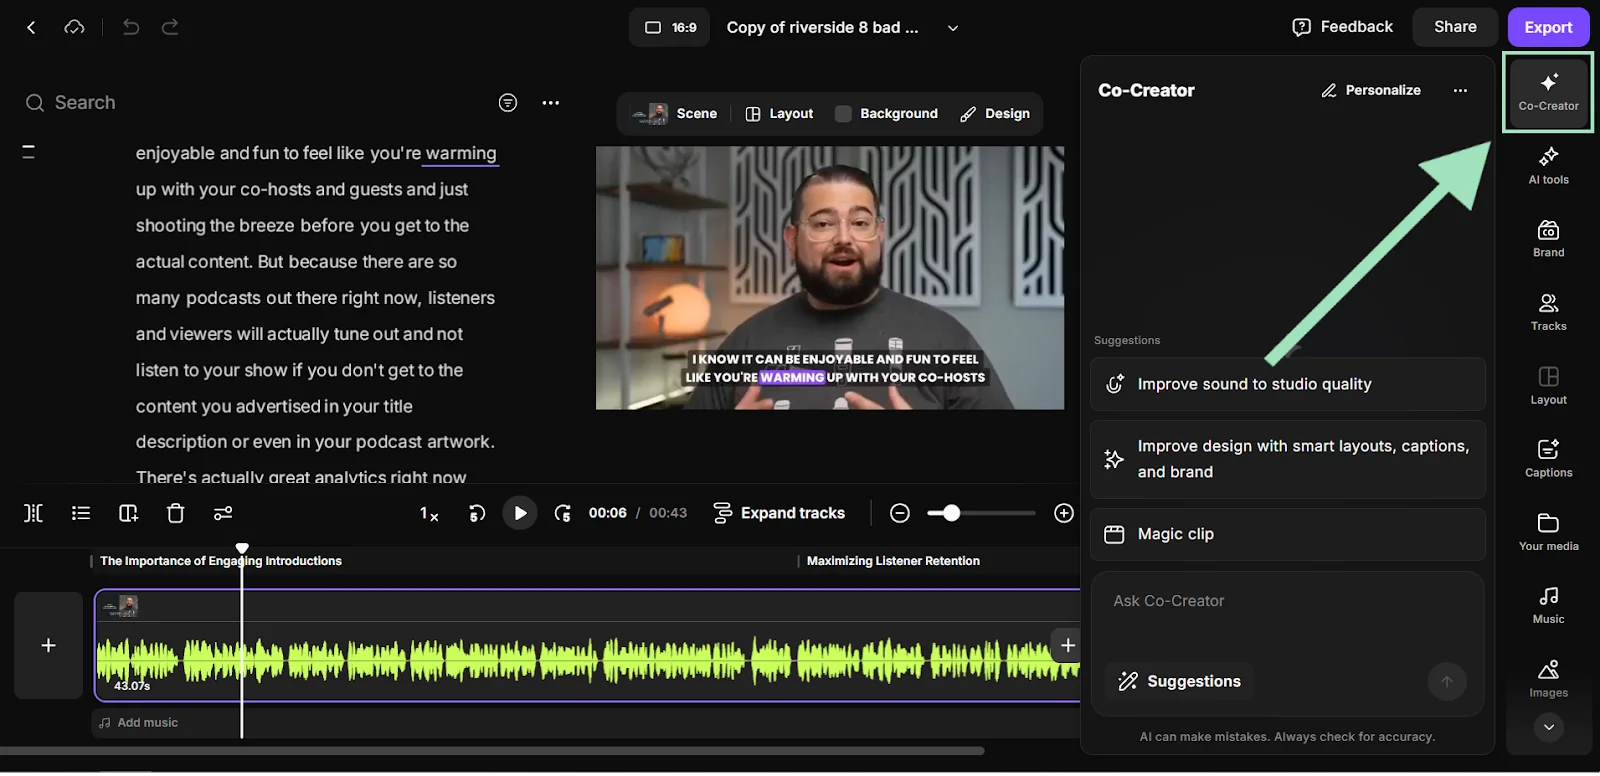
Chat-based editing is the most straightforward option. You edit your podcast by simply prompting an AI agent. You can ask it to trim your video to the desired length or highlight the parts you care about.
For example:
“Trim this episode to 25 minutes. Keep the strongest answers from the interview, remove long pauses and filler words, and cut the off-topic chat at the beginning. Make sure the intro gets straight to the main topic.”
There aren’t many editors that offer chat-based editing yet. But you can try Riverside’s Co-creator to give this editing method a try. It can also generate social media clips, thumbnails, and other repurposed assets for your podcast.
4. Set the pacing
Once you’re done cutting the episode, it’s time to edit out any remaining “noise” from the good parts that you decided to keep.
Make sure your edit fits the pacing of your format. An interview needs room for guests to think and react, while a short promotional clip usually benefits from tighter cuts.
Do not automatically remove every filler word and breath, though. Some pauses communicate uncertainty or emotion, and cutting them can make a natural-sounding conversation feel robotic.
You should cut:
- Unnecessary words (like redundant or rambling phrases)
- Transition words (like you know, so, I mean)
- Mistakes or awkward moments (like sneezing, or loud background noises)
- Filler pauses (like um, er)
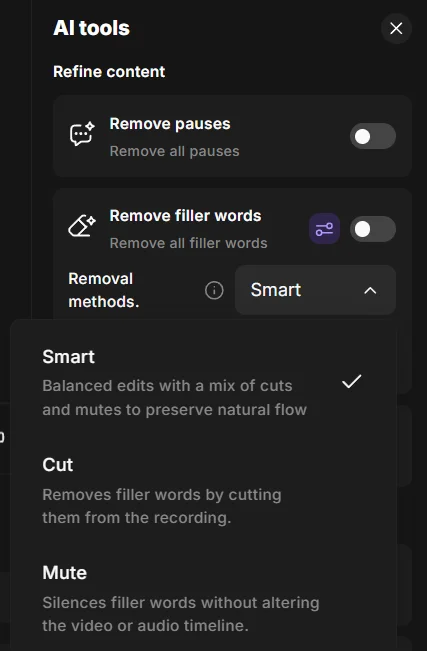
Pacing is where I love employing AI-assisted editing the most. For example, Riverside’s AI Producer lets me remove silences and filler words with a single click so I can focus on the story.
Stage 2: Sound design and editing
Sound design focuses on using audio elements to elicit emotions and enhance the overall listening experience. For example, using music tracks and sound effects to enhance your podcast.
This area of post-production really takes some practice. Part of it is personal taste, and another part involves understanding your audience and the content they want.
1. Cleaning up audio
Audio editing can get very technical, but you probably don’t need to take things too far. I often start with a first-pass AI-assisted audio cleaning, and in many cases, that’s more than sufficient.
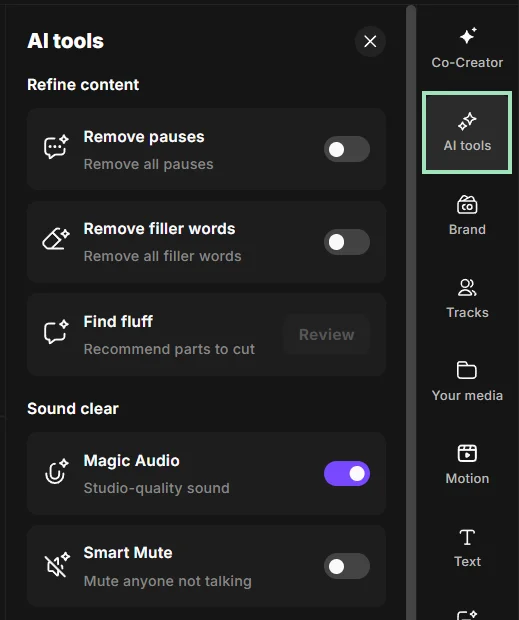
AI-powered features like Riverside's Magic Audio can cut background noise, balance volume levels, and reduce reverb with just a click. This way you can create studio-quality audio for all tracks without the technical hassle and long hours at the computer.
If you prefer chat-based editing, you can simply prompt “clean up audio” and Co-Creator will do everything for you.
On multi-speaker shows, I also mute each participant’s track when they aren’t speaking. This removes distractions such as keyboard sounds or any background noise. If you automate this step, inspect the cuts afterward to make sure reactions and overlapping speech haven’t been clipped.
2. Add music and create intro and outro
Placing podcast music strategically in your show amplifies storytelling by setting the tone, building drama, or helping your audience connect emotionally with your content.
Having a unique podcast intro or outro can also help you leave a lasting effect on your audience and is great for branding.
For example, check out this intro in the Mel Robbins podcast:
Individual music tracks can be added in the timeline editor, then trimmed and dragged to align with your episode. Volume can then be adjusted to add fade-in and fade-out effects.
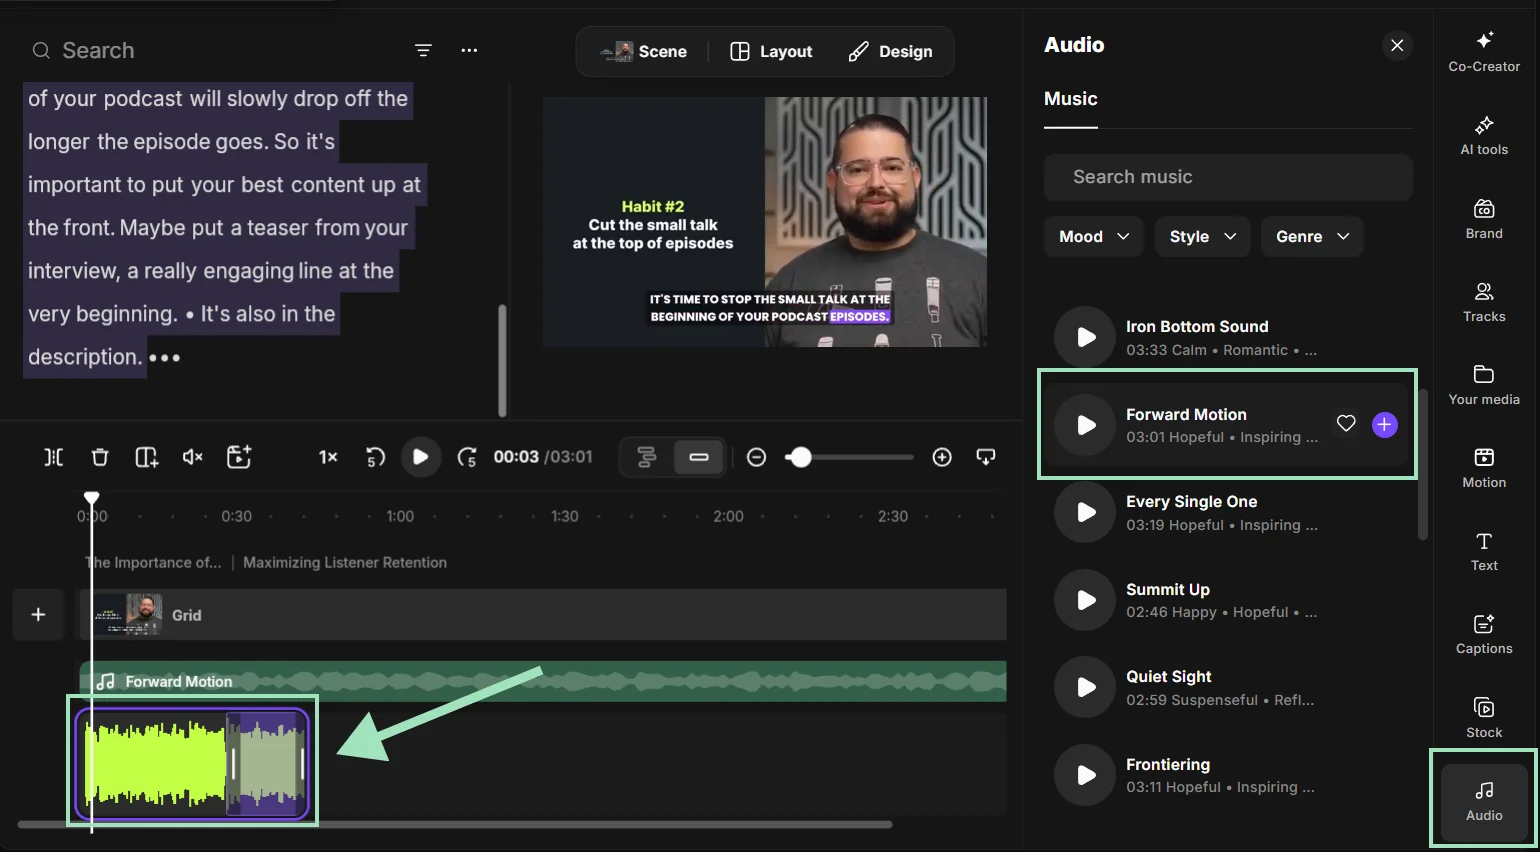
Some chat-based editors like Riverside’s Co-Creator also let you add copyright-free tracks by simply asking them.
For example, you can use this prompt:
“Add a [music genre or name of the individual track] music track at [insert timing] to emphasize when we talk about [topic]”.
This way AI will automatically enhance each moment you speak about a given topic.
You can also prompt AI to “add intro and outro” to start crafting the perfect intro and an outro for your episode.
3. Enhance your podcast with sound effects
Sound effects can spice up your podcast, like adding a “ba dum tss” drum after a joke. But don’t overdo it!
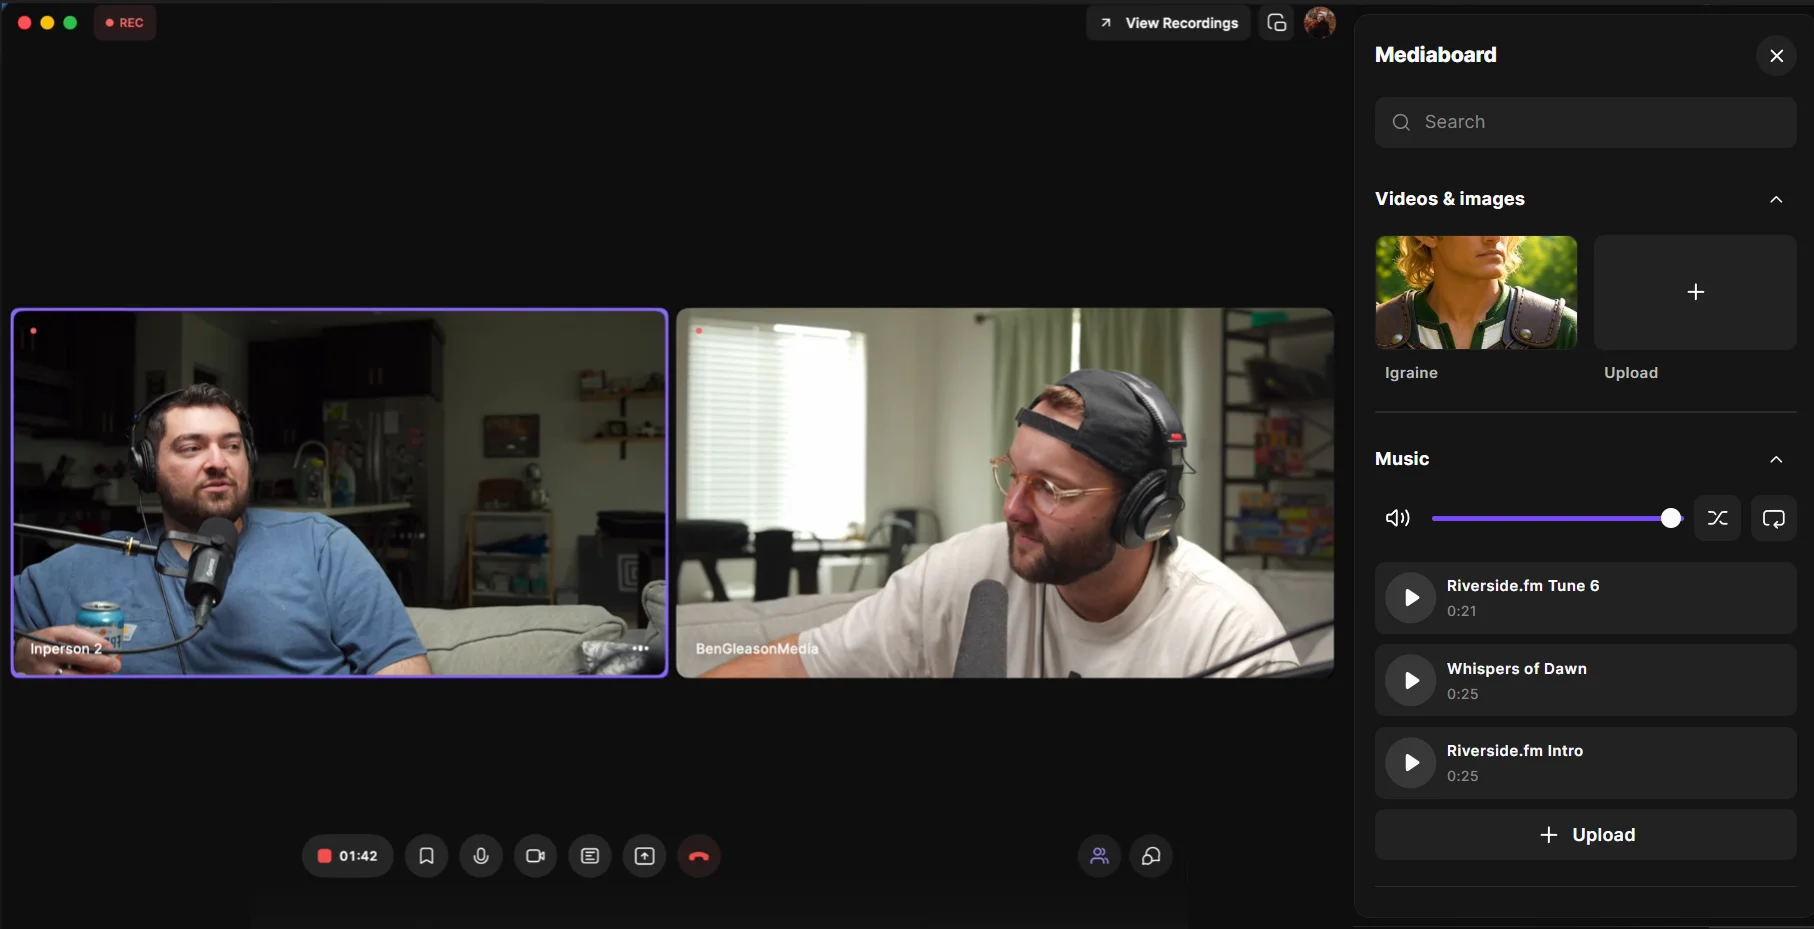
You can also add sound effects live while recording using your software’s Media Board to save time in post-production.
4. Mixing podcast audio
Mixing podcast audio focuses on the technical aspects of sound quality.
During the mixing process, you go through all of your audio tracks and adjust various elements, such EQ, reverb and pitch (more on all of this later).
If you want more control or you're producing a show with higher audio standards, just follow my advice to sound like a pro:
Improve your podcast’s tone using equalization
Equalization (EQ) helps adjust the balance of low, mid, and high frequencies in your audio to make it sound more natural. If you use proper recording techniques, it’s possible you won’t have to make any EQ adjustments at all.
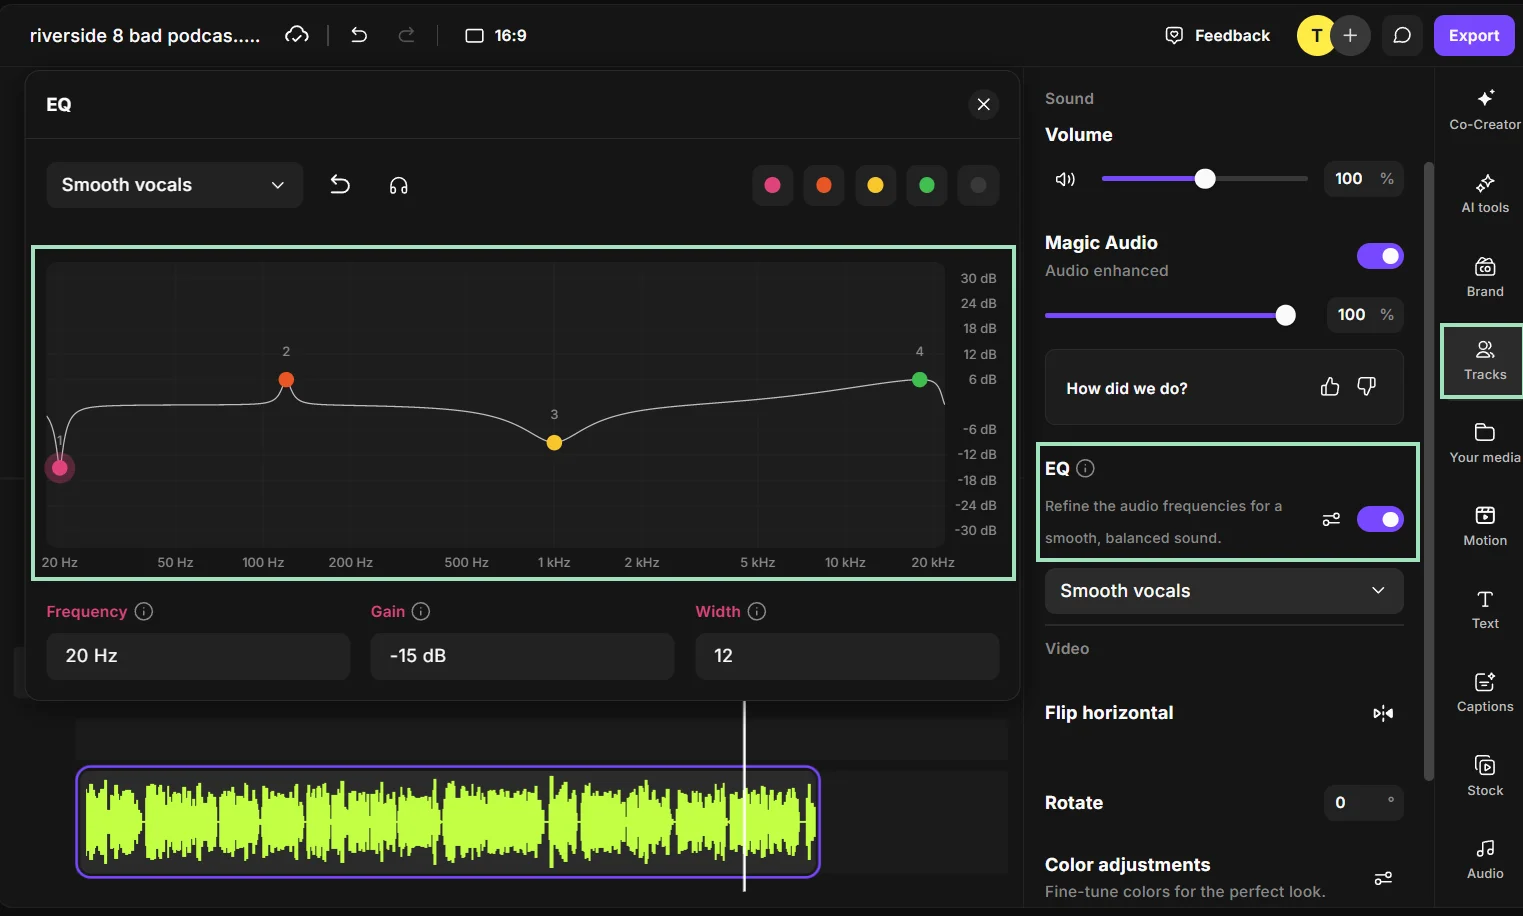
You can use a DAW to balance EQ, if you want to get into the finer details. But, for an easy route, you can choose a preset filter. Riverside’s ones work pretty well, and you can learn more about which filters work best for what issues here.
But overall:
- Use a low-pass filter to remove high-frequency noise. A common cutoff is around 10kHz.
- Use a high-pass filter to cut low-end rumble. A cutoff of 70Hz is a good place to start (human voice rarely goes below 80Hz).
Use a compressor to improve podcast sound
A compressor smooths out volume differences so listeners don’t have to keep turning their volume up or down.
Let’s say you have a guest that speaks quietly compared to your loud co-host. A compressor will equalize the levels between the two speakers so the listener doesn’t have to turn the volume up and down to hear everything comfortably.
Just like EQ, compression is usually a filter or effect you apply. Import your recording into your DAW and then select the appropriate filter.
For example, in Adobe Audition, you’ll find this under “Amplitude and Compression” effects.
Diving into compression is complex and out of the scope of this article. You can learn more in our video on audio effects below:
Use noise reduction to give your podcast clarity
Unless you're recording in a fully sound-treated space, background noise will sneak into your podcast. You can reduce it before you hit record, but editing is where you’ll really clean things up.
Here’s what to focus on:
- Remove background noise: This includes things like traffic, humming appliances, or noisy neighbors.
- Fix reverb (de-verbing): Sound bouncing off walls can make your audio echo. Use a proper recording setup to prevent it. Then reduce any leftover reverb in post-production.
- Tame plosives and sharp “S” sounds: Plosives are the popping sounds made when certain consonants are spoken into a mic. A pop filter and good mic help, but if those sounds still show up, you can smooth them out while editing.
Master and prepare your podcast for distribution
Mastering is all about listening to all of the editing you've done and identifying anything you may have missed. You’ll put the finishing touches on your podcast and polish it up so that it’s ready for distribution.
Make sure your podcast has smooth transitions and the audio tracks blend together. Your show shouldn’t have big, sudden changes in volume from one audio clip to the next.
Read more: Need more info on how to improve your podcast’s sound? Check our guide on how to edit video audio.
Stage 3: Editing a video podcast (optional)
If you’re creating a video podcast, then I suggest taking the following steps to make your show look visually appealing:
Read more: How to Record a Video Podcast, Step by Step
1. Lay out each scene
Decide how your speakers should show up on screen. Go with split-screen, speaker view, or a grid, whatever fits your vibe.
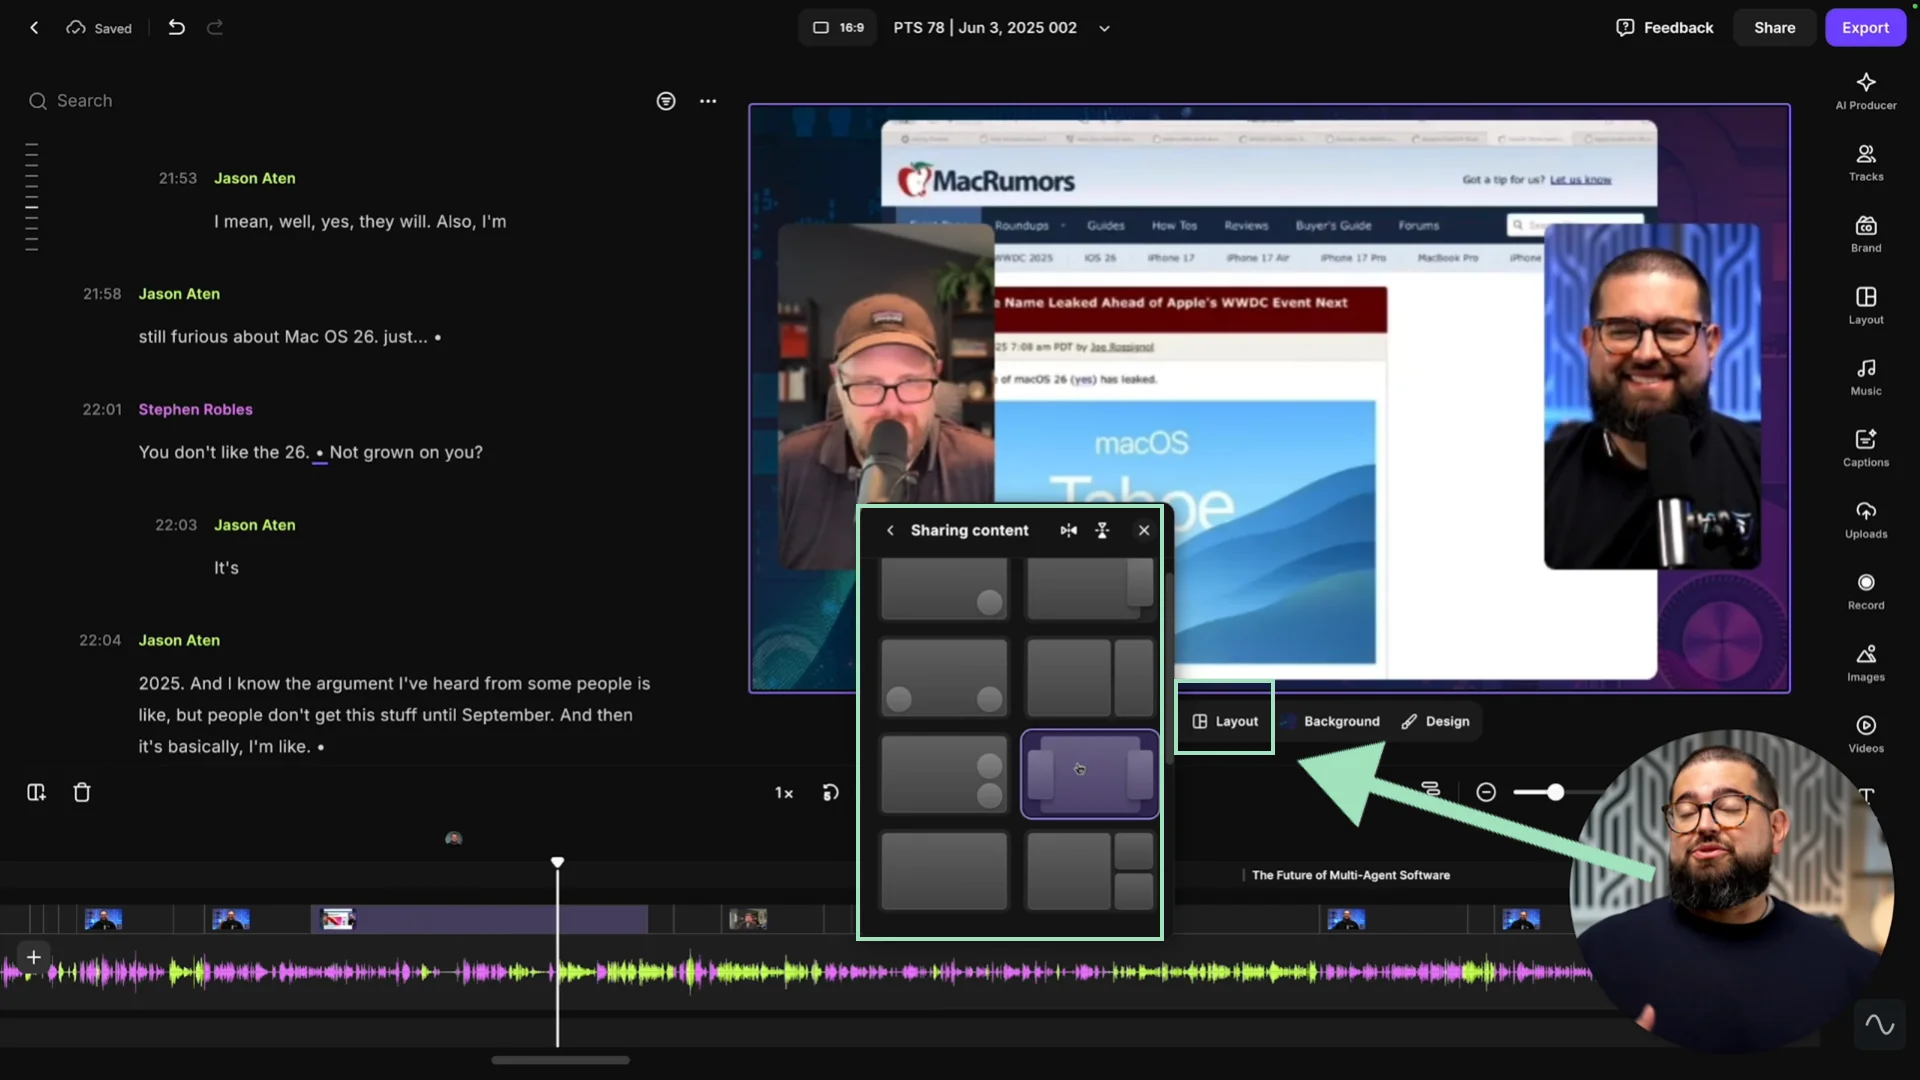
That’s another step of the editing process where I like letting AI help me do the work.
Riverside’s Smart layouts automatically adjust the layout to focus on the speaker for maximum impact. You can even save your scene presets, or choose one of the pre-defined templates to update the layout with a click.
2. Add captions
Captions make your podcast more accessible and increase engagement, especially on social media, where people watch with the sound off. Today, including them is pretty much mandatory if you want to appeal to mainstream audiences.
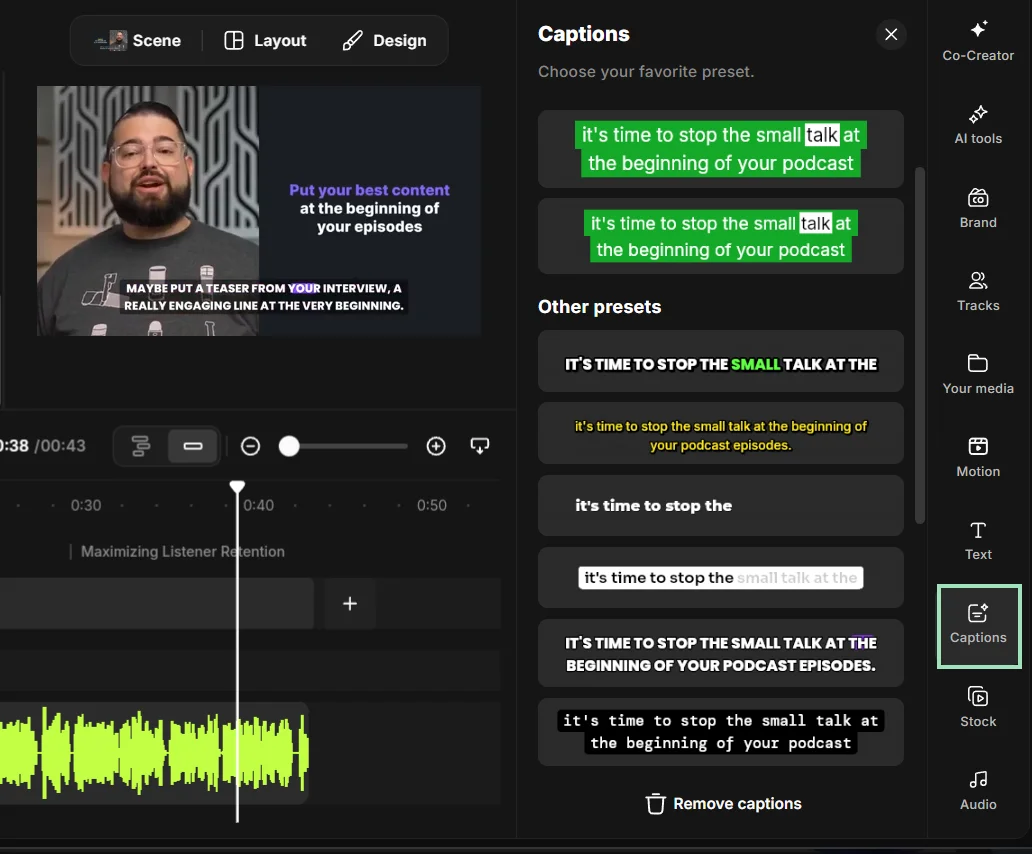
I suggest you style your captions to match your brand. Use animations and highlights to make them pop out and keep viewers hooked.
3. Add branding
Include your podcast logo, branded backgrounds, and consistent fonts or colors across your video. A strong visual identity builds recognition and gives your podcast a professional look.
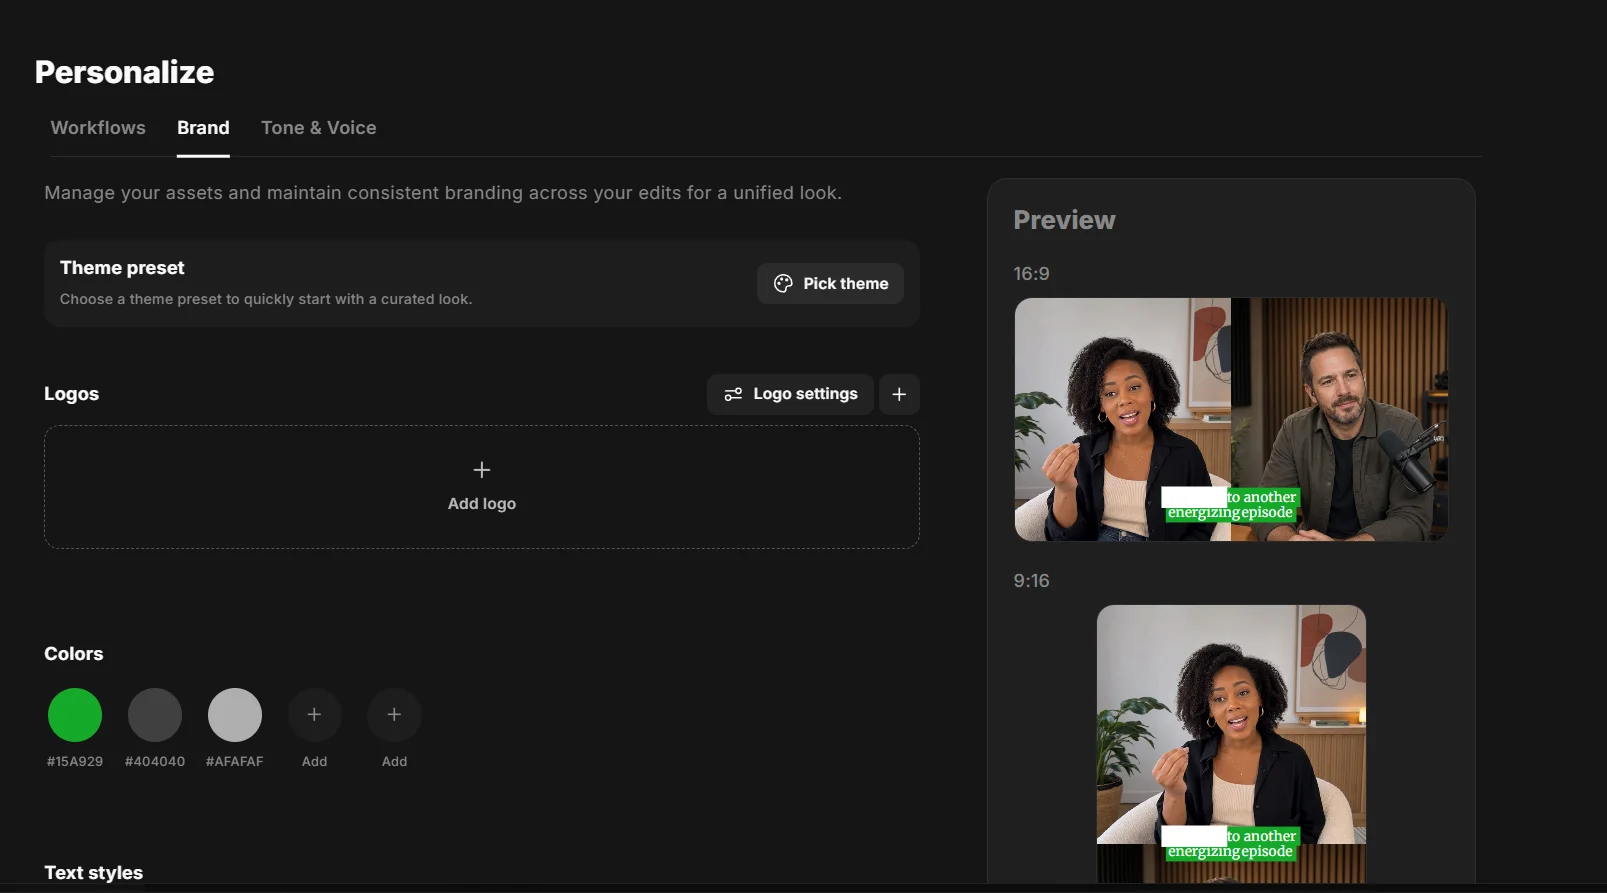
Pro tip: With Co-Creator, just type “Apply my branding kit” to add styled captions, backgrounds, logos, and layouts according to your saved presets.
4. Add video, image, and text overlays
Incorporate B-roll footage, reaction gifs, product demos, or screenshots to illustrate points.
Lower-thirds can introduce speakers or highlight takeaways. You can also drop in contextual text to summarize or emphasize key ideas visually.
This is where chat-based editing truly shines. Instead of spending hours creating complex motion graphics, you can just describe what you need in detail and let AI generate it.
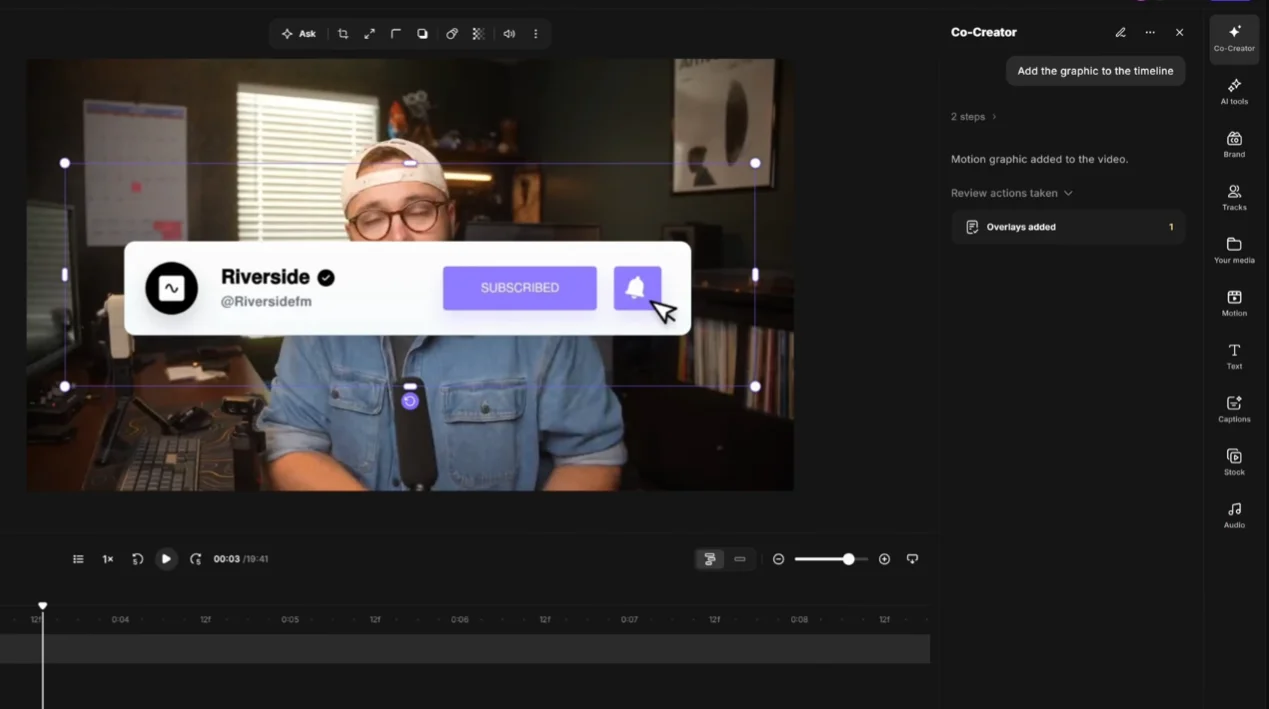
Here are a few example prompts:
- “Add a b-roll showing a woman recording herself with a smartphone when I start talking about [insert a topic].”
- “Generate a clickable, animated CTA using the handle [insert your @handle], my brand kit colors, my profile image, and a link pointing to [insert link]”
- “Add a lower third that introduces my guest with their name [insert name] and profession [insert profession] when they appear on video for the first time. Use my brand kit colors.”
Don’t forget to mute or level B-roll audio so it does not compete with the conversation.
Pro tip: Riverside has a complete library of stock media for your episodes. But you can also create new visual elements by asking Co-Creator to generate them for you.
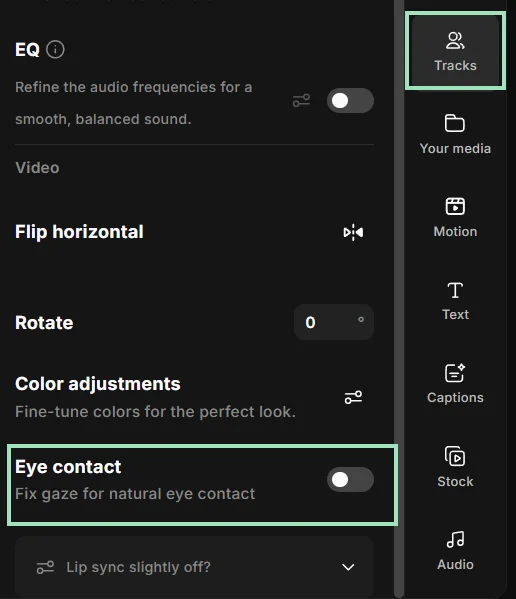
5. Fix eye gaze
Some AI-enhanced editors like Riverside let you fix eye gaze so that you and your guests are all looking into the camera. This is a very useful feature if you don’t want to re-take a shot.
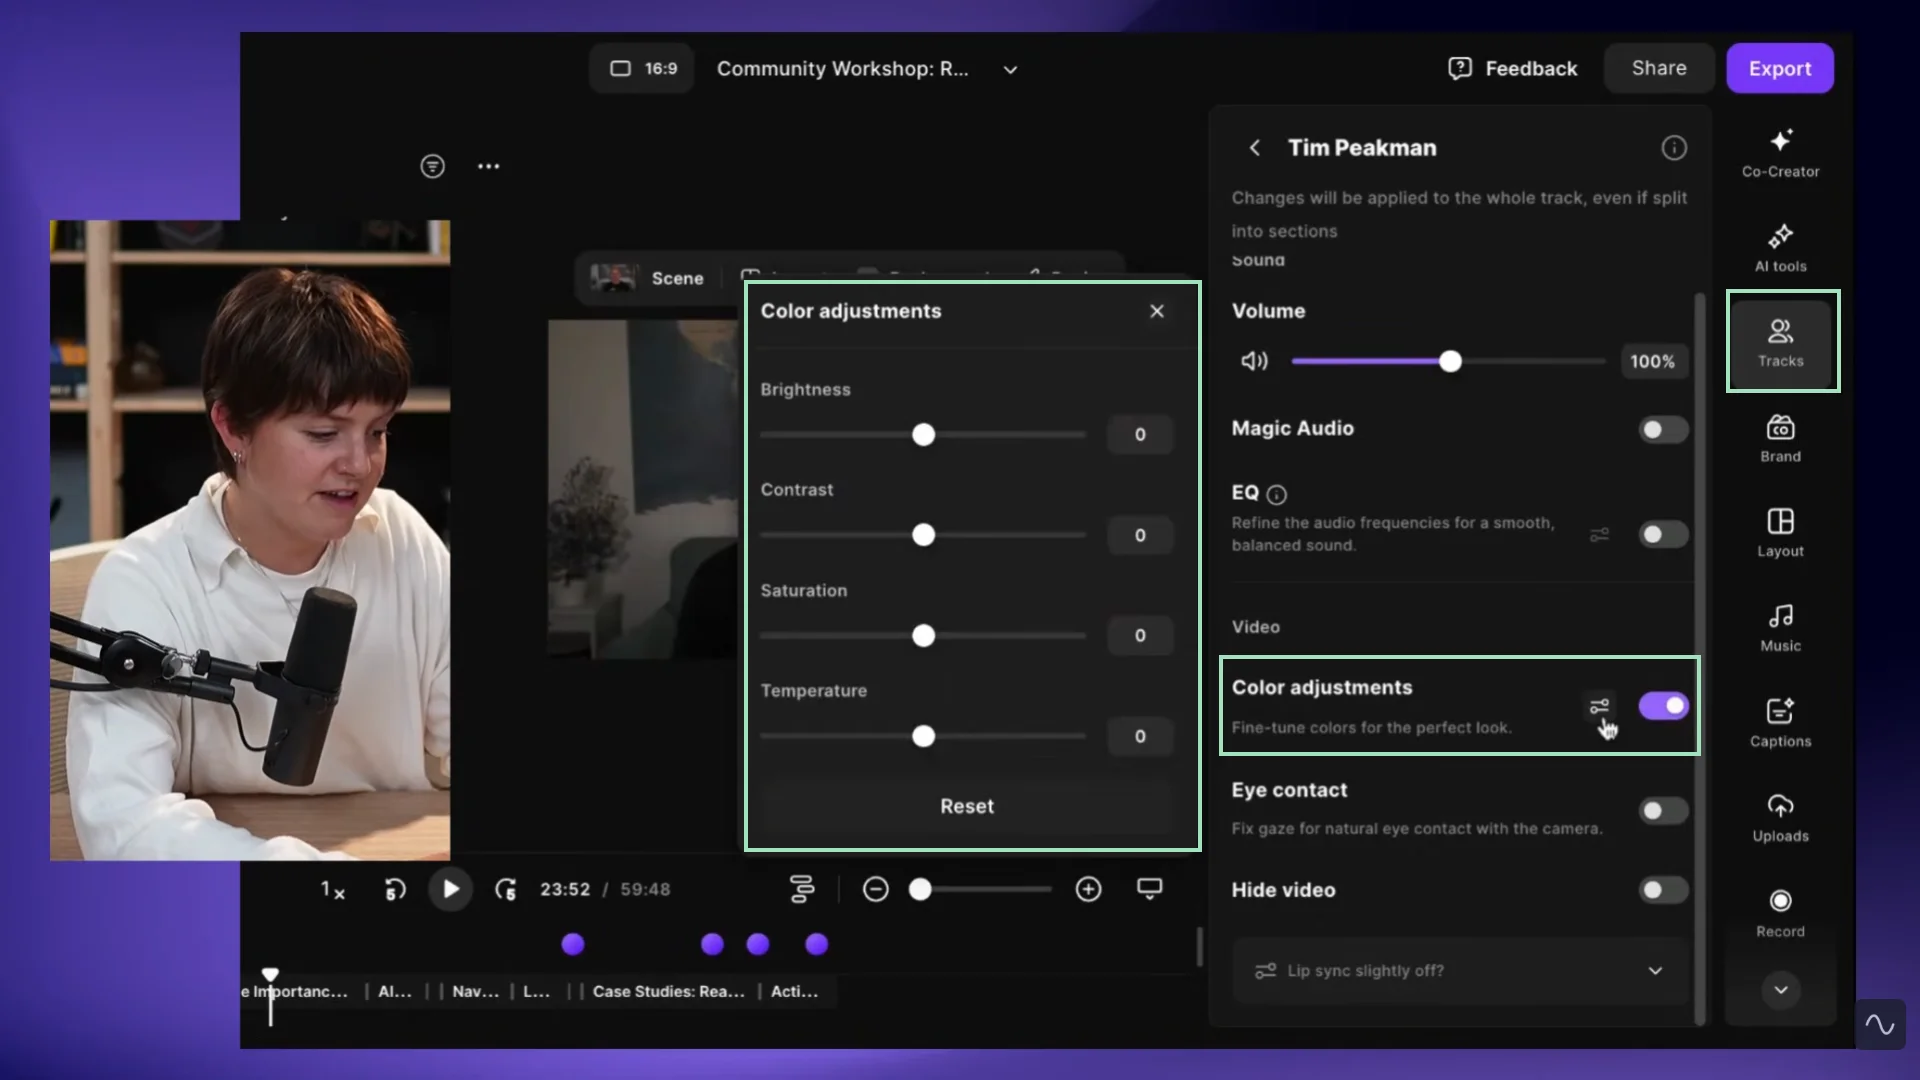
6. Adjust colors
Depending on your guests’ webcams and lighting environments, their video may look too dark or bright, flat, or washed out. A quick color pass could correct these issues.
Start by adjusting the brightness and saturation of each video, so faces look naturally exposed, and skin tones do not appear dull.
Next, make small changes to contrast and temperature to give each shot more depth and color. You want to make sure the shot doesn't look overly yellow or too blue.
Your goal should be consistency, so every speaker looks like they’re recording from the same studio.
How long does it take to edit a podcast?
On average, editing takes about 2 to 5 minutes per minute of audio. So, for a 60-minute episode, expect to spend around 2 to 5 hours editing manually. Video editing might take more, as well as editing a multi-speaker interview where you need to balance separate audio levels.
Editing will take longer when you have:
- Long or unstructured interviews requiring narrative re-sequencing.
- Multiple speakers or overlapping dialogue, especially on single-track recordings.
- Background noise, echo, or inconsistent audio coming from bad room acoustics.
- Heavily produced narrative shows require precision sound design, extensive music or scripted voiceover placements, sound effects, or B-roll.
- Complex video shows with manual multicam switching.
If you’re using AI-powered tools, though, you can cut that time down significantly. Features like automatic audio cleanup can handle leveling, background noise removal, and filler word removal in just a few clicks instead of an hour or two. Text-based editing can wrap up basic trimming in a few minutes, and chat-based AI agents can add video effects, captions, and layouts in minutes.
Just keep in min to review the results for unnatural pacing or cuts that change the speaker’s meaning.
Should you edit a podcast yourself or hire an editor?
Editing your own podcast gives you complete creative control and helps you understand what makes your show work. Hiring an editor saves time and can provide more consistent results, especially when the production becomes too complex to manage alone.
If you are just starting out, I suggest editing your own show as it teaches you how to be a better host. You learn exactly which bad habits to avoid on the microphone. Then, as your show grows and post-production becomes a bottleneck, it may make financial sense to hand the work off to a professional editor.
FAQs on podcast editing
Do you need a DAW for podcast editing?
DAWs are not mandatory for podcast editing, but they can be useful if you need advanced audio engineering since they offer granular control over sound editing.
DAWs are comprehensive audio production platforms that provide pro-level tools, extensive plug-in support, and the ability to do just about anything you can think of with your audio. The downside is that they come with a steep learning curve and have a lot more tools than are needed by most podcasters.
What makes a good podcast edit?
A good podcast edit means your audio and video sound clean and flow naturally. That usually involves cutting out background noise, awkward pauses, or anything off-topic, without making the cuts feel choppy or sudden. If you record with good equipment and reliable recording software, like Riverside, podcast editing becomes a lot easier because you get to start with high-quality audio.
How much do podcast editors charge?
Most freelancers charge an average of $30 to $50 per audio hour. But, prices can reach up to $200 per hour of audio for more experienced editors or more complex edits. Several production agencies also offer professional podcast editing services.
Is podcast editing hard?
Editing a podcast is much easier than it used to be thanks to modern, AI-powered editing software. The best way to keep editing simple is to start with good equipment and high-quality recording software, then run a first pass with AI tools to handle repetitive tasks like audio cleaning and eye gaze fixing.
Can you edit a podcast for free?
Yes, you can edit a podcast for free using free software such as Audacity for manual audio editing or a browser-based editor such as Riverside for text-based and AI-assisted editing. Free plans may limit certain advanced features, but they provide enough functionality to cut, arrange, clean up, and export a basic podcast.
What is the difference between mixing and mastering?
Mixing improves the audio quality in each track, while mastering is a final pass applied to the entire combined track to ensure it’s ready for distribution.
Mixing balances and processes the individual tracks in your podcast. This includes adjusting each speaker’s volume and applying effects such as EQ, compression, and noise reduction.
Mastering happens after the tracks have been mixed. It applies the final adjustments to the complete episode so its loudness and overall sound remain consistent and meets industry standards before publishing.


.webp)
.webp)