(copy)%20(2).webp)


Key takeaways:
- Split-screen videos display two or more clips at once, making them ideal for interviews, reactions, comparisons, and podcast content.
- Riverside is the best option for recording split-screen interviews from scratch because it captures separate, synchronized tracks for each participant.
- Premiere Pro offers the most precise control, while Canva, CapCut, iMovie, Filmora, and Kapwing provide simpler ways to combine existing footage.
- Facebook, TikTok and Instagram have built-in split-screen tools, but they’re mainly designed for short-form reaction videos
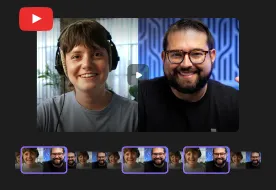
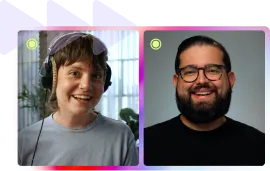
A split-screen video shows two or more clips on screen at the same time, each in its own section of the frame. For example, here’s how I use a split-screen layout on my podcast, Primary Technology, to show me and my co-host at the same time.
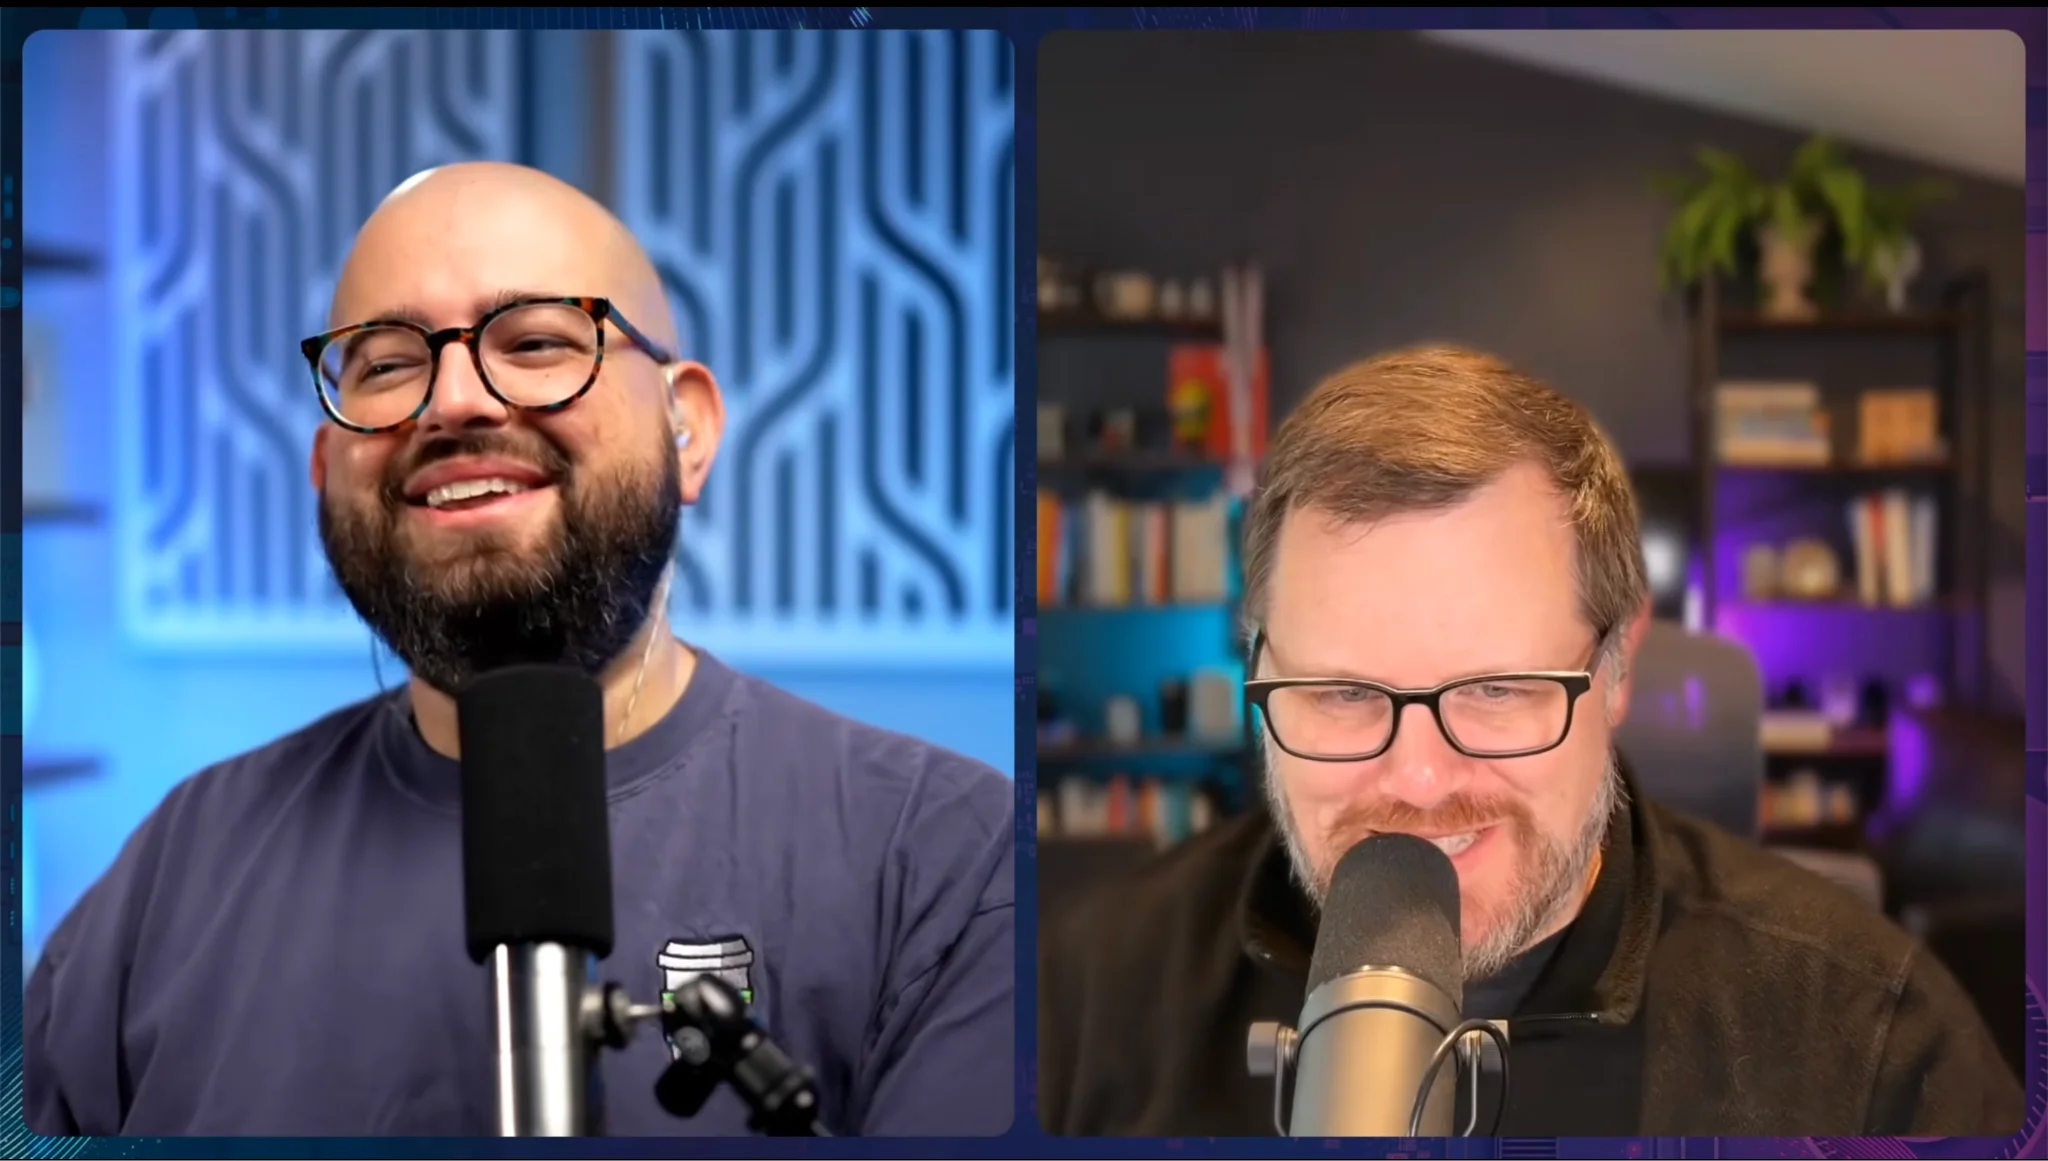
Creating a split screen can take just a few minutes with the right split-screen editor.
To help you, I’ve rounded up my top editors and will show you step by step how to create a split-screen video in each one. I looked up reviews online and tested each platform for ease of use and key features.
How to make a split-screen video with any editor
To create a split-screen video, you need to:
Step 1: Import the clips you want to show on your split-screen. Your editor may place the clips on separate timeline layers or add them directly to a split-screen template.
Step 2: Edit all clips’ audio to make sure they’re in sync and there’s no unintended overlapping sound.
Step 3: Apply a preset split-screen layout, or resize, crop, and position your clip manually so the participants appear side by side or stacked.
Step 4: Review and export your clips. Check synchronization, framing, and audio transitions.
The process can differ depending on your editor. For example: Riverside and Filmora automatically apply layouts for you, while Premiere Pro requires manual cropping.
Best split-screen editors and how to use them
Riverside: Best for split-screen interviews and podcasts
Price: Free plan available; paid plans from $29/month.
Ease of use: Browser-based, easy to use, includes AI tools to speed things up.
Riverside is my top pick for podcasts and interviews because you can switch split-screen layouts scene by scene, so a long conversation never sits in one static frame.
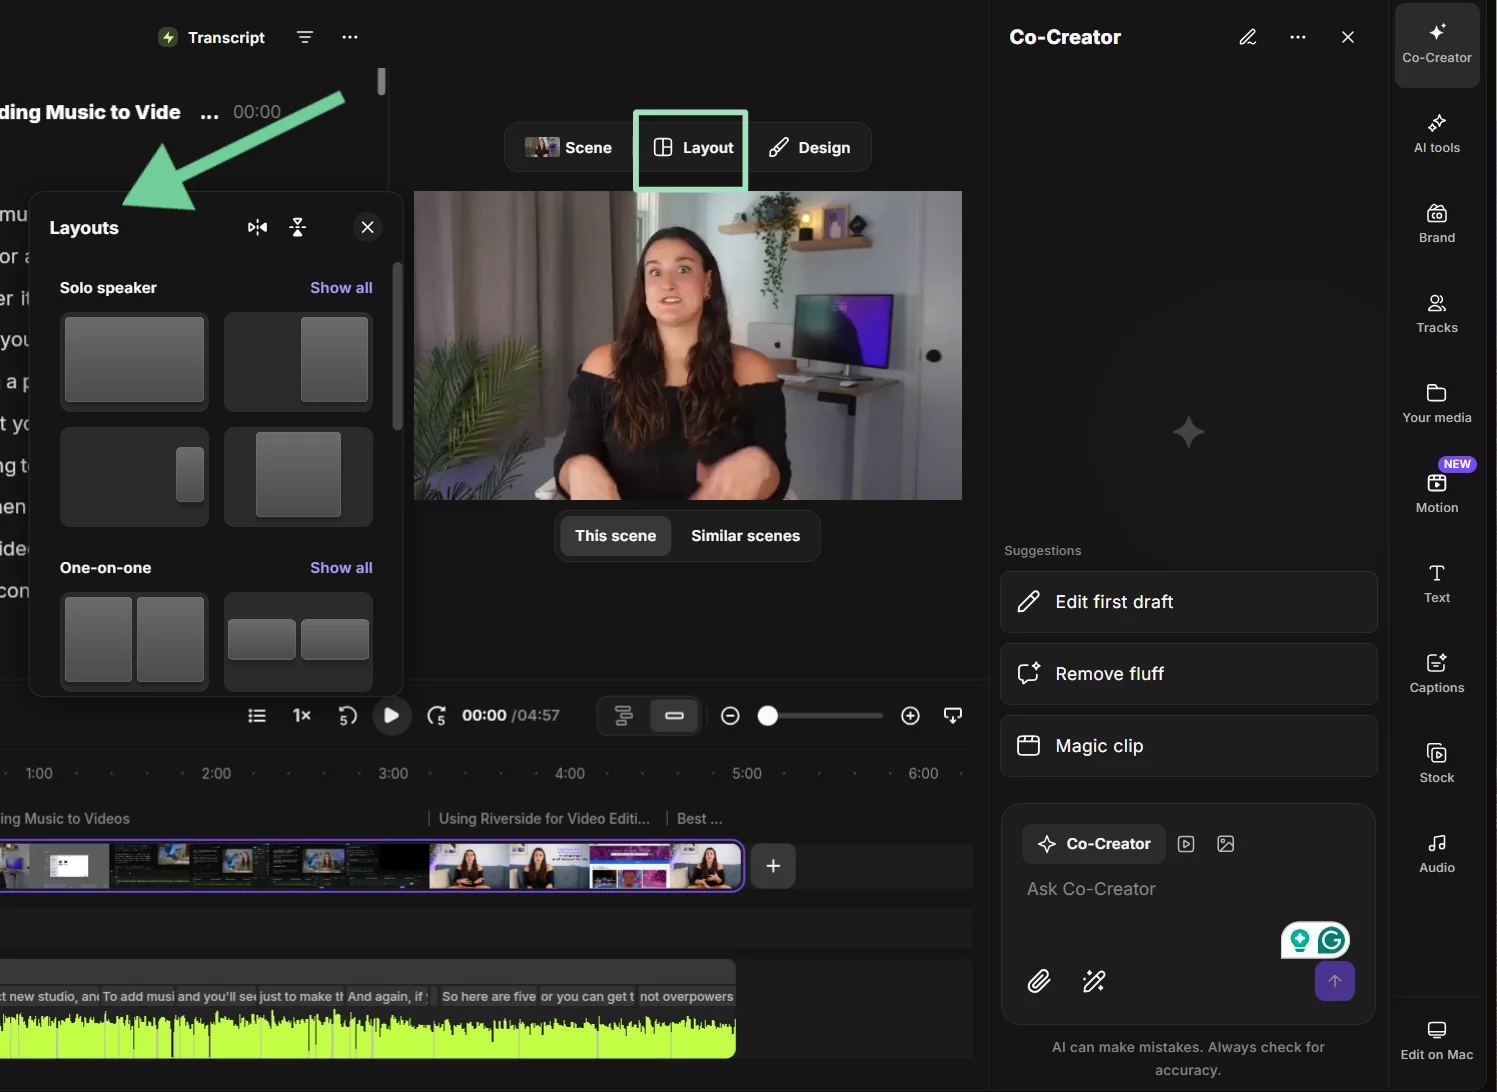
In the editor, choose from multi-speaker presets or adjust the layout yourself. Or use Smart Layouts to let AI set the layout for each scene automatically.
Record interviews with up to 10 participants directly in a split-screen layout. This layout then carries into the built-in editor as a scene you can adjust or swap before exporting.
I use Riverside for split-screens in my own podcast because it's all one workflow. I record, edit, and repurpose in one place.
Key features:
- Flexible layouts: Choose split-screen, grid, full-screen, or picture-in-picture layouts, and switch between them at different points in the finished video.
- Customizable split-screen edits: For more control, drag your frames and position them exactly how you like.
- Synced high-quality recording: Record locally in up to 4K resolution with synced audio and video tracks.
- Separate screen-share recording: Share a presentation or demonstration and capture it independently, giving you more freedom to arrange it beside your speakers.
- Easy guest access: Guests can join through a link without installing desktop software, reducing setup problems before an interview.
- AI Co-Creator: Edit quickly and easily using chat-based prompts. Repurpose your video into newsletters, social posts, or blogs in minutes.
How to make a split-screen video with Riverside
If you’re creating a split screen in the recording studio:
Step 1: Log in to Riverside or sign up for an account.
Step 2: Hit “Record” to jump into a studio, choose your mic and camera, and click “Join studio.”
Step 3: Click “People” to quickly invite your guest by email or with a shared link. All they have to do is click the link to join.
Step 4: Once your guest has joined, click “Layout” and choose one of the split-screen layout options. You and your guest will appear side-by-side during the recording.
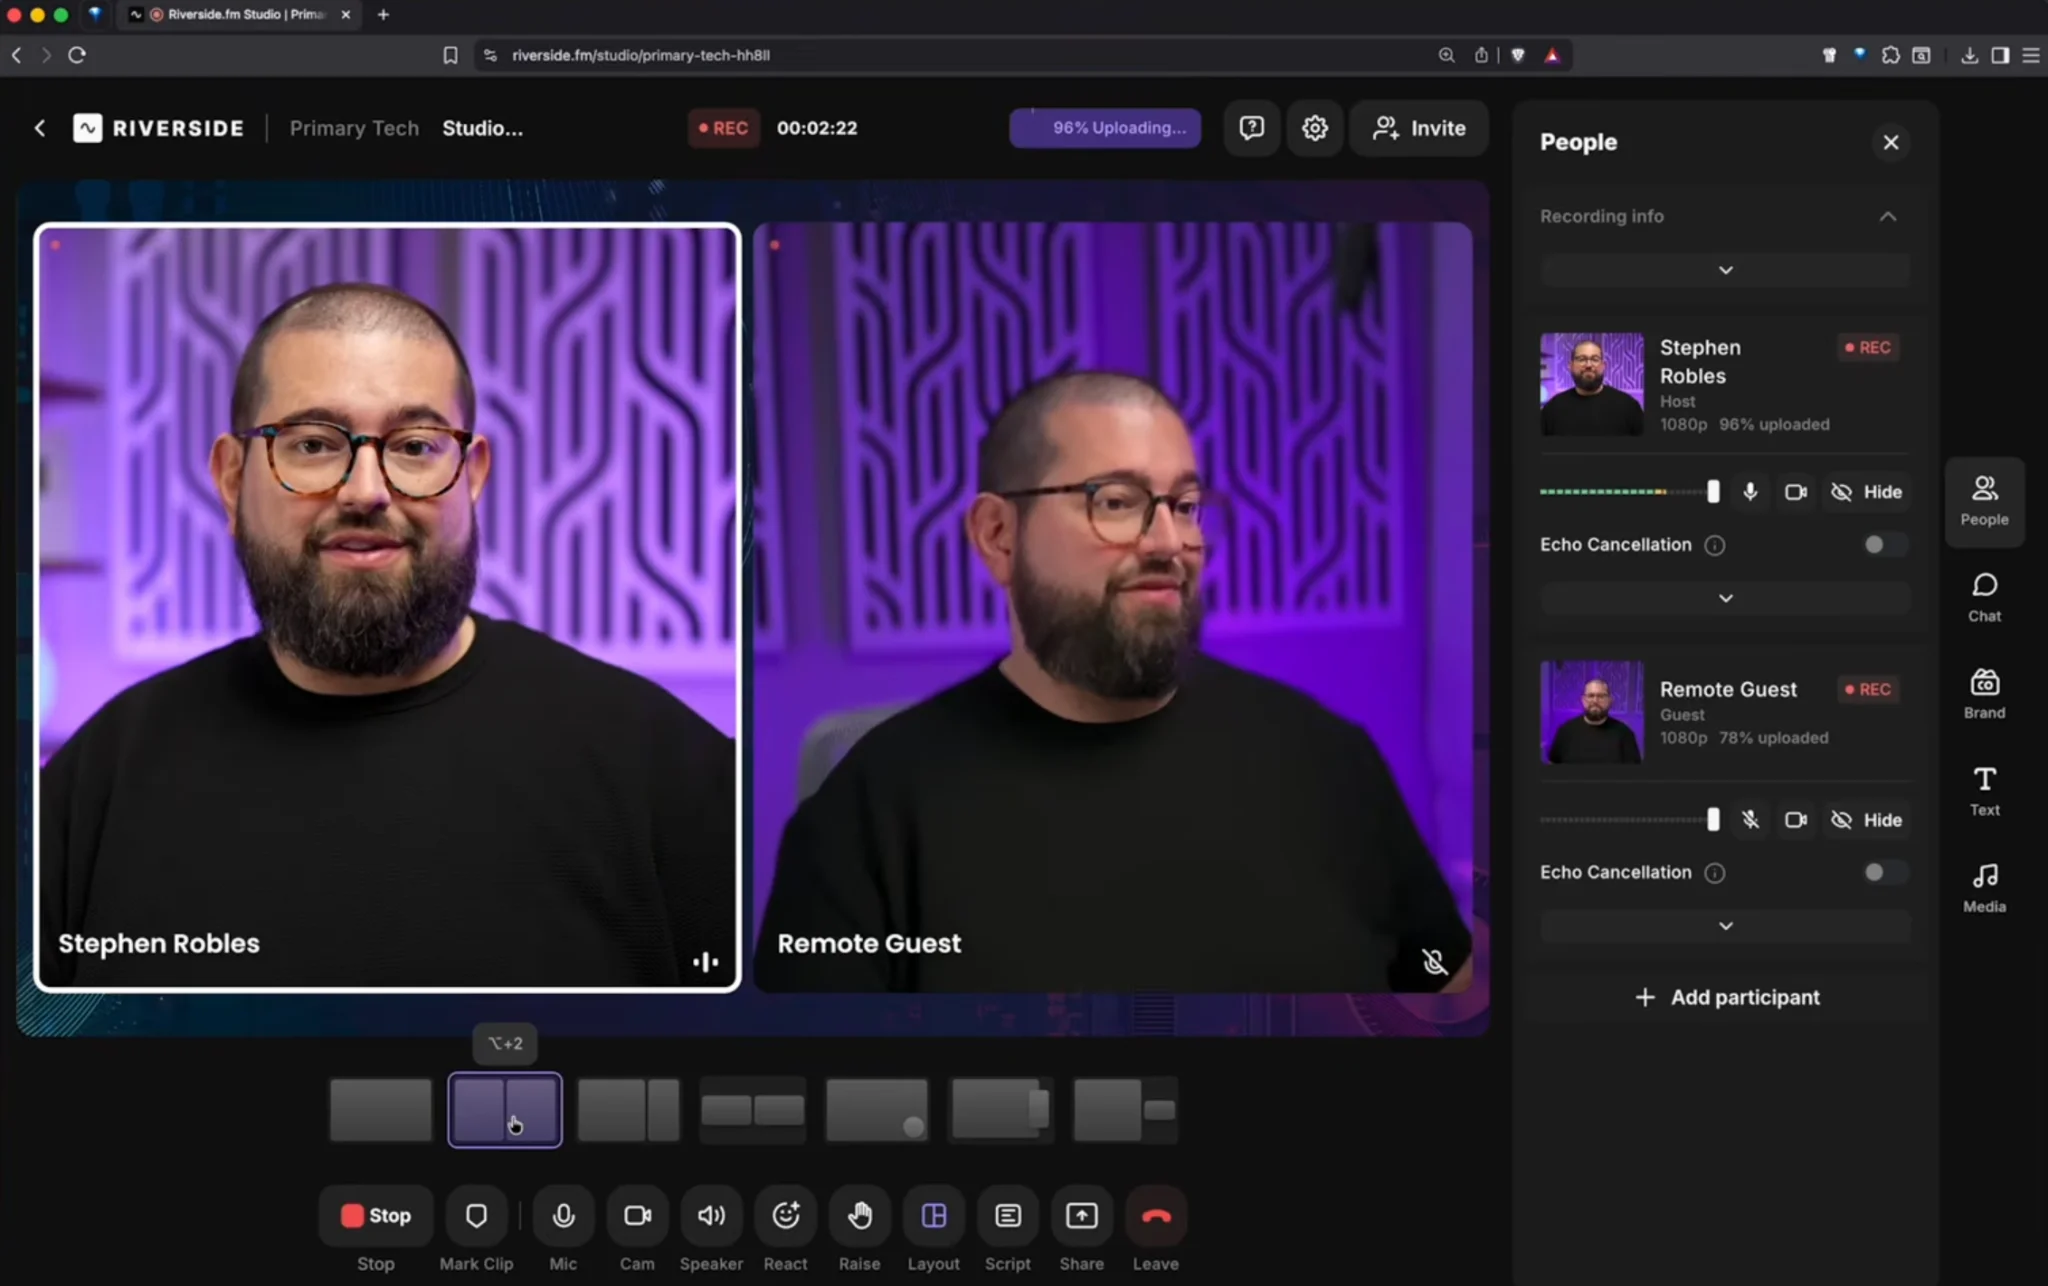
Step 5: When you and your guests are ready, hit the red “Record” to start the recording. You’ll get a 5-second countdown before the recording begins.
Step 6: Record your split-screen video. When you’re done, click “Stop.” You’ll get a prompt to “Go to project.” From here, you can open your video in the editor.
If you’re creating a split screen layout in Riverside’s editor:
Step 1: Log in to Riverside and click “Upload” to add your recording, or to “Projects” to find a session you recorded on Riverside.
Step 2: Select “Edit” to open your video in the editor.
Step 3: In the editor, click “Layout” and select an option from the menu.
Premiere Pro: Best for precise manual split-screen editing
Price: $34.49/month
Ease of use: Professional-level editor with a steep learning curve.
Premiere Pro gives you precise control over how your split screen looks.You set each clip's position, size, crop, and transparency by hand, so you can build evenly sized panels, uneven layouts, or fully custom designs.
The trade-off is speed. Testing it, I had to import both clips, then crop and position each one before I even had a side-by-side. Premiere also takes time to learn.
Pick it only when detailed creative control matters more than getting the video out quickly.
Key features:
- Frame-precise timeline: Make cuts or change layouts at an exact frame rather than relying on automatically generated scenes.
- Unlimited custom layouts: Stack clips on separate tracks and arrange them in virtually any split-screen configuration.
- Keyframe animation: Animate the position, size, and opacity of each video to create layout changes, speaker transitions, or moving panels.
- Advanced masking: Use shapes or custom masks to create unusual frame shapes, isolate subjects, or overlap videos.
- Auto Reframe: Automatically adapt your finished split-screen video to vertical, square, or widescreen aspect ratios, then fine-tune the framing manually.
How to make a split-screen video with Premiere Pro
Before you begin, you’ll need a separate video file for each participant. Then, follow these steps:
Step 1: Open Premiere Pro and import both video files. Create a new sequence, then choose the video settings you want for the finished video.
Step 2: Place the clips on separate video tracks, one above the other, and align their starting points on the timeline.
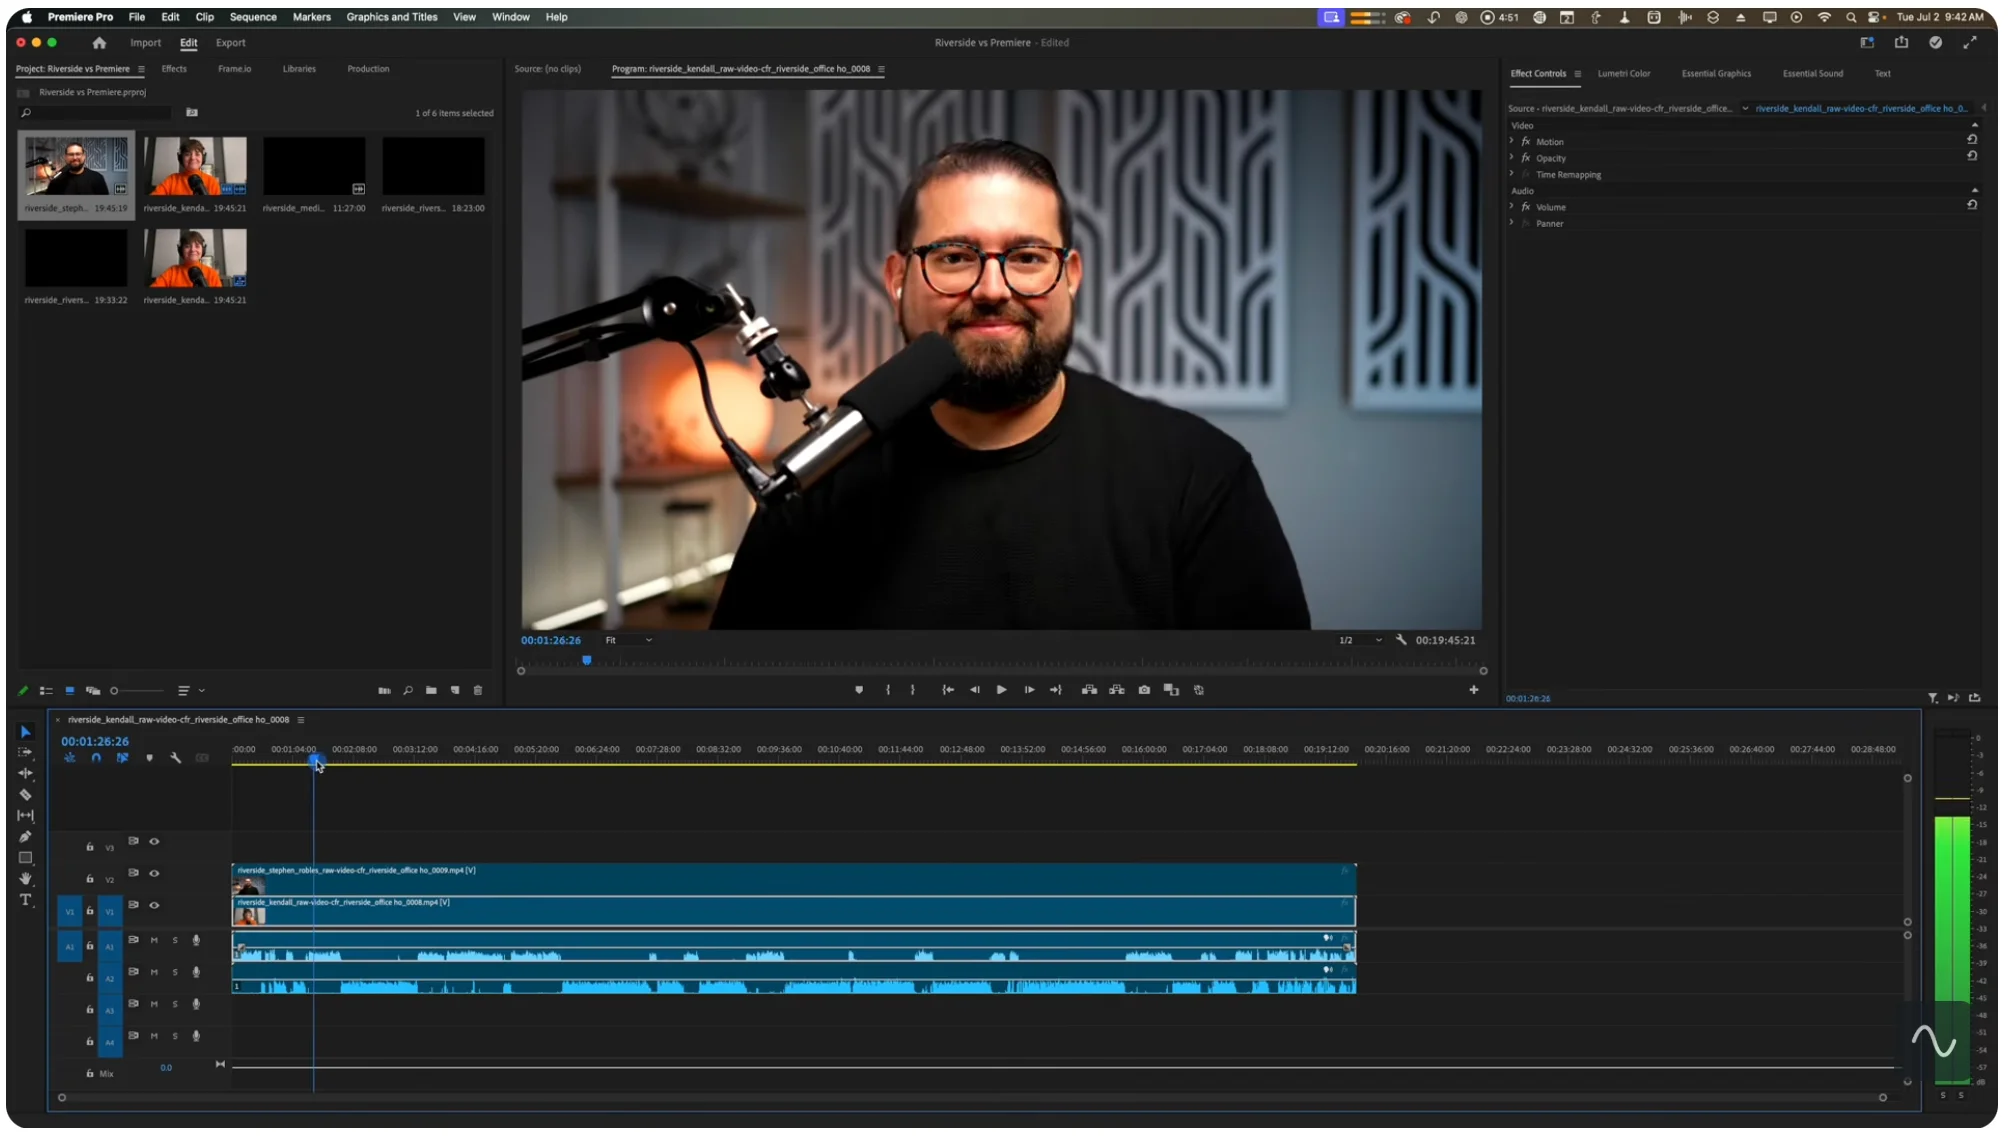
Step 3: Synchronize the clips and trim them so they cover the same section of the timeline.
Step 4: Open the “Effects” panel and search for the “Crop” effect. Drag the effect onto both video clips in the timeline.
Step 5: Select the first clip and open “Effect Controls.” Under “Crop,” set the “Right” value to 50%. Select the second clip and set its “Left” crop to 50%. Reverse these settings if you want the clips to appear on opposite sides.
Step 6: Under “Motion,” adjust the “Position” and “Scale” settings for each clip until both participants are framed properly within their half of the screen.
The exact values depend on your sequence resolution and the original footage framing, so preview the result and adjust until each participant is centered and fully visible.
Step 7: Preview the split screen and fine-tune the crop, scale, and position of each clip. You can also add a border or background between the videos if you’d like.
Step 8: Make any remaining video and audio adjustments, then export the finished split-screen video.
Pro tip: Making more than one split-screen video? Save your finished layout as a template. Next time, replace the clips and adjust the framing instead of starting from scratch.
Canva: Best for split-screen video templates and designs
Price: Free plan available; paid plans start $18/month.
Ease of use: Easy for basic layouts and design, but less helpful for custom designs or more complex edits.
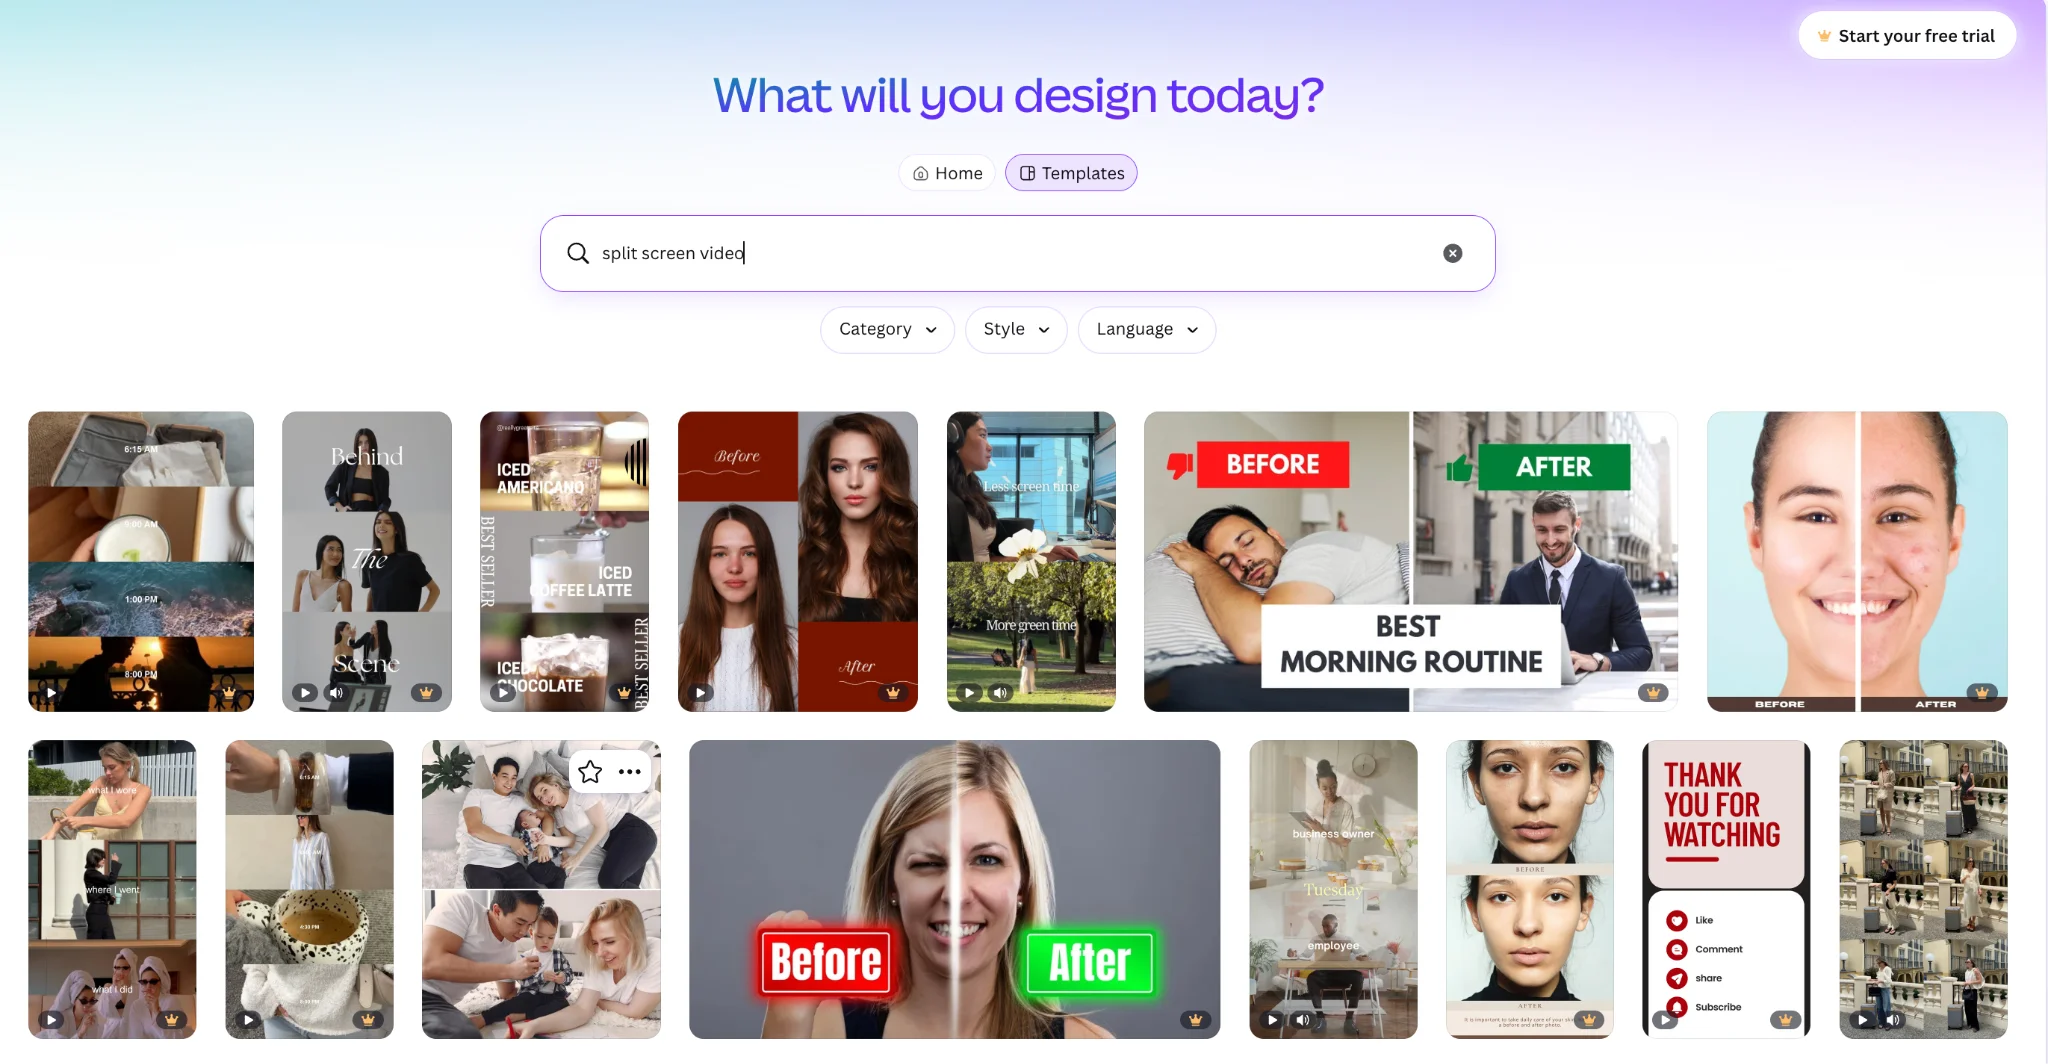
Canva offers a range of drag-and-drop templates as a starting point for your split-screen video. You still upload your own clips, and then customize your split-screen layout with Canva’s design features, including shapes, overlays, and text.
Most Canva templates are for social media content, including comparison before-and-afters, reaction videos, or aesthetic b-roll clips with different shots.
Canva also includes a timeline and basic video editing tools to trim and split clips and clean up audio.
Key features:
- Drag-and-drop templates: Load videos into simple templates for a nearly instant split-screen effect.
- Grid-based layouts: Place videos into grids to create side-by-side, stacked, or multi-panel designs quickly and easily.
- Easy cropping and positioning: Double-click a video to resize it or reposition the subject within its frame.
- Basic timeline editing: Trim, split, and layer video clips, then add transitions and animations.
- Audio tools: Add multiple audio tracks, music or sound effects, then trim them and adjust their volume or fades.
- Magic Resize: Use Magic Resize to adapt the same video for widescreen, square, or vertical platforms.
How to make a split-screen video with Canva
On Canva, you can go to templates and search “split screen video” to start with a ready-set layout. You’ll just need to swap in your own videos.
To create a split-screen video on Canva without a template, follow these steps:
Step 1: From the Canva homepage, select “Create a design” and search for “Video.” Choose “Landscape Video” for a standard widescreen video.
Step 2: Open “Uploads,” select “Upload files,” and upload your video clips along with any separate audio tracks you want to use.
Step 3: Open “Elements” and search for “Grids.” Choose a two-panel grid with the arrangement you want, such as two equal sections placed side by side.
Step 4: Resize the grid to fill the canvas. You can also adjust the grid spacing if you want a visible border between the videos.
Step 5: Go back to “Uploads” and drag the first uploaded video into one side of the grid. Drag the second video into the other side. Each clip should snap into its frame automatically.
Step 6: Double-click each video to resize or reposition it within the frame. Make sure the important parts of both clips remain visible.
Step 7: Use the timeline to align and trim the clips so they begin and end at the correct times. Preview the video to make sure both sides remain synchronized.
Step 8: Add any text, captions, backgrounds, music, or other design elements, then click “Share” to export your video.
Pro tip: If Canva’s split-screen layout cuts off someone’s face, double-click their video and drag it to reposition them inside the frame. You can also zoom in using the corner handles without changing the layout.
CapCut: Best split-screen editor for Android
Price: Free plan available; paid plans start at $19.99/month.
Ease of use: Mobile-first Android app. It’s beginner-friendly, although the interface can feel crowded on a smaller screen.
CapCut is the best option on Android because the split screen is built for touch. Add your second video as an overlay, pinch to resize it, and drag it into place.
It's all manual, so there's a learning curve before it feels quick. But once you have it, arranging clips by hand is much faster on a phone than dragging boxes around with a mouse.
CapCut also has animated keyframes, which allow you to change a clip’s position and scale over time. For example, you can slide a reaction clip into view, then enlarge it for emphasis. Best of all, it includes all the editing features you need to finish your video right in the app.
Key features:
- Multitrack timeline: Arrange, trim, and synchronize multiple video and audio clips within the same project.
- Video overlays: Add a second video as an overlay, then resize and position it anywhere on the screen.
- Flexible layouts: Crop, mask and reposition each video to create side-by-side, stacked, picture-in-picture, or custom split screens.
- Keyframe animation: Use keyframes to make videos move, shrink, expand or change position during playback.
- Editing tools: Edit audio, generate synchronized subtitles, and remove backgrounds.
How to make a split-screen video with CapCut
If you want to create a split-screen video with CapCut, adding an overlay is the simplest, most reliable option. Before you begin, make sure you have a separate video file for each participant. Then, follow these steps:
Step 1: Open CapCut, tap “New video” and import the first video.
Step 2: Select a video from your video roll and tap “Add.”
Step 3: Tap “Overlay,” select “Add overlay” and import the second video.
Step 4: If the videos are separate recordings of the same interview, move the second clip along the timeline until both recordings are synchronized. If they’re already synchronized, place both at the beginning of the timeline.
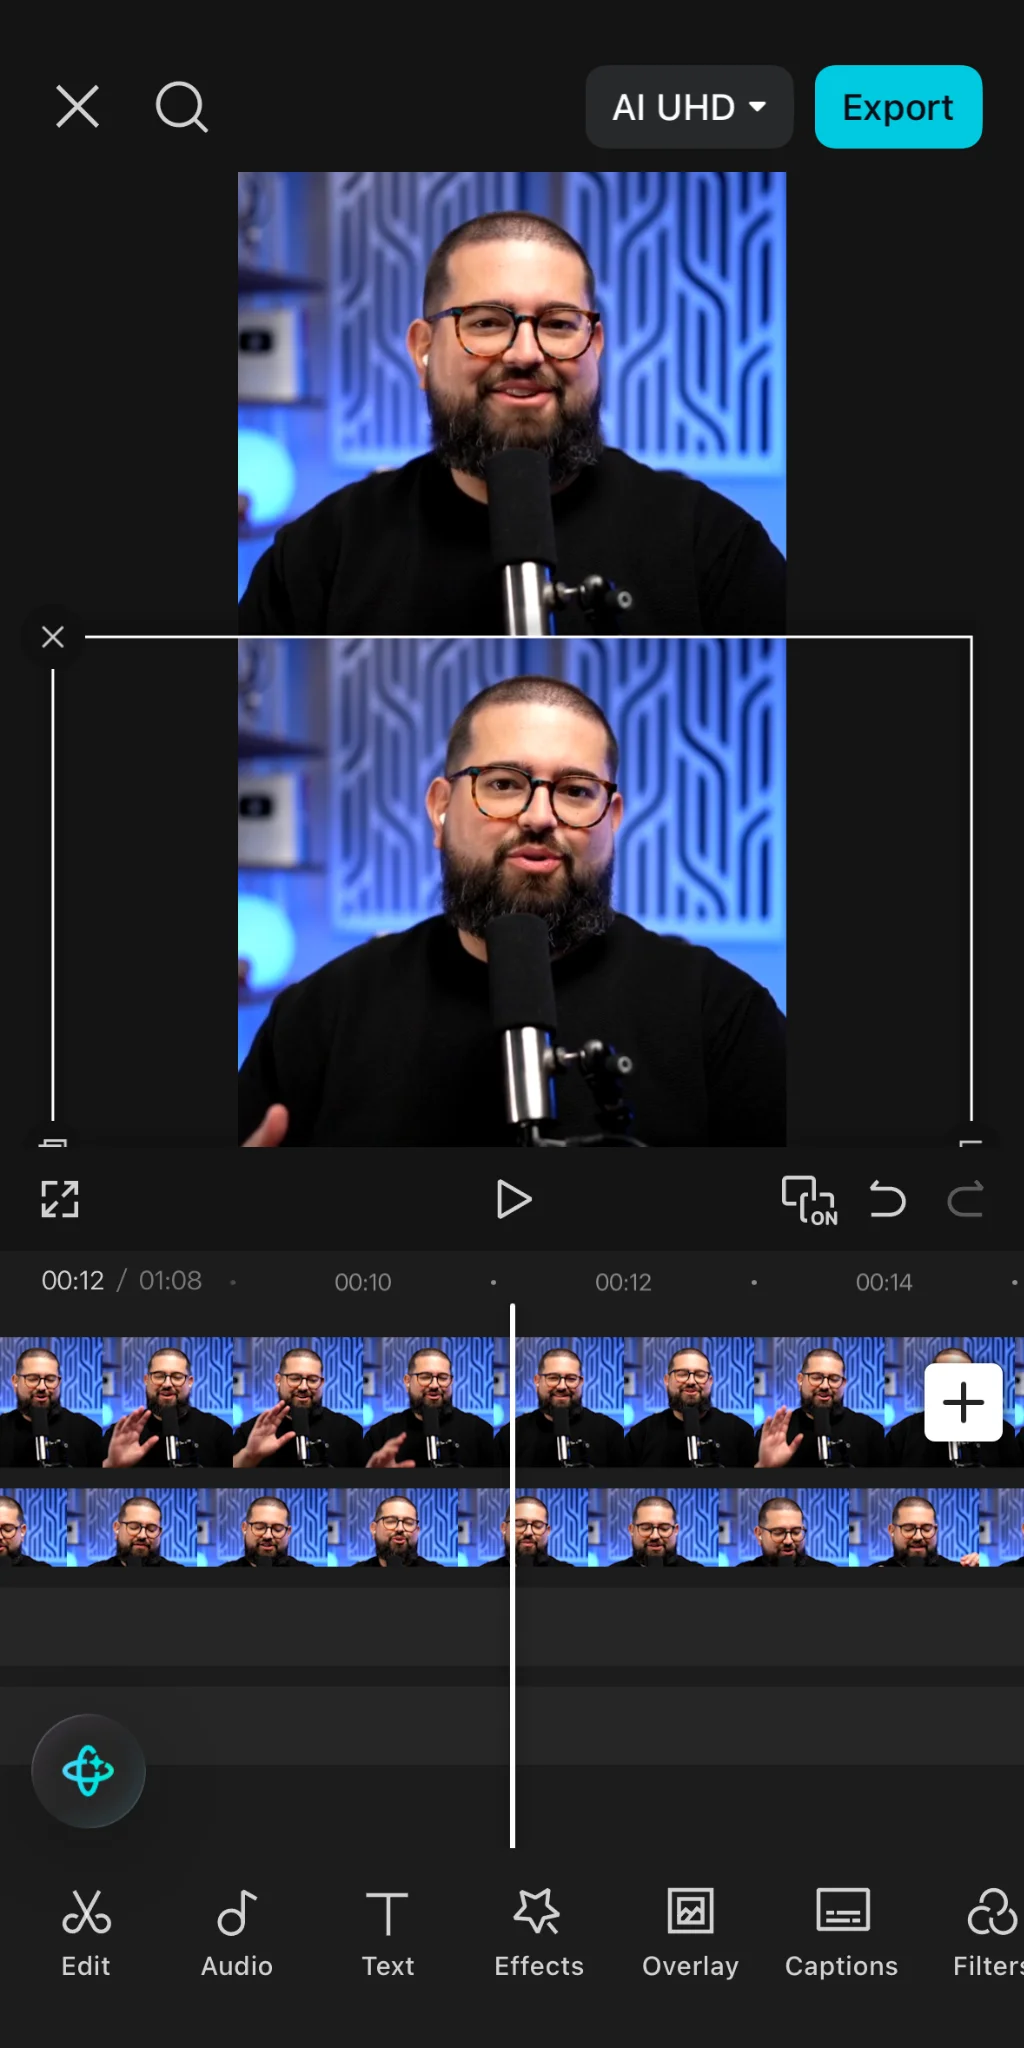
Step 5: Position the two clips side by side. Pinch to resize each one and drag it into place directly in the preview window.
If your clips fill the whole frame and you need a clean edge between them, select the second video in the timeline, tap “Mask” from the end of the bottom toolbar. Choose “Split” and drag to set where the divide sits.
Step 6: Adjust the audio for each clip. If both files contain the same mixed audio, mute one to prevent echo.
Step 7: Preview the video, make any final adjustments, and tap “Export” to save it.
Pro tip: Struggling to line up your two clips? Spread two fingers apart on CapCut’s timeline to zoom in. This makes small timing differences easier to see and adjust.
iMovie: Best split-screen editor for iPhone
Price: Free
Ease of use: Easy to use thanks to a built-in Split Screen effect.
If you’re an iPhone user, you can’t beat the simplicity of iMovie for making split-screen videos. Instead of manually resizing and positioning both videos, you can use the built-in Split Screen effect to place two clips side by side at equal size. You can also stack them vertically, add or remove the dividing line, and adjust how each video is framed.
iMovie is very easy to use, but its layout options are pretty limited. Its Split Screen effect uses a fixed 50/50 layout, so you can’t create custom grids, uneven panels, or animated layout changes. It’s also just an editor: no recording options here.
Key features:
- Horizontal or vertical layouts: Position participants beside each other or stack one above the other.
- Simple layout controls: Swap the clips, add or remove a divider, and zoom or reposition the footage within each panel.
- Alternative overlays: Create picture-in-picture, cutaway or green-screen effects using the same overlay menu.
- Picture-in-picture: Display one video in a smaller, resizable window over the other instead of using a 50/50 split.
- Video and audio editing: Trim, rearrange, and enhance clips with titles, filters, transitions, audio controls, music, and narration.
How to make a split-screen video on iPhone with iMovie
Step 1: Start a new Movie project and add your first video.
Step 2: Position the playhead where you want the split screen to begin.
Step 3: Tap “+” and add your second video.
Step 4: Tap the the three dots and choose “Split Screen.”
Step 5: Drag or trim the second clip to control when the split screen appears.
Filmora: Best for beginners editing on desktop
Price: Free plan available; paid plans start at $4.17/month.
Ease of use: Beginner-friendly on both Windows and Mac, with drag-and-drop split-screen templates.
Filmora suits desktop users who want plenty of layout options, but don’t want to build every split-screen manually. Its library includes more than 250 split-screen templates, from basic side-by-side arrangements to animated grids that display as many as 6 clips.
Choose a template, drag your videos into its frames, and Filmora creates the layout for you.
What I liked is that Filmora doesn’t lock you into a template as Canva does. After filling a template, you can open Advanced Split Screen Edit to control a clip’s position, scale, rotation, color, and motion. You can even enable borders and choose their color and thickness.
You won't get Premiere Pro's level of control. But, Filmora offers an excellent balance of ease-of-use and customizability.
Key features:
- Drag-and-drop workflow: Choose a template and drop each video into its designated frame.
- Customizable frames: Resize and reposition footage, adjust borders, and change the color or spacing between panels.
- Animated layouts: Add entrance and exit animations to the complete split-screen arrangement.
- Custom layout options: Use the Multi Frame effect, picture-in-picture, or separate timeline tracks when a template doesn’t provide the arrangement you need.
- Video and audio editing: Trim and split clips, adjust color and sound, detach audio, reduce background noise, and add titles, captions, music, or effects.
How to make a split-screen video with Filmora
Using a split-screen template is the easiest way to make a split-screen video in Filmora. Here’s how to do it:
Step 1: Open Filmora and create a new project.
Step 2: Go to “Templates,” select “Split Screen,” and browse the available layouts. Choose one, download it, and drag it onto the timeline.
Step 3: Double-click the split-screen template on the timeline to open its editing controls, then click “Advanced” to adjust things like scale, position, and border.
Step 4: Open the “Media” panel, click “Import,” and select the participant videos from your Downloads folder.
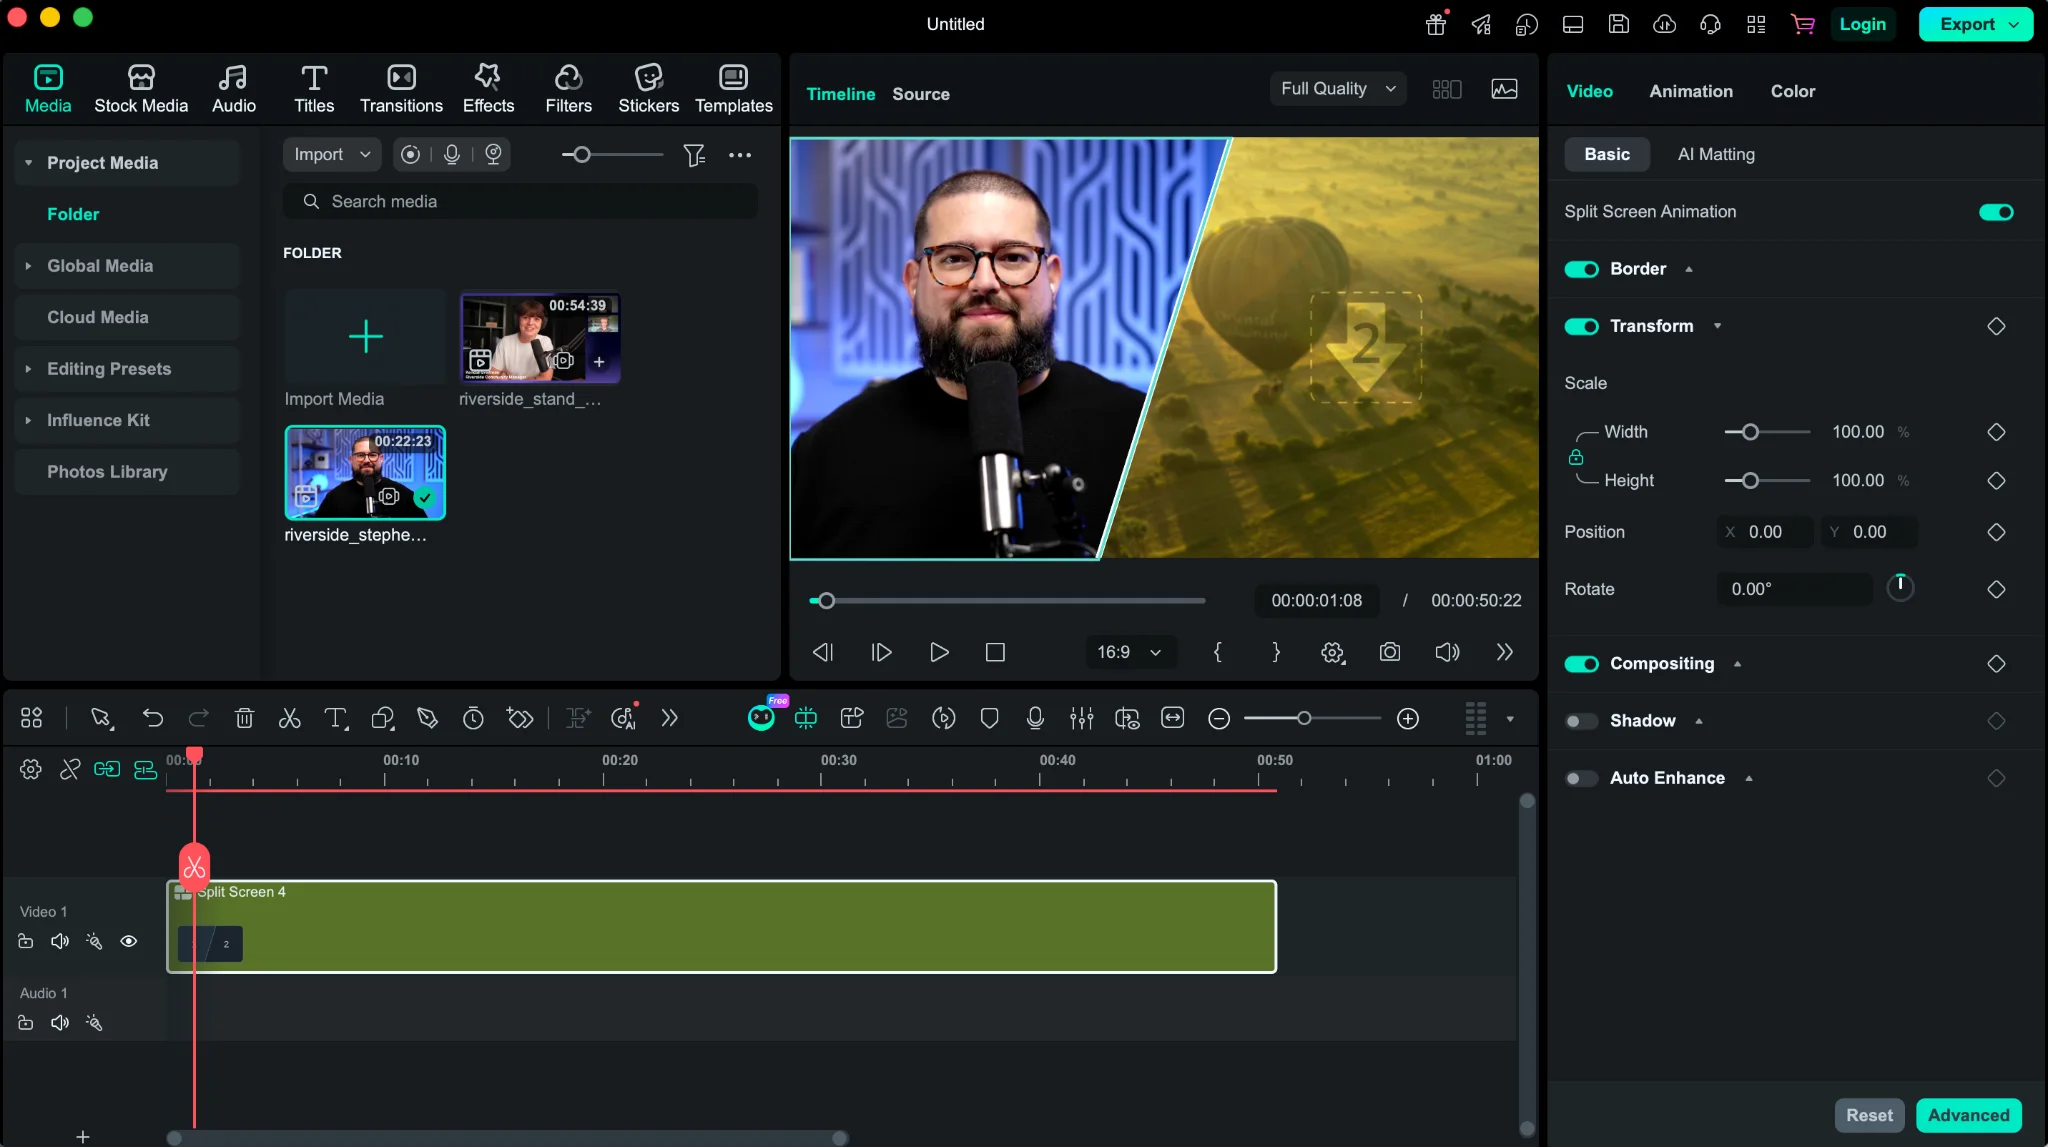
Step 5: Drag each imported video into one of the boxes in the split-screen layout. If the template contains sample media, select each clip and click “Replace.”
Step 6: Click each video to open the “Video” panel to adjust the size and position of each clip.
Step 7: Click “Apply,” preview the finished split screen, and make any necessary audio adjustments. When you’re finished, click “Export” and choose your preferred file settings.
Pro tip: Showing an app or website on different devices? Try Filmora’s Mockup split-screen templates. Drop your screen recordings into ready-made laptop, tablet, or phone frames to show the different versions side by side.
Clipchamp: Best free online split-screen editor
Price: Free plan available; premium features included with Microsoft 365 Personal and Family subscriptions.
Ease of use: Simple drag-and-drop editor. App and web version available.
Clipchamp is a good free option because it lets you export split-screen videos at up to 1080p without a watermark or export time limit. Plus, it works in Chrome or Edge on Windows, Mac, Linux, and Chromebooks, so you don’t need to download desktop software.
You can arrange multiple clips side by side, stack them vertically, or create a picture-in-picture layout. Clipchamp also offers split-screen templates that let you replace the sample footage with your own videos.
While Clipchamp has no time limit for video length, Microsoft recommends videos of 10 minutes or less for best performance. Longer videos may still work, depending on your CPU, graphics card, memory, and disk space.
Key features:
- Flexible split-screen layouts: Use templates or manually arrange multiple videos within the frame.
- Layered timeline: Adjust the timing and duration of individual video and audio clips.
- Free captions and voiceovers: Generate subtitles or add narration with text-to-speech.
- Watermark-free HD exports: Download finished videos at up to 1080p on the free plan.
How to make a split-screen video with Clipchamp
Here’s how to create a simple side-by-side layout using Clipchamp:
Step 1: Open the Clipchamp editor and click “Import media” to upload your clips.
Step 2: Drag the videos onto separate layers of the timeline, one above the other, so they play simultaneously.
Step 3: Adjust their starting positions and trim their lengths. For tracks from the same conversation, match a shared sound or moment to synchronize them.
Step 4: Select the clip on the top layer of your timeline. Click “Crop” in the floating toolbar and trim the framing so your subject fills their side of the frame.
Step 5: In the preview, drag the corners to resize the clip, then move it to one side. Repeat both steps with the second clip.
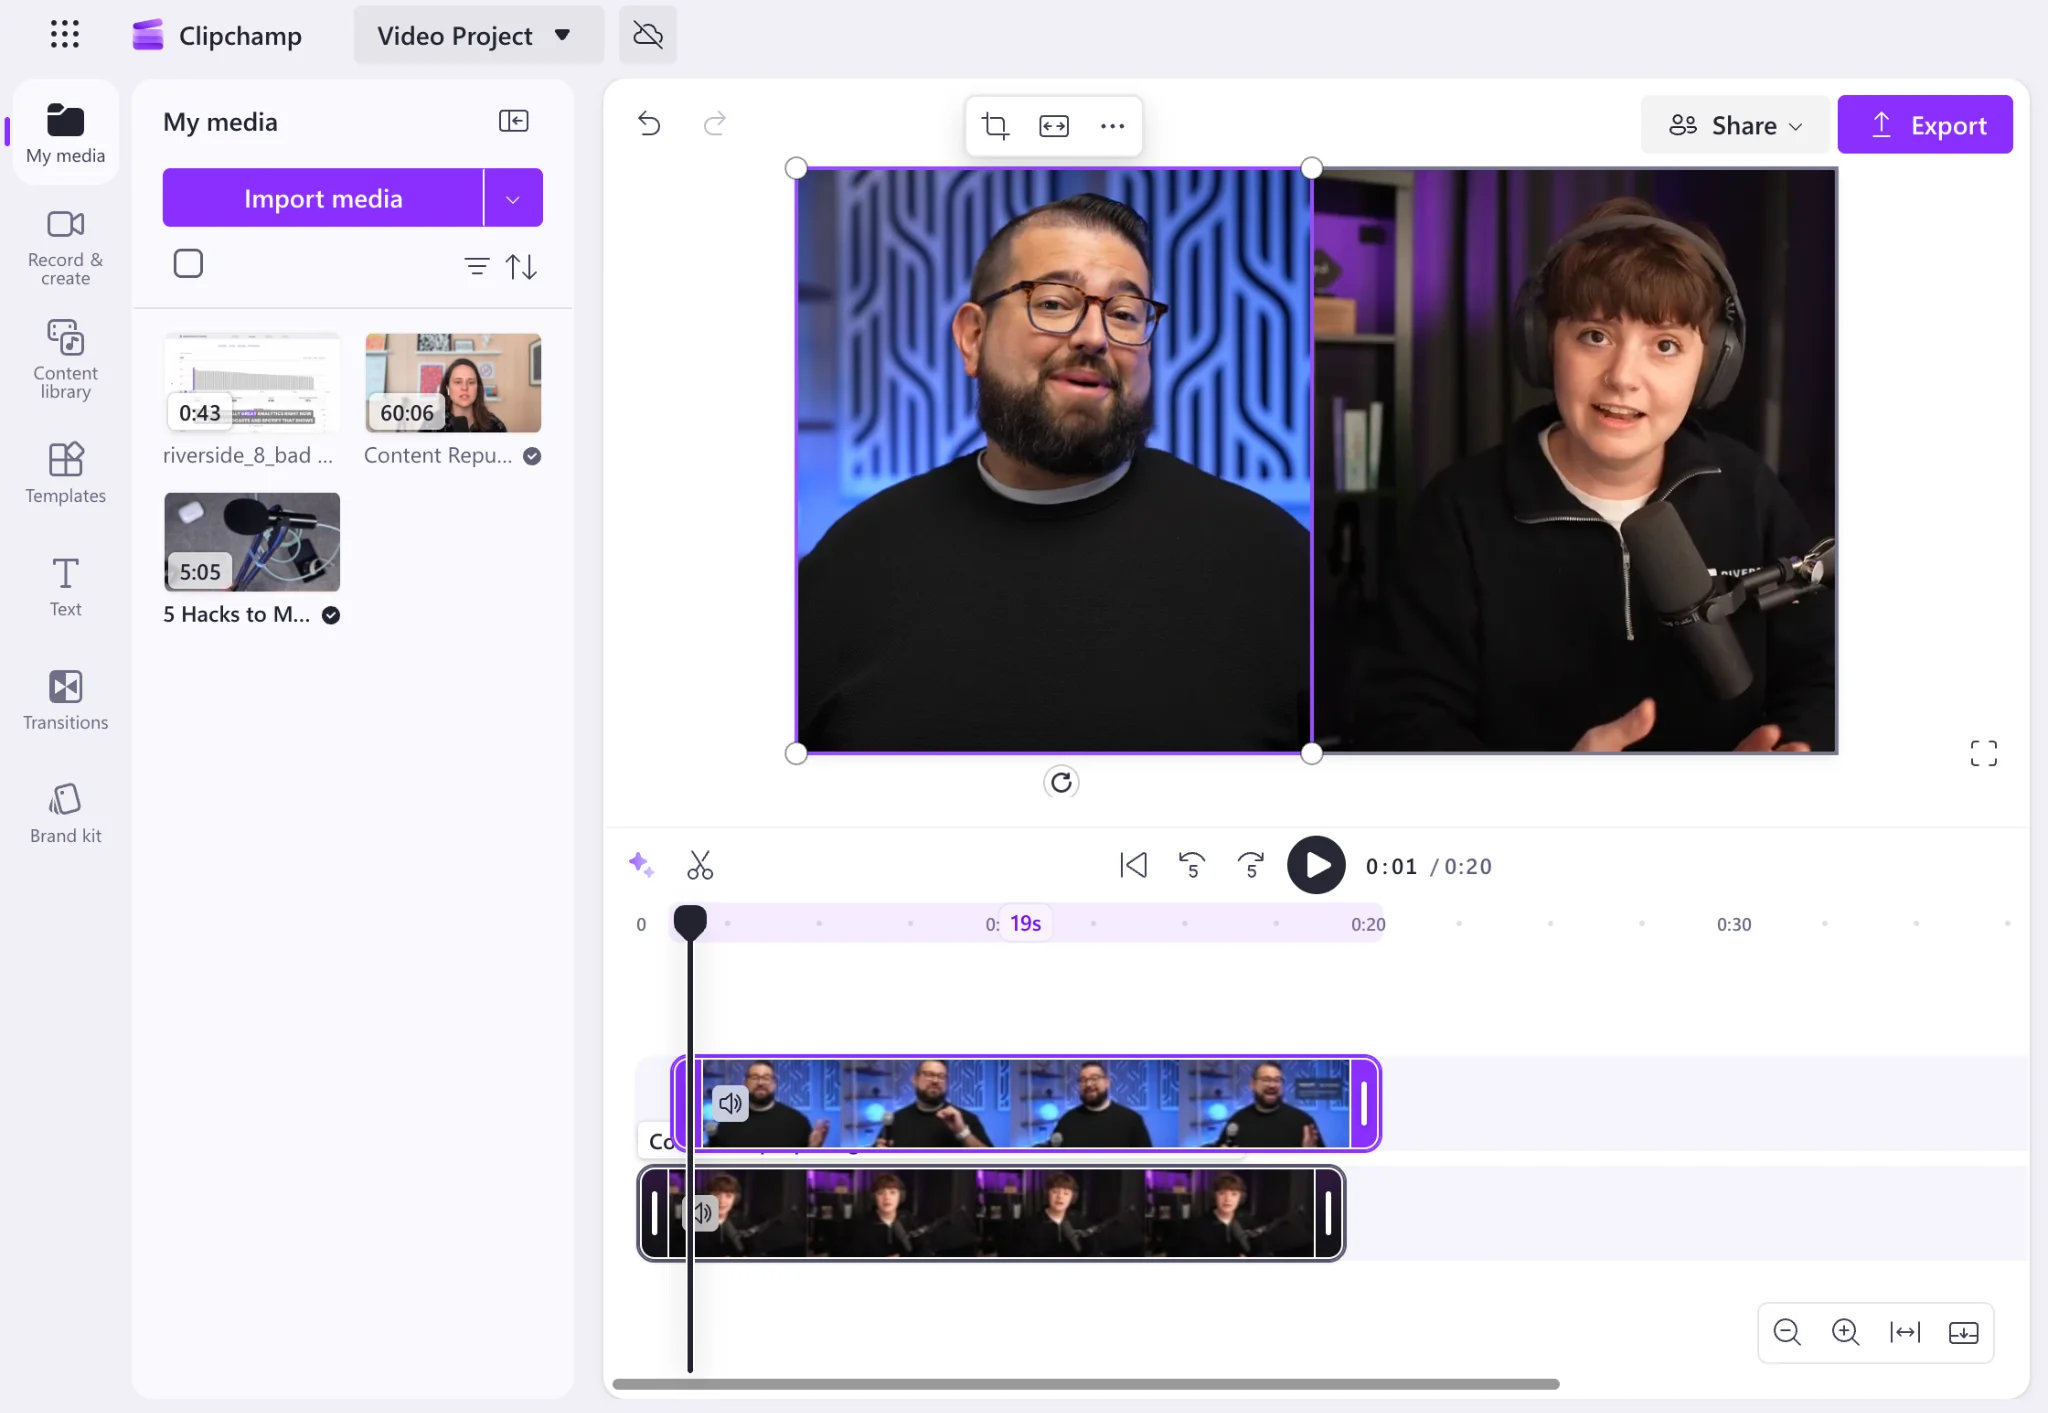
Step 6: Adjust each clip’s audio volume and add any captions, music, or other edits.
Step 7: Preview the video, then click “Export” and choose “1080p” to download the finished MP4.
Pro tip: Making a split-screen tutorial? Choose “Record & create,” then “Screen & camera” to capture yourself and your demonstration at the same time. Clipchamp keeps the two views separately editable, so you can arrange them side by side afterward without manually synchronizing separate recordings.
How to do a split-screen video on Facebook
Facebook's split-screen tool works on mobile only, through the Reels Remix feature. You can only pair your video with an existing Reel, which makes it best for reaction videos.
Here’s how to create split-screen videos using Facebook Reels
Step 1: Open the Facebook app and tap the “Reels” icon to find the Reel you want to pair your video with.
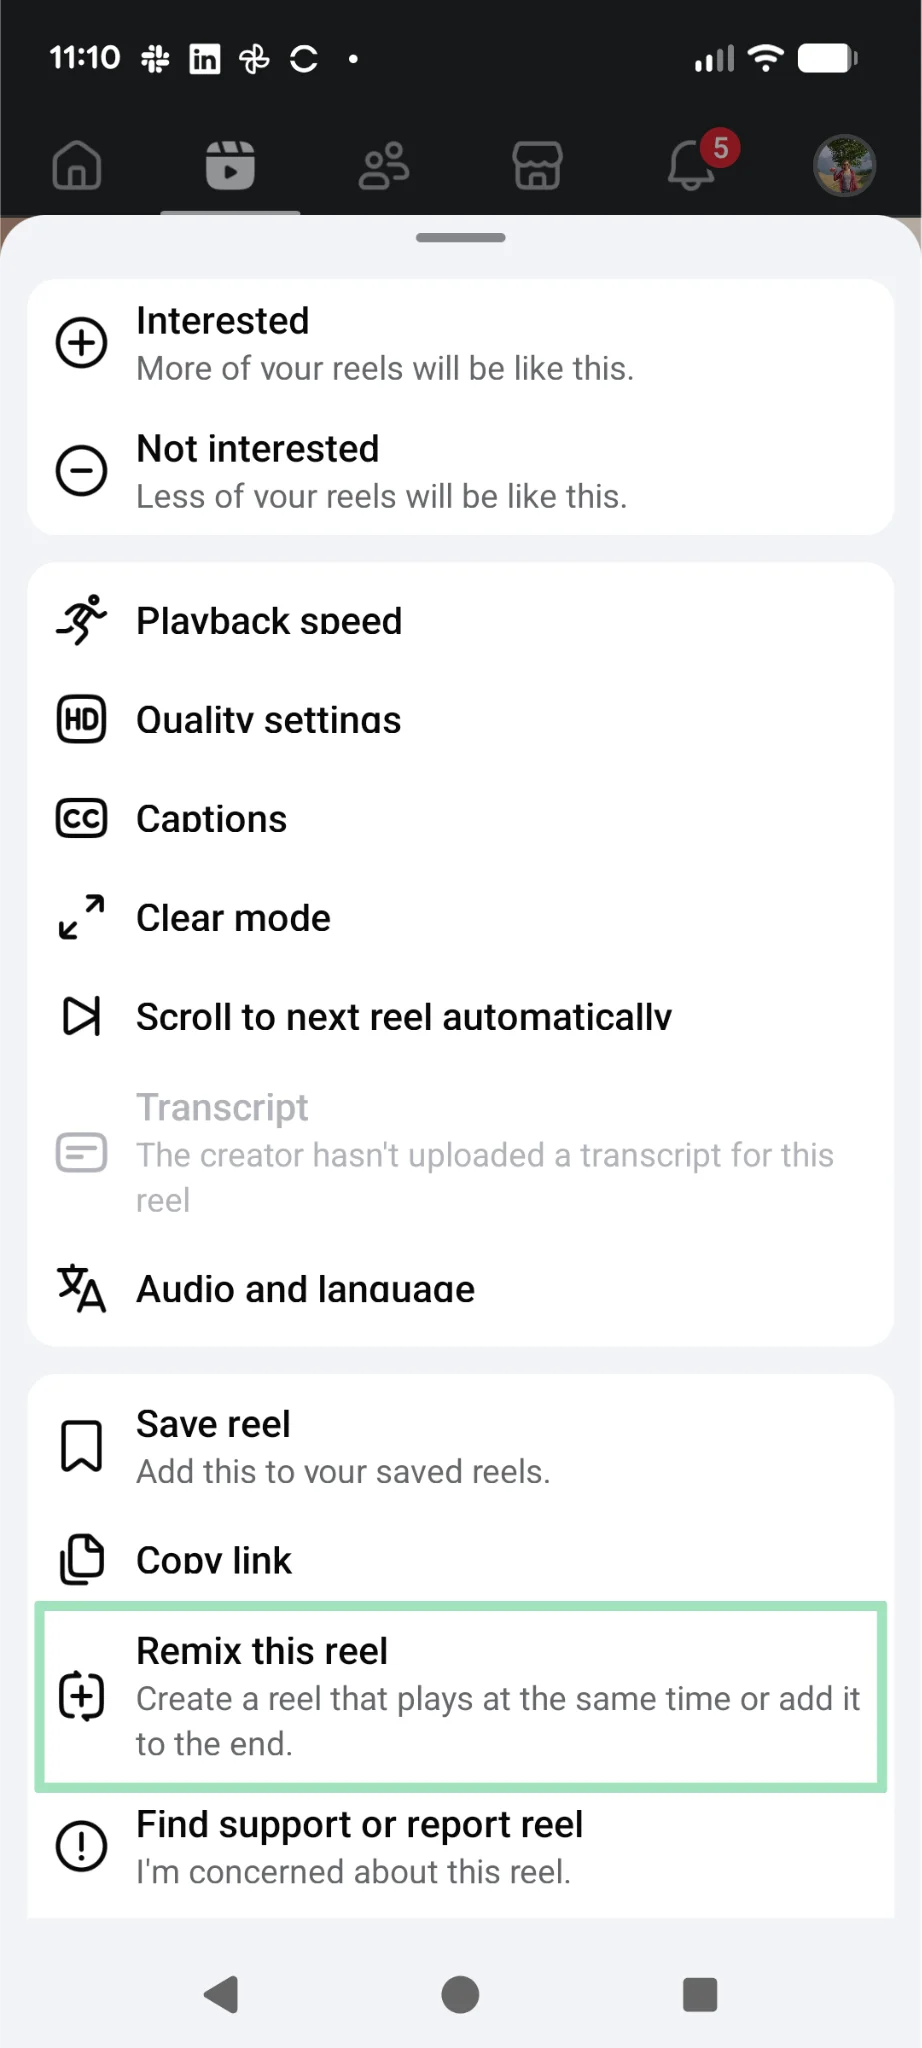
Step 2: Tap the “Three Dots” in the bottom corner of the Reel, then select “Remix this Reel.” (If you don’t see this option, the creator may not allow remixing.
Step 3: Record your reaction video or clip alongside the original content. Or, tap on the “Pictures” icon at the bottom of your screen to choose a pre-recorded option.
Step 4: Tap “Next” when you finish your recording/adding.
Step 5: Add text, music, or other edits, choose your audience, and tap “Share Now.”
How to make a split-screen video on TikTok
You can make a simple split-screen video on TikTok using the Layouts function. Here’s how:
Step 1: Open TikTok and tap the “+” to start.
Step 2: Tap your gallery in the bottom left to select your videos.
Step 3: Ensure that “Select Multiple” is checked at the bottom of the screen, then choose your two videos.
Step 4: Select “Use Layout” at the bottom of the screen.
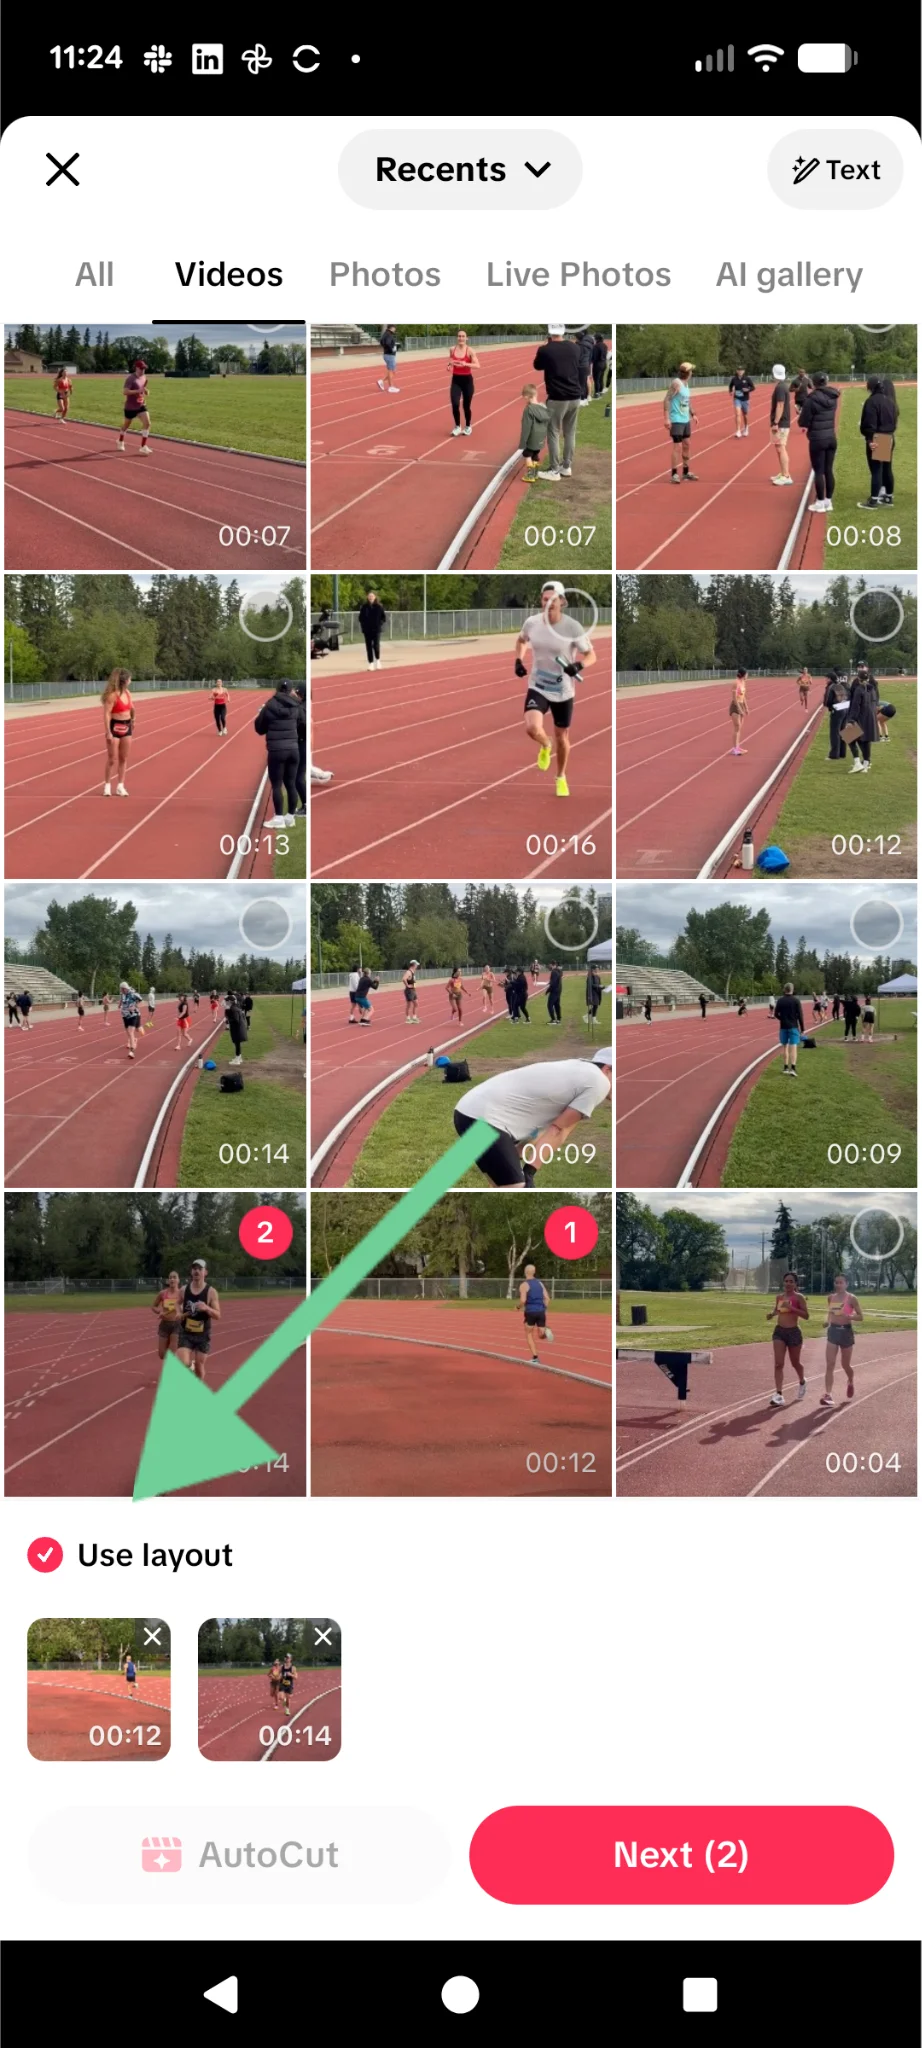
Step 5: Click “Next” to preview your split screen video.
Step 6: Add it to your Story or click “Next” to post.
Like Facebook, on TikTok, you can also create reaction videos using the Duet feature. Here’s how:
Step 1: Open the TikTok app and find the video you want to place on your split screen.
Step 2: Tap the “Share” arrow button.
Step 3: Tap “Duet” in the bottom row.
Step 4: Choose your split-screen layout (side by side, top and bottom, or picture in picture) from the menu below the video.
Step 5: Tap the record icon to capture your video.
Step 6: When you’re finished, tap the checkmark, add text or filters, and tap “Post.”
How to make a split-screen video on Instagram
You can make a split-screen video on Instagram in two ways: using Instagram’s Edits app to create custom split-screens, or using Remix (best for reacting side-by-side with another Reel).
Here’s how to make a split-screen video using Instagram Edits.
Step 1: Open Edits, click the “+” and select “Gallery” to choose your videos. Both will appear in the timeline, one after the other.
Step 2: Select one of your clips and from the bottom toolbar, select “Overlay.” This will place one video over the other.
Step 3: Select the top video and then tap “Crop” to resize it to half the screen. Adjust the second video the same way so that they are one on top of the other.
Step 4:Use the handles on the timeline to trim your videos to match in size.
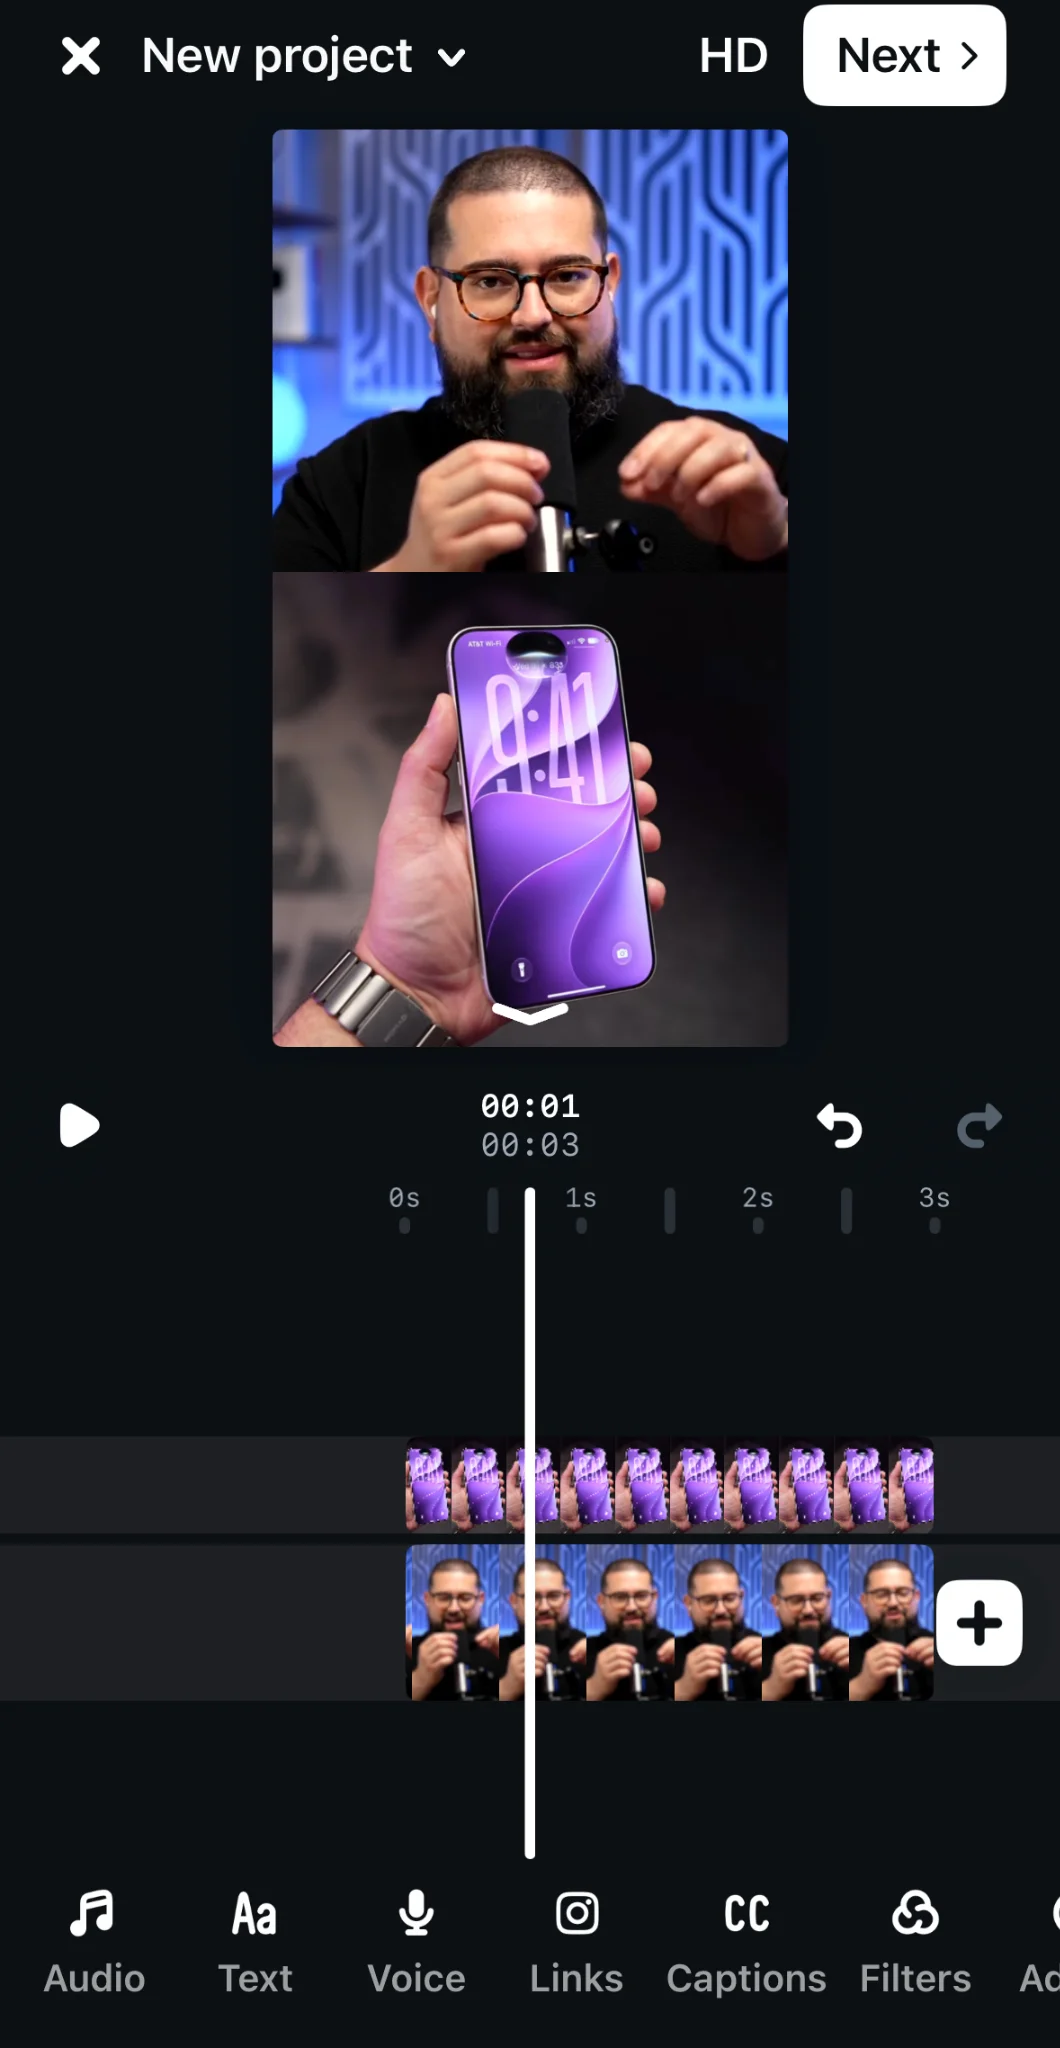
Step 5: Use the volume button to mute the audio from one or both clips. You can also apply filters and effects to one or both videos.
Step 6: When you’re happy with your edit, click “Next” to share or export your video.
And here’s how to use Remix to make split-screen videos with someone else’s Reel.
Step 1: Open Instagram and find a Reel to remix.
Step 2: Tap the “Three Dots” at the bottom and then “Remix”
Step 3: Select “With original video” so both videos display at the same time on a split screen.
Step 4: Hold the record button to film your reaction live alongside the original clip, or tap the gallery icon to import a pre-recorded clip.
Step 5: Tap the “Controls” icon at the top to balance the volume between the original video and your video, then proceed to the caption screen and share.
FAQs about split screen video editors
How can I make a split-screen video for YouTube?
Yes, you can make a split-screen video for YouTube using a video editor or, if you’re making a YouTube Short, you can use the Collab feature to create a reaction video. To create a YouTube Shorts Collab, just open the YouTube mobile app and:
- Find the Short or regular YouTube video you want beside yours.
- For a Short, tap “Remix,” then “Collab.”
- For a regular video, tap “Share,” then “Remix,” then “Collab.”
- Choose a split-screen layout.
- Select the section of the original video you want to use.
- Record your side of the split screen with your phone’s camera.
- Add text, filters, music, or other edits.
- Tap Next, enter the details, and upload the Short.
Learn more in our guide on how to make YouTube Shorts.
What’s the difference between split-screen and side-by-side video?
Side-by-side videos are two clips next to each other, while split-screen videos can include more clips arranged in different layouts. Basically, side-by-side videos are a specific type of split-screen video.
Side-by-side videos are often used for direct comparisons, before-and-after shots, interviews, or reaction videos.
Split-screen videos, on the other hand, let you show multiple perspectives or scenes simultaneously. You can use this to showcase different viewpoints or for creative effect.
How do I sync audio for two videos in a split screen?
If you want to sync audio between two videos in a split-screen, you can do it using the audio waveforms on your video editor. It can help to start your recording session with a distinct sound, like a clap or loud word. Then you can use that to line up the tracks on the wave form. Some editors, like Premiere Pro and Filmora, can do this automatically. Then, keep the clearest audio track and mute the other one to prevent echo.
If the clips contain different audio, align the videos at the point where you want each one to begin. If both tracks are to play together, adjust their volume so neither overwhelms the other. If viewers should hear one clip at a time, mut, cut, or fade between audio tracks as the focus changes from one video to another.
How to crop video for split-screen without losing quality?
If you want to crop a video for split-screen without losing quality, it’s best to:
- Start with high-quality footage.
- Crop each clip to fit its section of the screen without stretching or enlarging it.
- Keep the original aspect ratio whenever possible to avoid distorting the video.
With Riverside, you can film in up to 4K resolution, then use our Layouts tool to easily turn it into a high-quality split-screen video in a few clicks.


.webp)

.webp)