.webp)


Live podcasting gives you what pre-recorded episodes can’t: real-time connection and instant feedback. You build trust faster, spark real conversations, and boost discoverability wherever you stream.
Plus, going live cuts down your post-production time.
In this guide, I’ll show you how to plan, record, and host a smooth, professional live podcast.
What is a live podcast?
A live podcast is a show that records and airs in real time in front of an audience. Unlike traditional pre-recorded podcasts, this isn’t edited. It’s more authentic and allows you to engage with listeners in real time.
Live podcasts come in two main forms:
Online live streaming: Episodes are live-streamed to social channels (e.g., YouTube, LinkedIn) or the podcast brand’s website at the time of recording. For example, the H3 Podcast is a popular live online podcast on YouTube.
In-person live recordings: These shows are recorded in real time in front of an actual audience, and then published to the podcast feed afterwards. Here’s an example of this format from The SEO Mindset.
What you need for a live podcast
Your equipment differs if you’re podcasting online versus in-person. We’ve got a whole guide on live streaming equipment, but here are the basics:
Software and hardware
If you’re streaming your podcast online, you’ll want software that lets you stream and record simultaneously. Other considerations include engagement tools, branding, and ease of use.
For example, Riverside’s live podcasting lets you:
- Multistream your show to unlimited platforms, including YouTube, LinkedIn, or any custom RTMP.
- Brand your live podcast studio with overlays, lower thirds, backgrounds, and your logo.
- Record in up to 4K resolution so you can repurpose your show for on-demand listening.
- Stay on track with a built-in teleprompter to paste your script or podcast questions into.
- Edit your live podcast recording in minutes with the AI editor.
And much more.
For in-person recordings, you can also use recording software like Riverside. But, you may also choose to record everything using a digital recorder.
Microphones
You can choose any reliable podcast microphone. Generally, the best option is a cardioid microphone, and I suggest using one for each speaker.
If you’re recording in front of an audience, consider a microphone that cuts background noise. You might also want a lapel microphone for more mobility on stage. And you may want a microphone for when audience members ask questions.
Headphones
For live online podcasts, all participants should wear headphones. This allows everyone to monitor their own audio and prevents echoes and background noise.
During in-person podcasts, it’s best to assign a producer or audio monitor to listen to your output behind the scenes.
Camera
For video podcasts, consider investing in a quality podcast camera. If you’re on a budget, most 4K phone cameras can do a decent job.
Additional accessories
To enhance your setup, get:
- Lighting equipment: A three-point lighting setup using softbox, LED panels, or ring lights improves the quality of your video.
- Backdrop accessories: Style your background with a background or decor that matches your brand.
- A monitor to track audience interactions. (With Riverside’s omnichat, you can see everything directly in your recording studio.)
- Internet: High-speed internet is essential for online live streaming
How to create a live podcast
Below, I’ve outlined a step-by-step process that combines best practices with my own personal workflows to give you a framework to record your own live podcast episodes.
Step 1: Determine your live podcast format
Decide whether you want to live-stream your podcast or record in-person in front of an audience. You can even do both.
Next, choose the type of podcast. Here are some common archetypes:
- Solo: A single host drives the entire show, sharing insights, stories, or commentary.
- Co-hosted: Two or more hosts engage in a dynamic conversation, bouncing off each other, and sharing jokes or banter with each other and the audience.
- Interview: Host(s) ask questions and guide a conversation with a featured guest (often a subject matter expert or a person of interest).
- Roundtable/panel: Multiple participants discuss or debate different topics with each other.
- Audience participation: Audience members join live to ask questions or share their own experiences or thoughts on a particular topic.
- Storytelling/performance: Participants deliver live performances that can be either scripted or spontaneous.
- Hybrid: A diverse mix of different archetypes and formats to enrich the live experience.
After you plan out your segments and show length, consider the pace and rhythm of your show. For example, how smoothly will participants speak and transition between topics? Or will you pause for audience reactions and engagement?
“To keep viewers engaged, maintain a moderate pace. Not so fast that you lose people or too slow that interest fades. Stay on a topic if the conversation is engaging, but move on if you feel points are being repeated or value isn’t being added. If the audience responds, take a moment to address it and add commentary, then smoothly guide the discussion back on track.” - Sarah McDowell, Podcast Host of The SEO Mindset Podcast
You may not cover everything you planned, and that’s perfectly fine. It’s far better to explore an engaging conversation that the audience is enjoying, rather than cutting it short just to fit everything in.
Step 2: Create a run of show
A run of show (or ‘cue sheet’) outlines what happens during the live show, when it happens, and who is responsible. It’s a detailed timeline that keeps hosts, guests, and the production team on the same page, so the event runs smoothly.
Send the run of show to everyone involved beforehand so they can ask questions, provide useful feedback, or highlight anything that is missing. Be realistic and generous when estimating time slots for each section, and also include buffers in case you overrun on certain sections.
Step 3: Schedule your event and invite guests
Schedule live events at least one month in advance to give everyone ample notice, especially those who book up early. Follow up with regular reminders so they don’t forget.
If you’re going live with Riverside, schedule and invite guests by clicking on the “Plan” button from your dashboard, then select “Schedule session”.
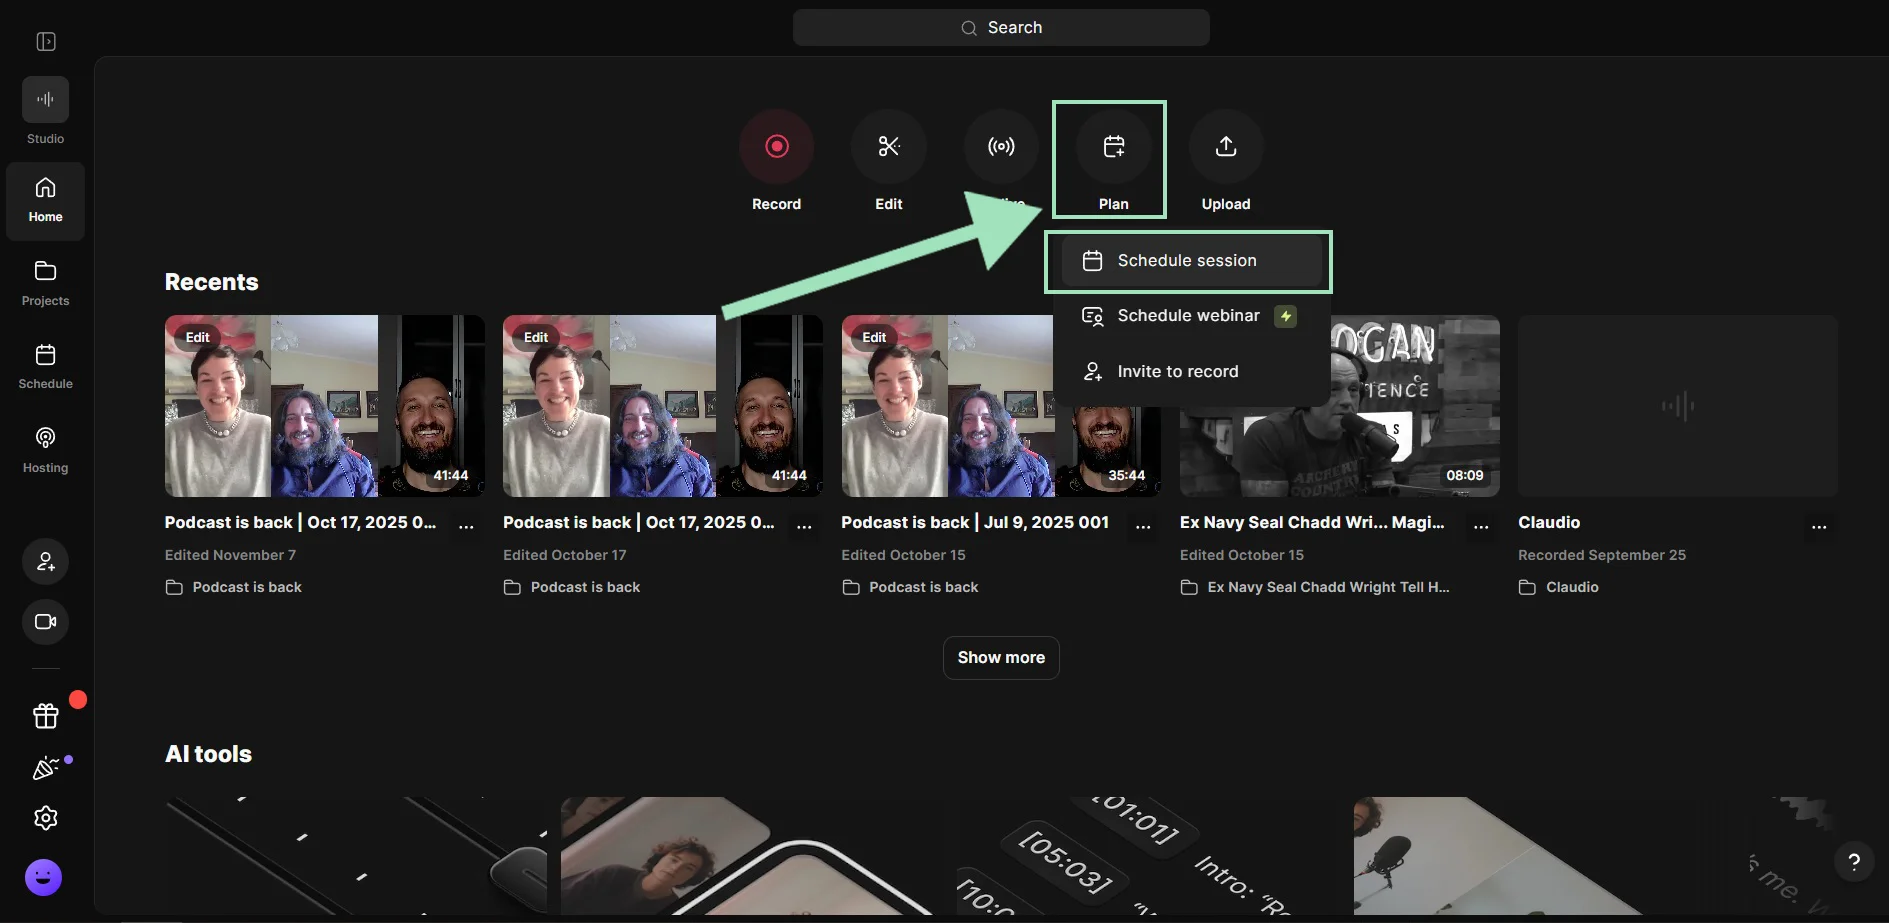
I also suggest scheduling your live streams on your streaming platforms like YouTube, Facebook, or LinkedIn. While you can go live ad hoc, informing your audience ahead of time usually ensures a better turnout.
Step 4: Promote your event
Promote your event and invite viewers to join the live stream or in-person podcast recording. Here are some basic tactics:
- Share the event on your brand/podcast’s social profiles and tag guests so they re-share.
- Record a short teaser (e.g., talking head video) to give audiences a preview of the episode.
- Create social-first images promoting your episode guests and ask them to share it with their networks.
- Ask people to subscribe or turn on alerts so they receive a notification when you’re live.
- Ask industry-relevant newsletters, media sites, and forums to help you spread the word.
- Send private messages to relevant people on LinkedIn, Instagram, Facebook, and other social media channels.
- Let past attendees from other events know about this live.
On Riverside, you can invite everyone who’s going to participate in your event with due anticipation by sharing a link or email. You can even create customized registration forms to collect all the data from your attendees.

For in-person events, use platforms like Eventbrite or Meetup to manage attendees, sell tickets, and share important event details (e.g., date, time, location).
Step 5: Set up your live streaming studio
For online podcasts, find a quiet location with adequate lighting and reliable internet.
I also suggest you set up your online studio beforehand.
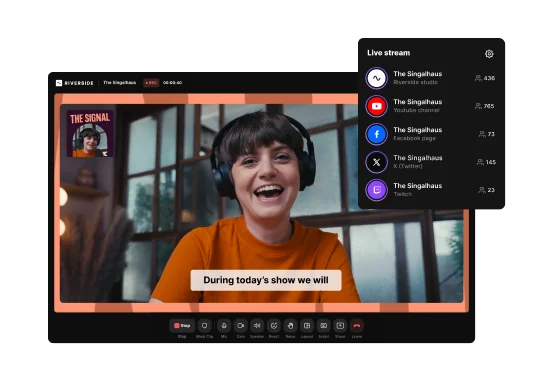
From your Riverside studio, click the “Live stream” button at the top and toggle the “Public audience link” button on.
Connect your broadcasting platform account (Twitch, YouTube, X, etc.) or a custom RTMP destination, and your livestream will be shared there. You can even stream on multiple platforms simultaneously.

From the right-hand sidebar you can also find many options to customize your stream.
From here you can:
- Add your own lower thirds, text backgrounds, and a logo.
- Choose a virtual background
- Pick speaker layouts
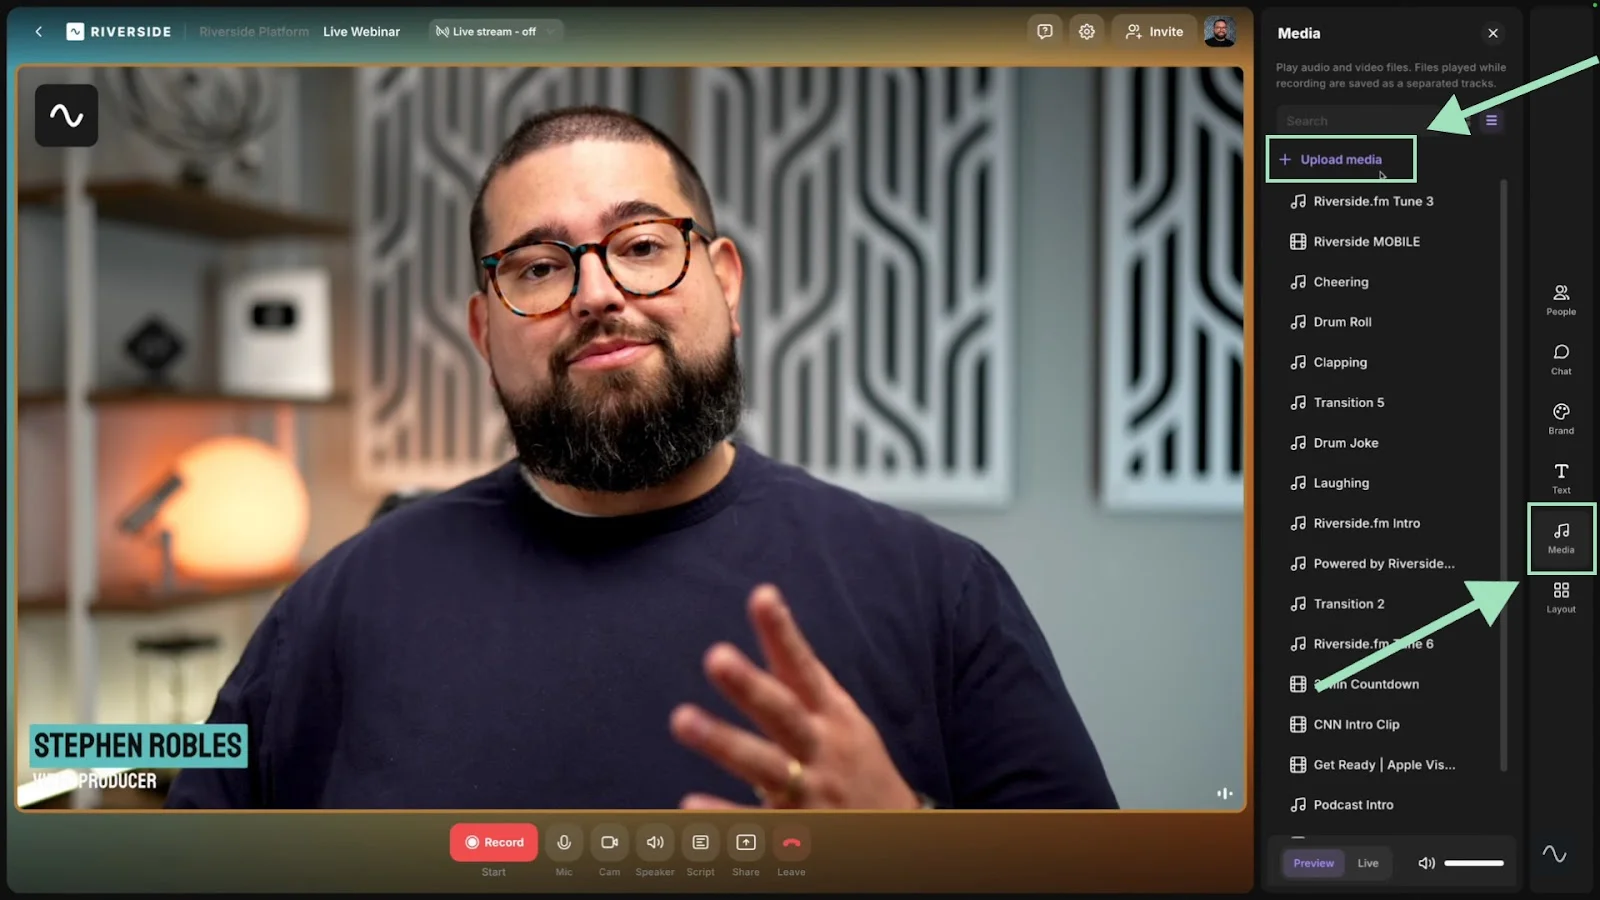
- Upload intro, outro, or background music to play throughout the show.
- Create overlays (e.g., on-screen elements, calls-to-action).
For in-person recordings, find a space that accommodates your audience. You’ll need good acoustics and enough space for stage setup and equipment. Make sure you’ve got decent lighting and that the stage is visually pleasing.
Arrive early to give yourself enough time to set up. Get familiar with the space, and run through the cue sheet with the team, so that you can troubleshoot any issues.
Step 7: Test your equipment
It is crucial to test all equipment before a live stream or in-person recording.
Give yourself enough time to troubleshoot and fix any issues that may arise. If you can, plan redundancies. Consider getting extra batteries, microphones, and a camera as backup.
It’s also smart to secure a backup guest and recording space.
Before going live, switch all phones and devices to “do not disturb”. Incoming calls, notifications, or apps can cause distractions or even technical glitches during recording and streaming.
You can test all your equipment beforehand from your lobby, or run a quick test on your studio before going live.

Step 8: Go live
Once you’ve covered all your bases and your guests are ready, it’s time to go live with your podcast.
Once you’ve set up your Riverside studio, you can start your live by clicking on the red “Go Live” button.
.webp)
Don’t forget you can increase your audience’s engagement by letting them jump in with live call-ins, or manage all your audiences with a unified chat!

You can also activate the teleprompter to read your script by clicking on the “Teleprompter” button at the bottom.

Step 9: Edit and repurpose your live stream
After your recording, it’s time to edit the content and repurpose it so that you can promote the episode as well as your brand.
With Riverside, you can edit your recording by deleting words like a document with text-based editing.

You can also repurpose your content into blog posts, social media assets, newsletters, and more just by chatting with Co-Creator. Just ask what you’re looking for with a prompt, and the AI agent assistant will generate it for you!
With Co-Creator, you can also generate short clips to share on your social channels, add B-roll, or even edit your recording just by chatting.
.webp)
The benefits of live podcasting
Live podcasting offers many advantages, including:
- Connection: Connect and engage with your audience in real time and make them feel more valued.
- Faster production: Substantially reduce production time as the episode is recorded and delivered in real time.
- Discoverability: Most social media platforms prioritize live streams in their algorithms as they keep users on the platform longer. Platforms typically send notifications to followers when someone goes live, leading to greater discoverability.
- Social proof: Leverage live viewer counts, active chats, and audience comments to show your relevance.
- Monetization: Boost your revenue potential by offering sponsors live podcast episodes where they can reach a larger, engaged audience and encourage real-time support from listeners through one-off tips and donations.
FAQS about live podcasting
How long are live podcasts?
There’s no set length for a live podcast, it depends on the format (live stream or in-person event), the style (solo, co-hosted, panel, etc.), and the structure of your show.
Plan your segments carefully and allow enough time for each one. For example, consider whether 15 minutes is sufficient for a Q&A session or if your audience would benefit from more time.
Where can I do a live podcast?
Nowadays, it’s pretty easy to do a live stream from anywhere. If you have the budget, opt for a professional studio, but if you don't, find a quiet space with adequate lighting and fast internet.
For in-person events, choose a venue that can accommodate guests and has the right equipment, acoustics stage for the podcast hosts and guests.
What do you wear to a live podcast?
Choose clothing that is comfortable and doesn’t blend into the background to avoid appearing as a floating head. Consider background noise and avoid wearing materials, watches or jewelry that may become distracting when you move.
Also, be kind to your audience and think about patterns that could cause visual distortions, distractions, or don’t film well on camera (e.g.,shiny fabrics, tight stripes, bold colors, overly busy prints). Skip logos and branding unless they’re intentional.
What’s the difference between a podcast and a live stream?
A traditional podcast is pre-recorded, edited, and then published at a later date. A live stream is recorded and aired in real time, in front of an audience.


.webp)