


Key takeaways:
- You need a professional account (Creator or Business) with at least 1000 followers to go live on Instagram.
- Go live on Instagram from the mobile app or use a streaming platform like Riverside to live stream from your desktop.
- Promote your stream with countdowns and reminders to create some buzz and maximize participation.
- Engage your audience during the session and repurpose the video for more visibility.
If you’re not even sure where the Live button is on Instagram, read on.
This article shows you how to go live on Instagram, step by step. I’ll walk you through how to start a stream from mobile or desktop, and what you need set up before you go live. By the end, you’ll know exactly how to start an Instagram Live and you'll pick up a few practical tips to avoid common setup mistakes.
What you need to go live on Instagram
Before you hit that ‘go live’ button, get familiar with Instagram’s requirements and the gear you’ll need for a successful stream..
Platform requirements
As of December 2025, to live stream on Instagram, you need:
- A public account with at least 1,000 followers.
- No recent policy violations.
Note: If you don't see the Live option, your account is likely <30 days old or has been reported for spam or abuse. (I'll cover how to troubleshoot this later in this guide.)
Equipment
For Instagram Live, your phone camera works just fine. You don’t need any specialized gear to get started.
That said, some of these upgrades can make a noticeable difference:
- Headphones to eliminate echo.
- An external mic for clear, crisp audio.
- A tripod so your video isn’t shaky.
Remember to keep your device charged or plugged in since live streaming drains battery quickly.
Read more: When you’re ready to level up and invest in some quality gear, check out our recommendations for live stream equipment.
Technical requirements
Plan to stream vertically since Instagram Live is built for portrait mode. If you're streaming from desktop, ensure that you meet these technical requirements:
- Aspect ratio: 9:16
- Resolution: 720 by 1280 pixels
- Audio sample rate: 44.1 kHz
- Channel layout: Stereo
- Audio bit rate: Up to 256 kbps
- Video bitrate range: 2,250–6,000 kbps
.webp)
How to go live on Instagram on mobile (iPhone & Android)
Instagram Live is designed primarily for the mobile app. That’s why it’s fairly easy to start a live stream on your phone. Here's how I do it.
Step 1: Open Instagram and tap the plus (+) button
Tap the + button on the top-left corner of your feed or profile page.
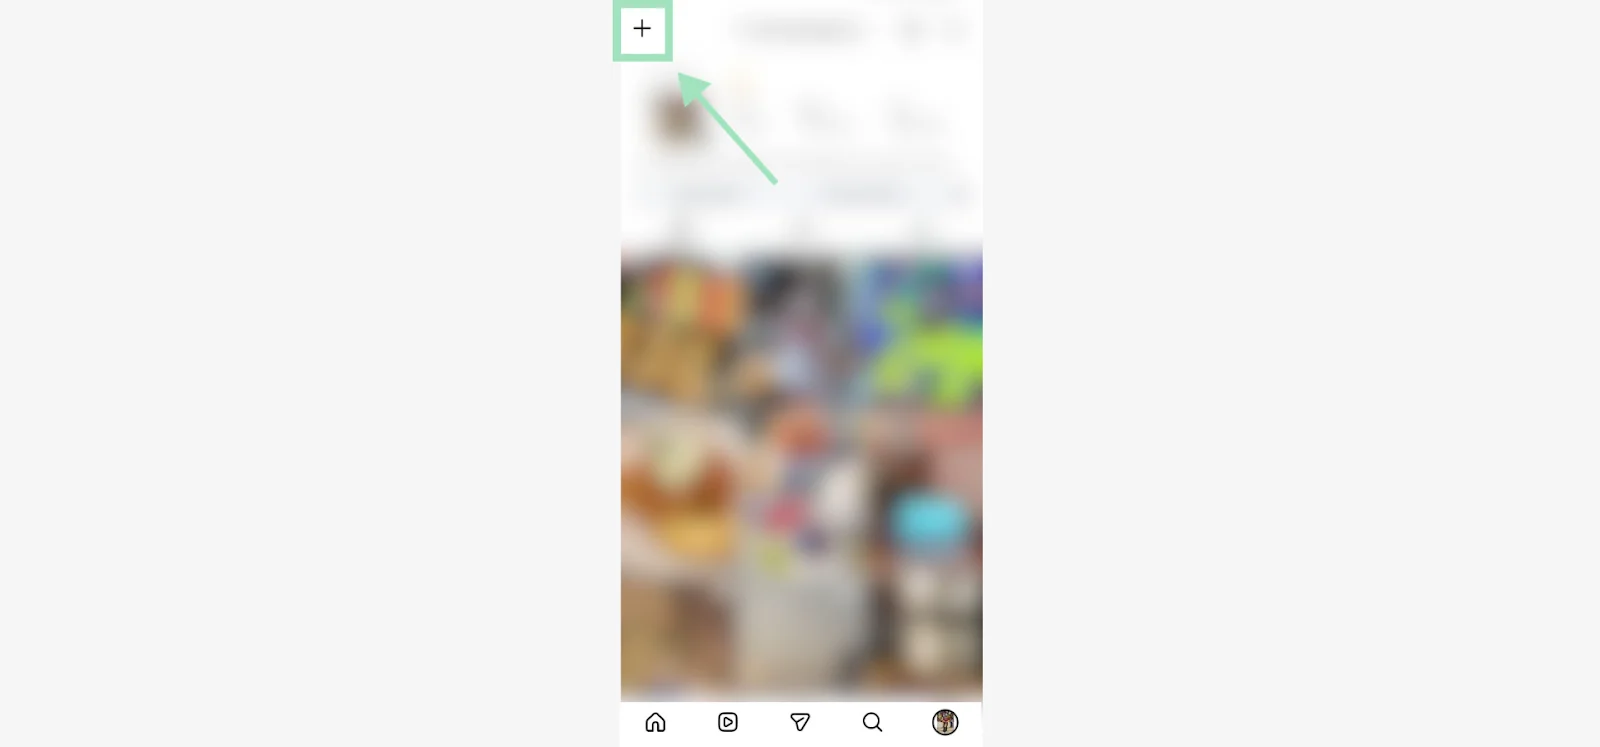
Alternatively, you can swipe right from your feed to open the camera, then select Live from the bottom menu. All of these methods get you to the same setup screen for Instagram Live.

Step 2: Check camera/mic and choose filters
Decide which camera angle works best for what you're doing:
- The front camera (selfie mode) is perfect for a direct conversation with your audience
- The rear camera works better when you're showing something around you.
You can also pick a filter from Instagram’s library to add a fun visual effect to your stream.
Pro tip: I frequently use the green screen filter to create a custom background. It’s a handy way to make your streams look consistent and on-brand without an actual setup behind you.
Step 3: Add a title and designate your stream’s privacy settings
Click the “Add a title” field to type in a title for your stream. Make it specific enough that people know why they should join.
On the top of your screen, you’ll see the option to choose who you stream to (set to Public by default). You can also switch to Practice mode (no viewers) or Close Friends if you want a smaller, more intimate broadcast.
I always run a practice stream first to check my lighting, audio, and internet connection before going public.
Step 4: Press Go Live to get started
When you’re ready, tap the circular button. Instagram will start a 3-second timer before your stream officially starts.
Step 5: Use engagement tools during your live stream
Once you’re live on Instagram, use some of the platform’s tools to engage your viewers.
For starters, pin a comment to give some context to anyone jumping in mid-stream.
You can also press the image icon on top of the tools menu to select any image or video from your gallery. This condenses your camera into a talking head video and displays the asset in the main frame.
Click the people icon at the bottom to invite guests to join your stream (I'll walk through that later on). Or toss out a few questions to get people talking in the comments.
Step 6: End your stream
When you're ready to wrap up your session, give your audience a quick heads-up so they're not caught off guard. Then tap the X icon in the top-right corner and confirm you want to end the broadcast.
After your Live ends, Instagram shows you insights about your viewers and engagement. You can save the video, discard it or even restart the stream if you want to bring on more guests.
.webp)
How to go live on Instagram on desktop
The mobile app is the quickest way to go live on Instagram. But if you want more control over your production quality, streaming from desktop is the best move.
Instagram Live Producer lets you use third-party live streaming platforms like Riverside to go live with better camera setups, professional-grade audio, and more post-production flexibility.
Here's how to set it up.
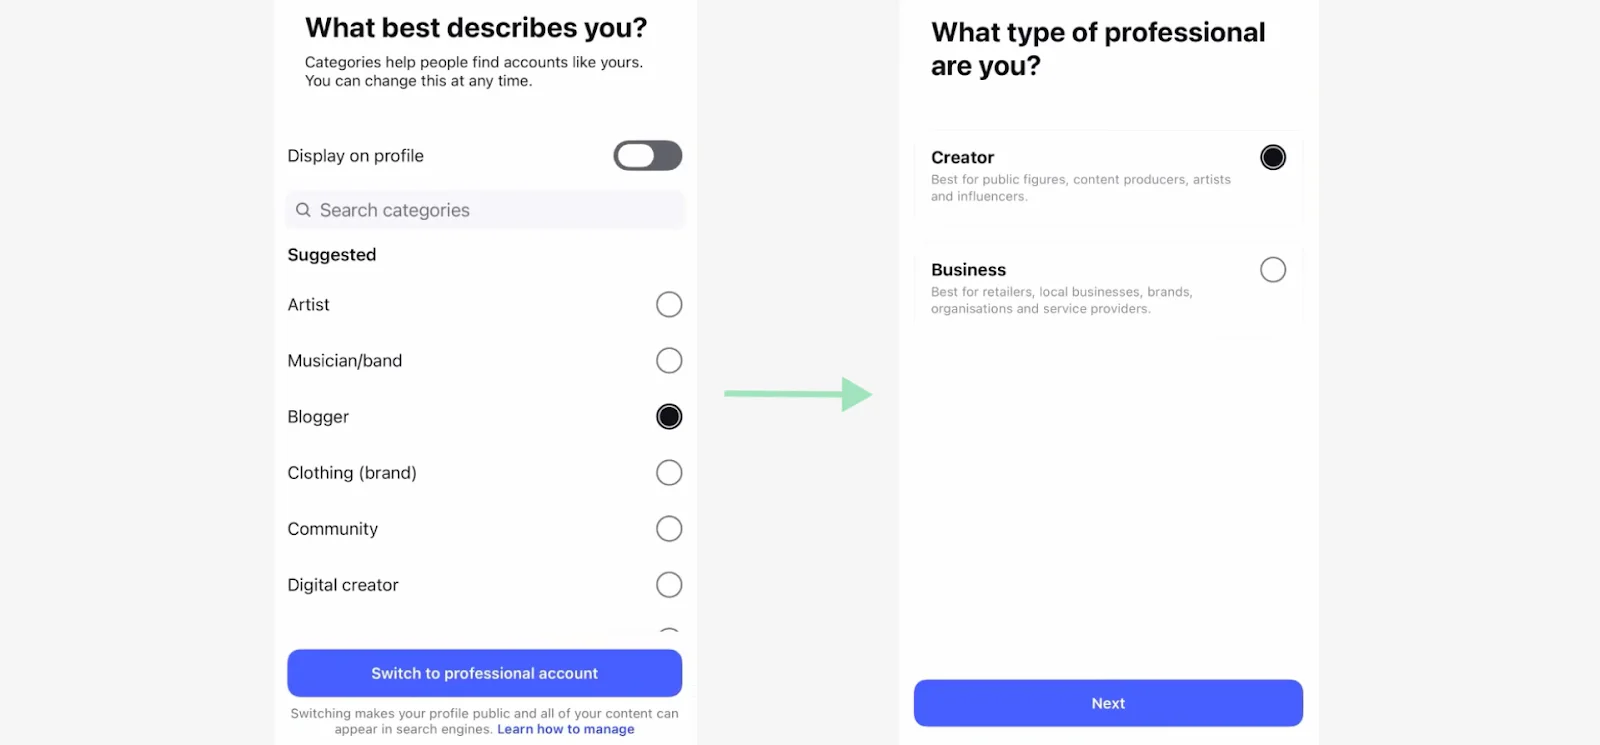
Step 1: Switch to a professional account
Instagram Live Producer only works with Professional accounts (Creator or Business profiles), not personal ones. If you switched yet, it takes about 2 minutes.
Open the Instagram mobile app, go to your profile and tap the ☰ "More" button in the top-right corner.
.webp)
Navigate to Account type and tools > Switch to professional account.
.webp)
Follow the prompts to choose a category and pick a Creator or Business profile.
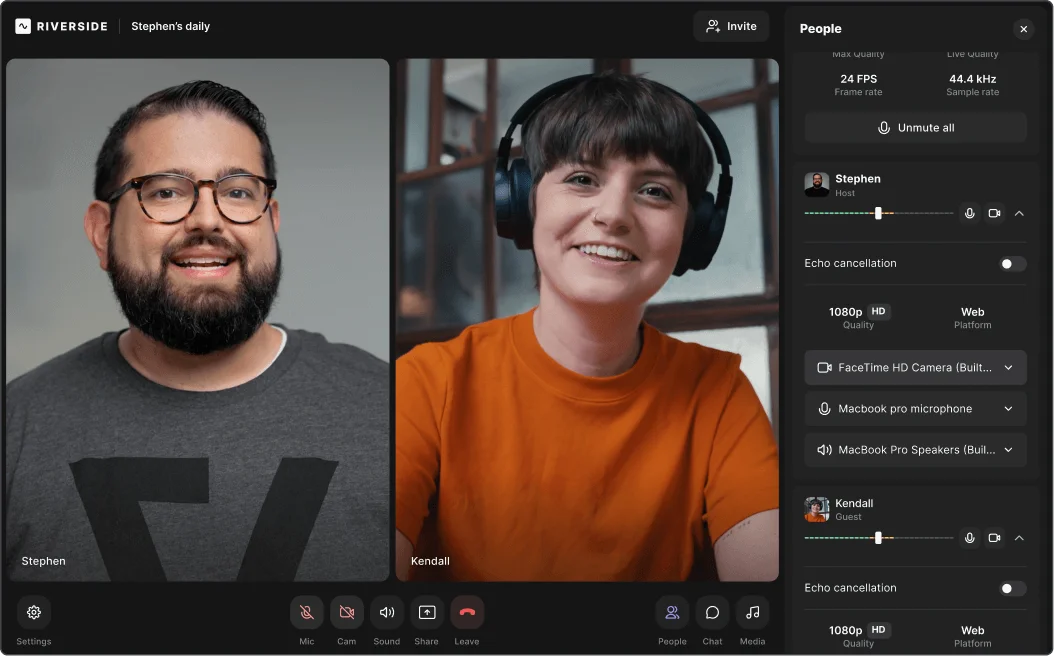
Step 2: Open Riverside and start a recording session
Once your Professional account is live, log into Riverside and start a new live session. Select your camera and microphone, then hit “Join studio” to prep your stream.

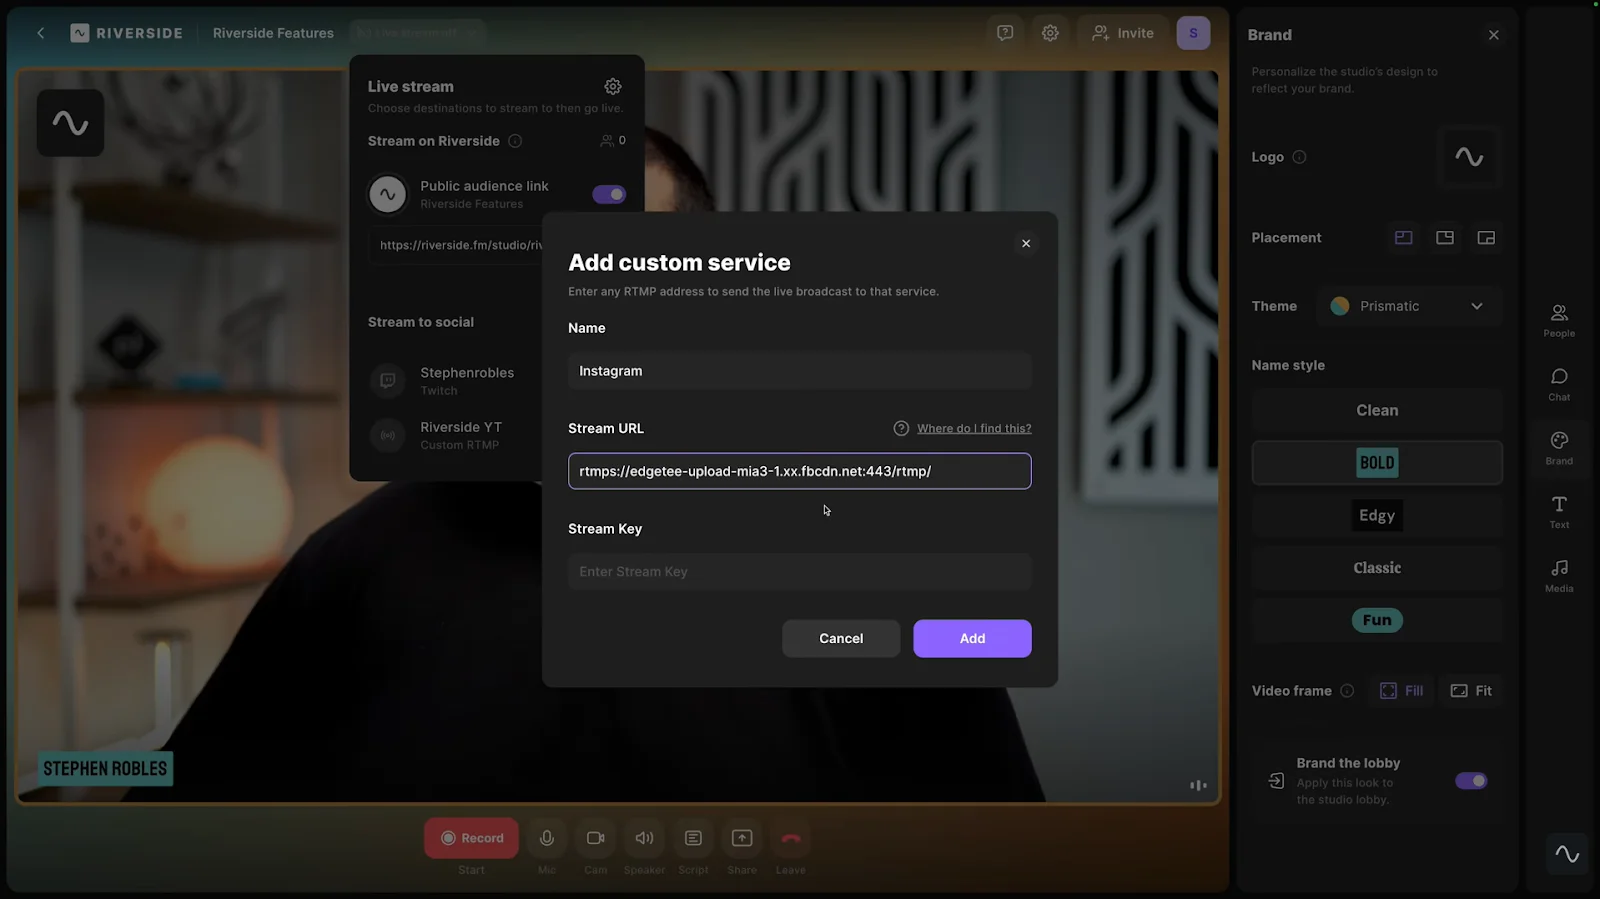
Step 3: Set up an RTMP connection for Instagram Live
Inside your Riverside studio, click “Live stream ready” in the top menu. You'll see a list of platforms you can broadcast to.
.webp)
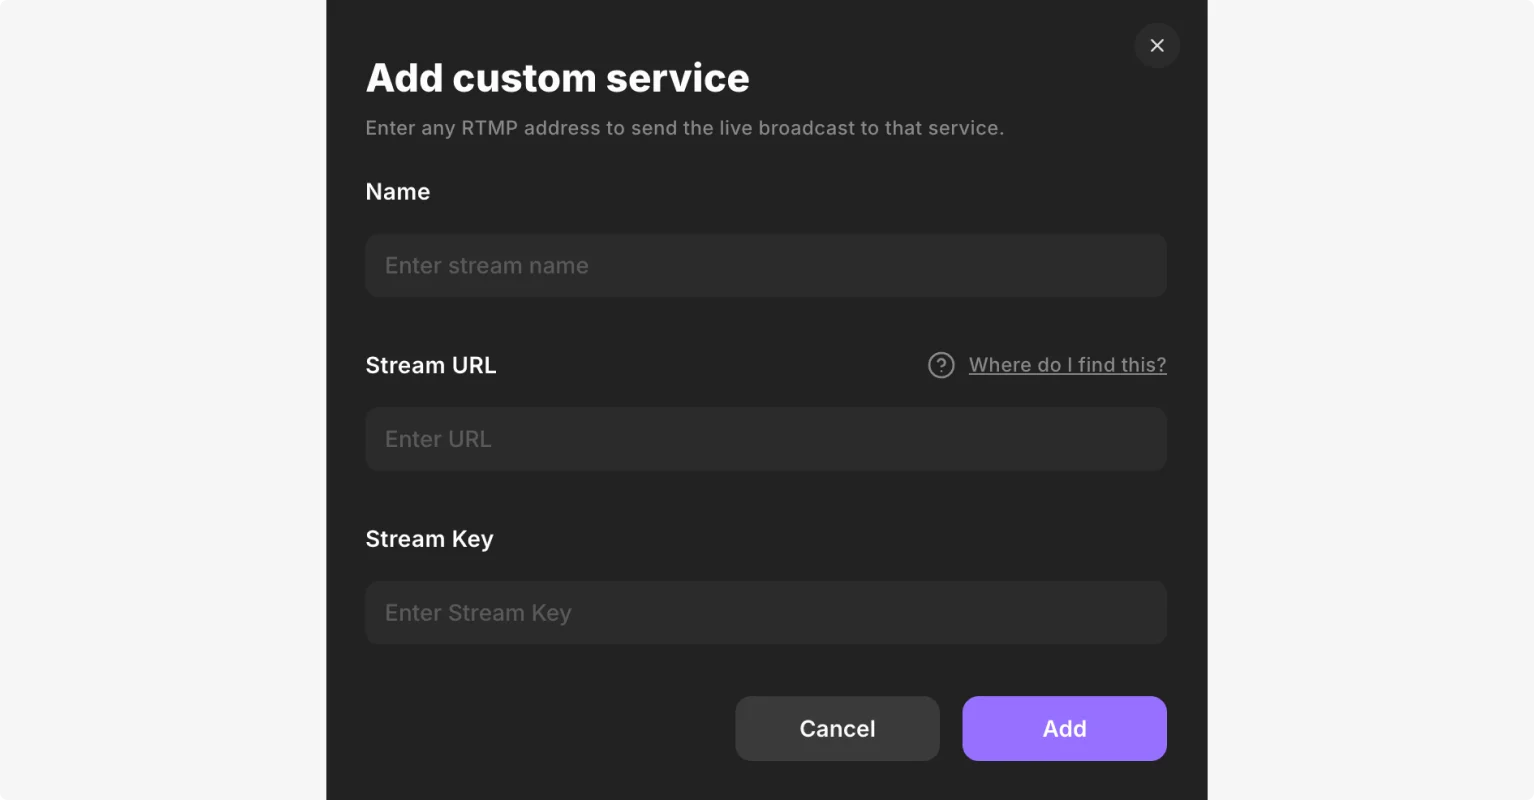
Hit the + icon and select the custom RTMP option.
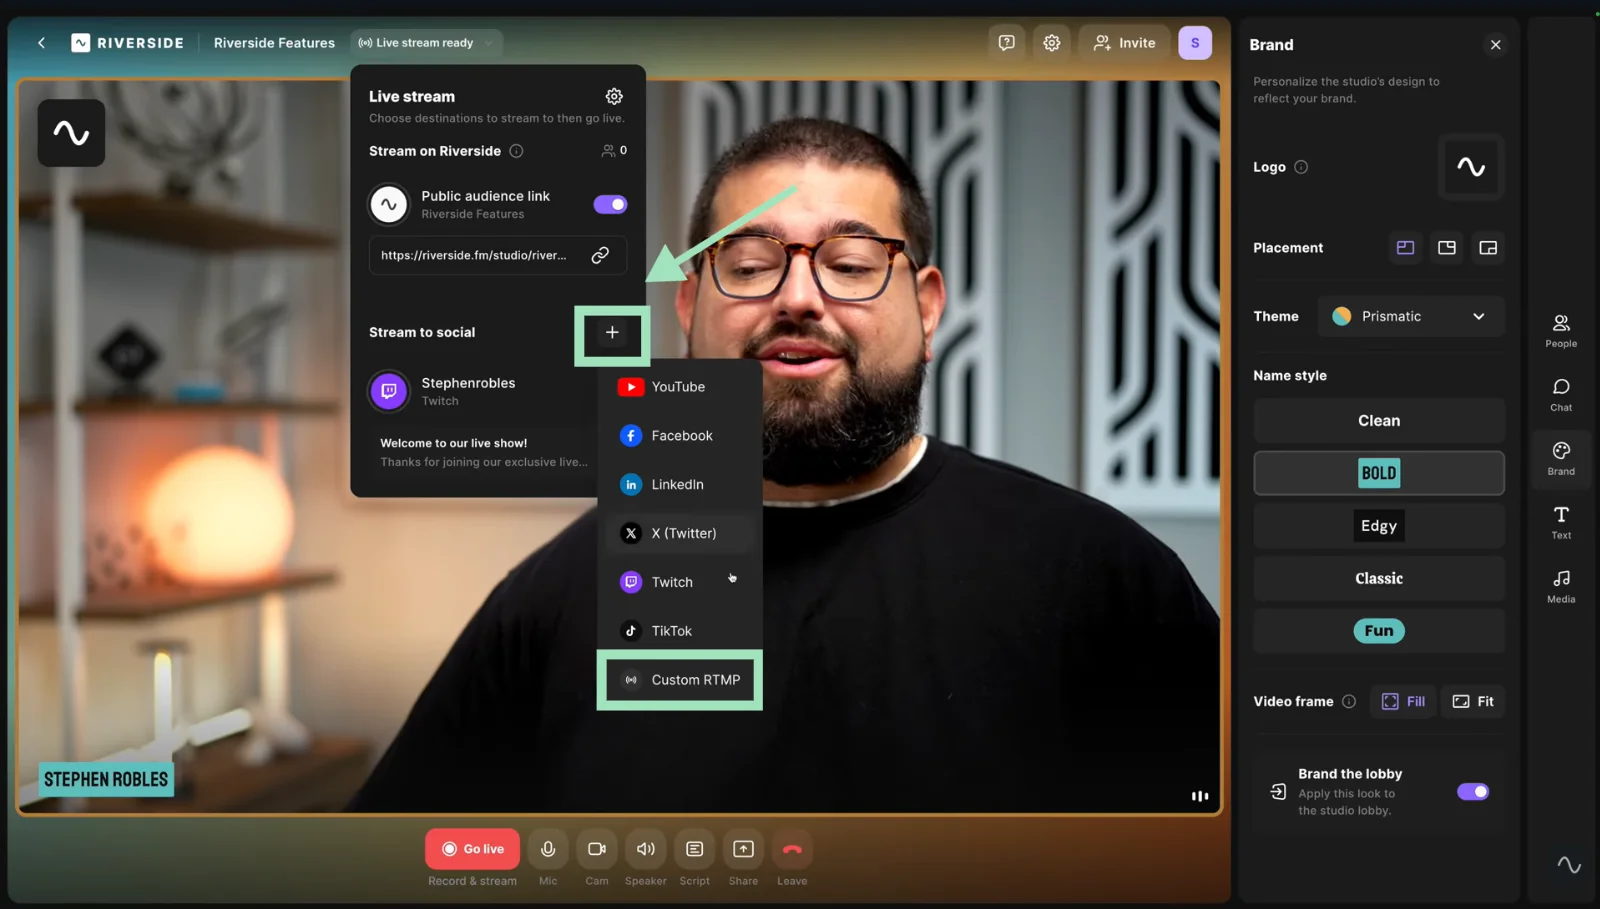
A new window will open asking for your Stream Key and Stream URL. You’ll find these details on Instagram.
Step 4: Get your stream key from Instagram
Head to Instagram on your desktop, click the “+ Create” button, and select “Live video.” Add your title and select your audience/privacy settings, then hit “Next.”
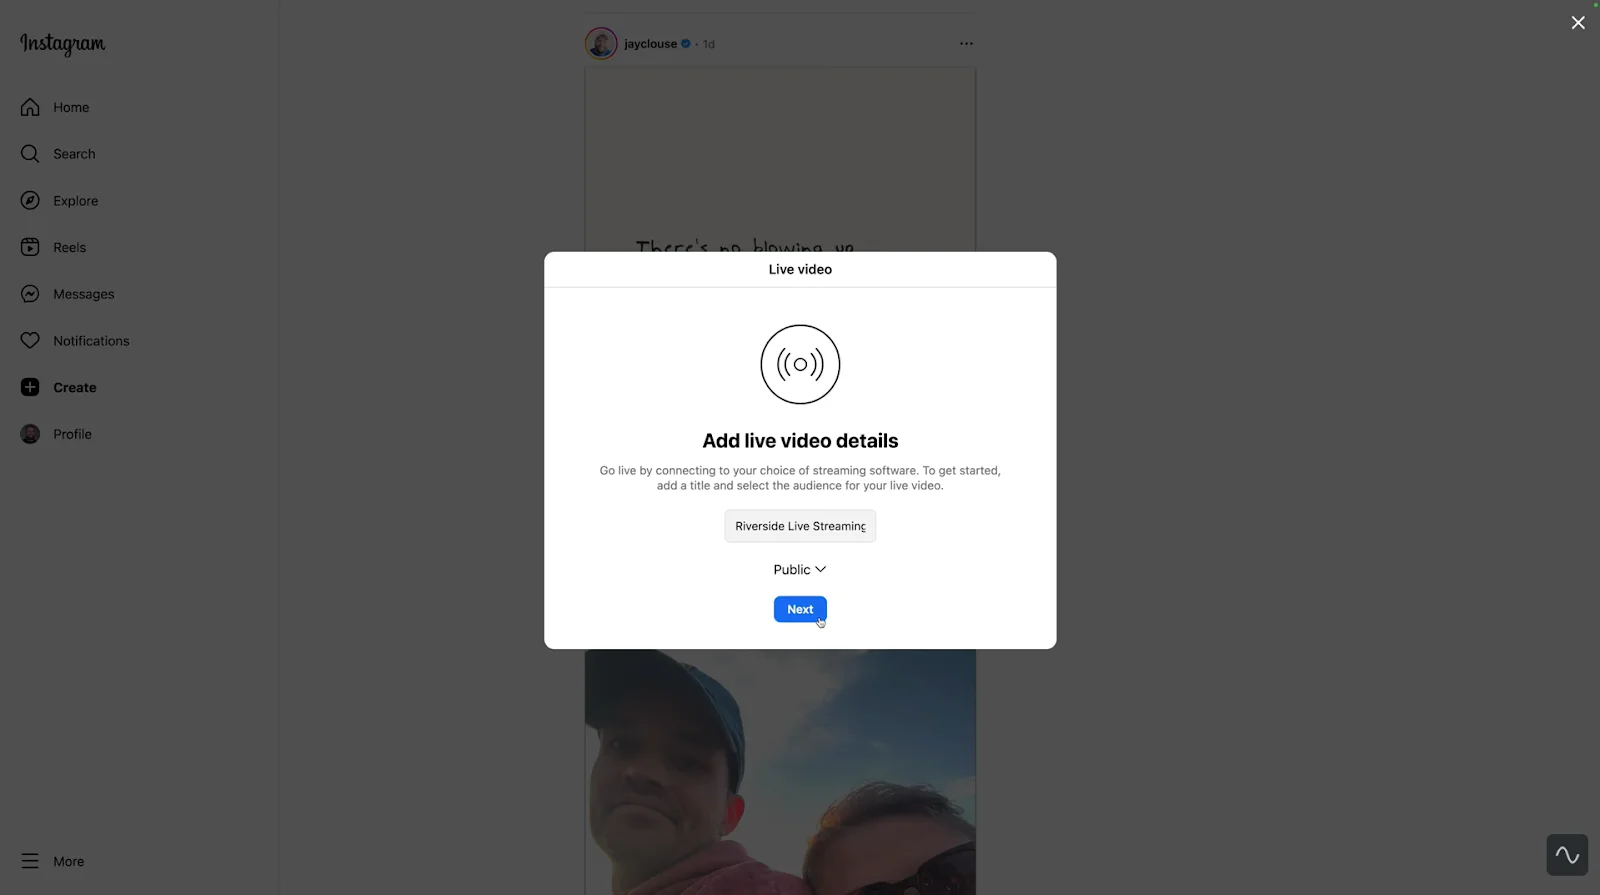
Instagram will generate a unique stream URL and stream key for you. Copy both for the next step.
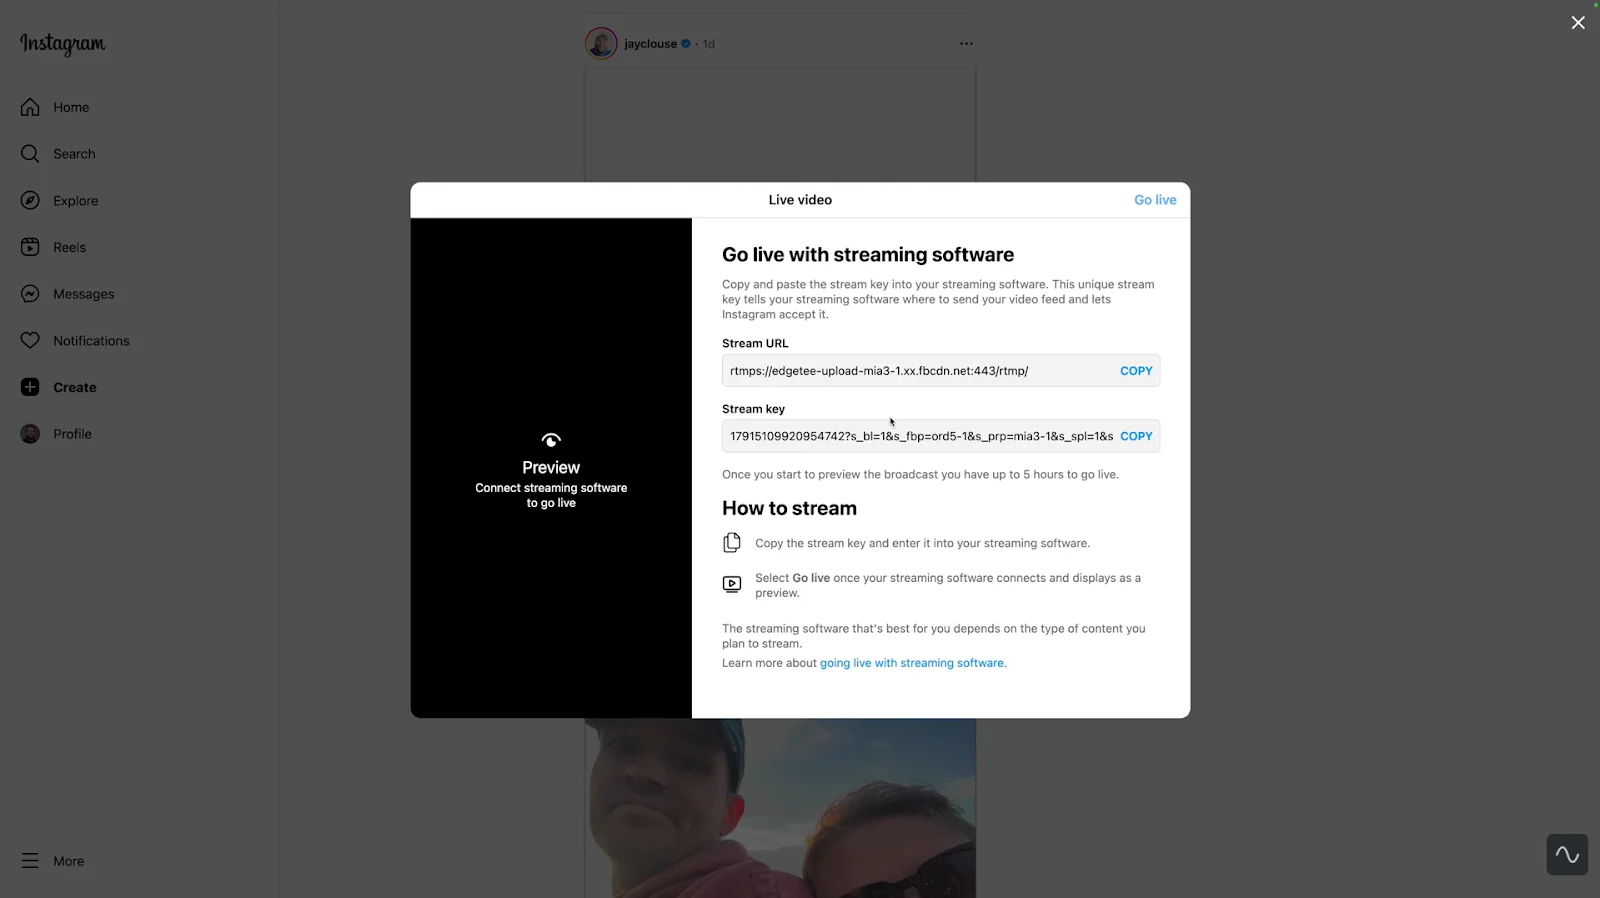
Step 5: Add your stream key to Riverside
Paste the stream key and URL from Instagram into your Riverside RTMP setup. This connects Instagram as a live destination in your Riverside account.
Step 6 (optional): Customize your Riverside studio
This is where desktop streaming really shines for Instagram Live. With Riverside, you get production-level control that the mobile app just can't match.
Start by customizing your studio branding. You can choose from preset themes or build a completely custom look with your own colors, backgrounds, logos, and video frames.
I've found that a branded setup makes your sessions feel more intentional, even if the content itself is casual.

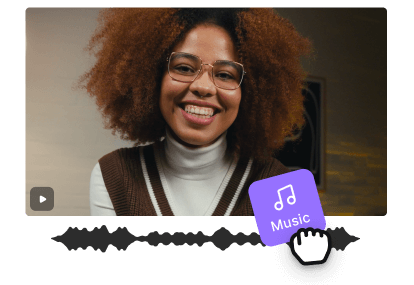
Next, build out your media board by queuing up:
- Video clips (B-roll, pre-recorded segments).
- Audio tracks (intro music, background soundscapes).
- Transitions to move between different parts of your session.
These elements are especially useful if you're doing product demos, interviews, or tutorials where you need to switch between live commentary and prepared content.

And my favorite feature to use in Instagram Live is Riverside’s teleprompter. If you're worried about losing your train of thought mid-stream or want to hit specific talking points, add your notes or even a full script. Seeing some structured notes keeps me from rambling or forgetting key points when I get distracted by comments.

Step 7: Start your Instagram Live
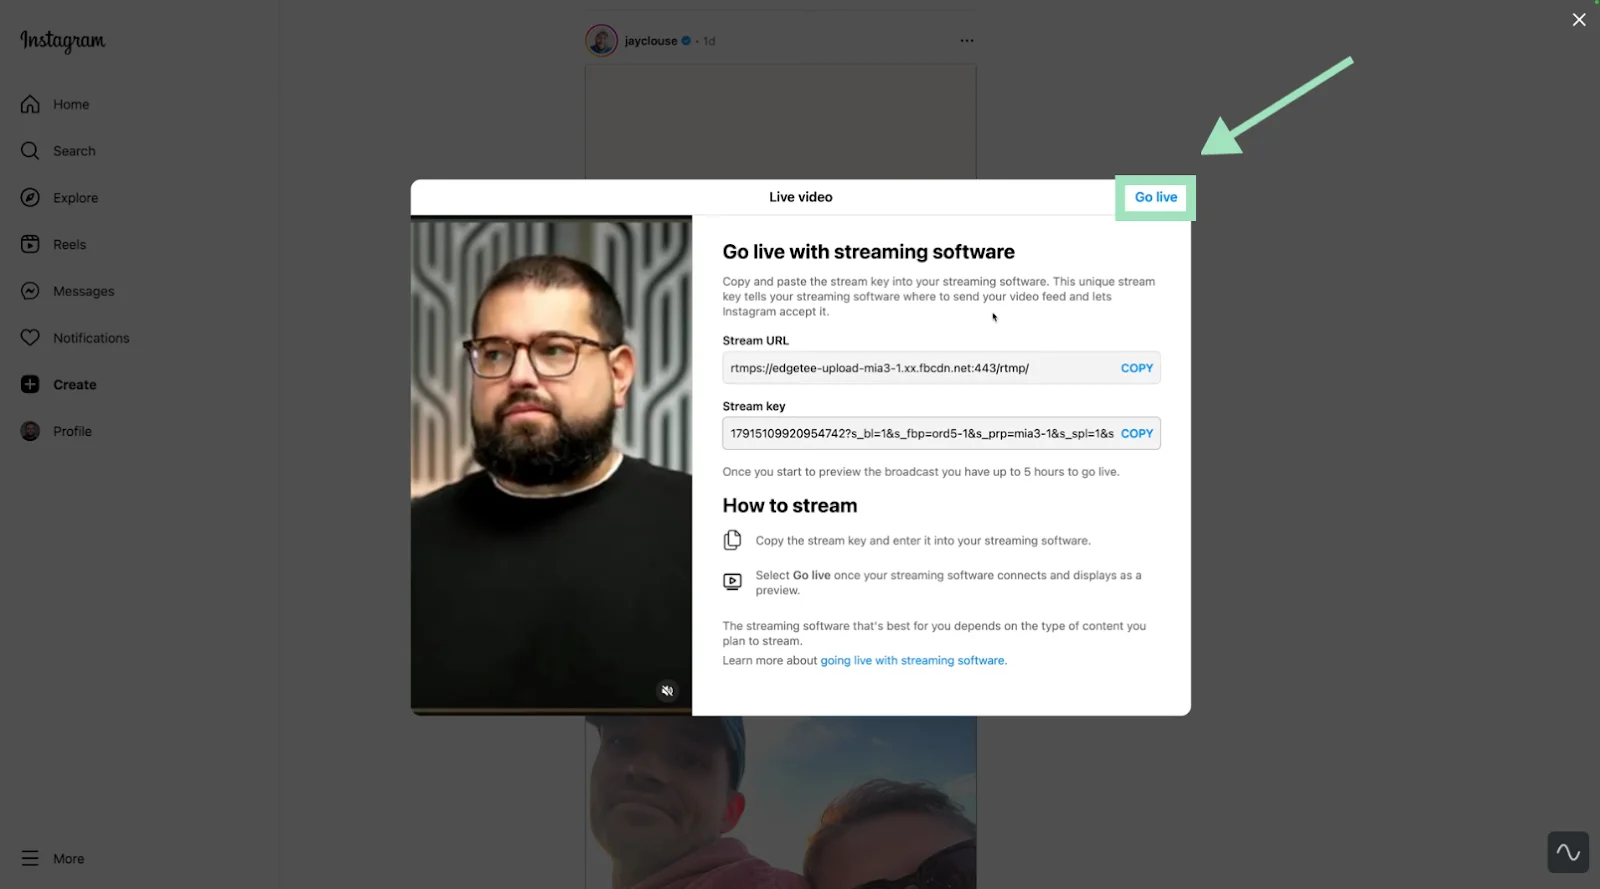
In your Riverside studio, hit the “Go Live” button to send your video feed to the Instagram RTMP server. Check the Instagram Live Producer preview in your browser to ensure your feed is coming through.
Once it’s visible, click “Go Live” on Instagram Live Producer. That's when your broadcast officially starts and your followers get notified.
Step 8: End your live stream on Riverside
When you want to finish the session, hit the stop button on your Riverside account. This will stop the stream on both platforms.

Read more: Learn how to multistream on Instagram and Facebook to reach a bigger audience.
How to go live with a guest: Live rooms and guest requests
Going live with a guest is great because you can get in front of someone else’s audience. Instagram automatically switches to a split-screen layout when someone joins your live stream, so all speakers are visible at once.
How to go live on Instagram with a guest from the app
On Instagram’s mobile app, inviting guests is straightforward. Tap the people icon next to the comments bar, and you can search accounts to invite as co-hosts.
How to go live on Instagram with guests on desktop
Desktop streaming through Riverside works a bit differently. But it gives you more control over who joins and how the conversation flows. Let’s look at the setup.
Note: When you're streaming via RTMP from Riverside, you can't use Instagram's native “Add Guest” button to pull in guests directly from the platform. Instead, you'll invite them through Riverside before or during your stream.
Step 1: Invite guests to your Riverside studio
Once your live stream studio is ready, click the “Invite” button on the top-right part of your screen. You can send invites via link or email.
I always recommend doing this ahead of time so your guests aren't scrambling to join while you're already live.
.webp)
That said, you can also send invites mid-stream if you want to bring someone on spontaneously. This option is available throughout your broadcast.
Step 2: Approve your guests’ request to join
With Riverside, you can invite people as:
- Guests: Speakers who join your stream to participate in your live session.
- Audience: Viewers who can request to call into your stream for asking questions.
When an invited guest wants to join, you'll get a request notification. Approve it, and they'll pop into your stream in a split-screen view.
And when an audience member requests a call in, you’ll see their request to join with their name and question (if added) like this.
.webp)
You can also rotate people in and out as the conversation shifts. This is great for panel-style sessions or Q&As where you bring on multiple experts.
Learn more: Explore how Audience Mode works in Riverside to interact with your audience on Instagram Live.
Step 3: Manage participants’ audio
You can mute any participant's audio if there's background noise, feedback, or an accidental interruption. I've had guests join from coffee shops or co-working spaces. Being able to control their audio without kicking them off entirely keeps the stream distraction-free for everyone.
You can also remove a guest completely if needed, though that's usually a last resort.
My tested best practices for Instagram Live
Now that you know how to go live on Instagram, let's talk about what actually makes a stream worth watching and sticking around for.
How to engage your audience during your Instagram Live
You've prepped everything. Your lighting's good, your audio's clean, and you go live. But then people trickle in, watch for 30 seconds, and leave. Nobody's commenting or staying for long.
After dozens of good and bad live streams, I've figured out what keeps people engaged from the moment they join to the second you sign off. Here's what works:
- Start with a warm open: The first few minutes set the tone for everything. When viewers join, greet them by name if possible. Give them context: “Hey [username], thanks for jumping on. Today we're covering [topic], and I'll also be answering your questions at the end.”
- Use pinned comments: As soon as you go live, drop a comment that explains what this stream is about and include a clear call-to-action. Pin it to the top of the chat. New viewers shouldn't have to guess why they're here or what you want them to do.
- Ask direct questions: Interact with your audience by asking short, direct questions that people can quickly answer in the comments. Instead of asking “What do you think about [topic]?” say something like “How many of you have seen this in real life?” or “Send me a 🔥if this has happened to you.”
- Bring in a guest (or 2): Invite collaborators, customers, or industry experts to join your session for a more dynamic conversation. This brings their audience into your stream, adding a new set of viewers that you might not have had access to.
- Do mini segments: Instead of talking endlessly about a topic, break your session into multiple short segments. I'll often pause between segments to check the comments and answer a few questions before moving on. This keeps pacing tight and gives viewers natural moments to jump in.
- Tease the next thing: Give viewers a reason to stick around. Pepper in phrases like “In 5 minutes, I’ll reveal…” and “Stay with me till the end because we're doing a giveaway.” Build some anticipation at regular intervals.
- Reward participation: Give shoutouts to people actively participating in your streams. When you make them feel seen, they’re likely to engage instead of passively watching. And it’ll create a cycle of interaction.
- Close with a clear CTA: End your live stream event with 1 well-defined action you want viewers to take. It could be to visit a link in your bio, join your email list, participate in a contest, or something else. You essentially want to tap into the highly-engaged audience that stayed till the end.
You can always share a poll asking your followers what they like/dislike about your live streams. Direct feedback for the win!
How to download and repurpose your Instagram Live
You just wrapped a great live session. Now what? You want to save this video and create some highlights to share with your audience. Here's how.
Download your live video on mobile
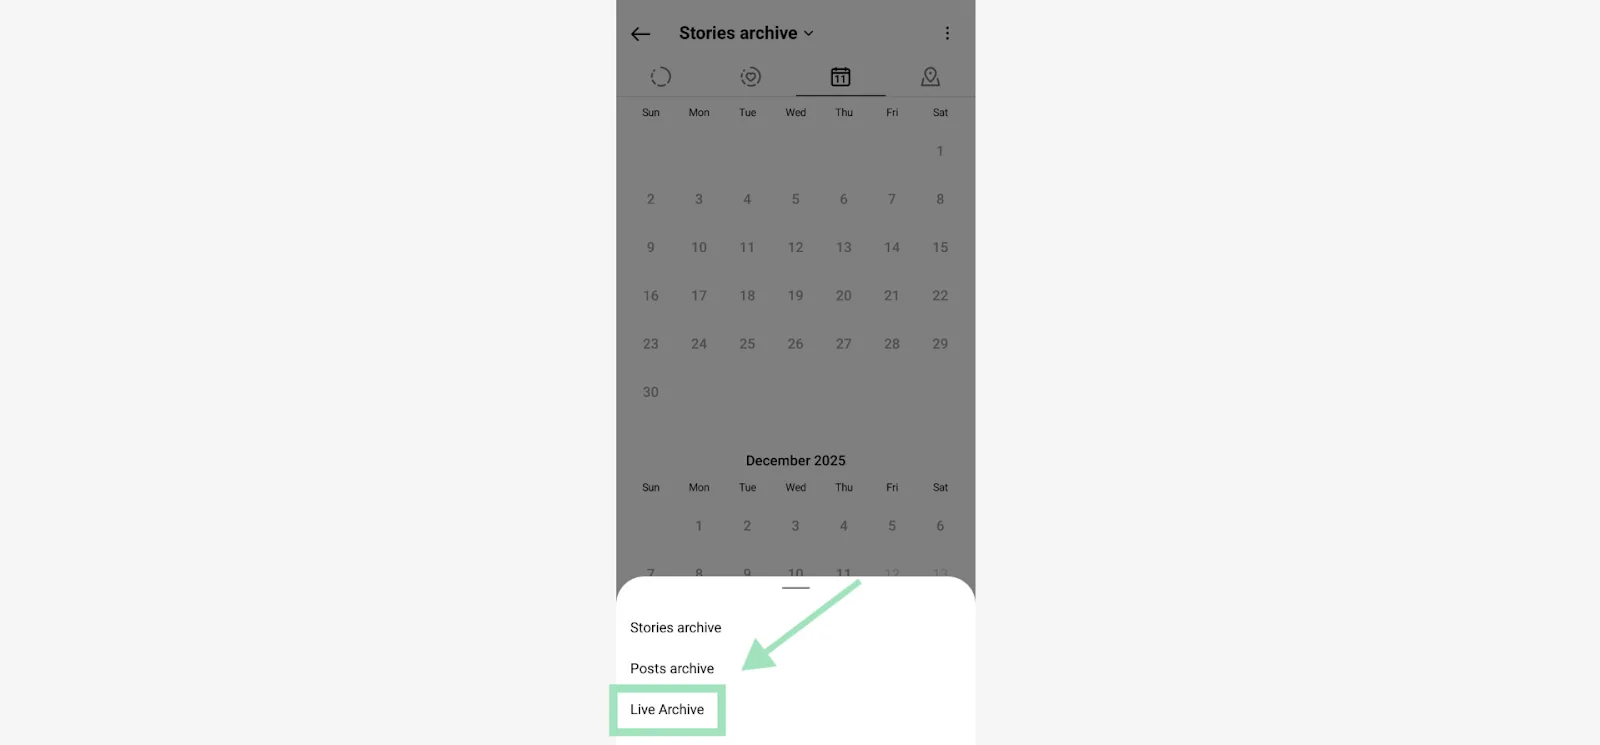
If you streamed from the Instagram app, follow these steps to save the video:
- Go to Settings > Archive.
- Select “Live Archive” from the list.
- Open the live video you want to save and click the download icon on the bottom menu.
The video file saves directly to your phone.
Note: The downloaded version won't include any comments from the stream. So if you want to capture audience reactions, screenshot or screen-record those separately.
Download and edit video on desktop
When you stream through Riverside, your videos save at a much higher resolution than Instagram's mobile app. That's because Riverside creates local recordings. So even if your stream buffers or cuts out due to shaky internet, your video stays sharp and your audio stays clear.
Plus, your video files are saved to the cloud during the stream itself. That means you can start editing videos as soon as your stream ends.
Learn more: Wondering what local recordings are? Learn how local recordings are better than cloud recordings for live stream events.
Here's where Riverside's editor becomes incredibly useful for repurposing Instagram live videos:
- Magic Clips: AI pulls out the best moments and turns them into short, ready-to-post clips. I use this to create highlights for Reels or Stories without manually scrubbing through an hour of footage.
- Multi-track editor: Riverside saves each participant’s video and audio tracks as separate files. If you had multiple guests on your stream, edit their tracks individually without affecting other speakers. The text-based editor makes it easy to polish up your video in a few minutes while AI cleans up all the ‘ums’ and ‘ahs’ for a smooth flow.
- Co-creator: Get more out of your Instagram live stream with Co-creator. Prompt it to turn your Instagram stream into a blog post, newsletter, or short-form video script. I've used it to extract key takeaways from longer streams and turn them into LinkedIn posts.
- Audio cleanup: Remove filler words, dead air, and awkward pauses automatically. Magic Audio also strips out background noise, reduces reverb, equalizes sound levels, and adjusts volume so your final output sounds professionally mixed.
- Show notes: Generate a title, description, takeaways, and soundbites for your Instagram live in a single click. This is perfect for creating a recap post for people who missed the live stream.
How to schedule and promote your Instagram Live
Whether 20 or 200 people join your live stream comes down to how you promote it. Let me break down how I get people to actually show up to my live sessions on Instagram.
Schedule your live
On the Instagram mobile app, you'll see a calendar icon when you set up a live stream. Tap it to schedule your session for a specific date and time. Add a descriptive title and cover image so people know what to expect.
Once it's scheduled, you can share it as a Story, post, or direct link. Your followers can set a reminder, which means they'll get a notification when you go live.
Note: Currently, scheduling an Instagram Live is not possible on desktop.
Promote and cross-post your live
You may get a much better turnout by promoting your Instagram Live beforehand.
I prefer scheduling a live stream and sharing it on a Story at least a day in advance. Even when I can’t schedule a live beforehand, I spread the word by saying something like, “I’ll be going live on [Date] at [Time] to talk about [Topic]. Join me!”
Here’s a great example of promoting your live session through an Instagram post with a calendar link for the event:
.webp)
I also try to share short teaser clips previewing what the stream will cover. It gives people a taste of what's coming to create some buzz.
Add a countdown sticker to your Instagram Story when you're about to go live. It notifies followers the second you start. And don't limit promotion to Instagram. Cross-post on X, Facebook, Threads, LinkedIn, and wherever your audience hangs out.
And if you're bringing on a guest, coordinate with them to promote the stream from both accounts. Their audience becomes your audience, and vice versa.
Instagram Live not working? Try these troubleshooting tips
I’ve had my fair share of issues with Instagram Live over the years. Here's how to fix the most common hiccups.
Account and app issues
- Live option not showing at all: Make sure your app is updated to the latest version. Older versions might not support Live. Once updated, force-close and reopen the app. If the Live option still isn't there, your account might be too new or you might have restrictions on your account.
- “Blocked from Live” message: Instagram has temporarily disabled your live streaming, usually due to a policy violation. Some common triggers include copyrighted music or being reported for inappropriate content. If it's a temporary ban, you'll need to wait anywhere from 24 hours to a week or more.
Audio problems
- Audio echo or feedback: This happens when your microphone picks up sound from your speaker. Use headphones to break the loop. If you're hearing an echo and you're alone, check if you have Instagram open on another device and mute it.
- Low volume or no sound: Check your phone's media volume first. Some phones treat Live audio as media, so it might be muted even if your ringer is on. If you're using an external mic, make sure it's properly connected. I always ask “Can everyone hear me okay?” at the start of every stream and watch the comments for confirmation.
- Sound distortion: If your audio is slightly out of sync with video on mobile, there's not much you can do. On a desktop, this can happen if your capture card or camera has a delay. If a guest's audio doesn't match their video, it's usually a network issue on their end.
Video and connection issues
- Choppy stream: This is almost always an internet problem. Run a practice stream first to test your connection. If it's choppy, switch to a stronger network or move closer to your router.
- Blurry image: On mobile, tap and hold your screen to lock focus and exposure. This prevents the camera from constantly refocusing. Also, clean your camera lens before the stream.
- Performance issues: Live streaming is intensive for phones because it uses your camera, processor, and network, all at once. Some phones can overheat. Close all background apps before going live to free up memory. Keep your phone plugged in to avoid battery drain, but if it starts overheating, unplug it and let it cool down.
RTMP and encoder errors (PC)
- Invalid stream key: Instagram's stream keys expire after a few hours, so don't generate yours too early. Also, make sure you're copying the entire key with no extra spaces or missing characters.
- Wrong aspect ratio: Instagram Live Producer supports 720p resolution at 30 FPS. Make sure your streaming setup follows these parameters. And you want to stream in an H.264 format with AAC audio, which most software does by default.
- No preview on Live Producer: If Riverside is streaming but Instagram's web preview is blank, your network might be blocking RTMP. This happens on some corporate or public Wi-Fi. Switch to a different network.
- Buffering: Set your constant bitrate (CBR) between 4000-6000 kbps for video and up to 256 kbps for audio. Also, close any background uploads or downloads while you're live (they'll compete for bandwidth and cause buffering).
FAQs about going live on Instagram
How many followers on Instagram to go live?
You need 1,000 followers to access Instagram Live (as of December 2025). This requirement applies to all users, with additional restrictions for teens under 16.
If you don’t see the Live feature despite meeting this threshold, try updating your Instagram app to the latest version. And, check for any account restrictions or policy violations that might block access.
How to go live on Instagram without 1000 followers?
It's no longer possible to go live on Instagram with fewer than 1,000 followers. Instagram created this minimum follower requirement in August 2025 to reduce spam and improve stream quality.
You'll need to grow your audience organically to 1,000 followers before accessing Live features.
How do I hide or remove comments in Instagram Live?
During an Instagram Live, you’ll see a comments bar at the bottom of your screen. Press the three dots on this bar to find the option “Turn off commenting.”
To filter specific content, set up keyword filters in your settings to automatically hide unwanted terms. For individual problematic comments, tap directly on the comment to restrict or block users who violate community guidelines or disrupt your stream.
How long can an Instagram Live be in 2026?
Instagram Live sessions can run up to 4 hours per broadcast for eligible accounts. That said, keep in mind that longer streams tend to see higher viewer dropout rates.
Plan strategic breaks with Q&A sessions or content resets to maintain engagement in longer sessions. If you reach the time limit, end with a clear call-to-action and schedule a follow-up session to continue the conversation with your audience.
Can I go live on Instagram from a computer without third-party tools?
No, you can’t go live on Instagram from a computer without third-party tools. The only way to go live on Instagram from a desktop is through the Live Producer. This tool generates a stream key that works with third-party streaming platforms like Riverside.
There's no native desktop camera app that works like the mobile version without an encoder. So, the only option is to use a streaming platform.


.webp)
.webp)

