.webp)


Key takeaways:
- Your public account must have at least 1,000 followers to start a live stream on Instagram.
- Your page must be at least 60 days old and have 100 followers to start a live stream on Facebook.
- Use Riverside to multistream to both Facebook and Instagram at the same time from your desktop.
- You’ll need two devices to multistream to both Facebook and Instagram on mobile.
Want to reach your audience on Instagram and Facebook at the same time? With multistreaming, you can broadcast your content across platforms.
In this guide, we’ll walk you through how to multistream on Instagram and Facebook from both desktop and mobile devices. You’ll learn requirements, limitations, and the easiest setup options.
Requirements for going live on Instagram and Facebook
Before going live on Instagram and Facebook, you must meet each platform’s requirements. Let’s take a look at what they are:
Requirements for going live on Instagram
To go live on Instagram, you need:
- A public Instagram account with at least 1,000 followers.
- The latest version of the mobile app to stream on mobile.
- A professional Instagram account and desktop streaming software like Riverside to stream from your desktop.
- An account in good standing (no violations, bans, restrictions, or reports against your account).
- Live streaming is switched off by default if you have a Teen Account. You’ll need permission to switch it on from your parent or guardian.
Requirements for going live on Facebook
To go live on Facebook, you need:
- A Facebook account that is at least 60 days old.
- At least 100 followers if you’re streaming from a Page or Professional Mode profile.
- The latest version of the app for your mobile device.
- The Google Chrome web browser. Streaming software isn’t required (but it makes things easier!)
- To go live from a Page, you need Admin, Editor, or Content Creator/Task access.
Recommended equipment
If you’re going live on Instagram and Facebook, you may also want:
- A microphone: A high-quality microphone significantly improves your stream’s audio quality. Check out our list of best microphones for streaming.
- A webcam: Get a decent-quality webcam that can film in at least 1080p resolution. Check out our list of best cameras for streaming to learn more. You could also turn your phone into a webcam.
- Headphones: A good pair of headphones let you monitor the quality of your live stream and pick up on small quality issues. Check out our list of best podcast headphones.
- Streaming software: Multistreaming to both Instagram and Facebook requires the use of multistreaming software like Riverside. This will allow you to set up your streams with a few clicks. You can also brand your studio, manage both platform chats in one place, and record locally in 4K while you broadcast.
How to broadcast live on Facebook and Instagram at the same time on desktop
Back in 2020, Instagram tested options to simulcast Instagram Live Streams to Facebook pages, but the feature was never officially launched. There’s currently no way to multistream to both platforms without streaming software or third-party tools.
Here’s a step-by-step look at how to go live on Facebook and Instagram simultaneously using Riverside.
Step 1: Create a new studio
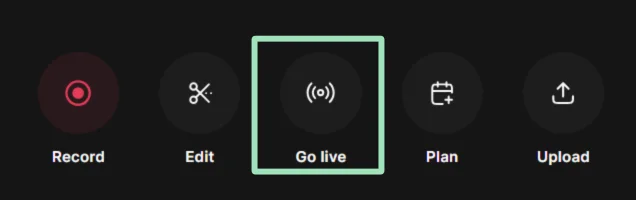
Log in to your Riverside account and create a new studio for your live stream by clicking “Go live” at the top of the screen.
Step 2: Enter your recording studio
Select your camera and mic, and whether you are using headphones, then click “Join Studio” to enter your recording studio.
Don’t worry, the recording won’t start immediately.
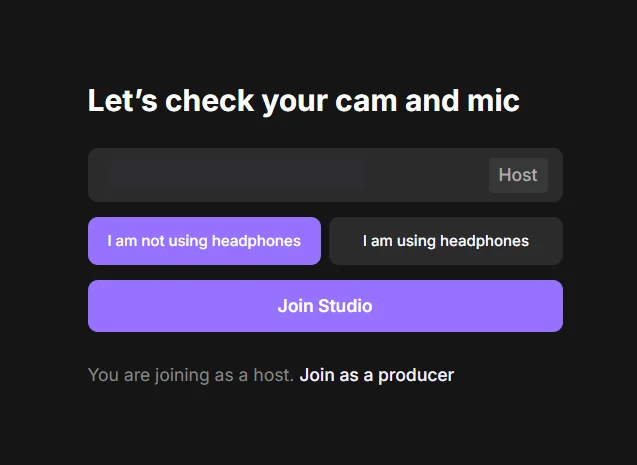
If you’re not using headphones, Riverside will automatically switch on “Echo Cancellation” for quality recording purposes.
Step 3: Connect your Facebook account to Riverside
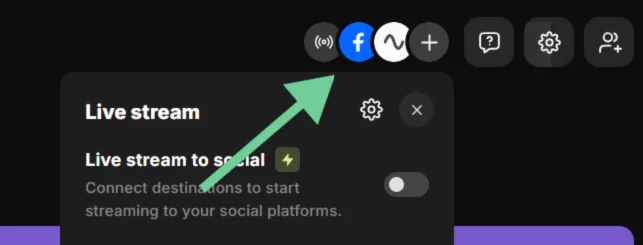
Click the “+” at the top of your screen, then select “Add destination.” Select Facebook to connect your Facebook account to Riverside.
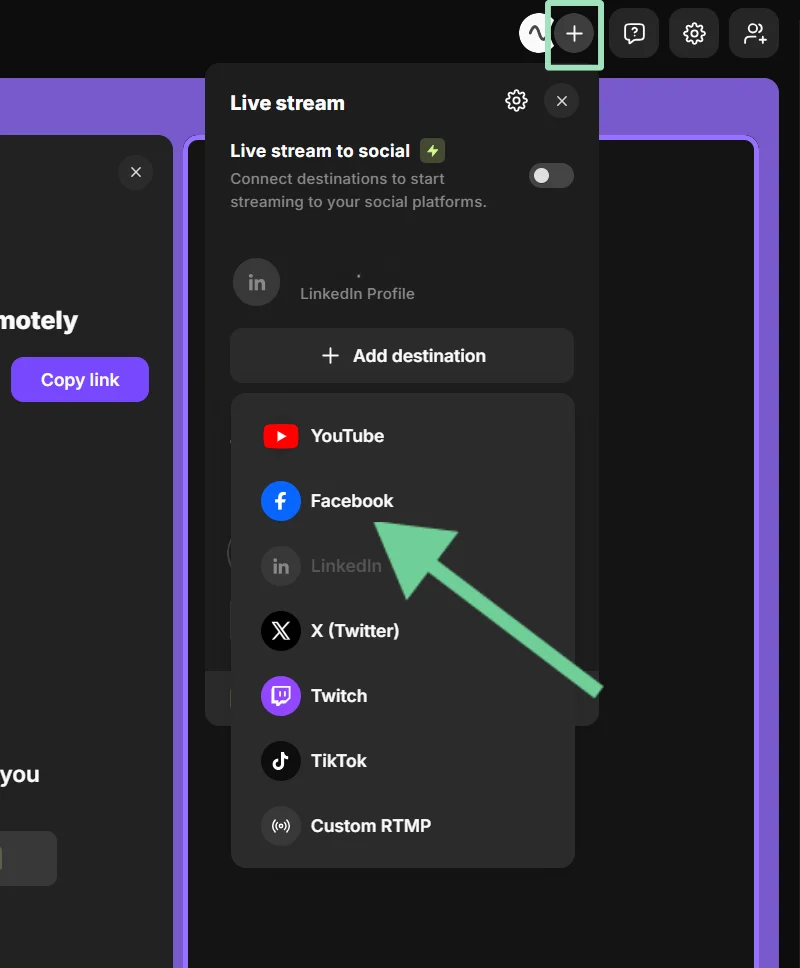
Follow the prompts to login into Facebook and connect to a Facebook profile or page.
Note: It’s really easy to connect and multistream to many other platforms with Riverside, including YouTube, LinkedIn, and TikTok.)
Step 4: Connect your Instagram account to Riverside
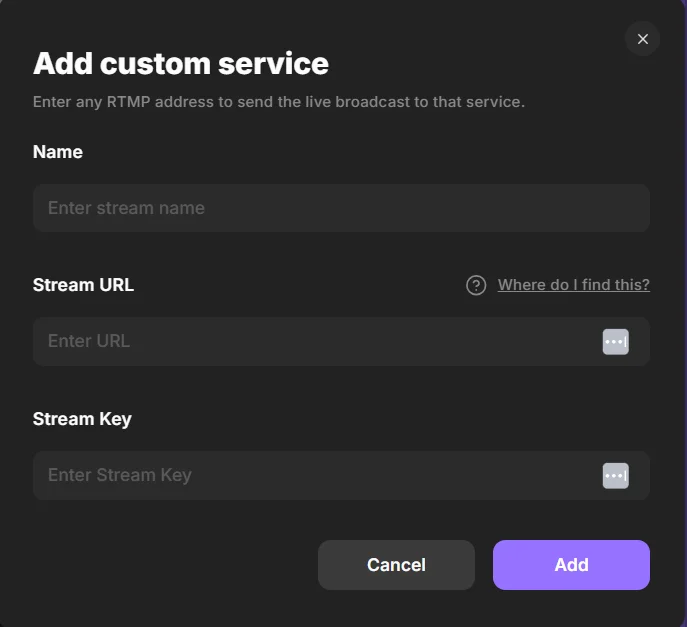
Select “Custom RTMP” from the same menu you used to connect your Facebook account.
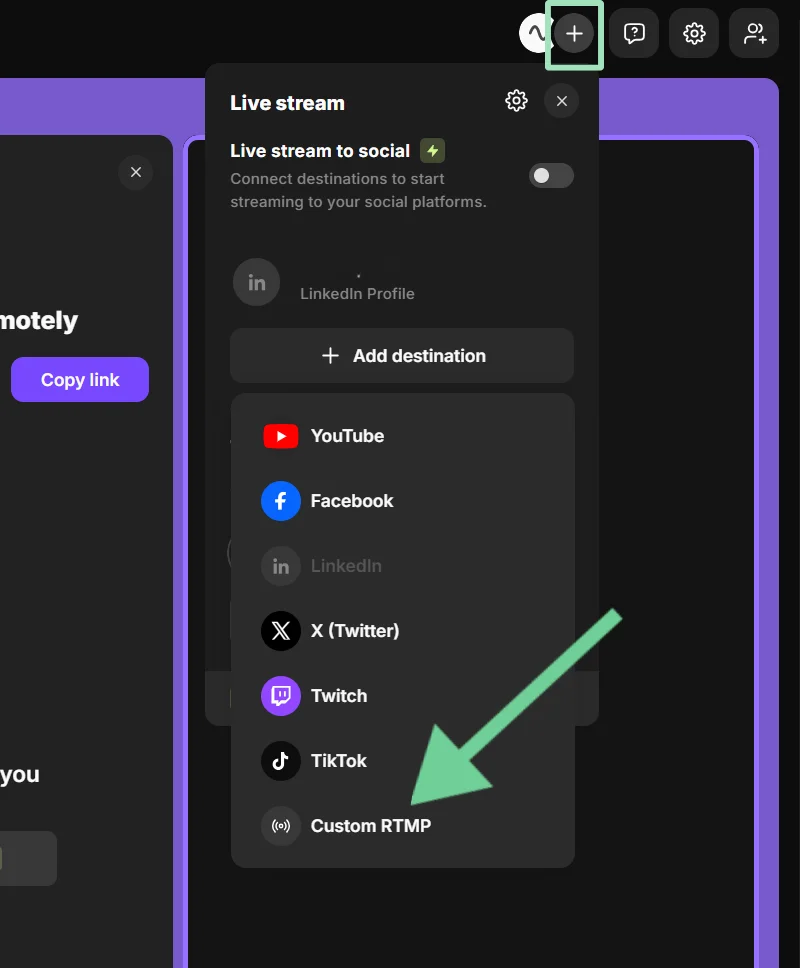
A new window will open, asking for your live session's stream key and stream URL. You can get this by launching a live video on your Instagram account.
Open Instagram on a new tab on your desktop and click “Create” and then “Live video.” Then, type in your live session’s title and choose an audience. Once you’re done, click “Next.”
A page titled “Live video” will appear. Copy your stream key and stream URL and paste it into Riverside.
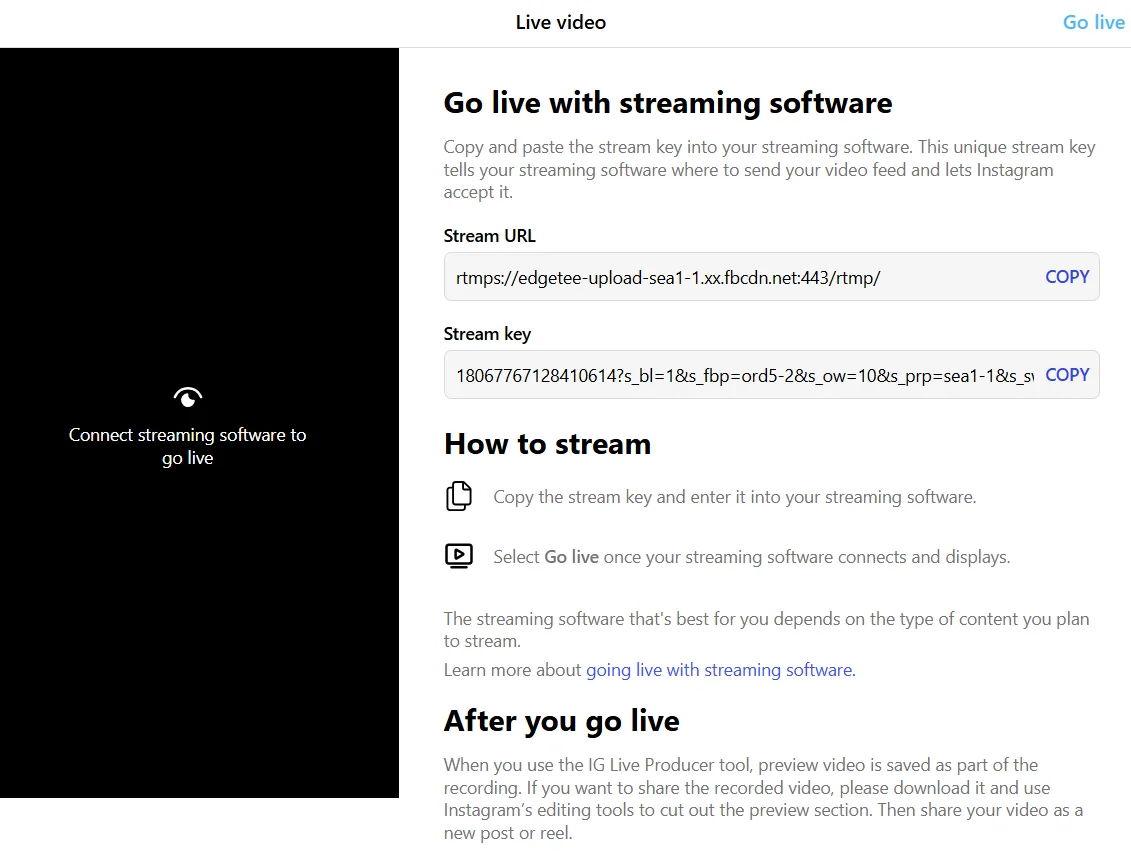
Note: This stream key is not permanent. It will reset after each stream.
Leave the Instagram tab open. You’ll need it to go live in Step 6.
Note: You need a professional Instagram account to multistream using streaming software. This is free and easy to set up:
- Go to your Instagram homepage, tap “More,” then “Settings.”
- Scroll down to “Account Types and Tools,” then click “Switch to a professional account.”
- Then Click “Done.”
Step 5: Adjust your studio settings
Before you go live, adjust your studio settings in Riverside. You can:
- Click the “Invite” button to invite other guests to join you.
- Personalize your studio’s branding.
- Add lower thirds, logos, and custom images with studio overlays.
- Use the in-built teleprompter to craft instantly engaging intros and outros.
- Set audio quality and video resolution (Instagram recommends 720p for live streams, while Facebook can accept up to 1080p).
- Enable or disable live stream chat directly within the studio.
Step 6: Go live on Facebook from Riverside
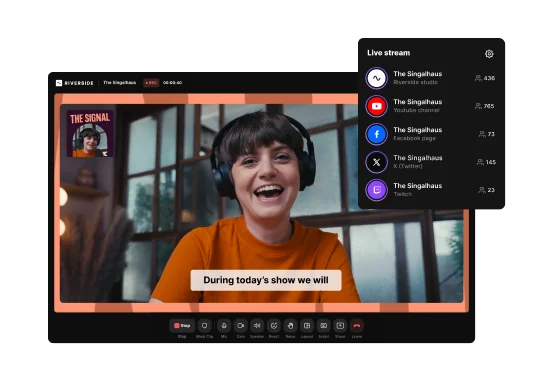
In your Riverside Studio, ensure that Instagram and Facebook are connected. If they are, you will see the Facebook logo and custom stream bubbles at the top of your screen.
If you’re all set, click “Go Live.”
You’ll get a five-second countdown before your stream goes live on Facebook.
Step 7: Go live on Instagram from Riverside
Instagram is strict about API access. So, you have to actually go live from your Instagram page as well, even when you’re streaming through Riverside.
Return to the Instagram tab where you got your URL and stream key (the one you left open). You should see a preview of the video you’re recording on Riverside on the left side of your screen.
Click “Go live” in the top right corner to launch your live session on Instagram.
You’ll have a five-second countdown from when you start your stream on Riverside before your stream starts for your audience. This should give you just enough time to go live from Instagram’s platform.

Head back to your Riverside studio to control the show. During your live stream, you can:
- Chat with your guests on both platforms with the omnichat in the studio.
- Share your screen or a presentation.
- Make your live interactive with Q&A, live call-ins, polls, and reactions.
- Add even more platforms to your live stream session.
- Play audio and video files from Riverside’s Media Board.
- Work with a producer in Producer Mode.
Step 8: Stop streaming and access your recording
When you’re ready to stop your live stream, click “Stop” at the bottom of your Riverside screen. This will stop the live stream on both Instagram and Facebook at the same time.
You’ll get a prompt to “Go to project.” At this point, you can download your live recording as is. Or you can repurpose it in minutes with Riverside’s editing features.
You can:
- Edit your recording just by promoting Co-creator, your new chat-based editing agent. Ask it to cut parts, clean audio, or style your video.
- Turn your recording into assets like social posts, a blog, thumbnails, and more, also with Co-creator.
- Trim your recording with text-based video editing. Text you delete in your recording transcript immediately syncs to your video.
- Style your video in minutes with automatic animated captions, AI b-roll, text, music, and other overlays.
- Clean up your video automatically with filler word removal, eye-gaze fixing, background removal, and more.
- Instantly create short clips of your live stream to share with your followers.
And much more!
While you can download a live stream recording directly from Instagram or Facebook, these videos will be lower quality. With Riverside, you can record in up to 4K, even if you’re live streaming in 720p. You’ll also get individual tracks for audio and video, which makes for much higher-quality edits.
How to go live on IG and FB at the same time on mobile
To multistream on Facebook and Instagram from a mobile device, you’ll have to use two mobile devices.
Let’s walk through the steps.
Step 1: Create your setup
You’ll need two mobile devices, one with the Facebook app and one with the Instagram app. Set each device up on its own tripod.
Step 2: Open Instagram and set up your live stream
Open Instagram on one phone, tap the “+” icon at the top of your screen, then scroll to the “Live” option at the bottom.
Add a title or description (optional but recommended), and place your phone on the tripod stand.
Step 3: Open Facebook and set up your live stream
Open the Facebook app on your second device. Navigate to the profile, page, or group where you want to go live.
Tap on the “Live” button. You’ll find it under the box where you add a post.

Add a title or description, then position your device on the second tripod.
Step 4: Go live
Tap “Go Live” on both Facebook and Instagram to start your live stream on both platforms.
Step 5: Manage your streams
Check comments on both streams as you go, and do your best to respond where you can. You’ll also need to ensure you’re giving both cameras equal attention.
Step 6: End both live streams
Tap “End” on Instagram (top right) and “Finish” on Facebook (bottom) to end your live stream on both platforms.
Step 7: Post and share
After the live stream ends, you can share a replay of your live session from Instagram or save it to your phone.
On Facebook, you can post your recorded live video to your timeline, page, or group for those who missed it.
Best practices for multistreaming on Instagram and Facebook
Now that you’re ready to go live on Facebook and Instagram, here are a few tips to ensure your livestream succeeds.
Plan your setup in advance
The best streamers take their setup seriously. Your lighting, camera angles, and audio quality ensure you get the best stream possible.
Perfect your video lighting setup before starting your live stream. Try different camera angles in your studio to see what looks best.
For better audio quality, use a dedicated microphone rather than your in-built computer mic. (Check out our list of some of the best microphones for streaming.)
Here are a few more tips to improve the audio quality of your streams:
- Use headphones to monitor what the microphone is recording and what your audience can hear.
- Reduce distracting mouth clicks by staying hydrated during the day of your multistream.
- Turn off Alexa (or other voice assistants), switch off desktop notifications, and switch your phone to silent.
- Position your microphone 6-8 inches from your mouth at a slight angle.
- Use a wind shield and pop filter to reduce plosive sounds (air blasts) that can be created by hard consonants.
- Stream from a quiet room and make sure any windows are shut. Opt for somewhere with a carpet, rug, furniture or other soft furnishings to reduce echo.
Balance your resolution
The highest resolution Instagram Live will accept is 720p. Facebook accepts up to 1080p. Balance the needs of both platforms by streaming in 720p from your Riverside studio. Otherwise, Instagram will downgrade the resolution, which could result in lower quality.
Test your audio and video
Use Riverside’s one-click mic test to test that your microphone is working before you go live. You can use the same tool to test your webcam.
You can also use Riverside’s test recording feature to ensure all participants can be heard and seen and that there’s no unwanted background noise. This is crucial for a live recording.
Engage with viewers
Engage with viewers as much as you can during your live stream. Ask them questions. Use polls or Q&As to get their feedback. Encourage them to comment in the chat.
Riverside makes this easy by consolidating both Facebook and Instagram comments into one feed, allowing you to manage them right from the Riverside platform. Riverside also includes tools for Q&A.
Read more: Need more tips? Check out our webinar on mastering live streaming.
Practice with shorter streams
If you’re new to live streaming, try practicing with shorter streams or a smaller audience first. This will help you get comfortable managing live streams on Instagram and Facebook.
This will also give you a chance to practice using Riverside’s Media Board, where you can play intro/outro videos, add background music/jingles, and pre-load content for smoother transitions.
Have a dedicated producer for the livestream
Having a producer can help you focus on hosting, and ensure that your livestream runs smoothly.
With Riverside’s Producer Mode, you can have another person join a live stream session specifically to handle technical issues. They won’t be recorded or appear on camera.
Promote your live stream
Some of your followers will join your live stream when they’re notified. However, you’ll attract more viewers if you promote your live stream beforehand. Here are a few tips:
- Promote your live stream on social media posts.
- Gather questions from people in advance, and encourage them to join your live stream to get answers.
- Do a countdown a week before the live stream. In each post, remind your potential audience what value you’re offering.
- Invite guests to join you. Ask them to share the live stream with their audience too.
- Include a banner or pop-up on your website.
- Encourage people who follow you on Facebook and Instagram to turn on their notifications. This way, they will get notified when you’re live.
- Send emails to invited attendees and others on your list. Email them the week before, the day before, and on the day of your event.
How to troubleshoot common issues when multistreaming to Instagram and Facebook
Live stream not working? Here are a few common issues, and how to fix them.
Audio not working during the stream
How to fix it: Check that your microphone is plugged in, switched on, and selected as the audio source in your streaming software.
Stream ended unexpectedly
How to fix it: Make sure you haven’t exceeded the platform time limits. Facebook is 8 hours, and Instagram is 4 hours.
Also, check for internet outages or issues with your streaming software.
If you aren’t able to get up and running again quickly, follow up with those who attended and arrange another live stream.
Livestream viewers can’t see or hear you
How to fix it: Make sure your browser or streaming software has permission to access your camera and microphone.
Check your system settings, browser privacy permissions, and your streaming tool’s input settings to confirm the correct devices are not blocked.
Stream won’t start
How to fix it: A stream that won’t start usually means connection or platform handshake issues. Try these:
- Check upload speed: You need 5–10 Mbps minimum upload speed for reliable streaming (more if using HD). Run a speed test to confirm.
- Switch to a wired connection: WiFi can dip or spike. Ethernet gives a stable, uninterrupted connection, especially for long broadcasts.
- Verify your stream key: A changed or expired stream key will block the stream from starting. Recopy and paste the stream key and restart the stream.
- Restart your browser: Browser tabs or downloads can interrupt the live stream connection. Close them and start fresh.
- Refresh the platform page: Facebook Live Producer and Instagram Live Producer can quietly hang. Refresh and reconnect to try again.
Pixelated video quality
How to fix it: Poor video quality or pixelation is due to streaming resolution. If your bandwidth is limited, opt for 720p instead of 1080p.
You can also close any other app on your device that is using the internet to ensure that it isn’t interfering with your stream quality.
FAQs about multistreaming on IG and Facebook
What are the differences between live streaming on Facebook and Instagram?
There are a few key differences between streaming on these platforms. Here’s an overview:
- Stream duration: Facebook lets you stream for 8 hours on desktop, and 4 on mobile. Instagram only lets you stream for 4.
- Aspect Ratio: Facebook supports 16:9, 1:1 and 9:16. Instagram only supports 9:16 and will crop horizontal videos.
- Stream key: Static stream keys stay the same on Facebook. On Instagram, your stream key changes every live.
- Discovery: On Facebook, streams appear in the newsfeed with a “LIVE” notification. Once finished streams are found in the “Videos” section. Whereas, on Instagram viewers tap your profile picture to view your live broadcast. They also appear in the “Stories” bar on the home feed, and “Explore” page.
- Account requirements: On Facebook your account needs to be at least 60 days old and you need 100 followers. On Instagram you need 1000 followers on a public account.
How long can you be live on Instagram and Facebook?
The maximum duration of a live stream on Instagram Live is 4 hours. On Facebook, you can go live for up to 8 hours when streaming from a computer and 4 hours when streaming directly from a mobile device.
Once you hit these limits, the live stream will end automatically, but you can immediately start another live session if you want to continue.
Can you multistream on Twitch and Facebook?
Yes, you can stream to Twitch and Facebook at the same time using Riverside.
- Connect your Facebook account to Riverside by clicking the “+” at the top of your screen and selecting Facebook from the menu.
- You can follow the same steps to connect your Twitch account.
- Once connected, click “Go live” to stream to both platforms simultaneously. It’s that easy!
How can I multistream to other platforms besides Instagram and Facebook?
On Riverside, you can easily live stream to several social media platforms (at no extra cost), including YouTube, Facebook, LinkedIn, X, Twitch, Instagram, and TikTok.
Once you’ve connected your platforms to your Riverside studio, it’s as easy as clicking “Go live.”
Once your live stream is over, you’ll get a recording and transcript, which you can edit to post on the same social platforms for more engagement.
How to stream to multiple platforms for free?
OBS is an option for free multistreaming, but you’ll need to combine it with a multistreaming service like OMI.gg. It’s a bit tricky to set up, but you essentially stream from OBS to OMI.gg, which splits the stream and sends it to your social platforms.
Are there any legal considerations when live streaming?
There are a few legal considerations to keep in mind for live streaming. They include:
- Get consent from your guests before you livestream. Do they approve of their voice and image being used?
- Don’t use copyrighted music, videos, or images without the correct permission.
- Be careful about defamation. False statements that damage a person’s or brand’s reputation can result in a lawsuit against you.
- Use captions or transcripts so people with hearing impairments can access your content.
- Moderate comments in the chats to prevent harassment, hate speech, or any illegal content.
- Brief guests beforehand on what is (and isn’t) appropriate during your live stream (you’ll also be accountable for their behavior!)
Can I save my live streams for later viewing on Facebook and Instagram?
Facebook Lives are accessible and saved on your profile for up to 30 days after they’re published. After 30 days, you’ll no longer be able to access them.
Once your live stream has ended on Instagram, you can share a replay to your Instagram profile and Feed. Alternatively tap “Download video” to save your video to your camera roll.


.webp)

.webp)


.webp)

