-(1).webp)


Key takeaways:
- To go live on Facebook, create a post, select “Live video,” add a title and description, then start your broadcast.
- You can go live from a Profile, Page, or Group, and from desktop or mobile, depending on your setup. Choose based on your audience size, privacy needs, and available features.
- To go live, you need: a Facebook account, a stable internet connection, a camera, and a microphone.
- If you want more control or to stream to multiple platforms, you can use third-party streaming software like Riverside.
Facebook Lives are watched longer than regular videos and drive more engagement. Plus, they’re pretty easy to set up.
In this guide, you’ll learn how to live stream on Facebook step-by-step. We cover everything from going live on desktop and mobile to scheduling a live and hosting one with specialized streaming software.
Facebook Live requirements and setup checklist
Before you go live on Facebook, here’s a quick overview of what you’ll need:
- Reliable internet connection: Always use a wired Ethernet connection for the best internet stability. If you're using Wi-Fi, stay close to the router and avoid heavy internet use by others. For best results, your upload speed should be 5-8 Mbps for 720p streaming and 10-15 Mbps for 1080p.
- Webcam: Choose a 1080p webcam. Many laptops are limited to 720p, so an external 1080p webcam will look noticeably better. You could also use your phone as a webcam.
- Microphone (optional): While not required, a dedicated microphone can drastically improve audio quality. Check out some of the best microphones for streaming.
- Headphones (optional): We recommend headphones to monitor what audio is being recorded and live-streamed. They also help to avoid echo and feedback, especially in group streams.
- Streaming software (optional): Facebook lets you go live natively on desktop or mobile. But you won’t have many options in the way of quality and customizability. With streaming software like Riverside, you can add branding, music, and overlays, and record the live in high quality for later use.
How to go live on Facebook from desktop (webcam)
Going live on Facebook desktop gives you more control and better audio and video quality. You’ll have a more stable connection (especially with Ethernet) than using mobile. And it’s easy.
Just follow these steps:
Step 1: Set up your Facebook Live
Log in to Facebook on your desktop.
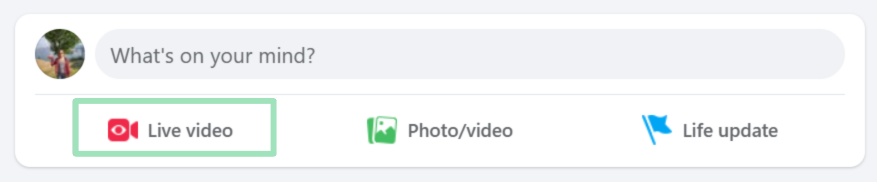
If you’re going live from a post or page, select “Live Video” from under the box where you create a post.

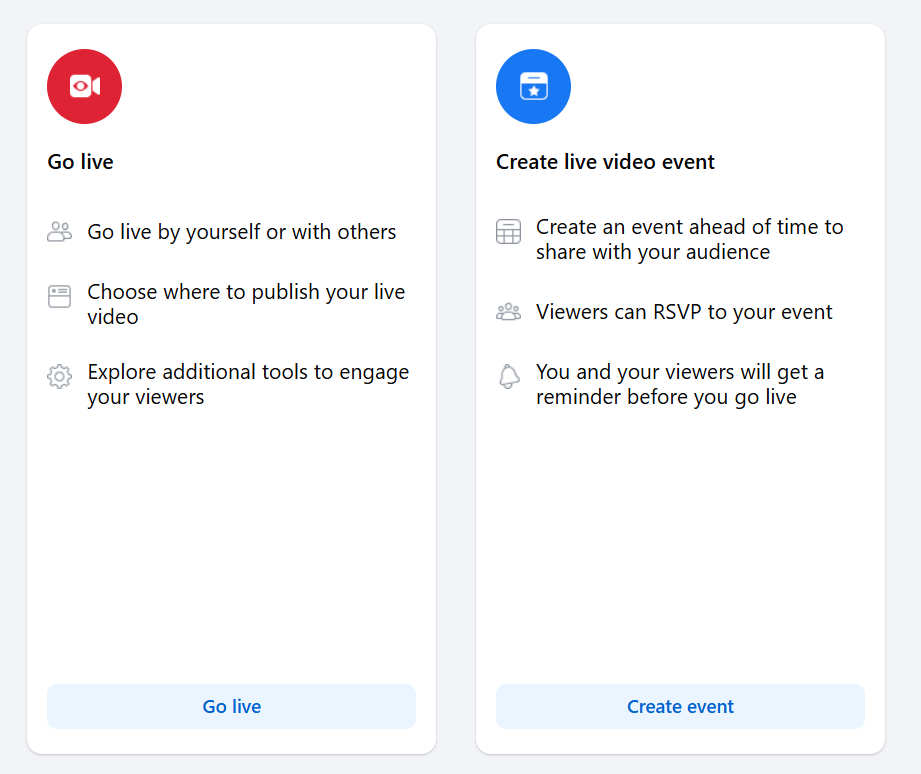
Step 2: Opt to go live now, or schedule an event
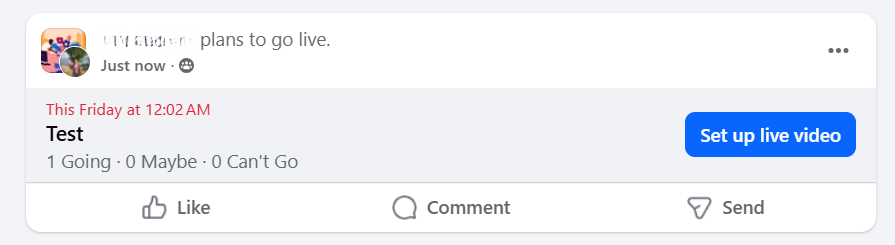
Next, you’ll have the option to go live now or to schedule an event.
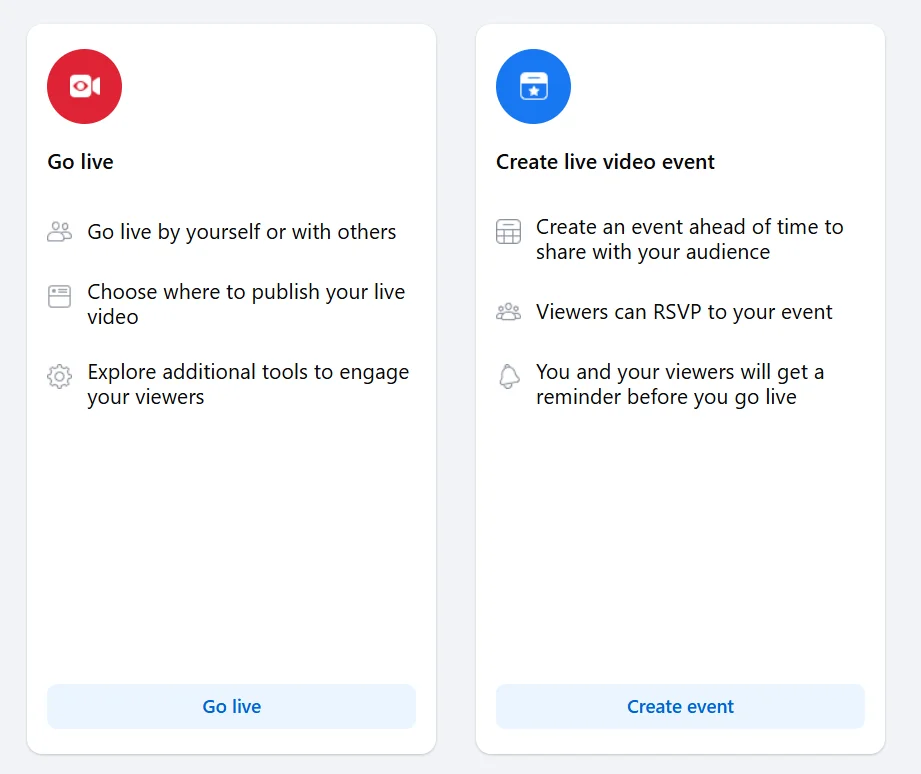
Going live starts your stream immediately and notifies viewers only when you’re already live. It’s best for spontaneous or casual broadcasts.
Scheduling an event lets you set a date and time in advance. That way, you can promote your live stream in advance, send reminders, and go live at the scheduled time. This option is better for planned sessions, interviews, or webinars.
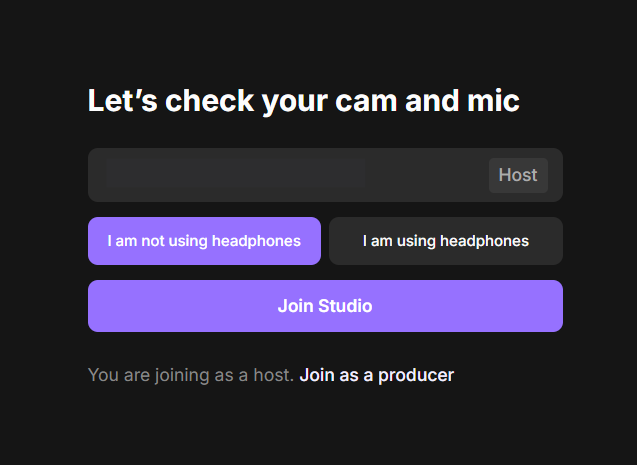
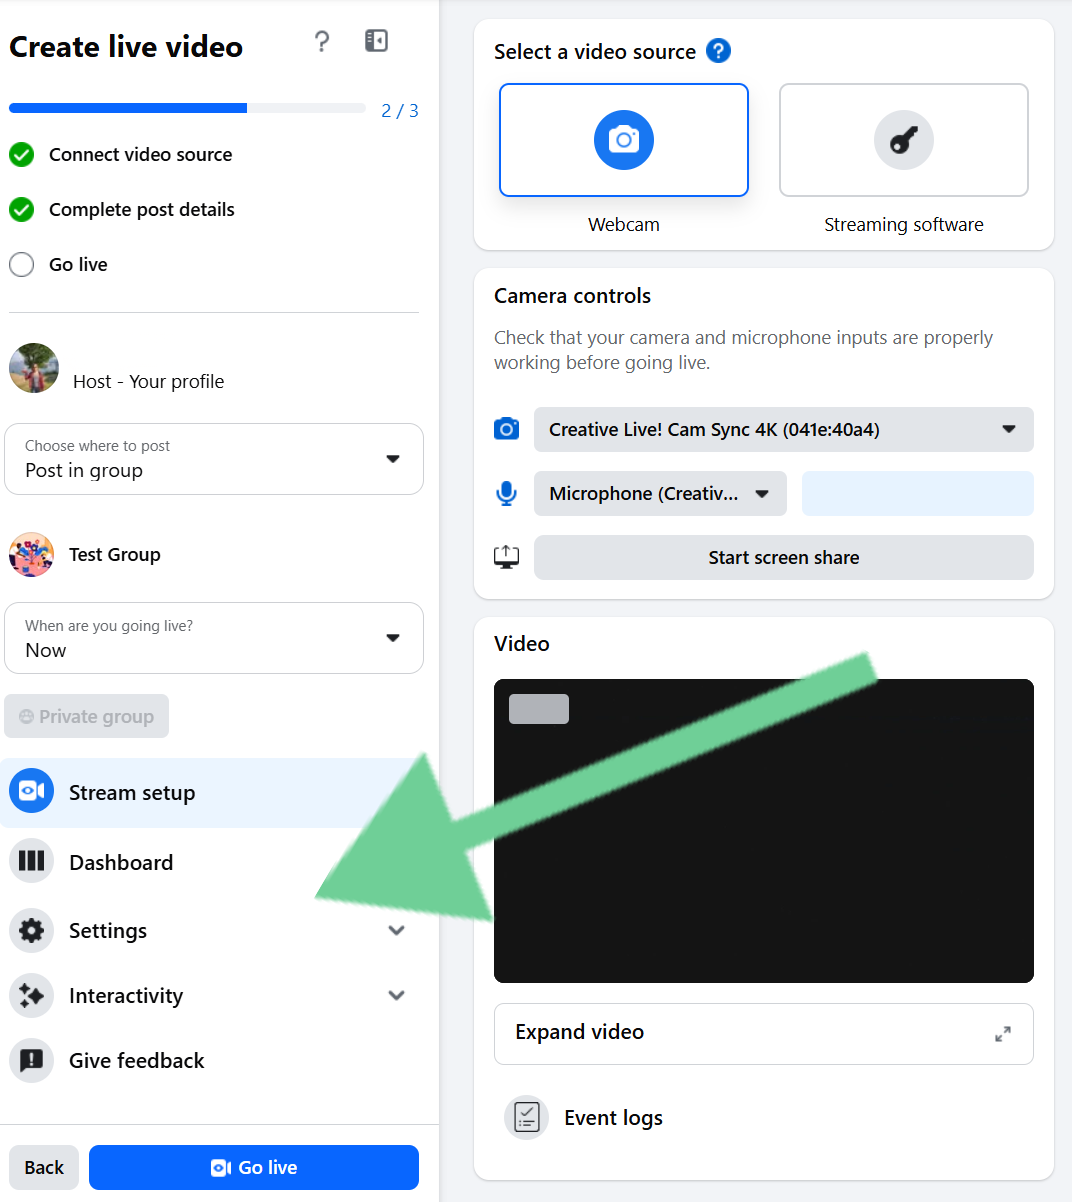
Step 3: Give access to your camera and mic
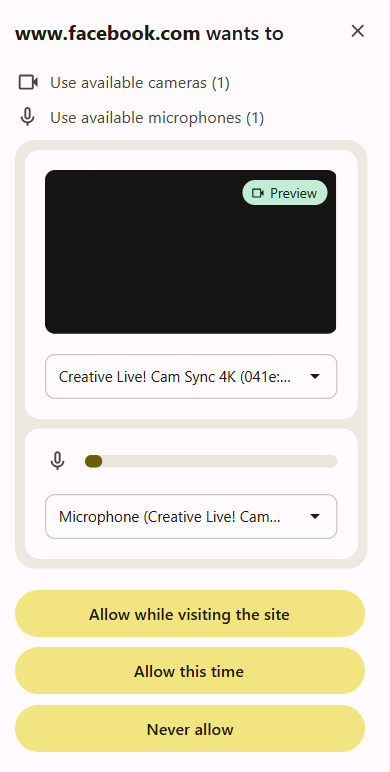
When you’re ready to go live, Facebook will ask you to grant permission for your camera and microphone to be used. Make sure the camera and microphone you want to use are selected.

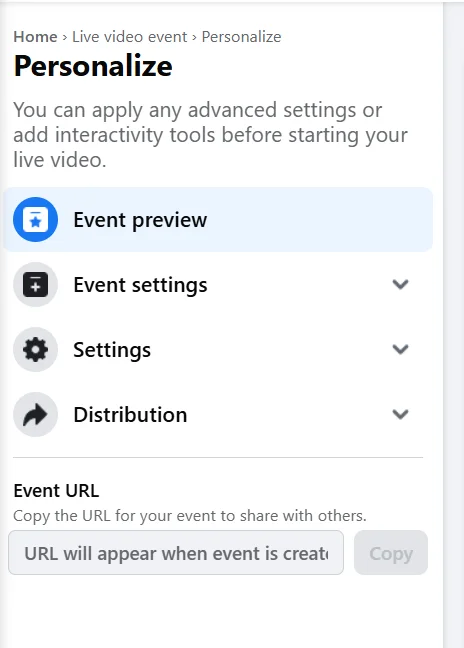
Step 4: Check your settings
Next, you’ll be able to adjust some settings before starting your stream. In the left panel, ensure your settings are correct.
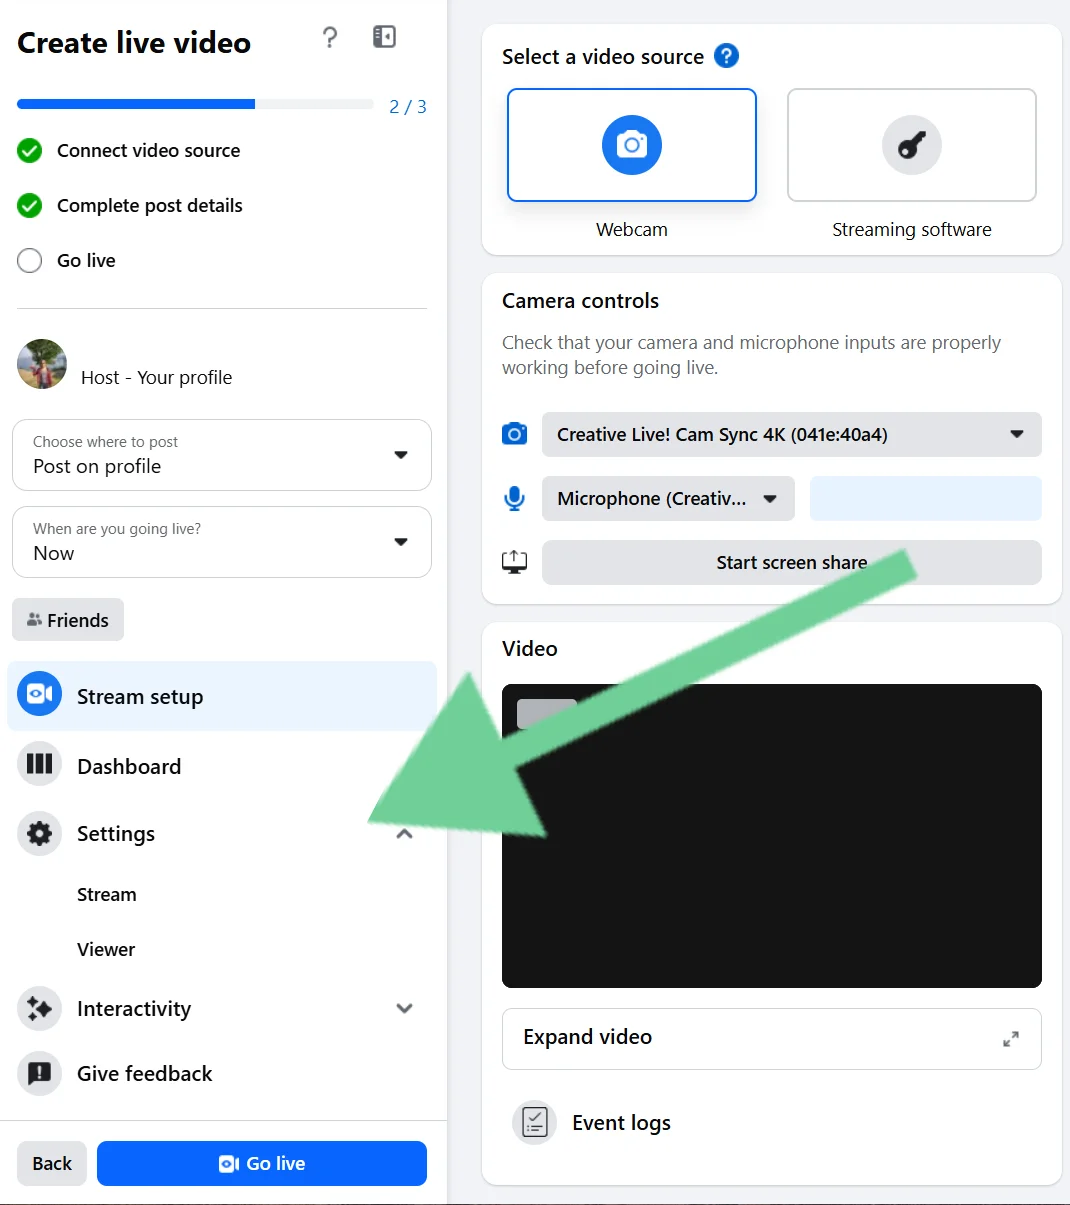
Under:
- Stream setup: Check that your camera and mic are selected, and that your video feed is appearing in the viewer. You can also decide whether your live video will be added to your story.
- Settings: Choose stream latency, enable the ability to embed your live on another website, and decide whether to unpublish the post after the live is over. You can also decide whether to auto-generate captions and set viewer controls around rewinding and messaging.
- Interactivity: Set up features like polls or Q&As for your live in advance.
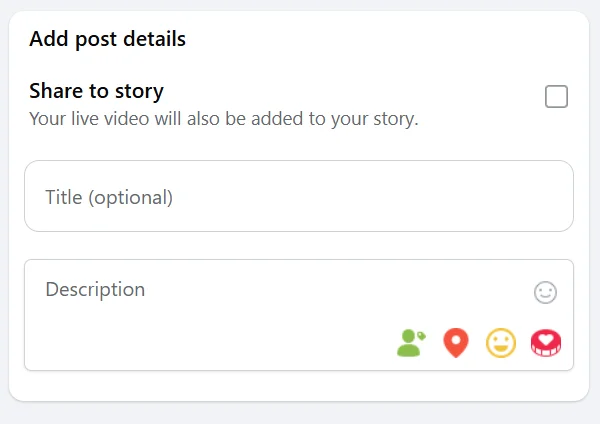
Step 5: Add a title and description
Write a clear, keyword-rich title and short description. Make it descriptive. Explain what viewers will learn or see. Use an engaging hook in the first line of the description.
Above the title field, toggle “Share to story” on or off depending on whether you want it to show there as well.
Step 6: Go Live
Once you’re ready, hit “Go Live.” You’ll see a 3-second countdown, and then you’re live on Facebook!
Open the three-dot menu on the post to You can live stream to Facebook using third-party streaming software like Riversidecopy and share your Facebook Live link. You can also share the URL after the live has ended. See our complete guide on how to live stream for a more in-depth streaming setup walkthrough.
Pro tip: For more control over custom layouts, overlays, multiple guests, and multi-platform streaming, use Riverside.
How to go live on Facebook from the mobile app (Android and iPhone)
Mobile is the easiest way to go live on Facebook when you’re on the go. It’s ideal for quick updates and behind‑the‑scenes streams. Follow these steps to set it up:
Step 1: Set up your Facebook Live
Open the Facebook app on your phone and start a new post.
At the bottom of the screen hit “Live.” On some devices, you may need to scroll through the options.

Step 2: Ensure your settings are correct
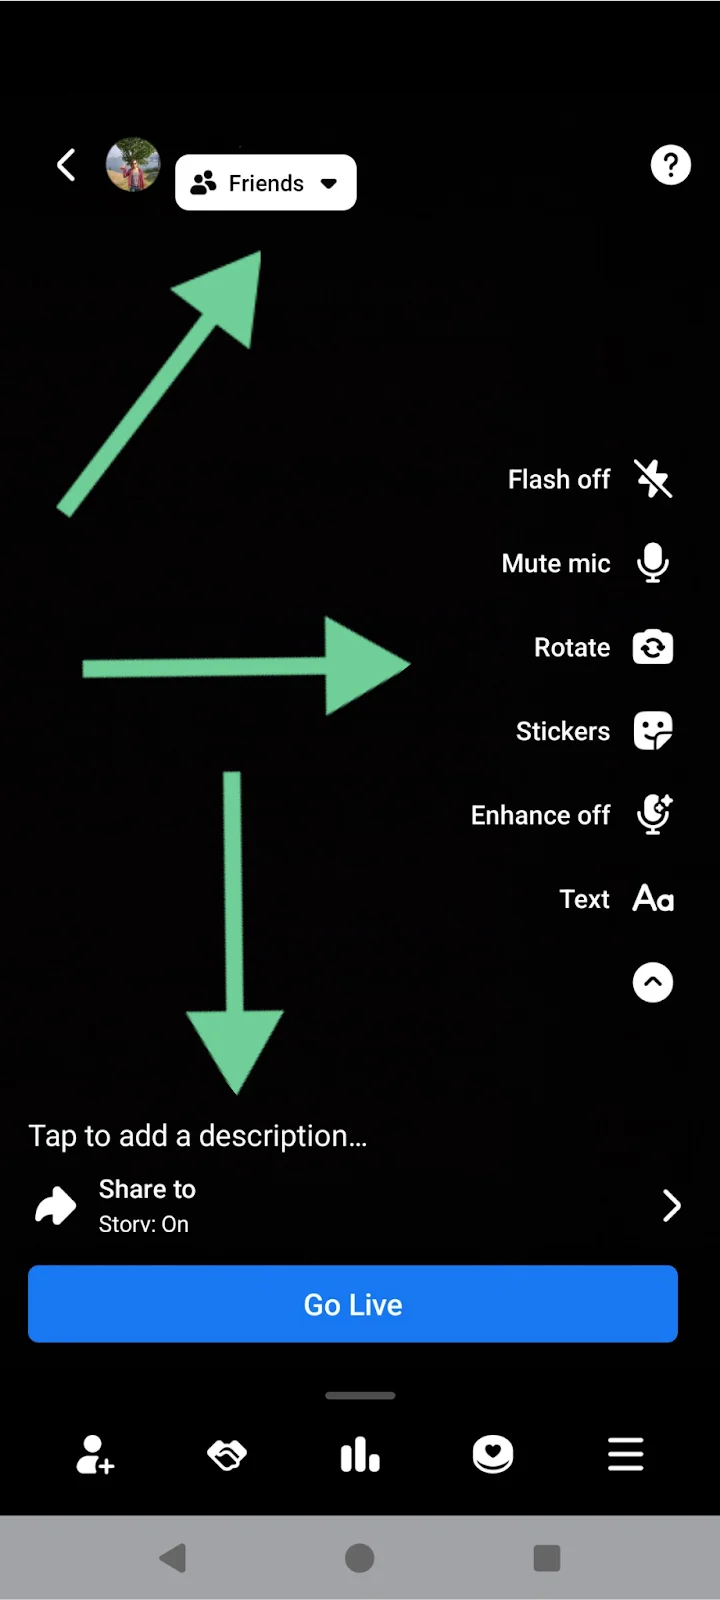
At the top of the screen, underneath your avatar, tap the dropdown to select your audience. Share your live with the public, followers, or just yourself. You can also exclude certain followers or pick specific people to join your stream.
In the right panel, you can switch off your flash, mute your microphone, and rotate the camera angle. You can also add stickers, lower thirds, and text.
At the bottom of the screen, add a description about your live broadcast. You can also tag friends and turn on “Share to story.”
Step 3: Invite guests to your Facebook Live
You can invite up to 3 people to join your Facebook Live stream.
Before going live, tap the guest list icon to pre-select people who’ll be notified when you go live.
During a live broadcast, you can send invitations to viewers by tapping the guest menu and selecting people from your audience.
Viewers can also request to be part of the live, which you can accept or deny.
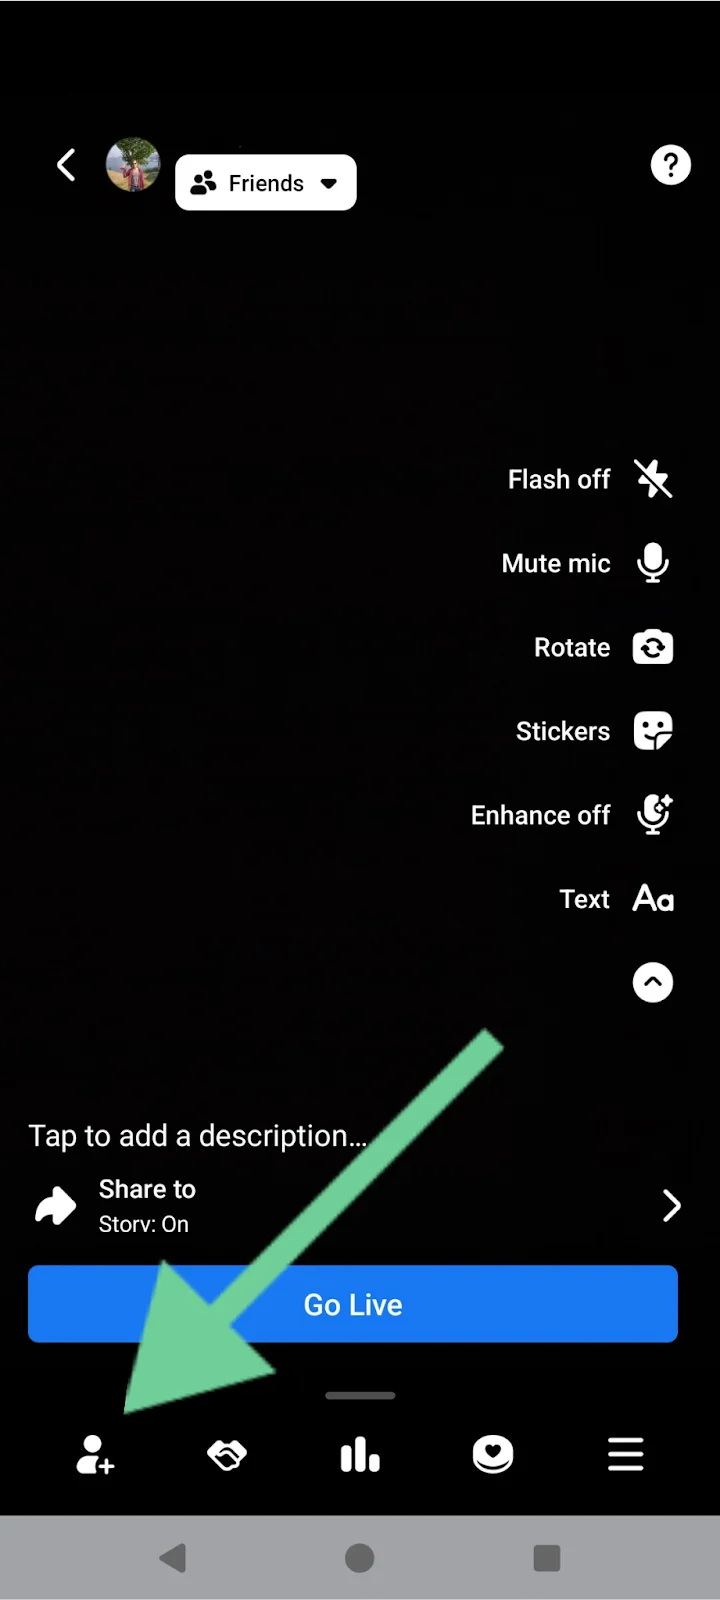
Step 4: Go live
When you're ready hit “Go Live.” After a short countdown, you’ll be live to your audience.
During the live, you can monitor and reply to comments, and set up polls for your viewers. You’ll also be able to manage viewer requests and invite friends to join you.
Step 5: Finish your live
When you’re done, tap “Finish.” Your live stream will be saved as a video post. Share the link or download a copy to your device. You can also turn the live into a Reel.
Tip: For the best audio quality, use headphones to avoid echo and feedback. For the best video quality, stabilize your phone with a tripod, and face a window to avoid dark shadows.
Going live: Profile, Page, or Group?
If you plan to go live beyond your personal Profile, Facebook lets you stream from a Page or within a Group.
Each option offers different visibility and features. Here’s how to choose the right one.
How to go live on a Facebook Group
Live streaming to a Facebook group is very similar to starting a regular stream. Here’s how to do it.
Step 1: Find your group
Log in to Facebook and click the “Groups” icon at the top of the screen. Find the group you’d like to post to.

Step 2: Set up your live stream
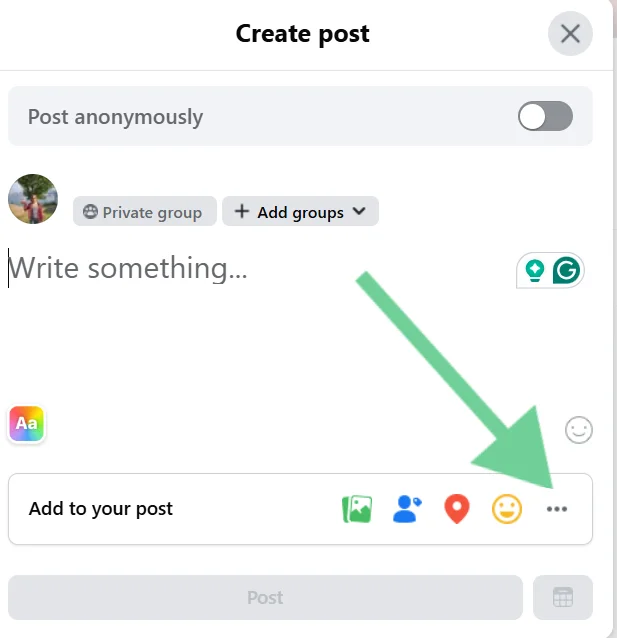
Click to post, then click the three dots in the menu to choose “Live Video.”
Step 3: Choose whether to go live or create a live event
Going live now means starting instantly without setup. This works well for quick updates, informal discussions, or real-time responses.
Scheduling a live stream ahead is better for training, interviews, or recurring group sessions.
Step 4: Connect your camera and mic
Grant Facebook permission to use your selected camera and microphone, the same as if going live from your profile.
Step 5: Adjust your settings
Click “Settings” in the left panel to make adjustments.

As mentioned above, you can adjust your:
- Camera and mic under “Stream setup”.
- Latency, viewer controls, captions, and embeds in “Settings”.
- Polls and Q&As in “Interactivity”.
Step 6: Add a title and description
Give your live post a title and description so that people who may want to join know what it’s about.

Step 7: Go live
When you’re ready, click “Go live.” After a 3-second countdown, you’ll be live on Facebook. You can see your live video and stats about who is watching in your Dashboard.
Step 8: End live video
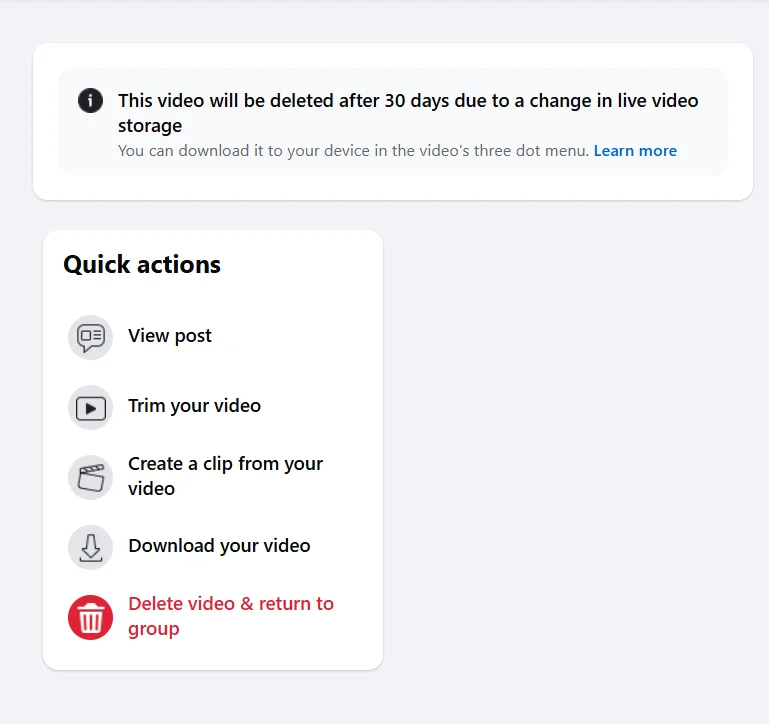
To stop your live video, click “End live video.”
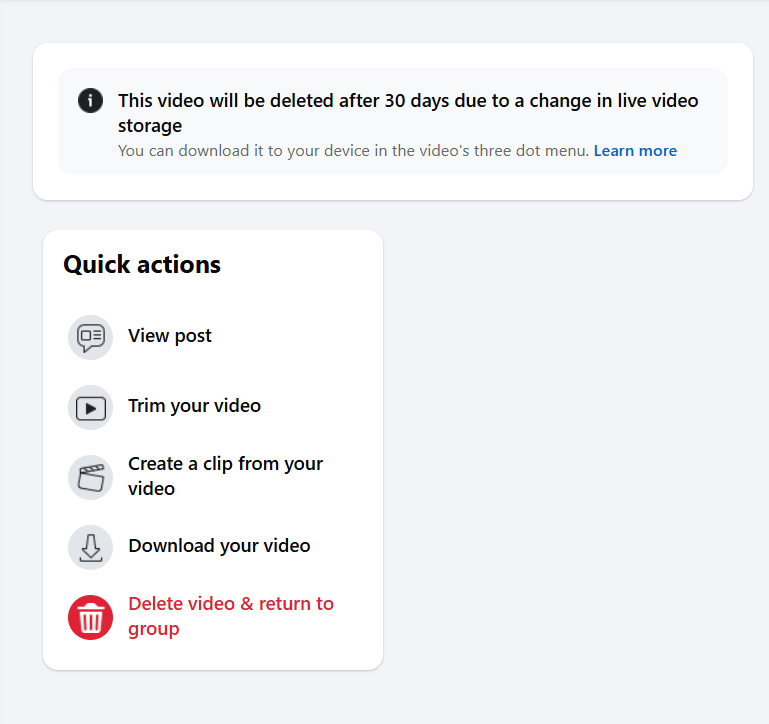
Once you’re done, you’ll be able to trim your video, create a clip, download the video, or delete it.
Note that live videos are automatically deleted from Facebook within 30 days.
How to schedule a Facebook Live and share a link
Scheduling a Facebook Live is similar to starting a live event. Here’s how to do it:
Step 1: Set up your Facebook Live
Log in to Facebook on your desktop.
If you’re going live from a post or page, select “Live Video” from under the box where you create a post.
Step 2: Schedule your event
Next, you’ll have the option to go live immediately or schedule an event. Choose “Create live video event.”
Step 3: Set up the Event
Fill in event details, including:
- a cover photo,
- event name,
- details,
- and start date and time.
You can also choose whether your event is Public or in a Group.
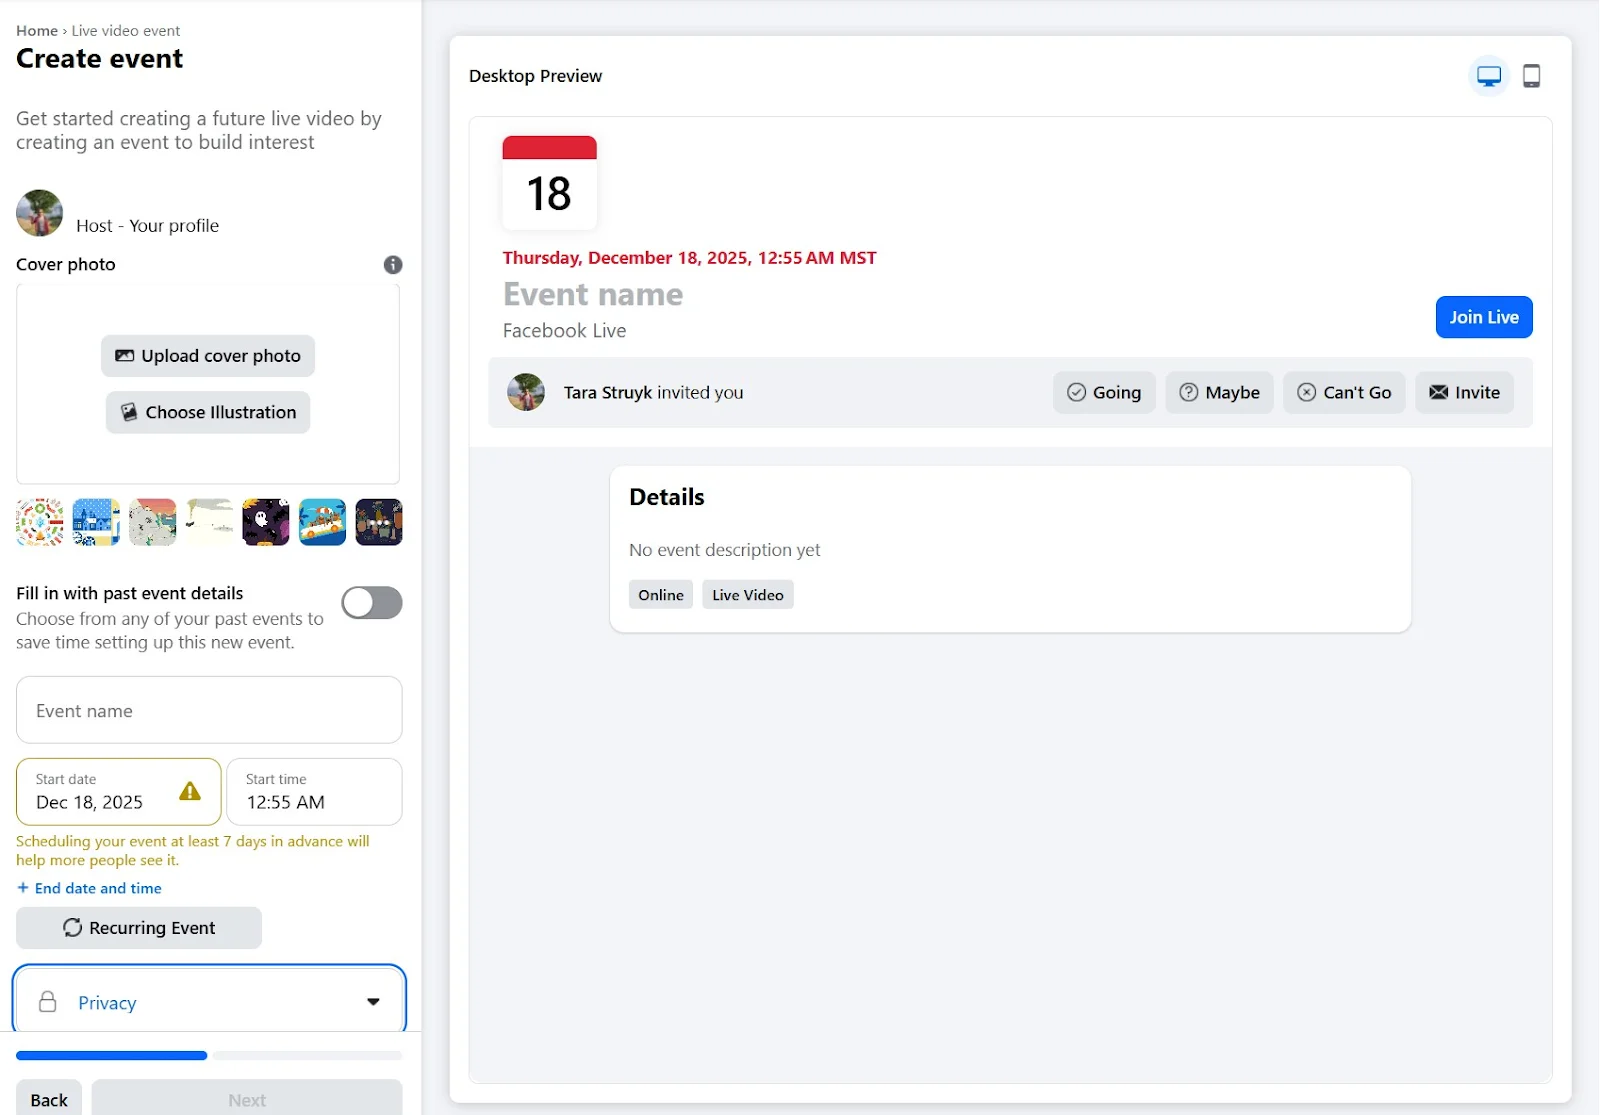
Once you’ve filled in all the fields, click “Next.”
Step 4: Adjust your settings
On the next page, you can adjust your settings.
Under:
- Event settings: Opt to add a co-host.
- Settings: Adjust your stream settings, like latency, and viewer settings, such as auto captions. You can also find your stream key to use in your streaming software (like Riverside.)
When you’re done, click “Create event.”
Step 4: Go live
When it’s time to go live, go to Facebook and find your live stream. You should see it at the top of your feed when you log in.
Click “Set up live video.” If you don’t find it there, use the dots menu in the top right to go to “Events.”
Here you will see all scheduled events. From there, you can also copy the link for your event to share it with others.

From there, you can follow the instructions on going live for desktop.
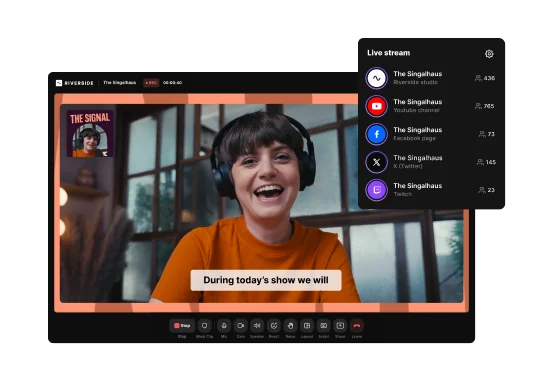
How to go live on Facebook using streaming software (Riverside)
Want a more professional stream? You can live stream to Facebook using third-party streaming software like Riverside. Why not just stream directly through Facebook? Because with Riverside, you get:
- Up to 9 guests (with easy access invite link).
- Custom layouts, lower thirds, and branding (logos and colors).
- Screen sharing and media playback.
- Multistreaming to Facebook and other social media platforms.
- High‑quality recording of every participant on separate tracks for easy repurposing later.
- Editing tools to polish your live for later use.
- Access to a chat-based editor to repurpose live recordings just by sending a prompt.
Here’s how to quickly and easily live stream to Facebook using Riverside.
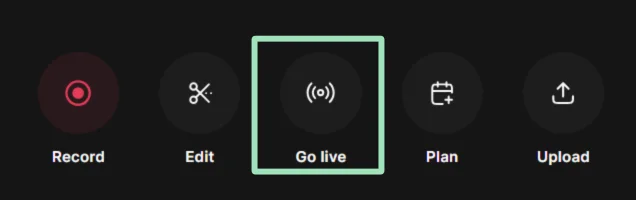
Step 1: Log in to your Riverside account
Sign up for a Riverside account or log in to an existing account. In your dashboard, open a project and then select “Go live.”

Step 2: Set up your camera and microphone
You’ll get prompted to select your camera, audio input (microphone), and audio output (headphones or speakers).
We highly recommend using headphones. But if you don’t, Riverside will automatically switch on noise cancellation.
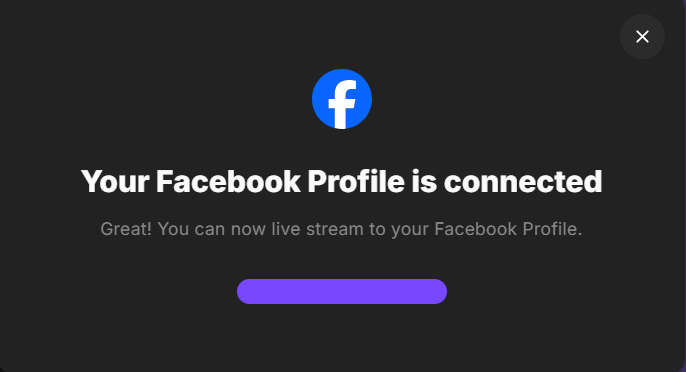
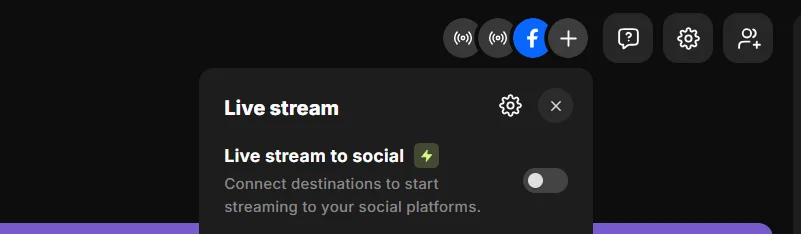
Step 3: Connect Facebook
Hit the “+” icon in the top right of the screen, and ensure “Live stream to social” is toggled on. Underneath this hit “+ Add destination.”

Select Facebook, and choose whether you want to connect a Page or Profile. Riverside will then prompt you to “Continue with Facebook.”
You’ll be sent to Facebook and prompted to connect your account or page. Once you’re done, you’ll be sent back to Riverside with a note that your account has been connected.
Step 4: Invite guests
You can invite up to 9 speakers to join the live stream. In the top right, hit “Invite” and then copy and share the link. You can also send invites via email.
For guests, getting into the livestream is as easy as clicking the link. There’s no need to download anything or sign in.

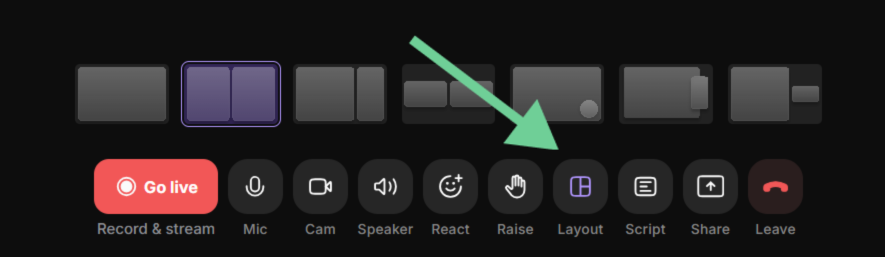
Step 5: Set your layout and branding
Choose your layout (speaker, side-by-side, grid, or picture-in-picture) from the menu at the bottom of your screen. You can also change your layout during the live stream.
In “Script” you can also use the teleprompter to script your intros and outros for that added professional touch.
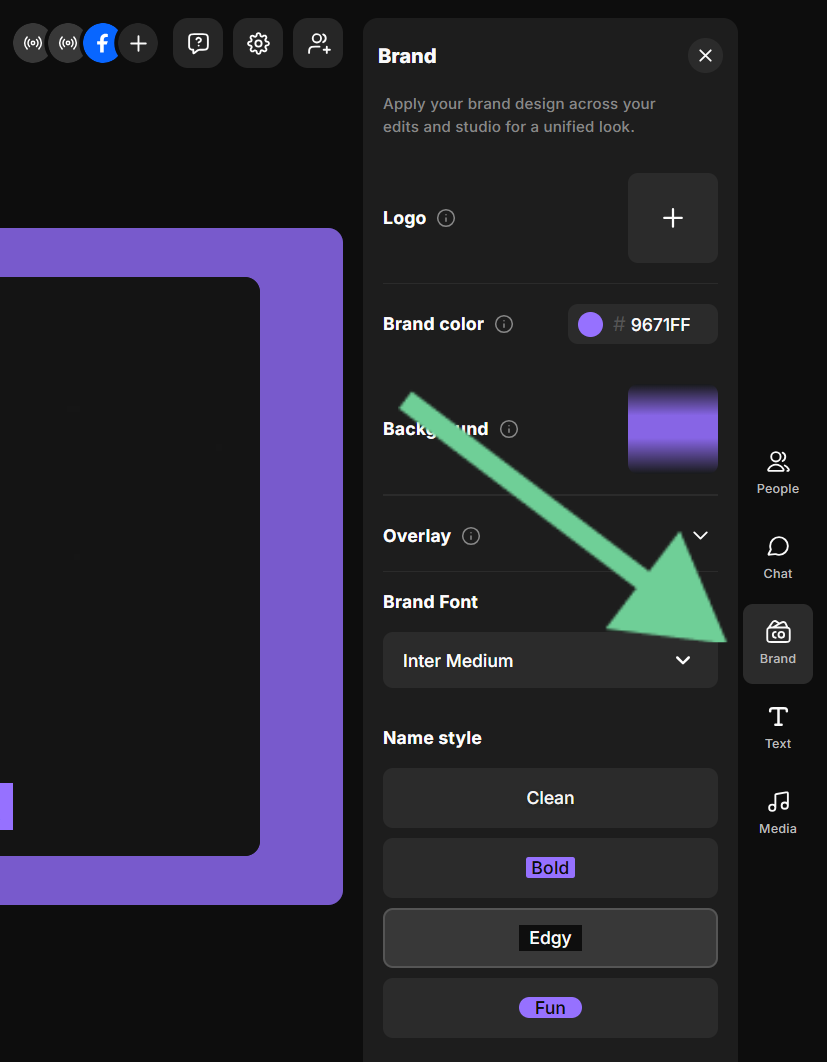
Step 6: Brand your studio
Brand your studio by adding your logo and colors. You can also add other lower thirds, overlay graphics, and other media here.
Step 6: Go live
Once you’re ready, click on the red “Go live” button at the bottom of the screen to start your Facebook Live. It’s as easy as that!

During the live, you can use Riverside’s Chat to monitor and reply to comments from Facebook. You can also send private messages to your guests or producers (if you invite one.)
During the live stream, you can share your screen, play music, or video clips. You can also run polls or conduct Q&A to keep your audience engaged.
While you’re live streaming, Riverside records your live stream automatically. Each participant is recorded locally in up to 4K video and 48 kHz audio with separate tracks.
Step 7: Edit, repurpose, and share
When your live stream is done, click “Stop.”
Now you can use Riverside’s editor to polish your live stream. You can use the text-based editor to trim your video, and add captions, intro and outro music, and more!
Or, just ask Riverside’s AI Co-Creator to help. It can edit and repurpose your video based on prompts. Ask it to cut to the good parts, style your video, or to turn it into video highlights, blogs, and an on-demand video.
You can also generate clips of your stream's key moments.
You can then publish this content online, so your live will reach even more people.
See the NEW Live Streaming Tools in Riverside | Full Guide
Optimize your Facebook Live for reach, engagement, and accessibility
If you want your Facebook Live to get the most engagement and reach, there are a few things you can do. Here are some tips.
Promote your Facebook Live stream
Promote your Facebook Live to reach the largest possible audience. You can:
- Announce the Live in advance with a post (date, time, topic, who it’s for).
- Create a Facebook Event for the Live so people can get reminders.
- Pin the announcement post to the top of your Page or Group.
- Tease the Live with a short video or image (“Going live tomorrow to talk about…”).
- Post a countdown reminder (24 hours before, then 1 hour before).
- Share the Live link in relevant Facebook Groups (where allowed).
- Email your list with a calendar-style reminder and direct link.
- Ask a question in advance and promise to answer it live.
- Go live a few minutes early so Facebook can notify people.
- Pin a comment during the Live telling viewers to share it.
Stay on top of live engagement
Once your live streaming is running, the goal is to keep people engaged and prevent them from dropping off. Here are a few tips:
- Welcome viewers in the first few minutes and share your agenda.
- Encourage people to introduce themselves in the comments.
- Pin a key comment with a CTA or resource link.
- Ask questions at regular intervals and acknowledge viewers by name.
- Assign a moderator to manage questions and manage spam.
- Use polls, Q&A, and interactive features when available.
Bonus guide: Check our community guide on how to maximize engagement during your livestreams.
Moderate your live stream
During your live stream, moderating comments can help ensure the vibe stays the way you want it. Here are some things to monitor:
- Assign trusted moderators to approve or remove comments.
- Quickly delete harmful comments and report violations.
- Prepare a safety plan with intermission or cutaway options.
P.S With Riverside, you can assign a behind-the-scenes producer to keep track of this all while you focus on your content.
Keep it accessible
Accessibility can help expand your reach, ensuring anyone who wants to see your live stream can do so. Here are some things to try:
- Enable auto-captions for muted viewers and accessibility.
- Speak clearly, pause between points, and avoid crosstalk.
- Verbally describe on-screen visuals like charts.
- Use high-contrast overlays with large, readable fonts.
- Prioritize clean audio by using headphones and positioning your mic close to your mouth.
Create a strong title, description, and thumbnail
If you schedule a live event, it’s important to make it look appealing. Here are some things to try:
- Write a compelling, descriptive title that tells people what they’ll get from your Facebook Live.
- Front-load your hook and put the main benefit of your stream in the first 70 characters.
- Optimize your text for keywords but use them naturally (avoid keyword stuffing).
- Outline 3 to 4 bullet points in your description.
- Create high-contrast thumbnails with large text that reads well on mobile.
- Deliver on your promise within the first 5 to 8 minutes. Always avoid clickbait.
Tip! Ask Riverside’s co-creator to help you. It can create thumbnails, descriptions and give title descriptions based on your recordings.
Troubleshooting common issues on Facebook Live
Problems happen, especially with live streams. Here’s how to fix the most common ones fast.
Audio and video sync issues, lag, or echo
If your audio or video lags or includes echo, there are a couple of things you can try:
- Wear headphones for solo and group streams to help reduce audio issues and echoes.
- Avoid using video filters or noise reduction tools. These can cause latency in your stream. Use wired Ethernet for the best results. If you have to use Wi-Fi, move closer to your router.
Dropped frames and unstable stream
If your live video is choppy, freezes, or buffers repeatedly, the issue is usually an unstable internet connection or system overload. Here are some tips:
- Use a lower video quality if possible (for example, 720p instead of 1080p), so your connection has less data to upload.
- Use a wired Ethernet connection. It’s more reliable than Wi-Fi.
- Close any apps or browser tabs that use a lot of bandwidth or CPU, such as cloud backups, video calls, or large downloads.
- Restart your router and modem before going live to clear connection issues.
- Limit other devices on your network while streaming, especially those that include video or downloading files.
Problem: Mic/camera not detected
Sometimes, Facebook may not detect your mic or camera. Here are some options to troubleshoot this problem:
- Make sure that Facebook or your streaming software have access to the camera and microphone.
- Make sure the correct camera and mic have been selected. If your device doesn’t appear, unplug and reconnect it (or disconnect/reconnect Bluetooth). Then, update the device drivers or firmware if available, and restart your browser, the Facebook app, or the streaming software.
FAQs about going live on Facebook
Where is the Live button on Facebook?
On desktop, from your Profile or Page, the “Live video” button appears just under where you create a new post.
In Groups, start a new post, then select “Live video” from the options at the bottom under “Add to post.”
If it’s missing, ensure that you are a member of the Facebook Group, that the group allows live video, and that you have permission to post to the group.
Can you live stream on Facebook privately?
Yes you can live stream privately on Facebook:
- On your Profile, set the audience to “Only me” to test privately.
- Page streams are public by default. For private tests, use a test Page or an unlisted destination via your streaming software.
- In Groups, visibility follows the group’s privacy settings.
What are the best Facebook Live audio settings?
If you’re using streaming software like OBS or Streamlabs, you may need to adjust a few audio settings before you go live.
- Set your audio quality to AAC and choose a standard quality level (Facebook works best with 128–192 kbps).
- Use a common audio sample rate (44.1 kHz or 48 kHz) and make sure the same setting is used everywhere. This includes your microphone, your streaming software, and your computer settings. This way, the audio doesn’t slowly fall out of sync.
- Wear headphones while streaming to prevent echo or feedback.
- Watch your audio levels in the software. If the meter turns red or sounds harsh, lower your mic volume to avoid distortion.
How do I share my screen on Facebook Live?
To share your screen on Facebook: select “Share screen” in your live stream window. Then choose the window or display.
You can do the same with Riverside and choose how it displays on the screen. The added benefit with Riverside is that it records the screen on a separate track for editing and repurposing later. You can also upload presentations directly into Riverside, making presenting even easier.
What are the differences between streaming on desktop and mobile for Facebook Live?
In general, mobile is ideal for spontaneous or on-the-go Lives, while desktop is better for planned, longer, or more professional streams.
Facebook Live on mobile is best for quick, casual broadcasts because it’s fast to start and requires no setup. But it offers very little control over audio, video quality, or guest management.
Desktop streaming takes a bit more preparation, but it’s more stable, especially with a wired internet connection. It also makes it easier to manage comments, invite guests, and use better microphones, and cameras.
Third-party live streaming tools like Riverside can only stream to Facebook Live on desktop. They offer more options and higher-quality streaming and recording.
What are some alternatives to Facebook Live for streaming?
Creators also stream on YouTube Live, LinkedIn Live, Twitch, and X.
If your audience is multi‑platform, stream to several at once with Riverside’s multistreaming software. You can also record while you stream, so you can post the video on other platforms easily when you’re done.
Learn more: How to multistream to Instagram and Facebook
How long can a Facebook Live be?
A Facebook Live can run for up to 8 hours per broadcast. This limit applies whether you go live from mobile, desktop, or third-party tools like Riverside or OBS.
Once you reach the 8-hour mark, Facebook automatically ends the stream, and you’d need to start a new Live to continue.
Some premium Facebook partners may be able to stream for up to 12 hours.
Can I use vertical video for Facebook Live?
Yes. Facebook Live supports vertical (9:16), horizontal (16:9), and square (1:1) video, though the viewing experience can vary by device.
If you plan to repurpose your Live for Reels or TikTok, consider recording a clean vertical version. Or, use a tool like Riverside to create optimized vertical clips from a high-quality recording.
Going live starts your stream immediately and notifies viewers only when you’re already live. It’s best for spontaneous or casual broadcasts.
Scheduling an event lets you set a date and time in advance. That way, you can promote your live stream in advance, send reminders, and go live at the scheduled time. This option is better for planned sessions, interviews, or webinars.
Step 3: Give access to your camera and mic
When you’re ready to go live, Facebook will ask you to grant permission for your camera and microphone to be used. Make sure the camera and microphone you want to use are selected.
Step 4: Check your settings
Next, you’ll be able to adjust some settings before starting your stream. In the left panel, ensure your settings are correct.
Under:
- Stream setup: Check that your camera and mic are selected, and that your video feed is appearing in the viewer. You can also decide whether your live video will be added to your story.
- Settings: Choose stream latency, enable the ability to embed your live on another website, and decide whether to unpublish the post after the live is over. You can also decide whether to auto-generate captions and set viewer controls around rewinding and messaging.
- Interactivity: Set up features like polls or Q&As for your live in advance.
Step 5: Add a title and description
Write a clear, keyword-rich title and short description. Make it descriptive. Explain what viewers will learn or see. Use an engaging hook in the first line of the description.
Above the title field, toggle “Share to story” on or off depending on whether you want it to show there as well.
Step 6: Go Live
Once you’re ready, hit “Go Live.” You’ll see a 3-second countdown, and then you’re live on Facebook!
Open the three-dot menu on the post to copy and share your Facebook Live link. You can also share the URL after the live has ended. See our complete guide on how to live stream for a more in-depth streaming setup walkthrough.
Pro tip: For more control over custom layouts, overlays, multiple guests, and multi-platform streaming, use Riverside.
How to go live on Facebook from the mobile app (Android and iPhone)
Mobile is the easiest way to go live on Facebook when you’re on the go. It’s ideal for quick updates and behind‑the‑scenes streams. Follow these steps to set it up:
Step 1: Set up your Facebook Live
Open the Facebook app on your phone and start a new post.
At the bottom of the screen hit “Live.” On some devices, you may need to scroll through the options.
Step 2: Ensure your settings are correct
At the top of the screen, underneath your avatar, tap the dropdown to select your audience. Share your live with the public, followers, or just yourself. You can also exclude certain followers or pick specific people to join your stream.
In the right panel, you can switch off your flash, mute your microphone, and rotate the camera angle. You can also add stickers, lower thirds, and text.
At the bottom of the screen, add a description about your live broadcast. You can also tag friends and turn on “Share to story.”
Step 3: Invite guests to your Facebook Live
You can invite up to 3 people to join your Facebook Live stream.
Before going live, tap the guest list icon to pre-select people who’ll be notified when you go live.
During a live broadcast, you can send invitations to viewers by tapping the guest menu and selecting people from your audience.
Viewers can also request to be part of the live, which you can accept or deny.
Step 4: Go live
When you're ready hit “Go Live.” After a short countdown, you’ll be live to your audience.
During the live, you can monitor and reply to comments, and set up polls for your viewers. You’ll also be able to manage viewer requests and invite friends to join you.
Step 5: Finish your live
When you’re done, tap “Finish.” Your live stream will be saved as a video post. Share the link or download a copy to your device. You can also turn the live into a Reel.
Tip: For the best audio quality, use headphones to avoid echo and feedback. For the best video quality, stabilize your phone with a tripod, and face a window to avoid dark shadows.
Going live: Profile, Page, or Group?
If you plan to go live beyond your personal Profile, Facebook lets you stream from a Page or within a Group.
Each option offers different visibility and features. Here’s how to choose the right one.
How to go live on a Facebook Group
Live streaming to a Facebook group is very similar to starting a regular stream. Here’s how to do it.
Step 1: Find your group
Log in to Facebook and click the “Groups” icon at the top of the screen. Find the group you’d like to post to.
Step 2: Set up your live stream
Click to post, then click the three dots in the menu to choose “Live Video.”
Step 3: Choose whether to go live or create a live event

Going live now means starting instantly without setup. This works well for quick updates, informal discussions, or real-time responses.
Scheduling a live stream ahead is better for training, interviews, or recurring group sessions.
Step 4: Connect your camera and mic
Grant Facebook permission to use your selected camera and microphone, the same as if going live from your profile.
Step 5: Adjust your settings
Click “Settings” in the left panel to make adjustments.
As mentioned above, you can adjust your:
- Camera and mic under “Stream setup”.
- Latency, viewer controls, captions, and embeds in “Settings”.
- Polls and Q&As in “Interactivity”.
Step 6: Add a title and description
Give your live post a title and description so that people who may want to join know what it’s about.

Step 7: Go live
When you’re ready, click “Go live.” After a 3-second countdown, you’ll be live on Facebook. You can see your live video and stats about who is watching in your Dashboard.
Step 8: End live video
To stop your live video, click “End live video.”
Once you’re done, you’ll be able to trim your video, create a clip, download the video, or delete it.
Note that live videos are automatically deleted from Facebook within 30 days.
How to schedule a Facebook Live and share a link
Scheduling a Facebook Live is similar to starting a live event. Here’s how to do it:
Step 1: Set up your Facebook Live
Log in to Facebook on your desktop.
If you’re going live from a post or page, select “Live Video” from under the box where you create a post.
Step 2: Schedule your event
Next, you’ll have the option to go live immediately or schedule an event. Choose “Create live video event.”
Step 3: Set up the Event
Fill in event details, including:
- a cover photo,
- event name,
- details,
- and start date and time.
You can also choose whether your event is Public or in a Group.
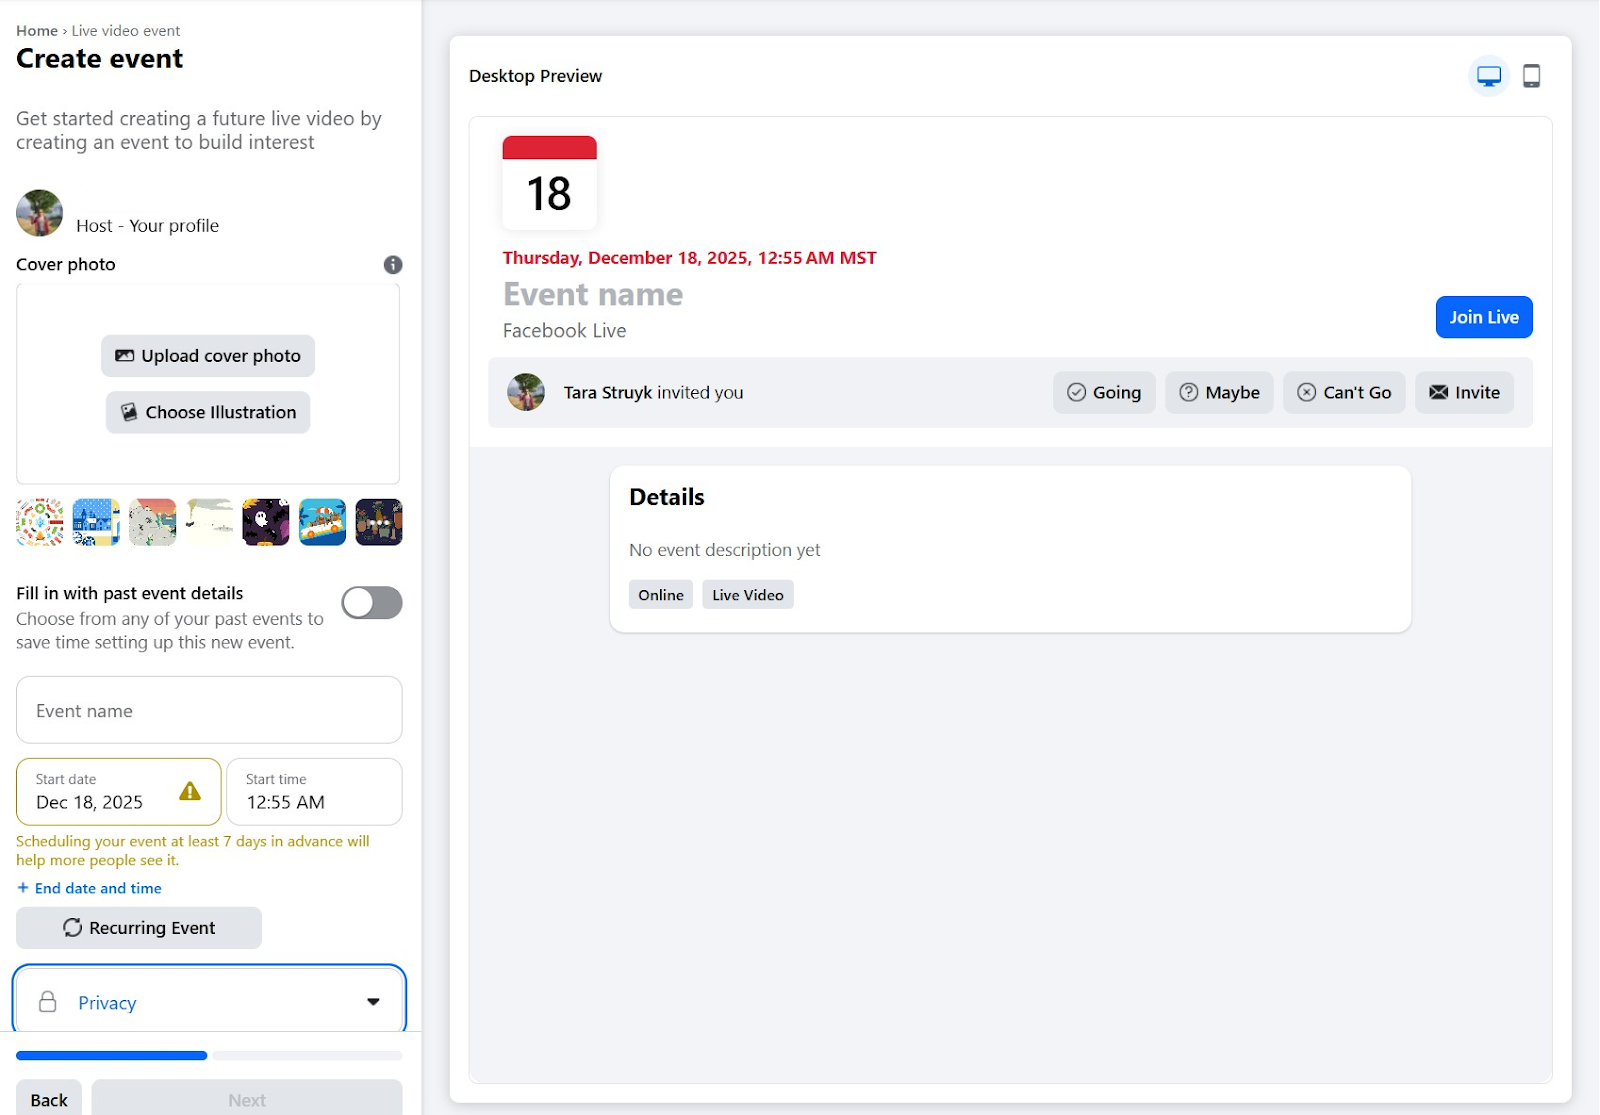
Once you’ve filled in all the fields, click “Next.”
Step 4: Adjust your settings
On the next page, you can adjust your settings.

Under:
- Event settings: Opt to add a co-host.
- Settings: Adjust your stream settings, like latency, and viewer settings, such as auto captions. You can also find your stream key to use in your streaming software (like Riverside.)
When you’re done, click “Create event.”
Step 4: Go live
When it’s time to go live, go to Facebook and find your live stream. You should see it at the top of your feed when you log in.
Click “Set up live video.” If you don’t find it there, use the dots menu in the top right to go to “Events.”
Here you will see all scheduled events. From there, you can also copy the link for your event to share it with others.
From there, you can follow the instructions on going live for desktop.
How to go live on Facebook using streaming software (Riverside)
Want a more professional stream? You can live stream to Facebook using third-party streaming software like Riverside. Why not just stream directly through Facebook? Because with Riverside, you get:
- Up to 9 guests (with easy access invite link).
- Custom layouts, lower thirds, and branding (logos and colors).
- Screen sharing and media playback.
- Multistreaming to Facebook and other social media platforms.
- High‑quality recording of every participant on separate tracks for easy repurposing later.
- Editing tools to polish your live for later use.
- Access to a chat-based editor to repurpose live recordings just by sending a prompt.
Here’s how to quickly and easily live stream to Facebook using Riverside.
Step 1: Log in to your Riverside account
Sign up for a Riverside account or log in to an existing account. In your dashboard, open a project and then select “Go live.”
Step 2: Set up your camera and microphone
You’ll get prompted to select your camera, audio input (microphone), and audio output (headphones or speakers).
We highly recommend using headphones. But if you don’t, Riverside will automatically switch on noise cancellation.

Step 3: Connect Facebook
Hit the “+” icon in the top right of the screen, and ensure “Live stream to social” is toggled on. Underneath this hit “+ Add destination.”
Select Facebook, and choose whether you want to connect a Page or Profile. Riverside will then prompt you to “Continue with Facebook.”
You’ll be sent to Facebook and prompted to connect your account or page. Once you’re done, you’ll be sent back to Riverside with a note that your account has been connected.

Step 4: Invite guests
You can invite up to 9 speakers to join the live stream. In the top right, hit “Invite” and then copy and share the link. You can also send invites via email.
For guests, getting into the livestream is as easy as clicking the link. There’s no need to download anything or sign in.

Step 5: Set your layout and branding
Choose your layout (speaker, side-by-side, grid, or picture-in-picture) from the menu at the bottom of your screen. You can also change your layout during the live stream.

By clicking on the “Script” tab you can also use the teleprompter to read the script for your intros and outros for that added professional touch.
Step 6: Brand your studio
Brand your studio by adding your logo and colors. You can also add other lower thirds, overlay graphics, and other media here.

Step 6: Go live
Once you’re ready, click on the red “Go live” button at the bottom of the screen to start your Facebook Live. It’s as easy as that!

During the live, you can use Riverside’s Chat to monitor and reply to comments from Facebook. You can also send private messages to your guests or producers (if you invite one.)
During the live stream, you can share your screen, play music, or video clips. You can also run polls or conduct Q&A to keep your audience engaged.
While you’re live streaming, Riverside records your live stream automatically. Each participant is recorded locally in up to 4K video and 48 kHz audio with separate tracks.
Step 7: Edit, repurpose, and share
When your live stream is done, click “Stop.”
Now you can use Riverside’s editor to polish your live stream. You can use the text-based editor to trim your video, and add captions, intro and outro music, and more!
Or, just ask Riverside’s AI Co-Creator to help. It can edit and repurpose your video based on prompts. Ask it to cut to the good parts, style your video, or to turn it into video highlights, blogs, and an on-demand video. You can also generate clips of your stream's key moments.
You can then publish this content online, so your live will reach even more people.
Read more: See the NEW Live Streaming Tools in Riverside | Full Guide
Optimize your Facebook Live for reach, engagement, and accessibility
If you want your Facebook Live to get the most engagement and reach, there are a few things you can do. Here are some tips.
Promote your Facebook Live stream
Promote your Facebook Live to reach the largest possible audience. You can:
- Announce the Live in advance with a post (date, time, topic, who it’s for).
- Create a Facebook Event for the Live so people can get reminders.
- Pin the announcement post to the top of your Page or Group.
- Tease the Live with a short video or image (“Going live tomorrow to talk about…”).
- Post a countdown reminder (24 hours before, then 1 hour before).
- Share the Live link in relevant Facebook Groups (where allowed).
- Email your list with a calendar-style reminder and direct link.
- Ask a question in advance and promise to answer it live.
- Go live a few minutes early so Facebook can notify people.
- Pin a comment during the Live telling viewers to share it.
Stay on top of live engagement
Once your live streaming is running, the goal is to keep people engaged and prevent them from dropping off. Here are a few tips:
- Welcome viewers in the first few minutes and share your agenda.
- Encourage people to introduce themselves in the comments.
- Pin a key comment with a CTA or resource link.
- Ask questions at regular intervals and acknowledge viewers by name.
- Assign a moderator to manage questions and manage spam.
- Use polls, Q&A, and interactive features when available.
Bonus guide: Check our community guide on how to maximize engagement during your livestreams.
Moderate your live stream
During your live stream, moderating comments can help ensure the vibe stays the way you want it. Here are some things to monitor:
- Assign trusted moderators to approve or remove comments.
- Quickly delete harmful comments and report violations.
- Prepare a safety plan with intermission or cutaway options.
P.S With Riverside, you can assign a behind-the-scenes producer to keep track of this all while you focus on your content.
Keep it accessible
Accessibility can help expand your reach, ensuring anyone who wants to see your live stream can do so. Here are some things to try:
- Enable auto-captions for muted viewers and accessibility.
- Speak clearly, pause between points, and avoid crosstalk.
- Verbally describe on-screen visuals like charts.
- Use high-contrast overlays with large, readable fonts.
- Prioritize clean audio by using headphones and positioning your mic close to your mouth.
Create a strong title, description, and thumbnail
If you schedule a live event, it’s important to make it look appealing. Here are some things to try:
- Write a compelling, descriptive title that tells people what they’ll get from your Facebook Live.
- Front-load your hook and put the main benefit of your stream in the first 70 characters.
- Optimize your text for keywords but use them naturally (avoid keyword stuffing).
- Outline 3 to 4 bullet points in your description.
- Create high-contrast thumbnails with large text that reads well on mobile.
- Deliver on your promise within the first 5 to 8 minutes. Always avoid clickbait.
Pro tip: Ask Riverside’s co-creator to help you. It can create thumbnails, descriptions and give title descriptions based on your recordings.
Troubleshooting common issues on Facebook Live
Problems happen, especially with live streams. Here’s how to fix the most common ones fast.
Audio and video sync issues, lag, or echo
If your audio or video lags or includes echo, there are a couple of things you can try:
- Wear headphones for solo and group streams to help reduce audio issues and echoes.
- Avoid using video filters or noise reduction tools. These can cause latency in your stream. Use wired Ethernet for the best results. If you have to use Wi-Fi, move closer to your router.
Dropped frames and unstable stream
If your live video is choppy, freezes, or buffers repeatedly, the issue is usually an unstable internet connection or system overload. Here are some tips:
- Use a lower video quality if possible (for example, 720p instead of 1080p), so your connection has less data to upload.
- Use a wired Ethernet connection. It’s more reliable than Wi-Fi.
- Close any apps or browser tabs that use a lot of bandwidth or CPU, such as cloud backups, video calls, or large downloads.
- Restart your router and modem before going live to clear connection issues.
- Limit other devices on your network while streaming, especially those that include video or downloading files.
Problem: Mic/camera not detected
Sometimes, Facebook may not detect your mic or camera. Here are some options to troubleshoot this problem:
- Make sure that Facebook or your streaming software have access to the camera and microphone.
- Make sure the correct camera and mic have been selected. If your device doesn’t appear, unplug and reconnect it (or disconnect/reconnect Bluetooth). Then, update the device drivers or firmware if available, and restart your browser, the Facebook app, or the streaming software.
FAQs about going live on Facebook
Where is the Live button on Facebook?
On desktop, from your Profile or Page, the “Live video” button appears just under where you create a new post.
In Groups, start a new post, then select “Live video” from the options at the bottom under “Add to post.”
If it’s missing, ensure that you are a member of the Facebook Group, that the group allows live video, and that you have permission to post to the group.
Can you live stream on Facebook privately?
Yes you can live stream privately on Facebook:
- On your Profile, set the audience to “Only me” to test privately.
- Page streams are public by default. For private tests, use a test Page or an unlisted destination via your streaming software.
- In Groups, visibility follows the group’s privacy settings.
What are the best Facebook Live audio settings?
If you’re using streaming software like OBS or Streamlabs, you may need to adjust a few audio settings before you go live.
- Set your audio quality to AAC and choose a standard quality level (Facebook works best with 128–192 kbps).
- Use a common audio sample rate (44.1 kHz or 48 kHz) and make sure the same setting is used everywhere. This includes your microphone, your streaming software, and your computer settings. This way, the audio doesn’t slowly fall out of sync.
- Wear headphones while streaming to prevent echo or feedback.
- Watch your audio levels in the software. If the meter turns red or sounds harsh, lower your mic volume to avoid distortion.
How do I share my screen on Facebook Live?
To share your screen on Facebook: select “Share screen” in your live stream window. Then choose the window or display.
You can do the same with Riverside and choose how it displays on the screen. The added benefit with Riverside is that it records the screen on a separate track for editing and repurposing later. You can also upload presentations directly into Riverside, making presenting even easier.
What are the differences between streaming on desktop and mobile for Facebook Live?
In general, mobile is ideal for spontaneous or on-the-go Lives, while desktop is better for planned, longer, or more professional streams.
Facebook Live on mobile is best for quick, casual broadcasts because it’s fast to start and requires no setup. But it offers very little control over audio, video quality, or guest management.
Desktop streaming takes a bit more preparation, but it’s more stable, especially with a wired internet connection. It also makes it easier to manage comments, invite guests, and use better microphones, and cameras.
Third-party live streaming tools like Riverside can only stream to Facebook Live on desktop. They offer more options and higher-quality streaming and recording.
What are some alternatives to Facebook Live for streaming?
Creators also stream on YouTube Live, LinkedIn Live, Twitch, and X.
If your audience is multi‑platform, stream to several at once with Riverside’s multistreaming software. You can also record while you stream, so you can post the video on other platforms easily when you’re done.
Learn more: How to multistream to Instagram and Facebook
How long can a Facebook Live be?
A Facebook Live can run for up to 8 hours per broadcast. This limit applies whether you go live from mobile, desktop, or third-party tools like Riverside or OBS.
Once you reach the 8-hour mark, Facebook automatically ends the stream, and you’d need to start a new Live to continue.
Some premium Facebook partners may be able to stream for up to 12 hours.
Can I use vertical video for Facebook Live?
Yes. Facebook Live supports vertical (9:16), horizontal (16:9), and square (1:1) video, though the viewing experience can vary by device.
If you plan to repurpose your Live for Reels or TikTok, consider recording a clean vertical version. Or, use a tool like Riverside to create optimized vertical clips from a high-quality recording.


.webp)

-(1).webp)

.webp)