


Key Takeaways
- The best explainer videos work best when they follow a clear structure: problem → solution → call to action.
- Keep your video short, visually engaging, and tailored to your audience’s needs. Hook viewers early with a bold statement or question, and avoid jargon in your script
- Create your explainer video on an all-in-one recording and editing platform, like Riverside, for an easier workflow. You’ll want tools like: high-resolution, lower-thirds, text, and branding.
If people don’t get your product fast, they won’t stick around. Explainer videos fix that with a clear, punchy pitch that turns “Hmm?” into “I need this.”
Read on for a step-by-step guide on how to make an explainer video that actually works.
What is an explainer video?
An explainer video is a short video (typically ~60–90 seconds) that explains a product, service, or concept in a simple, engaging way. Explainers often combine concise scripts, appealing visuals, and sometimes a dash of humor to educate viewers and pique their interest.
Companies and content creators use explainer videos to introduce what they do. For example, a startup might use one on their homepage to illustrate a problem and how their product solves it. A YouTuber might create a quick animated explainer to clarify a concept to subscribers.
The video format can vary (cartoon animations, live-action demonstrations, screen recordings, etc.). But, the goal is the same: quickly communicate the key message so that the audience “gets it.”
How to make an explainer video step-by-step
Ready to create your own explainer video? Here’s a step-by-step game plan:
1. Define your goal and audience
Before touching a camera or script, ask yourself: what you're trying to explain, and who actually needs to hear it.
Are you helping new users get started with your software? Walking potential customers through a product benefit? Figure this out early, because how you tell the story depends entirely on what people need from it.
I'd also recommend avoiding defining your audience in vague terms like “millennials” or “enterprise buyers.” Think specifically. What frustrates them? What questions do they always ask?
A short, punchy video that helps a product manager understand a reporting tool will look completely different from one showing a new parent how to install a car seat. One explains efficiency. The other offers peace of mind.
A good explainer solves a real problem for a real person. You need to be clear on both.
2. Choose the right format and style
The best explainer video format is the one that shows your point clearly and doesn’t get in the way. The good news is that you have options:
- Live-action: Film yourself or a team member talking to the camera to build trust and personality.
- Screencast: Record your screen to walk viewers through how your product works.
- Animation: Use motion graphics or cartoons to simplify abstract or complex ideas.
- AI avatar: Generate a talking presenter using AI for quick, scalable videos.
- Hybrid: Mix formats like face cam + screen share for a more dynamic explainer.
If you’re demoing a product or app, record your screen and walk people through it. You can add a voiceover or captions later, or use a webcam overlay to add a human face to the tutorial.
If the concept is more abstract, for example, explaining how your security protocol works, animation can help visualize what you can’t film. And if trust is key, consider filming yourself or a teammate speaking directly to the camera.
Ultimately, pick a style that will resonate with your audience and clearly convey your topic (and yes, it’s okay to keep it simple).
Pro Tip: You can also mix formats. Think: screen share + face cam. Talking head + overlaid graphics. Riverside makes this easier by recording both your screen and camera in HD. You can toggle between them cleanly in post-production.
3. Write the script and plan your visuals
A compelling script is the heart of your explainer video. This is where you decide what to say and how to say it efficiently.
Start by figuring out the core problem your audience is dealing with. Then introduce your product or idea as the fix. Don’t overcomplicate it.
A simple structure is best like:
- Problem
- Solution
- How it works
- What to do next
Keep your language straightforward and conversational. Imagine explaining it to a friend who knows nothing about your product. If a metaphor or bit of storytelling helps get the point across, use it, but skip the jargon and hype.
As you draft, remember to write visually: think about what viewers will see for each line you speak. This leads to creating a basic storyboard – sketch out scene by scene or at least note what visuals or footage goes with each part of the script.
Even a bullet list of scenes or doodles will do. The goal is to plan the visual flow. For example:
Scene 1: Show a frustrated person struggling with the problem
Scene 2: Your product appears as the solution
Scene 3: Screen capture of the product in action, etc.
Once the script feels solid, read it aloud and time it. Aim for around 90 seconds or less. If it’s too long or tongue-twisty, trim and simplify. If possible, get a second opinion from a colleague before moving on to production.
4. Record your video and voiceover
Once your script is ready, it’s time to bring it to life. In this section I’ll walk you through recording a live-action or screencast-style explainer video using Riverside. (I’ll cover animation workflows later).
Step 1: Decide whether you’ll be recording:
- Talking head (yourself on camera)
- Screencast (your screen only)
- Both (screen + face cam)
Riverside supports all three.
Step 2: If you haven’t already, head to Riverside and sign up for a free account. Once you're in, create a new recording studio—this is where all your videos will live.
.webp)
Step 3: Inside your Riverside studio, click “Record.” Follow the prompts and grant camera/mic permissions.
You can test your audio and video before starting inside the Lobby.

Step 4: Click the red “Record” button to start.
Click on the Script > Teleprompter button to read your script while you’re sharing your screen, speaking to the camera, or doing both.

Note: Each video and audio source (camera, screen, mic) is recorded on a separate track. This makes editing easier. Zoom in on the screen to highlight features, then cut back to your face for emphasis.
Step 5: Click “Stop” when you're done. Wait a few seconds while your full-resolution files upload automatically.
Pro Tip: Riverside instantly generates an AI transcript after your recording. Use it to find quotes, make text-based edits, or turn your video into repurposed content fast.
.webp)
5. Edit your explainer video
Now for post-production: edit your video and turn the raw footage into a polished explainer.
Step 1: Go to your Projects page, select the episode you want to work on, and click “Edit.” This takes you into the editing workspace.
.webp)
Step 2: Before you start trimming, let the AI Producer do the heavy lifting. It’ll remove background noise, smooth out audio levels, and automatically delete filler words like “uh” or “you know.” Your audio will instantly sound more professional.
.webp)
Step 3: Here’s the game-changer: with Riverside, you can edit your video just by editing the transcript. Want to cut a sentence? Just delete it from the text, and it's gone from the video.
.webp)
Step 4: Click on the “Captions” tab to add subtitles. Choose a style you like, then adjust the font, size, and placement to match your brand. Captions are key for mobile viewers or anyone watching on mute.
.webp)
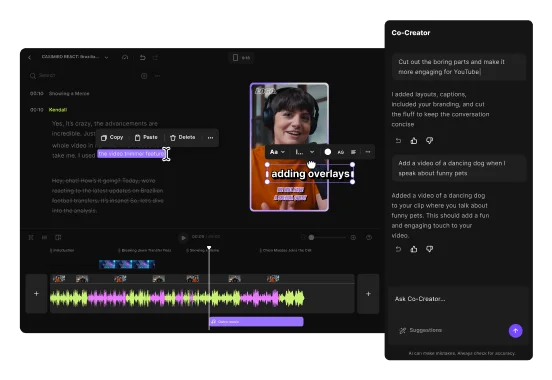
Step 5: Make your explainer more engaging with b-roll, images, or background music. Riverside gives you access to a library of royalty-free videos, pictures, and music—so you don’t have to go hunting elsewhere.

Step 6: Once you're happy with the edit, click “Export” on the right. Choose your format (MP4 is a safe bet) and aspect ratio (like 16:9 for YouTube or 9:16 for TikTok). Hit “Export video” and you’re good to go.

You now have a professional explainer video ready to post, embed, or email out into the world.
How to make an animated explainer video
Creating animated explainer videos follows a similar process to live-action one, with a few special considerations. Here’s a quick step-by-step for animation:
Step 1: Plan the story and style
Define what you're explaining, your tone (serious, playful, minimalist, etc.), and the animation style that fits. 2D motion graphics? Whiteboard sketch? Cartoon characters? Choose something that aligns with your brand and audience. Simpler usually works better.
Step 2: Write the script and map the visuals
Animation is built around narration, so your script comes first. Write short, clear lines that naturally translate into visual scenes. Then rough out a visual plan for each line: what will viewers see as they hear it? You don’t need full storyboards, just a scene-by-scene outline.
Step 3: Record your voiceover (or generate one)
A strong narrator voice brings your animation to life. Record your voiceover (or hire a voice actor) before finalizing animation, but remember that your visuals will need to sync with the audio. Many animation tools let you import the audio and then sync actions to it.
Pro tip: No mic? With Riverside AI voice you can turn text into natural-sounding speech or even replicate your own voice. Choose tone, accent, and delivery style, and listen back for awkward pacing or timing.
Step 4: Animate your scenes
If you’re not an animator, use DIY tools or templates. DIY tools like Vyond, Animaker, or Canva have drag-and-drop editors and ready-made explainer templates. Import your voiceover, then sync the visuals to match. If you have a budget, you could also hire a professional animator or studio.
Step 5: Add music and sound effects
Background music sets the tone. Many animated explainers use light, upbeat tracks. Layer in subtle sound effects (whoosh for transitions, subtle effects for clicks or pops) to highlight actions and enhance engagement.
Step 6: Export, review, and tweak.
Watch your finished video from the viewer’s perspective. Does the pacing feel natural? Do visuals match the message? Small tweaks—like adjusting timing or swapping out a scene—can make a big difference. And if you ever need to update it later, just edit the script and re-render.
How to make an AI explainer video
Here’s how you can leverage AI to create an explainer video, step-by-step:
Step 1: Create an AI-assisted script
Write the video script yourself or bring in AI to help you get started. ChatGPT, for instance, can turn a rough outline or a few bullet points into a usable draft in seconds. But treat the output as scaffolding – refine it so it sounds like something your brand would actually say. The goal isn’t to automate your voice but to speed up your thinking.
Step 2: Decide who speaks: you or an AI voice
If you want to use your own voice, record it in high-quality in Riverside, use it to or clone your voice and generate the narration from text.
Prefer a more visual narrator? Tools like Synthesia or HeyGen can create an AI avatar that reads your script on camera. These work best for instructional content like product walkthroughs or training videos, but feel flat for emotional or story-driven topics.
Step 3: Build your video with AI tools
Some tools like Pictory or InVideo can automatically match your narration to stock footage. It’s a fast way to build a draft, especially if you’re short on time. If your explainer needs more tailored visuals, you can use AI image generators like DALL·E to create custom graphics from text prompts.
Step 4: Edit quickly with AI features
Use Riverside’s AI-powered editing to clean up your audio, remove silences, correct timing, and generate captions automatically. Some tools can even auto-select the best takes or trim your video for social. These features speed things up and reduce the back-and-forth of traditional timeline editing.
Step 5: Localize or iterate fast
One of the biggest perks of AI explainers is how easily you can scale. Want the same video in Spanish? Just update the script and regenerate the voiceover with Riverside. Need to fix a sentence? Edit the text and re-render—no re-recording needed.
Step 6: Final check before you publish
Before you publish, take a step back and watch it from the audience’s perspective. Does the video flow naturally? Does the tone match the message? Tweak and refine the video accordingly. Remember, AI gets you 90% of the way, but it's your judgment that makes it polished.
A few things to keep in mind
Using AI to create explainer videos can be incredibly efficient, especially for:
- Multilingual content
- Frequent updates
- Tight deadlines
- Regenerating scenes
The trade-off is that fully AI-generated videos (especially with avatars) can feel generic or impersonal. The sweet spot is a hybrid workflow: let AI handle the repetitive or time-consuming tasks (like translating or generating drafts), then layer in human creativity for tone and final edits.
AI explainers work best for straightforward, instructional content. For more emotionally-driven storytelling, you might stick to traditional methods. Nonetheless, it’s an exciting option – the future might have us generating quality explainer videos at the click of a button!
Best practices on how to make your explainer videos stand out
- Speak your audience’s language: Match your tone to your audience—fun and casual if that fits, more formal if needed. Skip the jargon unless your viewers are highly technical. If you do use industry terms, explain them clearly or use visuals to reinforce the meaning.
- Use visuals to bring the story to life: Don’t just talk about your product—show it in action. Show a user facing a challenge, then demonstrate how your product solves it through screen recordings, animations, or real-life examples. Keep your visuals synced to the narration to engage both eyes and ears.
- Prioritize high quality production: Clear audio is non-negotiable. Use a decent microphone and reduce background noise. Use at least 720p or 1080p video resolution to avoid blurry footage. If filming yourself, good lighting and a non-distracting background go a long way to making it look professional.
- Don’t skip the CTA: After educating and engaging the viewer, tell them what to do next. It could be as direct as “Sign up for a free trial” or it could be a softer CTA like “Learn more at [your website].” Make sure your call to action aligns with your original goal (from Step 1) and reinforce it visually: display a clickable CTA on screen, ideally with your logo and a link.
Why explainer videos work
Explainer videos are powerful because they grab attention and drive action. Here’s why they perform so well:
- People prefer video over text: According to a Hubspot study, 72% of customers would rather learn about a product via video instead of text. It’s simply more engaging.
- Better understanding and retention: Through sight and sound, viewers retain more of a message when they watch it instead of reading it. A Wyzowl study found that 88% of marketers believe video improves audience understanding of their product.
- Higher conversion and purchase intent: Saleslion research suggests that landing pages with explainer videos can increase conversion rates by up to 80%. It’s a direct way to build trust and get viewers to take that next step.
- Broad reach and appeal: From websites to YouTube to social media feeds, video works everywhere. It’s a scalable format that fits every stage of your funnel.
4 Standout explainer video examples to learn from
1. Dropbox – “What is Dropbox?”
This one is a real case study legend.
A minimalist cutout animation from 2009, it uses simple cutout animation to show the problem—no access to your files when you need them—and how Dropbox solves it. The tone is low-key, the visuals are basic, and it’s all focused on being clear and straightforward. It helped drive massive early growth for Dropbox because it made the product feel immediately useful.
2. Slack – “So Yeah, We Tried Slack…”
This early explainer starts with the (relatable) mess of back-and-forth emails and missed messages, then gradually introduces Slack as a way to cut through it. Clean visuals, casual tone, no over-explaining. Just a clear message: Slack reduces the workplace chaos we all live into.
3. Dollar Shave Club – “Our Blades Are F**ing Great”*
A viral, single-take monologue that’s as clear as it is funny – but the format does a lot of heavy lifting too. It’s a single-take monologue with a tight structure that walks you through the business model while cracking jokes. You get the pricing, the pain points, and the positioning in under two minutes.
4. Chili Piper – Customer Success Explainer via Riverside
Instead of using animations or a scripted voiceover, Chili Piper went with live interviews recorded remotely using Riverside. You see a real customer explaining what the product helped them do, paired with screen recordings of the product itself. Honest, effective, and especially smart for B2B.
Final thoughts
At their core, explainer videos are just a clear way to show people what you do and why it matters to thems. You don’t need a studio team or motion design budget to make one. Just a sharp script, honest delivery, and the right platform like Riverside to record, edit, and transcribe everything in one place.
FAQs on explainer videos
What is the best explainer video tool?
It mostly depends on your format. For live-action or screen demos, Riverside is a top pick with high-quality video, multitrack recording, and built-in editing tools.
For animation, try tools like Vyond or Animaker. For AI avatars, tools like Synthesia turn your script into a talking presenter.
Many creators use a combination of tools, like recording with Riverside, then using Adobe Premiere or Canva for some extra graphics. Try a few free trials to see what fits your workflow best.
How much does it cost to make an explainer video?
An explainer video may cost anywhere from $0 to $10,000+. DIY videos made with tools like Riverside or animation platforms can keep costs low, whereas hiring a professional studio will push the price up fast.
How effective are explainer videos for increasing conversion rates?
Videos are very effective at increasing conversion rates. 82% of consumers say a video has convinced them to buy a product. When you explain your value clearly and visually, people are more likely to take action.
Who needs explainer videos?
Anyone with something to explain! Literally any business or creator can benefit from an explainer video. Startups, SaaS companies, ecommerce brands, educators, and content creators all use them to simplify complex ideas and build trust.
How long should an explainer video be?
The ideal length of an explainer video should be 60–90 seconds. That’s enough to explain your point without losing your viewer’s attention. As soon as you’ve answered “what is it and why should I care?”, you’re done.
Is an explainer video the same as a demo video?
Not exactly. While they’re related, explainer videos and demo videos serve different purposes. Explainers give a high-level overview of what your product is and why it matters, and they’re great for early in the buyer journey. In contrast, a demo video goes deeper, showing how your product works step by step. They’re usually used later in the funnel.


.webp)
-(1).webp)

.webp)

