


Key takeaways:
- Before recording, write a script, gather all your equipment, and test your tools.
- With software like Riverside, recording is as easy as plugging in your equipment, opening a virtual studio, and hitting record.
- After recording, it’s best to edit your video and add lower thirds, branding, and other elements to make it pop.
Training videos save time by replacing repeat calls and one-off walkthroughs. And they’re easier to make than you think.
In this step-by-step guide, we’ll give you a full walkthrough on how to record training videos. It’s simple and it won’t break the bank.
Let’s get into it!
How to prepare your setup for recording training videos
Before we get to the main part of our guide, let’s discuss a few things you should do before recording.
Plan an engaging video script
You need a good script to create training videos that keep viewers watching until the end.
Preparing a script will help you organize your thoughts, plan visual references, and add in a few punchlines to engage the audience.
When creating a script:
- Start with a clear goal: What should viewers learn or do by the end?
- Break it into sections: Organize content logically to avoid overwhelm.
- Write how you speak: Keep it natural, conversational, and easy to follow.
- Include visual notes: Flag where you’ll share your screen or add visuals.
- Keep it tight: Cut the fluff—respect your viewers’ time.
Create your recording setup
Once your script is ready, gather all your recording equipment to complete your setup.
We’ve got a whole guide on setting up a video studio, but we suggest you get at least:
- A good-quality microphone.
- A reliable camera, or phone camera, which records at least 1080p HD or ideally 4K.
- A set of headphones to monitor audio.
- Accessories like a camera tripod, stand, and pop filter for your mic, or lighting.
Whether you’re using a webcam, an external camera, or your phone, connect everything to your computer or laptop. Then, run a test with your mic, headphones, and other devices.
This is also a good time to check your background and lighting.
Choose video training software
Pick a good tool for recording training videos. The best recording software:
- Records high-quality video and audio. Aim for 1080p HD and 44 kHz or higher.
- Let you present your screen and other video assets.
- Allows you to invite collaborators seamlessly.
- Supports video editing to fine-tune and enhance your video.
A versatile video recording tool like Riverside checks all these boxes. It’s perfect for recording videos in up to 4K quality. Plus, you’ll get an intuitive text-based editor so you can create top-notch virtual training materials.
Check our full guide on training video software to learn more.
How to record training videos step-by-step
Now, let’s go through how to record training videos with Riverside in just a few minutes. (It’s that easy!)
Step 1: Log in to your Riverside account or create a new account if you don’t have one.
Step 2: Go to an existing studio, or create a new one by clicking on the studios on the right dashboard.
Open a project or click “New project” to create a new one.
All your training videos will save to this recording, and you can treat each project as a separate folder for different videos.
.webp)
Step 3: In your project, click “Record” to start a new recording. You can also click “Plan” if you want to invite other guests first.

From here you’ll enter the lobby.
Add your name and check your camera. Click on the camera, mic, and speaker options to connect the tools you want to use. Click “Join Studio” when everything is set.

Step 4: Click “Script” to add a script for your video. Having a script makes it easier to record training videos with clarity, and without too many awkward pauses or retakes.

You can also use the teleprompter tool to read from your script directly.
Step 5: Invite your guests if you haven’t already by sending them a link or inviting them by email. You can record up to 9 other people with you.

Step 5: When your setup is complete, hit the “Record” button to get started. After a 5-second countdown, the recording will begin.

You can pause recording at any point or restart your video if you make an error.
Step 6: If you want to share your screen, you can do that by clicking “Share.” You can also share a previously uploaded presentation.

While recording, you can also use the Media Board to play music, sound effects, or pre-recorded videos.
Step 6: When you’re done recording, press “Stop.”

Riverside will automatically save your video to your studio and upload it to the cloud.
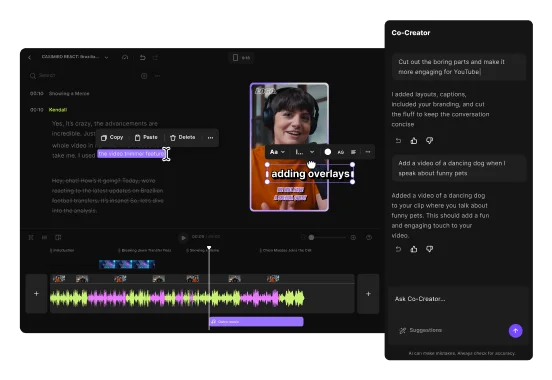
Step 7: Go to your Projects page, select the video you just recorded, and click “Edit” to access the editor. Here you can edit and enhance your training videos with Riverside’s powerful editing tools.
.webp)
With the editor, you can:
- Use text-based editing to trim your video and remove unwanted sections.
- Add and style auto-generated captions to help viewers retain more information.
- Add text, video, and image overlays to create more visual references.
- Add lower thirds for context around who you and your speakers are.
Use Magic Audio to clean up your audio and remove background noise.
Tips for creating better training video recordings
While Riverside makes it easy to record training videos, follow these best practices to produce great videos that maximize your training ROI.
Focus on storyboarding
A storyboard outlines the flow of your video. While storyboards are more common for creative projects like movies, you can use them for training videos to:
- Neatly organize different sections of a video
- Plan how to use visual cues in different places
For example, a storyboard will pinpoint exactly where in your video you’ll present the screen and share a workflow.
Ultimately, preparing a storyboard saves you the trouble of doing multiple retakes because you missed a key detail or messed up the flow.
Add a crisp and clear audio
Choppy audio is annoying and will detract from your message. Ensure that you record clear audio by using a quiet recording space. Using a high-quality microphone and pop filter can help, too. And, if some background noise sneaks in, you can use Riverside’s Magic Audio to clean it up with a click.
Include captions for accessibility
Adding captions to your videos makes them more accessible to those who can’t hear well, or even just those who prefer to read. With captions, people can understand your insights and implement them in their work. Riverside makes it easy to quickly and easily add captions to your content. Plus, it can transcribe in 100+ languages to help you reach a broader audience.
Add visual cues
Make your videos more engaging by adding visual cues. This helps break things up and maintain your viewers’ attention. Insert on-screen text, callouts, or icons to highlight key terms or steps. Or add images and videos that you referred to while recording.
What to do after recording your training video
Your training videos are recorded, edited, and ready to be rolled out. So, what's next?
Microlearning videos
One way to make sure your videos reach the maximum number of people is to create microlearning videos that are easy to digest.
You can break down a long video into short clips and share them with the team at different touchpoints as FAQs or weekly training nuggets.
And lucky for you, with Riverside’s clip creator, this is effortless. Our AI automatically generates short contextual clips around a single topic.
Repurposing content
You can also repurpose these videos into slide decks, checklists, or other assets to create handy job aids. This makes your content available on-demand for more hands-on guidance.
FAQs on how to record training videos
What is a training video?
A training video educates viewers on a specific topic. Training videos often explain a concept, share a step-by-step tutorial, or offer insights on a subject. There are different types of such videos, including employee or student training. The benefit of training videos is that they only need to be done once (or at least infrequently), and can be used to train many people. This saves time and resources when it comes to training.
How do I record a training video on my computer?
To record a training video on your computer, you can use any built-in recording software like QuickTime Player on Mac or Snipping Tool on Windows. But, these options tend to have lower quality audio and video, and don’t give you much in the way of editing tools.
If you want to record in high quality, edit and add captions, and deliver professional results, Riverside is a great option.
What equipment do I need to record professional training videos?
You can record high-quality training videos using Riverside with as little as a webcam. For higher quality results, we also recommend a microphone and headphones. Learn more in our list of the best video production equipment.


.webp)

.webp)
.webp)

