


Key takeaways:
- Recording a webinar is easier if you’re the host, but even attendees can do that with a screen recorder (and the legal permissions).
- Using a dedicated webinar platform is the best solution, especially if it’s an all-in-one tool that also lets you polish the recording, like Riverside.
- You can record a webinar on your phone, but if the screen recording doesn’t capture the audio, it means the platform is blocking it.
A live webinar lasts an hour. A recorded webinar can work for you for months.
And you don’t need to be a tech expert to record one.
This guide shows you exactly how to record a webinar on any device, whether you’re hosting the session or attending as a viewer.
Key options for recording a webinar
There are a few ways to record a webinar. Your choice will depend on whether you’re the host or an attendee, and what devices or software you have available.
Here are the key options:
- Using a webinar platform like Riverside, Zoom, Google Meet, or Microsoft Teams.
- Using a screen recorder (if you aren’t the host)
- Using your smartphone
How to record a webinar using your webinar platform

Major video-conferencing platforms (e.g., Zoom, Microsoft Teams, Google Meet) typically have a built-in recording function, but it’s mostly for archival purposes. This means your recording is heavily compressed, and its quality depends on your connection. And, according toour research on more than 400 marketers, 46.5% of them describe their quality as “pixelated” and “unprofessional.”
Plus, these platforms don’t offer editing tools to clean up your recording, contributing to the tool sprawl that 82% of companies are trying to reduce.
If you want to record your webinar in studio quality right from the start, then edit your recording under the same roof, you need a platform like Riverside.
With Riverside, you can:
- Record webinars locally in up to 4K video and 48kHz audio, unaffected by internet connection hiccups.
- Invite up to 10 speakers and 10,000 attendees with a link, no downloads needed.
- Create custom registration forms that sync with HubSpot and Salesforce to capture leads.
- Webinar analytics to track audience engagement, watch time and leads.
- Multistream to platforms like YouTube, LinkedIn, and Facebook or custom RTMPs.
- Host a pre-recorded webinar like it’s happening live.
- Brand your studio with overlays, lower thirds, your logo, and backgrounds.
- Engage your audience with live call-ins, Q&As, and polls.
- Share your screen and slides in high-res.
- Invite a producer to manage the session and participants from behind the scenes.
- Save all participants’ audio and video tracks separately for maximum control in post-production.
- Edit in minutes instead of hours with chat-based editing and text-based editing.
- Repurpose your webinar instantly with Magic Clips to turn highlights into short, shareable videos.
Recording a webinar on Riverside: Step-by-step
Recording a webinar on Riverside is simple. Here’s how:
Set up your studio
Step 1: Head to your session and click the “Record” button to open the lobby. Set up your audio and video input and click “Join studio” when you’re ready.

Step 2: From your studio, click the “Brand” tab to adjust branding in your studio and (optionally) your studio lobby. You can add your logo and overlays, change the background and colors, style your fonts, and more.
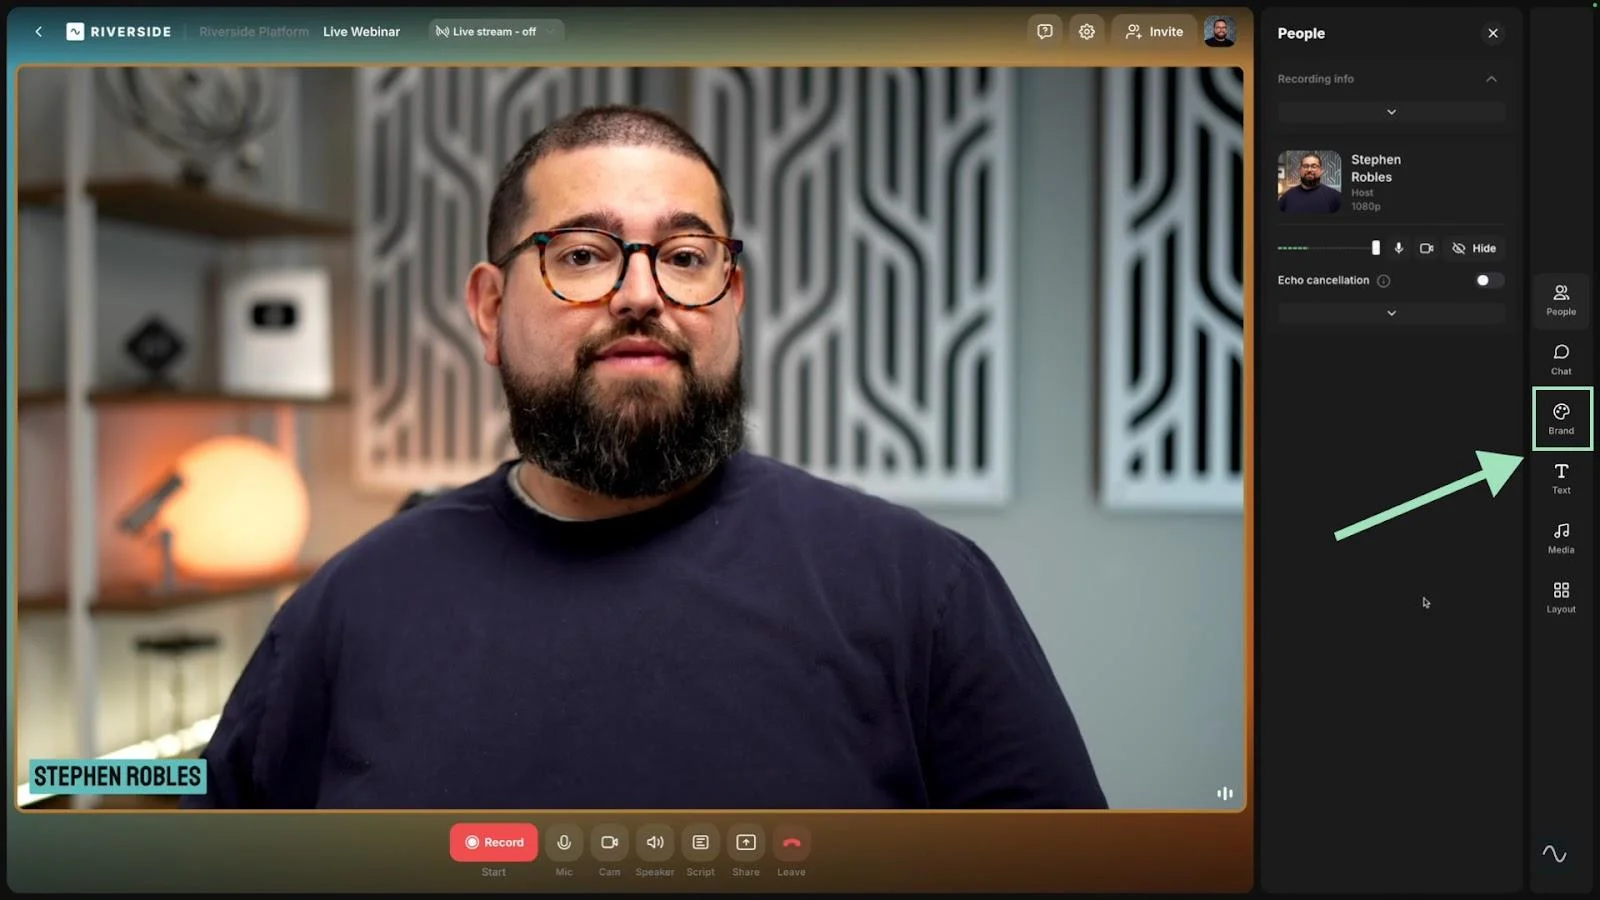
Step 3: You can also create and customize lower thirds for you and your guests by clicking the “Text” icon on your right-hand toolbar, then the “+” icon to add a new lower third.

Step 4: Add any media you plan to share during your webinar, including music, sound, or video, by clicking the “Media” button on the right-hand sidebar.

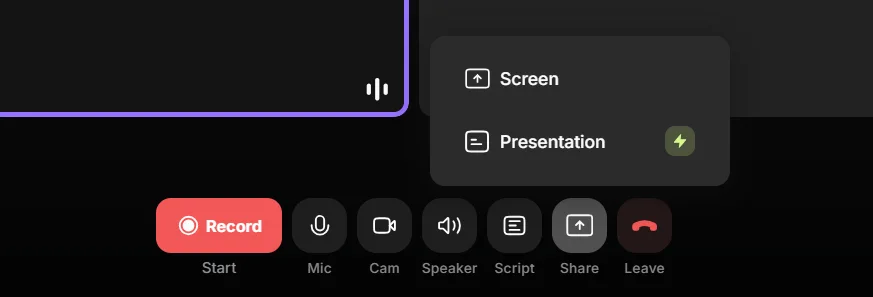
To add a presentation, click “Share” on the bottom toolbar, then “Presentation.”
If you’d like to use a script for your event, you can upload one by clicking the “Script” button. This allows you to easily read from your script using Riverside’s built-in teleprompter.
Connect your streaming platforms
This one’s optional, but if you’re broadcasting live, you can multistream your webinar to top social media platforms right from your Riverside studio.
Click the “Live Stream” button at the top of your screen and ensure the “Public audience link” toggle is turned on. Then, select the platforms you’d like to stream to.

Go live and record
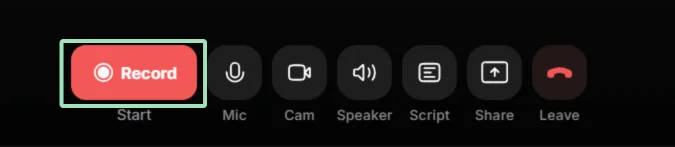
Step 1: Hit the “Record” or “Go Live” button to start recording. You’ll get a 5-second countdown before your recording (and live session) begins.
Step 2: Once your webinar is up and running, you can use Riverside’s interactive features to engage with your live audience. Use the chat box to chat with participants from across various platforms. You can even take live call-ins from audience members.
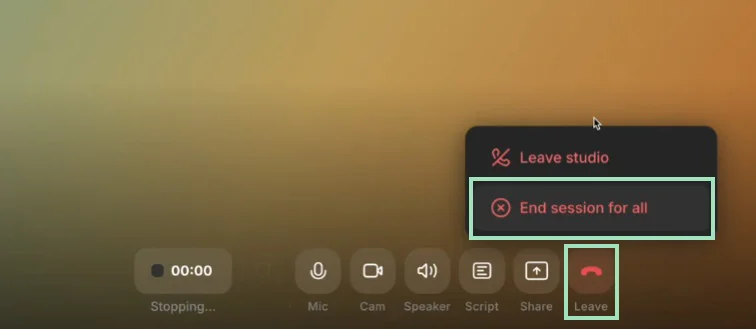
Step 3: When your webinar is over, stop the recording by clicking the “Leave” button at the bottom of the screen, and then “End session for all.” This will end the recording and, if you’re running a live stream, that will stop as well.
Pro tip: Don’t forget that after the webinar, you can still polish it and repurpose it into endless assets like blog posts, newsletter emails, and short clips by chatting with Co-Creator!
If you want more details, check this guide on how to run a webinar on Riverside.
Recording a webinar on Zoom: Step-by-step
Recording in Zoom is available only if you are the session’s host or a participant with the correct permissions.
You can save your file on your device (free plans) or in the cloud (paid plans).
Note that Zoom’s local recording refers to where files are saved. All actual recordings still take place, relying on your internet connection. On Zoom, any quality drops during the session will be reflected in your final recording, and the file will always be heavily compressed.
This is why I’d only recommend Zoom for archival recordings. Here’s how to record:
Step 1: Join the meeting, then click the “Record” button on the bottom control bar.
If you’re on a paid plan, a pop-up might appear asking whether you want to “Record on this computer” or “Record to the cloud.”
Step 2: When you’re done, click “Stop Recording” or end the meeting.
Note: For local recordings, Zoom will launch a ‘Conversion’ process immediately after the meeting closes. It is vital not to interrupt this process or shut down the computer, as it can corrupt the raw data file.
To learn more, check this guide on how to record a webinar on Zoom.
Recording a webinar on Google Meet: Step-by-step
Recording in Google Meet is only available to users on a Workspace Individual, Business Standard/Plus, Enterprise, or Education Plus account.
Only the meeting host or a co-host can record a Google Meet session, and recording must be enabled by the organization’s Google Workspace admin.
Here’s how to record webinars on Google Meet:
Step 1: Join the meeting, then click the “Activities” icon (geometric shapes) in the bottom-right, then select “Recording.”
Step 2: Click “Start recording.” A prompt reminding you to obtain consent from all participants will appear. Accept it to proceed.
Step 3: Click the red recording button again to stop the recording. The recording file will be saved to the host's Google Drive in a folder labeled "Meet Recordings."
To learn more, check this guide on how to record a webinar on Google Meet.
Recording a webinar on Teams: Step-by-step
Recording in Microsoft Teams is strictly limited. Guest users and attendees cannot start a recording. Even the host’s ability to record is controlled by IT administrators via global policies. If your admin has disabled it, the recording button will simply not appear.
Also, recording files are automatically stored in the cloud, so you need appropriate access to download them. Note that the recording might be automatically deleted after a certain period (depending on admin settings).
Step 1: Join the meeting, then click the “More actions” icon (ellipsis) in the top menu bar.
Step 2: Select “Start recording.” A banner will appear for all attendees stating that the recording has started.
Step 3: When you’re done, click the “More options” icon again and select “Stop recording.” The file will save directly to Microsoft OneDrive for standard meetings, or SharePoint for channel meetings.
To learn more, check this guide on how to record a webinar on Microsoft Teams.
How to record a webinar if you aren’t the host
If you’re a webinar attendee, the "Record" button is simply not an option, no matter what platform you’re using. But, there are still ways to record as a non-host. You just need the right tools and the legal permission to do so.
The simplest way to record a webinar when you aren’t the host is using a screen recorder while you watch the webinar.
You can use free built-in tools like Xbox Game Bar on Windows PCs, QuickTime Player on Macs. But, these solutions aren’t ideal. QuickTime doesn’t capture audio, and the Game Bar compresses video so much that all slides will look blurry when enlarged. Also, forget about separate tracks for any post-production needs you may have.
The simplest solution is, once again, Riverside. You can record in up to 4K, capture system audio cleanly from the browser tab, and save your recording to the cloud immediately, freeing up your local disk space.
Just follow these steps.
Note: Some webinars are fine with attendees recording for personal use, while others explicitly forbid it. Always ask the host or organizer for permission to record beforehand!
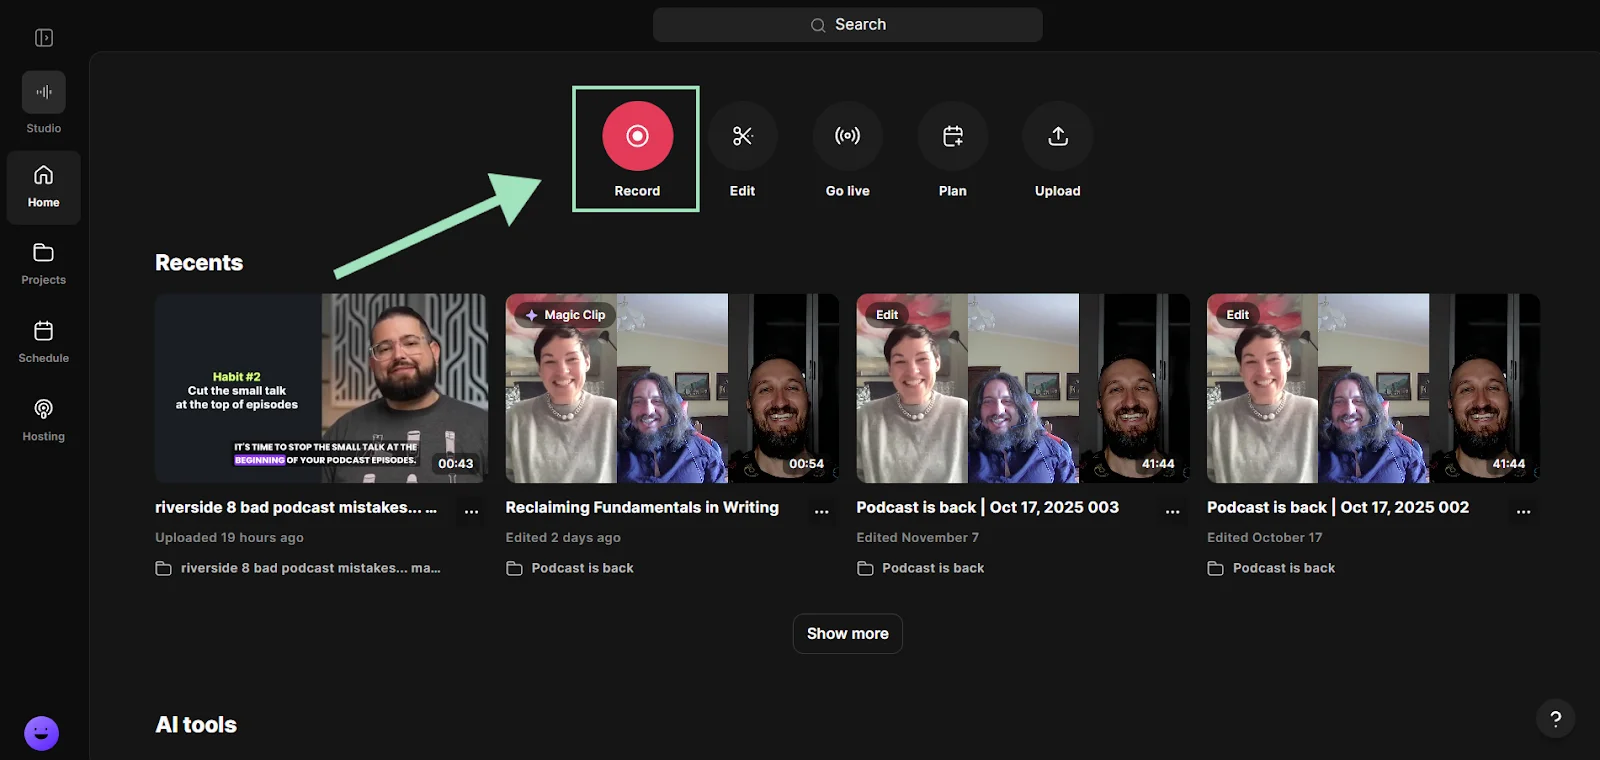
Step 1: Log into Riverside, and start a new recording by clicking on the “Record” button in your dashboard.
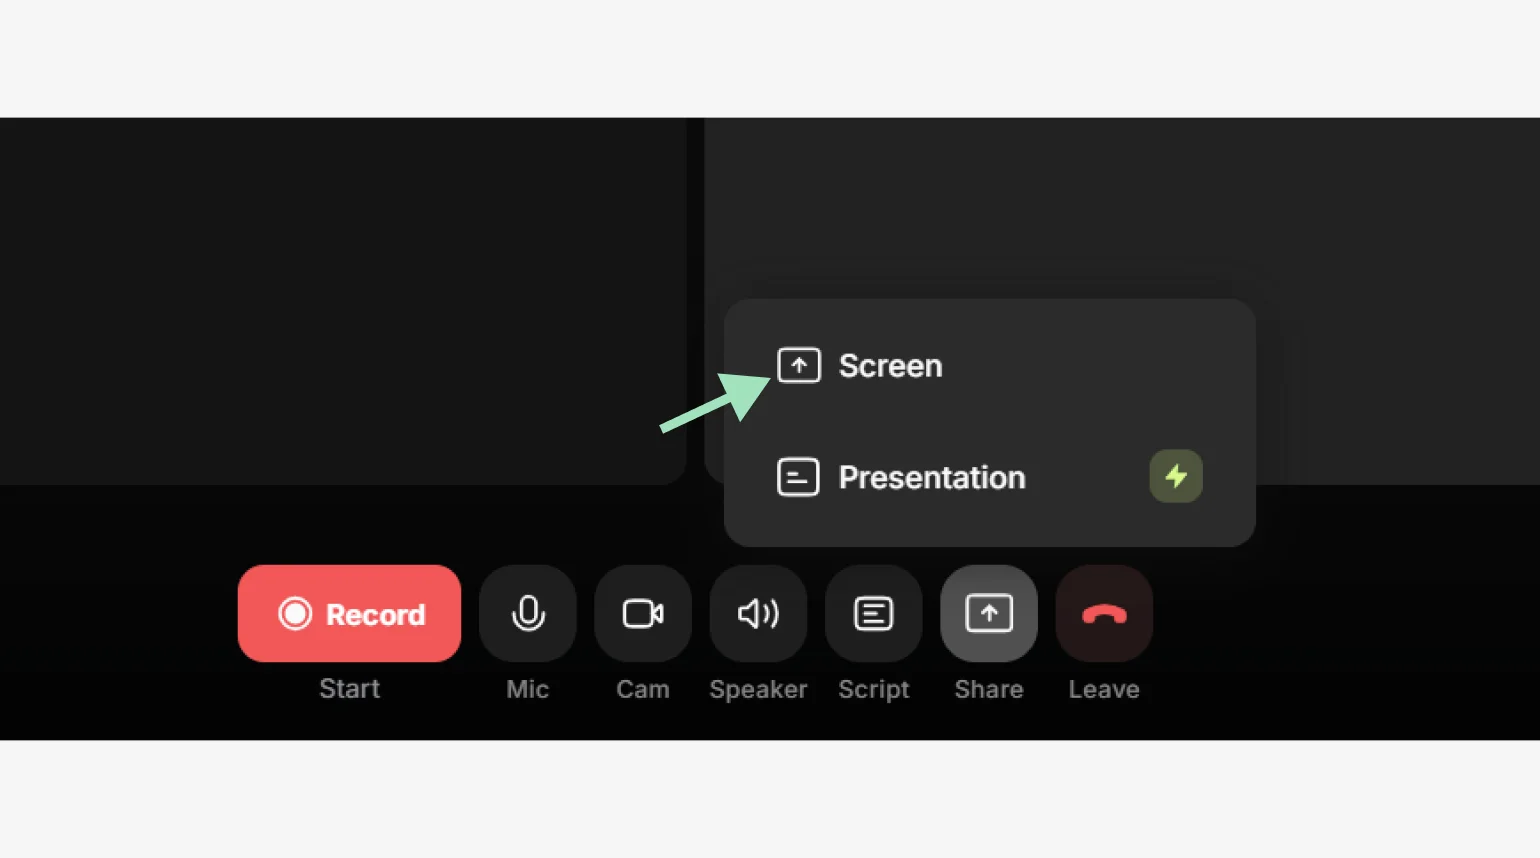
Step 2: From your studio, select “Share” to start recording your screen.
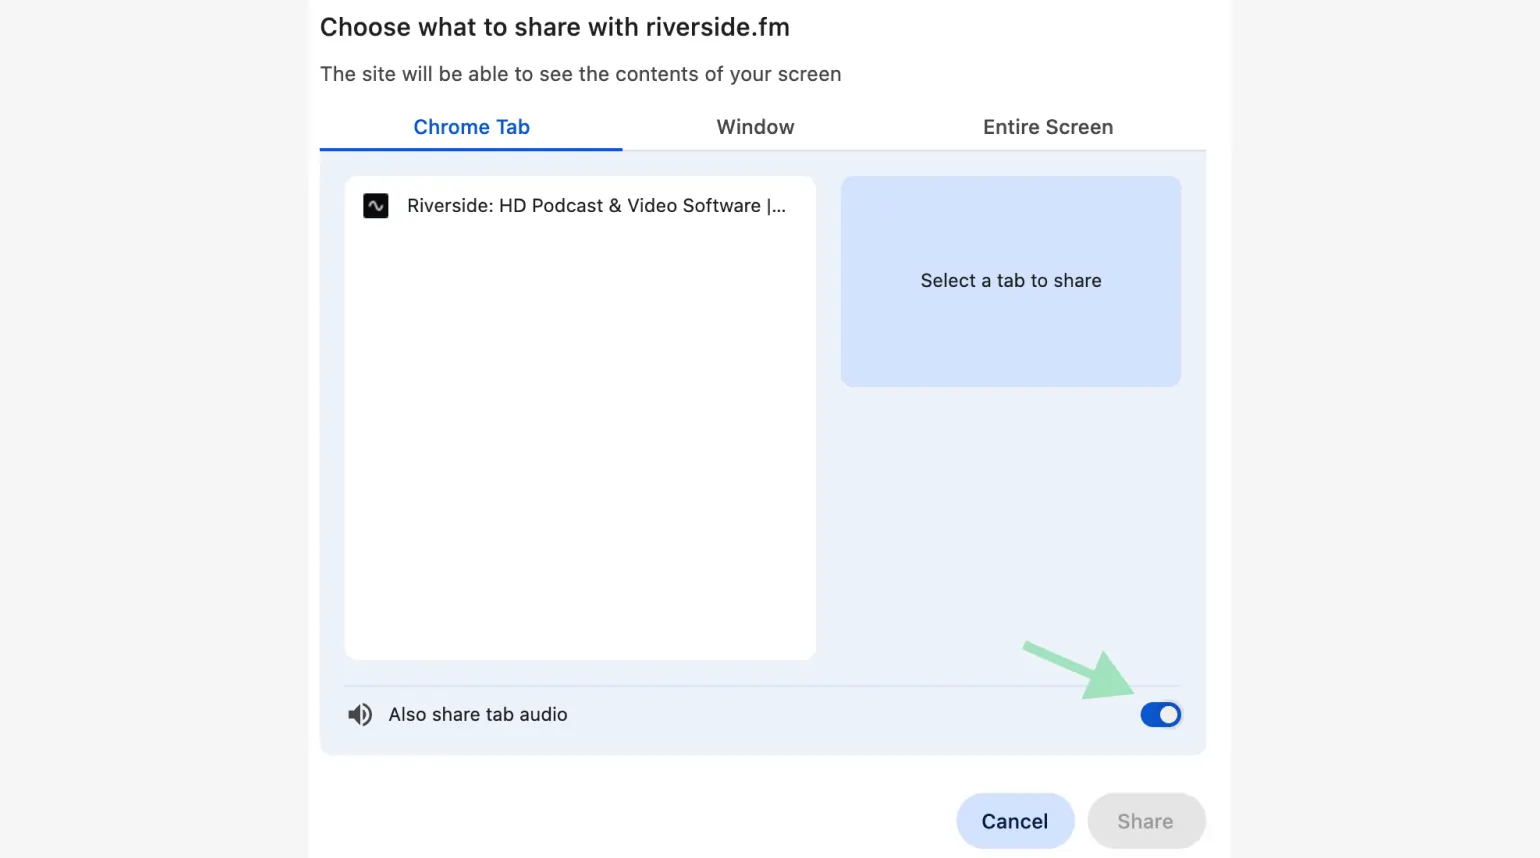
Step 3: Select “Chrome tab” or “Window” and pick the tab or app you’re watching the webinar in. Make sure to toggle the “Also share tab audio” setting on to record audio as well.
Step 4: Once you’ve set up your screen share, you should see it in your Riverside studio. Click the “Record” button to start recording the webinar as an attendee.
Pro tip: Don’t forget, you can try out Riverside’s screen recording capabilities using our free online screen recorder!
How to record a webinar on your phone (iPhone and Android)
Recording a webinar on your phone is absolutely possible on both iOS and Android devices. All you need is your phone’s built-in screen recording feature.
Here’s how:
On iPhone
Apple provides a native screen recording function in iOS, which makes it fairly easy to capture a webinar’s video and audio.
Follow these steps to record a webinar on your iPhone:
Step 1: Go to Settings > Control Center and find “Screen Recording” under the “More Controls” list.
Click on the green “+” icon to add the screen recorder to your shortcuts.
Step 2: Open the app or Chrome tab you’re watching (or hosting) your webinar in and set the player to full screen.
Swipe down to open the Control Center and press the recording button (solid dot icon). After a 3-second countdown, your iPhone will begin recording everything on the screen.
You can long-press this same button to turn microphone recording on and off.
Step 3: When the webinar is over, tap the red indicator at the top and confirm Stop. The screen recording video will be saved to your Photos app.
On Android
Modern Android 11+ phones come with a built-in screen recorder, though the exact steps can vary depending on the phone model.
Here’s a general guide that works for most Android devices:
Step 1: Drag down to open the Quick Settings panel and look for a “Screen Record” icon (might look like a camera).
Tap it to open the floating overlay and enable device audio from the options.
Step 2: Open the app or Chrome tab where you’re watching (or hosting) your webinar in and set the player to full screen. From the Screen Record overlay, tap the red dot button to start recording.
Step 3: When the webinar is over, tap the Stop button to stop recording. The file will save to your “Photos” or “Gallery” app.
Webinar recording troubleshooting tips
Here are some solutions to troubleshoot the most common webinar recording problems:
The platform won’t let me record the webinar
Most virtual meeting platforms, like Zoom, Teams, and Google Meet, restrict recording features to hosts.
On some platforms like Zoom, you can ask the host to manually grant you permission to record during that meeting. When that’s not possible, you can use an external screen recorder, like Riverside, QuickTime, or Xbox Game Bar.
My webinar recording is low-quality or glitchy
With cloud-based webinar platforms, the quality of the recording depends heavily on your connection as well as the host’s connection. If the host’s connection is weak, everyone’s video will suffer. Use a tool with local recording like Riverside, so all files capture directly on each participant’s device, unaffected by network issues.
My recording didn’t save, or I can’t find it
Platforms will save your video differently:
Zoom uses a default folder to save videos, usually in your Documents folder. You can search for .zoom files. However, they might have been saved on the cloud rather than on your drive. In that case, look for them in your Zoom web portal.
For Google Meets and Microsoft Teams, files don’t save to your hard disk by default. Search for them on the webinar host’s or recorder’s OneDrive or Google Drive.
If you want a single, predictable place for your recordings, use Riverside so everything automatically uploads to your dashboard.
I’m trying to record a webinar on my phone, but the audio won’t record
Apple’s iOS will not record the internal sound from some apps due to privacy. But even on Android, certain apps block audio recording at the OS level. If that’s the case, for example, with Zoom, there’s no simple software fix on mobile. The only solution is to use a desktop screen recorder, like Riverside, and record from there.
My computer slows down, freezes, or drops frames while recording
If you’re recording your screen using demanding software like OBS while running a video call simultaneously, your CPU may get overwhelmed. Use a lightweight, browser-based tool like Riverside to record each stream locally without doing heavy real-time compression on your end.
How to edit and repurpose your webinar recording with Riverside
Once you’ve recorded your webinar, you can turn that single session of content into assets that keep working for your brand long after the live event ends.
Because Riverside is an all-in-one solution, you can use it to edit and repurpose your content when your webinar is over.
Here’s how:
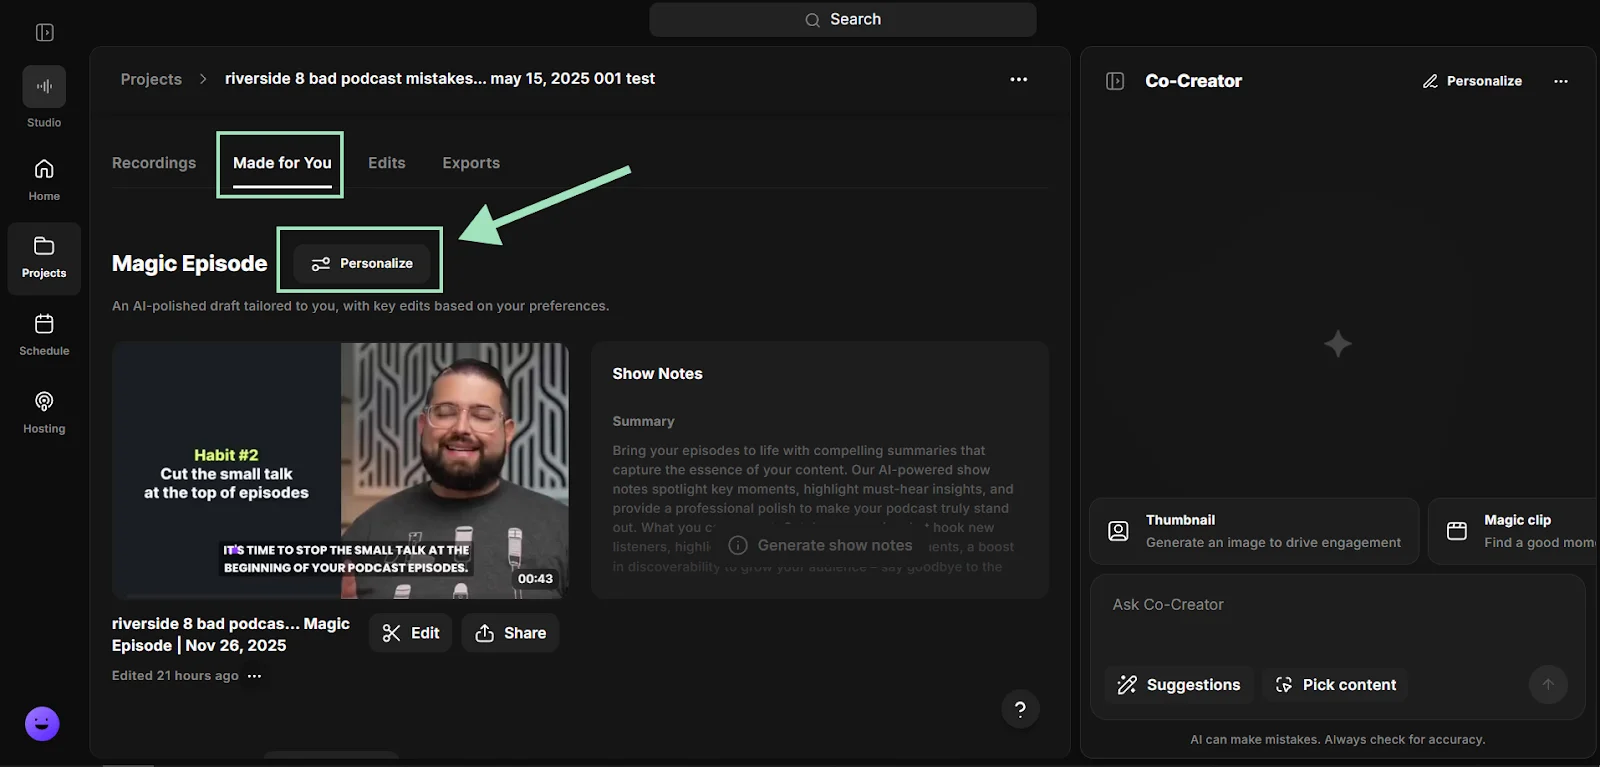
Step 1: From your Projects page, choose the webinar you just recorded. If you want to save time, you can let AI edit the episode for you.
Inside the “Made for you” tab, just click on “Personalize” in the Magic Episode section and pick the settings of your choice (length, pacing, etc.).
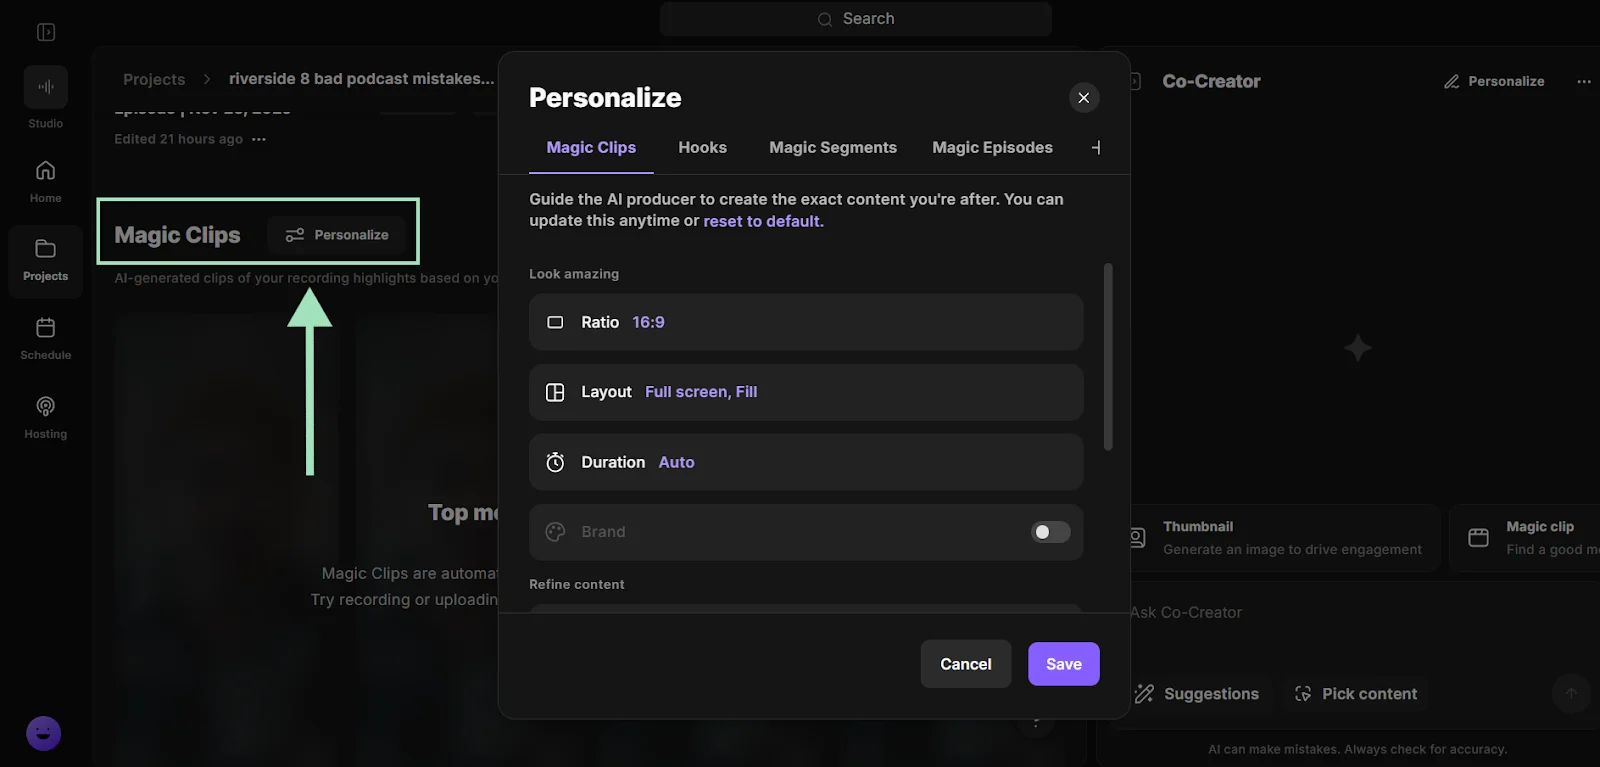
Step 2: Riverside’s Magic Clips uses AI to identify the best moments and create social-ready promotional shorts.
Scroll down to find the Magic Clips section. Click on “Personalize” to automatically generate clips, hooks, and highlights the top segments from your webinar.
Step 3: For a more hands-on post-production, select the “Recordings” tab and click on “Edit”.
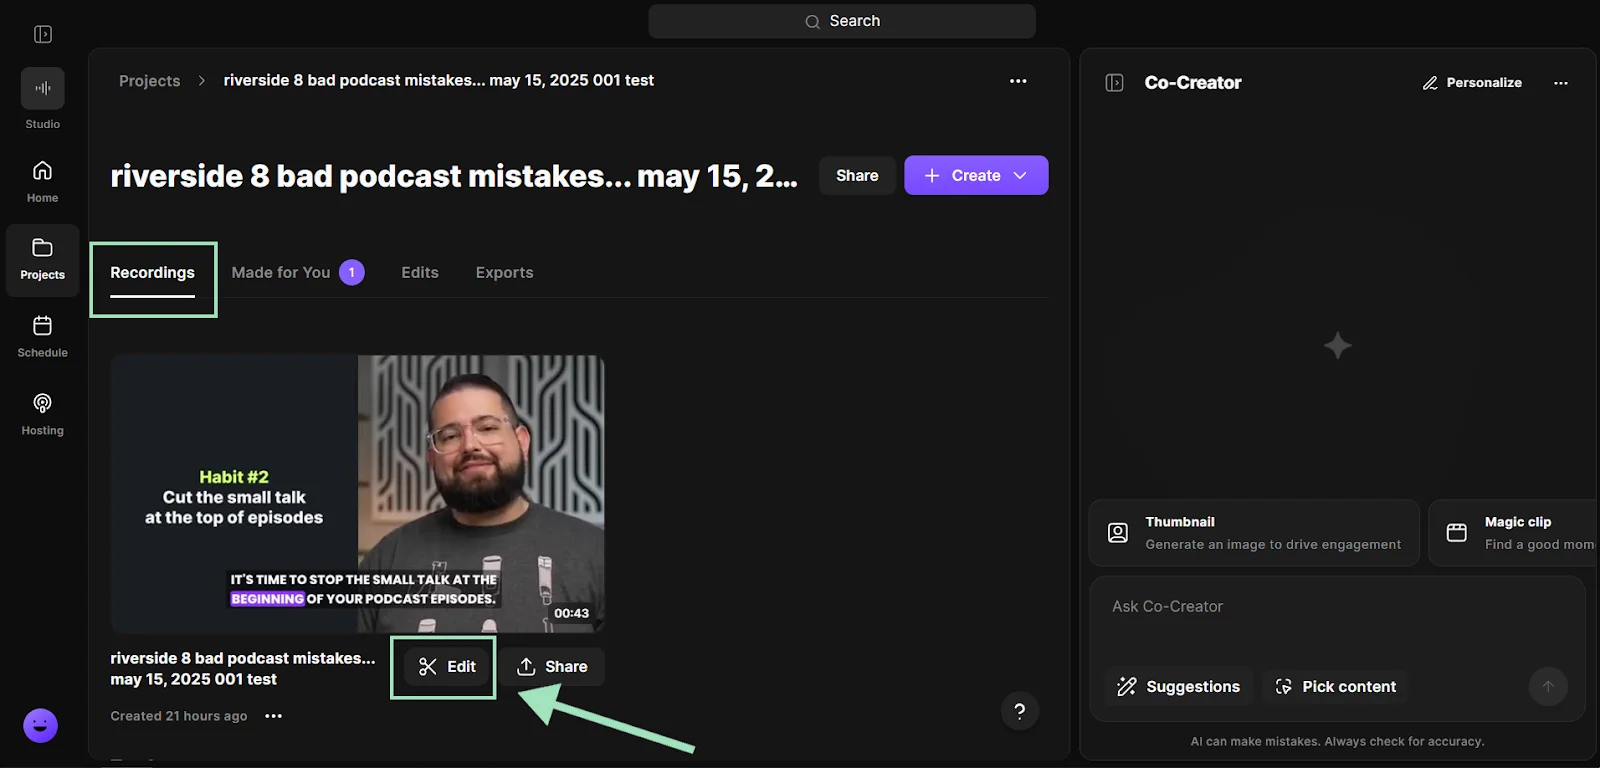
Step 4: You can cut out parts of your recording by deleting text in your recording transcript, or ask Co-Creator to do all the edits by just chatting with it.
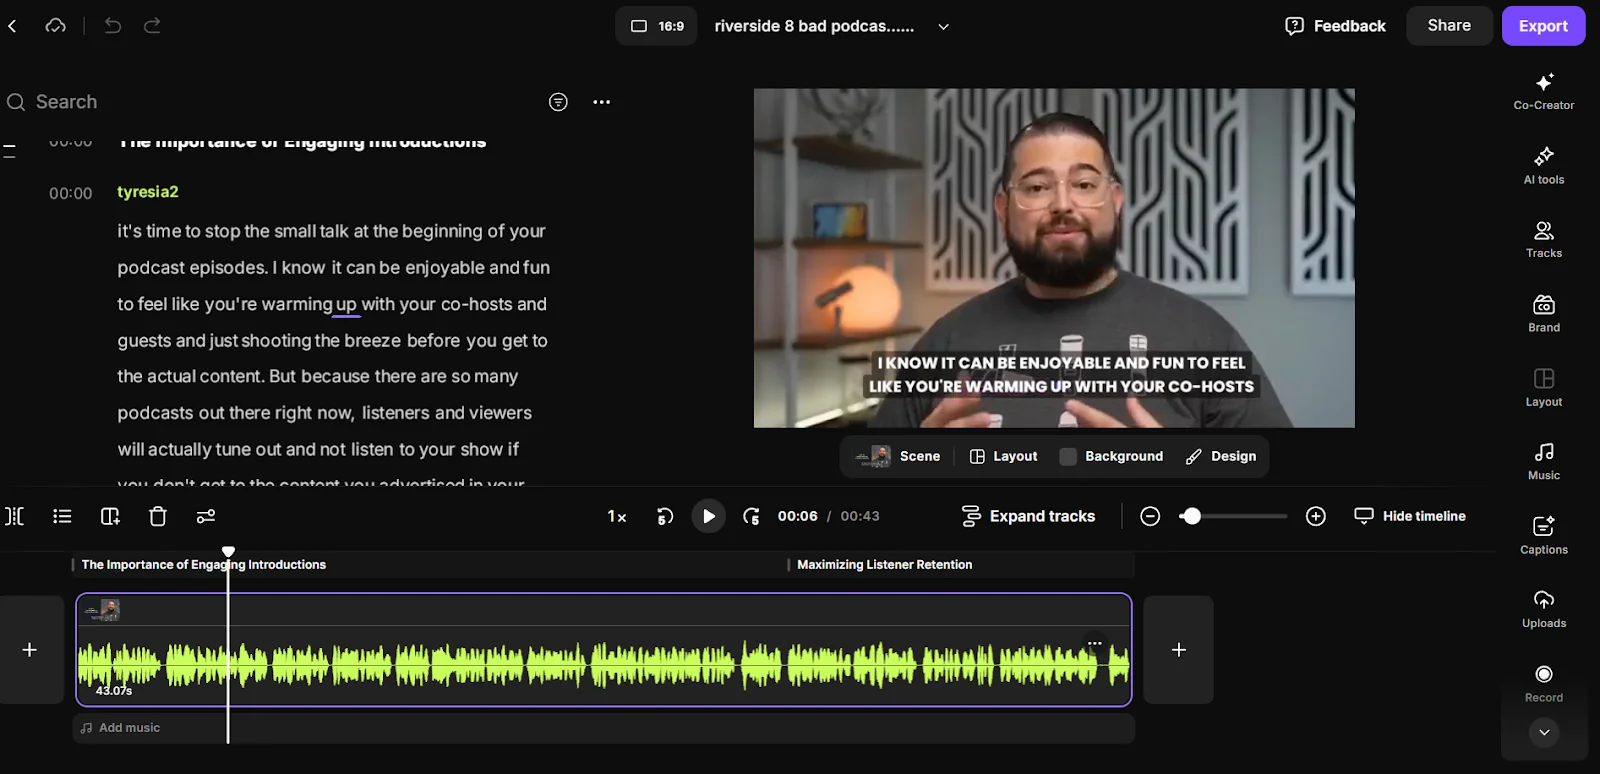
Step 5: You can also add captions, b-roll, or music, or change your layouts and customize your branding by clicking on the tabs in the right sidebar.

Step 6: Don’t forget you can also turn the transcript into blog articles, social posts, and newsletter emails, or extract quotes and key takeaways by just chatting with Co-Creator. You can use all these assets to help your content rank higher on Google search.
.webp)
FAQs about webinar recording
Can webinars be pre-recorded?
Yes, webinars don’t always have to be live. Pre-recording your webinar is a great way to deliver a more professional live experience. You record the presentation in a controlled environment and then broadcast it at a scheduled time. You can still be present in the chat to answer questions live while the ‘perfect; presentation plays.
Riverside lets you upload and play a pre-recorded video directly in the studio during a livestream. You can even invite a producer to help you manage the event from behind the scenes.
Check our guide on how to pre-record your virtual event.
What’s the easiest way to record a webinar on PC for free?
If you’re on a desktop PC and looking for a quick, free way to record a webinar, use Riverside’s online screen recorder. Just select the window or Chrome tab you want to capture and start recording in HD.
You can also use your built-in screen recorder. On Windows, open the built-in Xbox Game Bar by clicking Win+G. On Mac, open QuickTime, go to File > New Screen Recording, and select the area you want to capture. But be aware, this compresses your video, reducing the quality of the output. It also only records the active window, so you must keep the webinar on top and don’t switch to other windows or tabs while recording.
Is there a way to screen record and have audio?
Yes, you can record your screen with audio. You’ll need to use compatible software like Riverside. It’s really easy, just follow these steps:
- Start a new recording.
- From your studio, select “Share” to start recording your screen.
- Turn the “Also share tab audio” toggle on to record audio.
- Select “Chrome tab” or “Window” and pick the tab or app you’re watching the webinar in.
- Click “Record” to start recording.
How do I record both the webinar audio and my microphone?
If you want to capture the webinar’s sound and your own voice, you’ll need software that can handle multiple inputs at once. Riverside is a great choice because it automatically records separate tracks for each participant or source.
Just join the webinar on your computer, and also start a Riverside recording session. In Riverside, select your microphone as your audio input to record yourself, and share your screen with system audio to capture the webinar sound. Riverside will record both audio sources as two separate tracks so you can combine or edit them as you like.
Is it legal to record a webinar?
Legality largely depends on context, but, generally, you should have the consent of all relevant parties before recording.
If you’re the host, it’s usually within your rights to record your own webinar. Most platforms will notify attendees or have them explicitly consent before the recording starts. To respect privacy laws, you should get consent from people who will speak and be identified in your live.
If you’re an attendee, the safest route is to ask the host for permission. But, legality also extends to how you use the recording. Make sure you’ve obtained written permission before you publish or share that recording publicly.


.webp)
-(1).webp)
.webp)
.webp)


-p-800.webp)

