.webp)


Key takeaways:
- Recording is only available on desktop, and you need a Google Workspace plan with recording enabled.
- To initiate the recording, you must be the Google Meet’s host or co-host and have adequate space in your Google Drive.
- You can also record a Google Meet using screen recording software, but with some limitations (e.g., no system audio).
- Hold your meetings in third-party software like Riverside for automatic recording and higher-quality audio and video.
Are you struggling to record a Google Meet? While Google Meet events can be recorded, how you do it depends on your account type, permissions, and device.
Here we’ll walk you through how to record a Google Meet step by step and share the best ways to capture high-resolution meetings on any device.
Let’s do this!
Can you record a Google Meet?
You can record a Google Meet using the tool’s built-in recording function, but only if:
- You’re on a desktop or laptop (recording is not available on mobile).
- You have a paid Google Workspace subscription.
- You‘re the meeting host or co-host. The host can promote other meeting participants to co-hosts.
- Recording is enabled by the Google Workspace administrator (for organizational accounts).
- You’re recording to a Google Drive with adequate space. Files save directly to the Drive of whoever recorded the meeting. Recording won’t start if the Drive is disabled or out of space.
If you don’t meet all these conditions, you won’t be able to record using Google Meet’s built-in feature. Fortunately, there are other recording options, which we’ll cover later.
If you want to check if you can record on Google Meet, just start a Google Meeting, then click the dots on the right-hand side of the menu (or the three dots on the bottom toolbar, depending on your version of Meet).
If it shows “Unavailable or Premium,” your plan may not support recording. If it says “You don’t have permission,” your Workspace administrator may need to enable recording.
How to record a Google Meet with permission (Google’s built-in recorder)
Now that you have everything in place, here’s how to start recording a Google Meet step by step.
Step 1: Start or join your meeting
Go to Google Meet to start a meeting, or join the event directly from your Google Calendar. If prompted, enable your microphone and camera.
Step 2: Invite participants
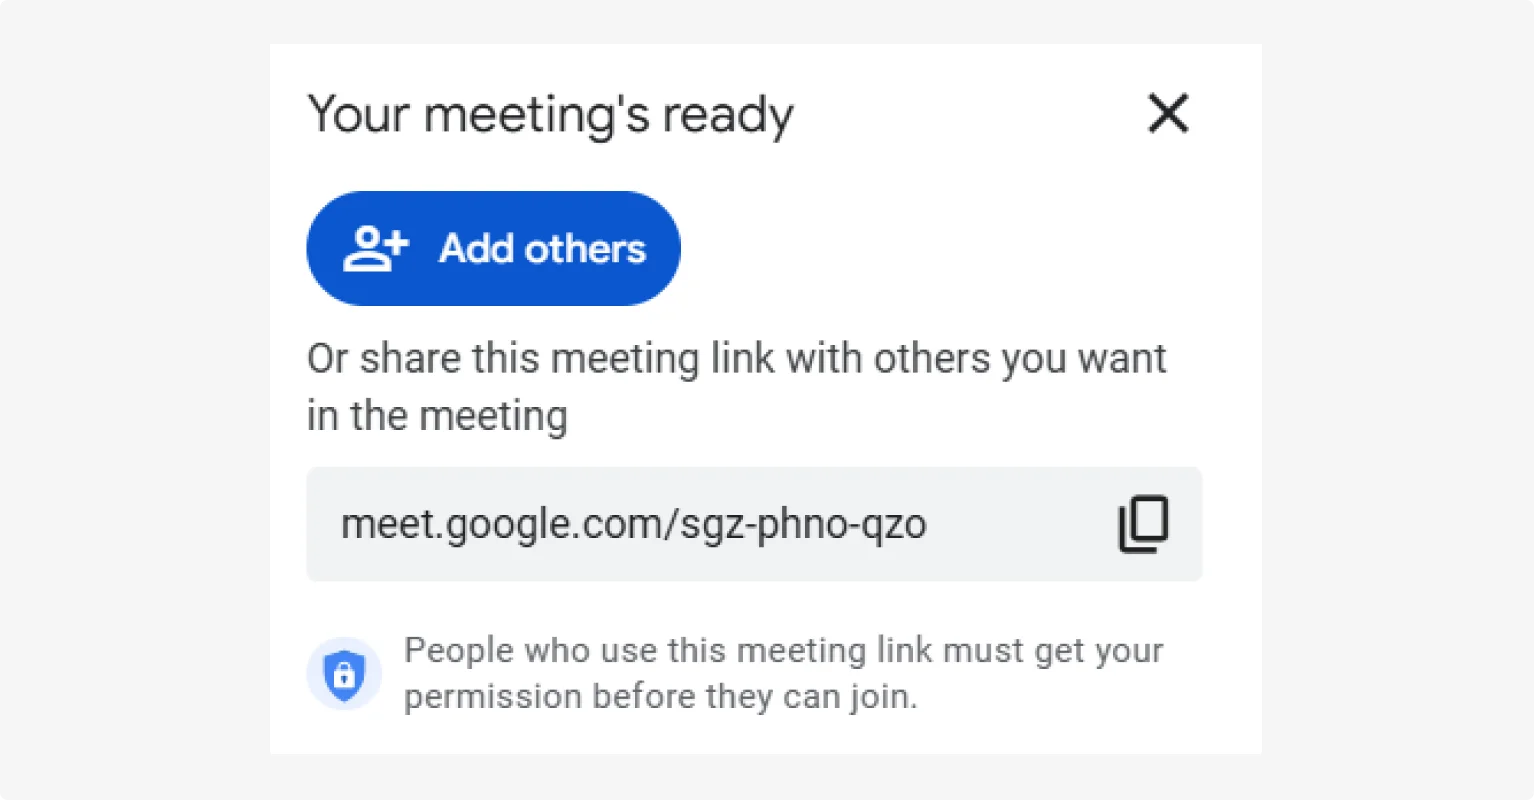
Wait for your participants to join or invite them by sharing your meeting link.
Step 3 (optional): Activate captions and transcription
Click the three dots in the menu at the bottom of your Google Meet and select “Manage Recording.”
Here you can activate automatic captions and a transcript (in English only).
Step 4: Start recording
Click “Start Recording.” A prompt will appear reminding you to obtain consent from all participants. Confirm by clicking “Start.”
A red recording icon will appear in the top-left corner of the screen, alerting all participants that the meeting is being recorded.
Step 5: Stop recording
To stop recording, click the red recording button in the top left of your screen, and then confirm that you want to end the recording.
The recording will also end automatically when all participants leave the meeting.
Step 6: Access your recordings
The recording will save to the recording participant’s Google Drive, in a folder called Meet Recordings. An email with the recording link will also be sent to the meeting organizer and the person who started the recording.
If it’s not available in Google Drive, wait for the confirmation email before trying to access it. Processing a Google Meet recording can take 10-30+ minutes depending on the length of the recording.
How to record a Google Meet without permission or a paid account
Even if you’re not the host or you don’t have a paid Google account, there are still ways to record a Google Meet. Here are the best options for recording online and with the built-in tools in your Mac or PC.
How to record a Google Meet online with Riverside
One of the best ways to record a Google Meet when you don’t have the right permissions is to use a screen recorder like Riverside.
Unlike other screen capture tools, Riverside can record in up to 4K video and 48 kHz audio. And, you get local recording to ensure high-quality results, even when your internet isn’t the best. It’s also really easy to use!
You can try the online screen recorder, for a quick capture. But for the best results, we suggest signing up and recording in a studio. You’ll have a lot more control and can jump into our video editor to clean up your video straight after.
Here’s how to record a Google Meet using Riverside’s in-house recorder:works.
Step 1: Log in to Riverside
Log in to Riverside or set up an account (it’s free.)
Click “Record” to open up a new studio. Don’t worry, your recording won’t start right away.

Step 2: Select your camera and mic
On the next screen, you’ll be prompted to select your camera, mic, and whether you are wearing headphones.
Enter your details, test your equipment and click “Join studio”.

Step 3: Start your Google Meet
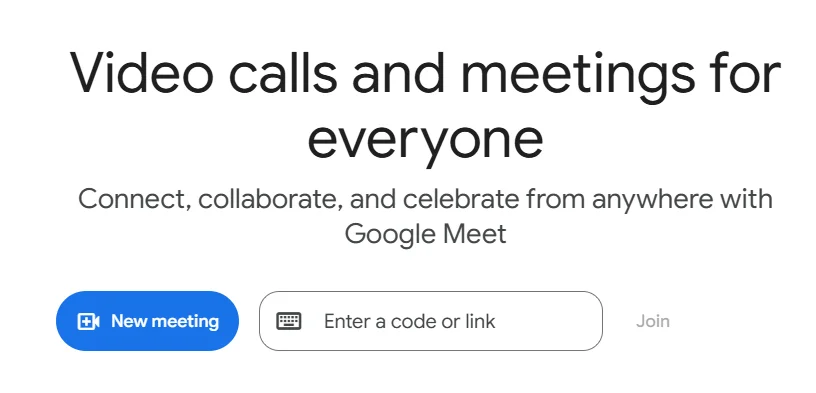
In a separate tab, navigate to Google Meet from your calendar invite, or start a new meeting by going to meet.google.com and clicking “New Meeting.”
You’ll be prompted to invite participants by email, or you can share your Google Meet link.
Step 4: Share your screen
Go back to your Riverside tab and click the “Share” button from the menu at the bottom of your screen, then select “Screen.”

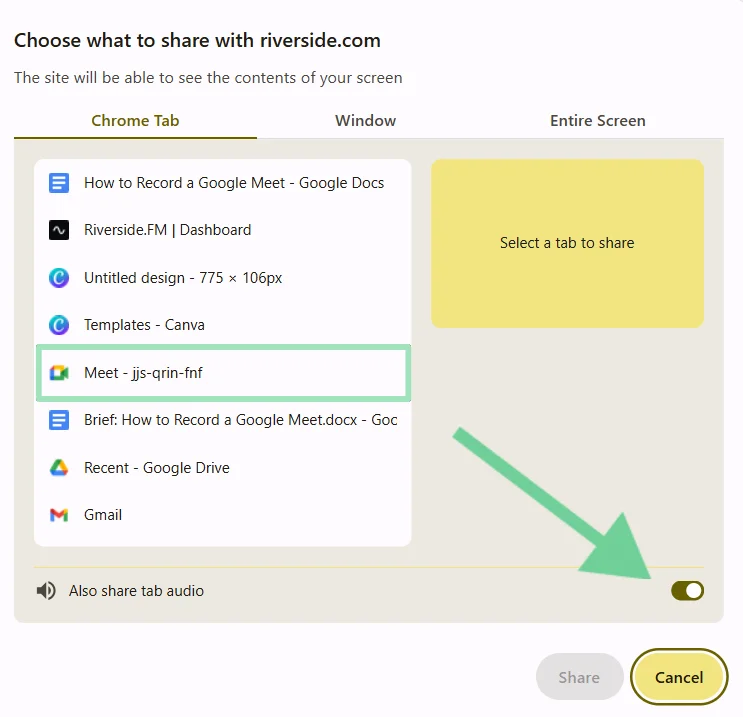
Step 5: Select your tab
Select the tab where you’ve set up your Google Meet. Ensure that “Also share tab audio” is switched on.
Now, you’ll see your Google Meet screen in the Riverside studio.
Step 6: Start recording
When you’re ready, click “Go live.” You’ll get a 5-second countdown before the recording begins.

Step 7: Stop recording
When you’re done, click “Stop.” Shortly after you stop your recording, you’ll see a pop-up where you can find your recording file. You can also locate it under “Projects.”

Step 8: Edit, share, or download your recording
From your “Projects” dashboard in Riverside, you can edit, share (with a link), or download your Google Meet recording.
Unlike basic screen recorders, Riverside keeps everything in a single workflow. With the video editor you can turn your recording into finished content in minutes using:
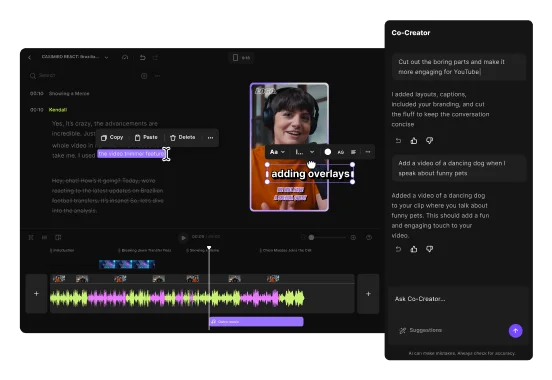
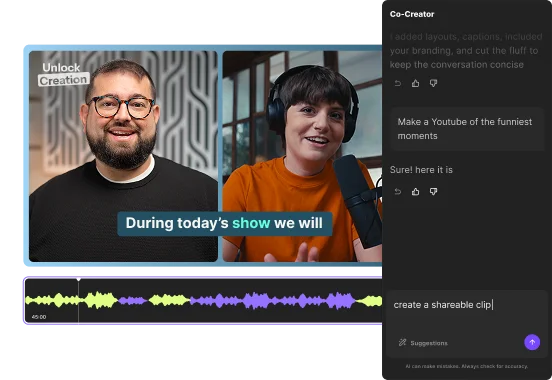
- Chat-based editing and repurposing: Prompt Co-creator, your AI editing agent to cut to the highlights, style your video or even create assets like a blog, clips, or summaries.
- Text-based editing: Cut video and audio by deleting words from the transcript.
- Automatic cleanup: Remove background noise, filler words, and fix eye gaze in just a click with our AI tools.
- Dynamic captions: Generate accurate captions instantly with your choice of color, animation, font, and size.
- Styling tools: Customize layouts, add b-roll, music, and even your own logo to stay on brand.
Pro tip: Try skipping Google Meet altogether and holding your next meeting directly in Riverside. You can easily invite guests with a link, and you can record in higher quality audio and video than Google Meet. Compared to Google Meet, Riverside is just as easy to use, but you’ll get a lot more tools. Plus, you can invite and record up to 9 participants for free.
How to record a Google Meet on Windows PC
If you’re on Windows, your best option is to record directly with the built-in Xbox Game Bar screen recorder. It comes pre-installed on most Windows 10 and Windows 11 devices.
Here’s how to use it to record a Google Meet session on a Windows PC:
Step 1: Open your Google Meet event and select the window it’s using.
Step 2: Open Xbox Game Bar from the apps in your Start Menu, or press Windows + G.
Step 3: In the Game Bar overlay, click on the “Settings” icon. Under the “Capturing” section, select “All” to capture all system sounds, including meeting audio.
Step 4: Start or join your Google Meet event.
Step 5: In the “Capture” widget (camera icon), click the “Start Recording” button (a circle icon), or press Windows + Alt + R to begin recording immediately.
Step 6: To stop recording, click the “Stop Recording” button or press Windows + Alt + R again.
You can find your video recordings in the Videos folder of your Windows system directory.
How to record Google Meet on Mac
Modern Macs come with a native screen recording feature that can record a Google Meet, but this tool won’t capture system audio (it’ll only capture your voice from the microphone). To record system audio, you have to use additional software, such as Loopback, or another virtual audio routing tool.
Follow these steps to record Google Meet videos on your Mac using the built-in screen recorder and Loopback:
Step 1: Install Loopback.
Step 2: Open Loopback and click “+ New Virtual Device.” Name it something like “Meet Recording.”
Step 3: On the left side of the screen, click “+” to add your microphone and the browser you’re using for Google Meet. In the “Monitors” section, add your headphone or speakers so you can hear the meeting while it records.
Step 4: Open Google Meet and join (or start) a meeting. Invite your participants or wait for them to join.
Step 5: In Meet, click the three vertical dots from the menu at the bottom of your screen. Select “Settings,” then “Audio.” Set your microphone to “Meet Recording” (your Loopback virtual device) and your audio to your normal output (your speakers or headphones.)
Step 6: Open the Mac screen recorder by pressing Shift + Command + 5 and choose “Record Selected Portion.” Drag the frame to cover your Google Meet window.
Step 7: At the bottom of the Mac screen recorder window, click “Microphone,” then select “Meet Recording” (your Loopback virtual device.) Choose where your recording will save and set any other preferences (show clicks, timer, etc.)
Step 8: Click “Record” in the screen recorder toolbar, then go back to the Google Meet tab and run your meeting as usual.
Step 9: When you’re done, click the “Stop” icon in the menu bar. macOS will save the recording in the location you specified earlier.
How to record Google Meet on a Chromebook
Chromebooks have a surprisingly good built-in recorder that can capture the Meet window, your mic, and system audio. Here’s how to use it:
Step 1: Open Google Meet and start your meeting.
Step 2: Press Ctrl + Shift + Overview (the □|| key).
Step 3: Click the “Camera icon” for video recording.

Step 4: Turn “Mic On” if you want to capture your voice.
Step 5: Select whether to record Full Screen, Partial Screen, or a Window. Once you select one of these options, your recording will start automatically.

Step 6: When you’re done, click the red “Stop” icon at the bottom-right corner of your screen. This immediately ends the recording and saves it to your Downloads folder.
Note: Some Chromebooks cannot capture system audio. If this is the case for you, use a Chrome extension like Screencastify or use Riverside’s screen recorder for higher quality audio and video.
How to record a Google Meet on your phone or mobile device
Both iPhone or Android come with built-in tools you can use to record a Google Meet. Let’s take a look at how to use them.
How to record Google Meet on Android phones
Most Android devices running Android 11 or later come with a built-in screen recording feature. To use it to record your Google Meet, follow these steps:
Step 1: Swipe down to open the Quick Settings panel and find the Screen Record app.
Step 2: Configure your recording settings. Choose “Record one app.” Under “Record audio” choose “Device audio and microphone.”
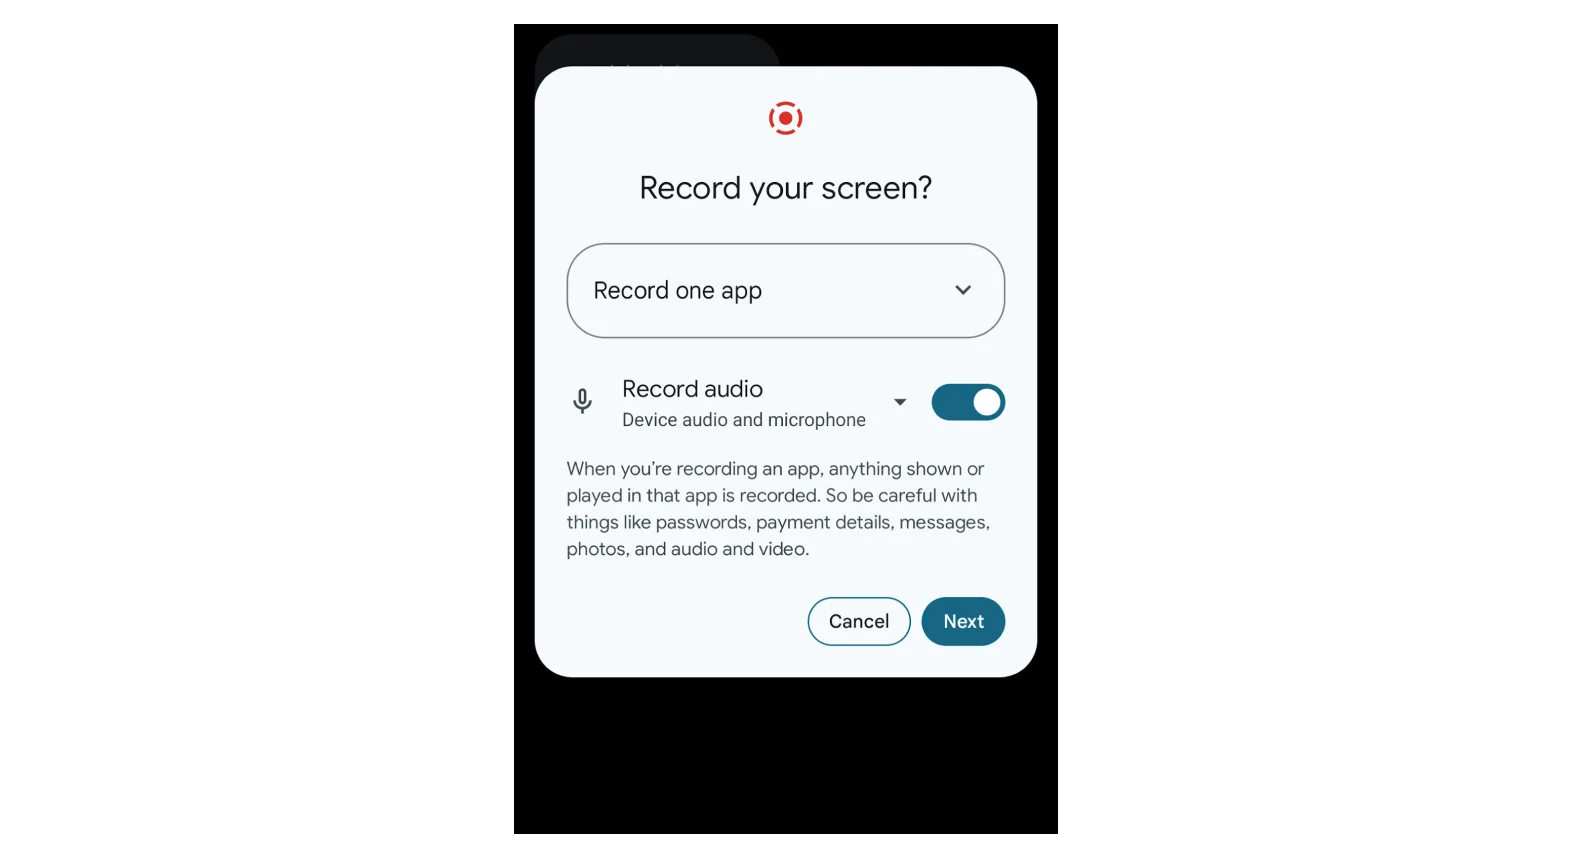
Step 3: You will be prompted to select an app. Choose Google Meet.
Step 4: As soon as you do this, your recording will begin after a 3-second countdown. Click “New” then “Create link” to start your Google Meet. Or, if you’re joining a meeting, you’ll see a link called “Code” at the top of your screen where you can enter your Google Meet code.
Step 4: Join your Google Meet event.
Step 5: To stop the recording, tap the red recording button in the top left of your screen and then “Stop recording.”

The video will save to your device's gallery or photos app, usually under Screen Recordings.
How to record a Google Meet on iPhone
iPhones also have a built-in screen recording feature you can use to overcome Google Meet’s mobile recording limitations. Just follow these step-by-step instructions:
Step 1: Open “Settings” and select “Control Center.”
Step 2: Locate “Screen Recording” and tap on the “+” next to it to add it to your Control Center.
Step 3: Go back to the Home screen and open your “Control Center.”
Step 4: Press and hold the “Record” button.
Step 5: Choose where your downloaded file will save after recording. Tap the “Microphone” icon to turn it on.
Step 6: Tap “Start Recording.” Your video screen will begin recording after the countdown.
Step 7: Open the Google Meet app to join your meeting.
Step 8: To stop the recording, tap the red status bar at the top of your screen and confirm by tapping “Stop.” The video will be saved to the folder you choose. If you didn’t choose one, it’ll save to your Photos folder.
Note: iOS's screen recording feature captures audio from the microphone, not directly from the app. This means you may not capture other participants' voices unless they are audible through your iPhone's speakers and picked up by the microphone.
You can use Speaker Mode during your call to help here, although overall audio quality may suffer. For a simpler alternative, hold your calls using Riverside’s mobile app. It’ll easily capture high-quality recordings (and it’s free).
Google Meet recording troubleshooting tips
Can’t get your Google Meet recording to work? Here are some common problems and tips on how to fix them.
Can’t record a Google Meet (record option missing)
- You don’t have a Google Workspace Account that supports recording: Upgrade to a Google Workspace plan that includes recording. You could also use screen recording software. Or, move your call to Riverside to invite up to 9 guests with a simple link (no downloads required) and record for free.
- Your Google Workspace Admin hasn’t enabled recording on your account: Ask your admin to enable recording.
- You aren’t the meeting host or co-host: Ask the meeting host to make you a co-host.
- Google Drive is inactive or full: Whoever records the meeting (presses “Record”) must have an active Google Drive with adequate space to save the video.
Can’t find my Google Meet recording
- Google hasn’t processed the recording yet: Longer recordings can take a while to process. When the recording is ready, whoever recorded the meeting will find it saved in their Google Drive in a folder called “Meet Recordings.” They (and the meeting organizer) will also receive an email notification that the file is ready.
Google Meet recording won't save or is stuck processing
- Wait: Google Meet files process in Google’s cloud before they become available. This takes 2-10 minutes for meetings under 30 minutes, and 10-30 minutes for longer meetings.
- You don’t have adequate storage space in Drive: Verify that there's adequate storage available in the Google Drive of the person recording.
- Meeting was accidentally stopped or terminated: If a meeting ends abruptly without properly stopping the recording, it might not save correctly. When this happens the recording could be lost or take longer to process.
No audio in the Google Meet recording
- Your microphone is muted or incorrectly configured: Check Google Meet settings (three-dot menu > Settings > Audio) to ensure the correct mic is selected and unmuted. You can also test your mic using our mic test tool.
- Your screen recorder needs reconfiguration: Screen recorders, like the Xbox Game Bar, don’t capture audio by default. Check the settings to ensure audio is set up to capture system sounds, app audio, and microphone input.
FAQs about recording a Google Meet meeting
What alternatives exist for recording Google Meet?
If you don’t have a paid Google Workplace account, there are lots of other options to capture a Google Meet. Here are our top choices.
- Use a screen recorder: Just about any screen recorder will do the job, but not all of them record system audio. Windows Xbox Gamebar is a good option for PC users. Mac’s built-in screen recorder must be paired with the Loopback app to capture the meeting’s audio. Or, you could use Riverside’s screen recording feature to record in high quality with a few clicks.
- Use a free tool with built-in recording: When it comes to video calls, Google Meet isn’t the only option. You can record a meeting on Zoom for free (although the free plan only allows calls up to 40 minutes.) You can also invite participants and conduct your calls directly on Riverside, where you can record as long as you want for free.
How can I share a Google Meet recording with others?
If you use Google Meet’s built-in recording tool (available only on Workspace accounts), your recording saves to Google Drive under Meet Recordings. You can share it in the following ways:
- Share a link to the file by right-clicking on it and choosing “Share.” You can then select the recipients’ email addresses.
- Create a link anyone can share by changing access to “Anyone with the link” and sharing it via email, chat, etc.
- Download the file and send it directly to recipients via email.
Can I record a Google Meet for free without the host’s permission?
Technically, yes, but proceed with caution. If you are not the host and the host hasn’t enabled Meet’s own recording capability, you can use a screen recorder to record the meeting from your side. This doesn’t require the host’s permission on a technical level. But recording without their (or participants’) knowledge may violate trust, company policy, and even laws. In many places, everyone on a call has a legal right to know if they’re being recorded.
If you need a recording and the host isn’t able to do it, the proper approach is to ask the host and participants if they’re OK with you recording locally. Always get consent from everyone on the call before you record.
Where do Google Meet recordings get saved?
It depends on the method:
- Google Meet’s built-in recording: These save to the Google Drive of the participant who clicked “Record,” in a folder called “Meet Recordings.” The file is also linked in the organizer’s calendar event (if it was a scheduled meeting) and an email with the link is sent to the organizer and the person who started the recording.
- Your own screen recordings (Xbox Game Bar, etc.): These save locally on your device. For example, Xbox Game Bar recordings default to the Videos > Captures folder of your PC. Mac’s recordings go to whatever folder you set (Desktop by default). Chromebooks save recordings to the Downloads folder as WebM files. If you’re not sure, check your device’s photo/gallery app or file manager right after recording. It’ll usually highlight the new video.
- Riverside or third-party software: If you use third-party recording software like Riverside, files will usually save to their own cloud or a designated folder. Riverside recordings are uploaded to Riverside’s cloud storage until you download them. (And did we mention that we don’t put limits on cloud storage?)
What’s the time limit for recording in Google Meet?
The maximum length of a single recording in Google Meet is 8 hours. After this point, the recording will automatically stop. Note that extremely long recordings take longer to process and could be more prone to errors, so it’s often better to break them up into smaller sessions.
Can I record Google Meet with captions or a transcript?
Google Meet has a live captions feature (real-time subtitles) and a separate transcript feature. But it’s important to know that:
Captions don’t appear in the video recording: Meet does not embed captions into the video feed by default. So, if you turn on live captions during the meeting, those words won’t appear in the saved video. You can enable “Save captions” prior to recording to save the subtitle transcript as a separate file, and then use a video editor to add that file as captions.
Transcripts: Some Google Workplace accounts can generate text transcripts (if enabled). If your Google Workspace plan doesn’t include transcription, you can try one of the following options:
- Use transcription software, like Otter.ai, or a free Google transcription tool, like the Google Recorder app.
- Upload the video privately to YouTube. YouTube will automatically caption it and you can then go to the video’s settings and export the caption file or just copy-paste from the transcript viewer.
- Upload your recording or record directly in Riverside. Our software creates an automatic transcript that’s up to 99% accurate. You can use it to quickly add captions to your video, or download a full transcript as a TXT or SRT file.
Can a participant record a Google Meet?
No, a regular participant cannot start the native recording on Google Meet if they are not the host or co-host. The only exception is if the host has turned off Host Management and your account is in the same Google Workspace organization. In this case, any internal participant could start recording. Even if you aren’t a host or co-host, you can use a screen recorder, like Riverside, to capture the meeting (with permission from all participants, of course).
Do breakout rooms get recorded in Google Meet?
No, not automatically. Breakout rooms are not included in the main session recording. Google Meet treats each breakout as a separate sub-meeting for the participants in it. If you need to record breakout sessions, you have a few options:
- Have a host/co-host in each breakout who starts recording there: This means the person managing the meeting would need to join each breakout (or assign someone in each) with recording privileges in that room. Each breakout’s recording will then save to the Google Drive of whoever started it. This can involve a bit of logistical juggling. You should also notify participants that recording is happening in their breakout rooms.
- Use local recordings by participants: Alternatively, you could ask the members of each breakout to use their device’s screen recorder to capture their small group discussion (with the same consent caveats). You can compile these later as needed.
- Rejoin the main meeting to record summaries: Some hosts just bring everyone back to the main room after breakouts to share a summary, and record that part. This ensures you at least get the key outcomes on record.
Does Google notify participants when a meeting is recorded?
Yes, absolutely. Google Meet displays a persistent notification at the top left (“Recording”) and shows a red dot icon when recording is in progress. It also plays an audio alert when recording starts and stops for all participants. If participants join while a meeting is already recording, they get a warning prompt that says “This meeting is being recorded,” and must acknowledge it to continue.
If you’re using a screen recorder to capture your Google Meet, participants are not notified. Note that in many jurisdictions, you are legally required to notify others before recording the call.
How can I transcribe a Google Meet for free?
There are a few different ways to transcribe a Google Meet:
- Use Meet’s built-in transcription tool: Google Workspace now offers an automated transcription feature in certain tiers (like Business Plus, Enterprise, Education Plus). If enabled, you can click the Activities panel and start transcription (if you’re the host). Google will then generate a text document of the meeting’s dialog. This is a great option if you have the right Google Workspace plan.
- Use a meeting assistant app: Some third-party services (like Otter.ai, Tactiq, Meet Geek, Grain, etc.) can join your Google Meet and transcribe it in real-time. Some have free plans or trials. For instance, Otter.ai can integrate with Google Meet and provide live captions and a post-meeting transcript even on the free tier (with some limits on minutes per month).
Transcribe the recording afterward: If you have recorded a Google Meeting, you can feed that recording into a transcription tool, like Whisper. Even Microsoft Word has a transcribe feature for uploaded audio.


.webp)