


Key takeaways:
- SRT files are used to add subtitles to videos, improving accessibility and SEO.
- You can create SRT files automatically, with a platform like Riverside, or type them manually in a text or Microsoft Word document.
- Platforms like YouTube, Facebook, and LinkedIn accept SRT files for captions.
- Some platforms, like YouTube, can generate subtitles automatically, but they are not as accurate.
Have you ever uploaded a video and then paused when the platform asked for an “SRT file”?
It sounds technical, but it’s really just a text file that stores your subtitles with timestamps so that they’ll sync with your video. Adding one can boost accessibility, reach more viewers, and even help with SEO.
SRT files are easy to create. Here, we’ll walk you through how to make them on different devices and platforms.
What is an SRT file?
An SRT file, short for SubRip Subtitle file, is a plain text document that holds subtitles for video or audio content. Each caption is written on its own line, paired with a start and end timestamp, and arranged in order. This format keeps your captions in sync with the exact moments of speech or sound.
An SRT file has four main components:
- A sequence number for each frame
- Beginning and ending time code
- A caption for each time code
- A blank line after each frame

Adding SRT subtitles helps more people watch and enjoy your videos - from viewers who are hard of hearing to audiences who speak different languages. They also give your content an SEO boost, making it easier to discover on platforms like YouTube, Facebook, and Vimeo.
Learn more in What Is an SRT File?
How to create an SRT file automatically (from audio or video)
Creating SRT files is quick and hassle-free with Riverside’s free SRT file generator. Here’s how it works.
Step 1: Upload your file
Go to Riverside’s free SRT file generator. Upload the audio or video file you want to create subtitles for.

Step 2: Pick your preferred language
Choose the language you’d like your subtitles in. Riverside’s transcription tool can generate subtitles in 100+ languages to help you reach a global audience.

Step 3: Set the content format (optional)
Depending on the workflow, you may be prompted to choose the content type - podcast, webinar, interview, or video. This helps with formatting and metadata, but it isn’t required for generating your SRT file.

Step 4: Generate and download the transcript
Click “Start Transcribing.” Riverside will automatically create a transcript and generate time-synced subtitles within minutes. Before exporting, review the text in Riverside’s editor to make quick corrections if needed.

Step 5: Download the SRT file
Once everything looks good, download captions as an SRT file. If you want, you can also download the file in TXT. To make corrections, open the file in a text editor like Notepad (saved as UTF-8) to keep formatting intact.

Now you have an SRT file ready to upload to YouTube, Facebook, LinkedIn, or any other platform that supports SRT files. Easy!
Want to get an SRT file even faster? If you record with Riverside, SRT transcriptions are automatically generated for all your recordings and can be downloaded directly from your dashboard. (You can learn how here.) Riverside also produces studio-quality audio and video recordings with a powerful editor to polish your content. Its built-in transcription tool has a lot to offer, including:
- Automatic transcription in 100+ languages.
- Speaker detection and labeling.
- AI summaries with overviews, titles, and chapters.
- Quick, customizable captions.
How to create an SRT file manually in a text file
If you don’t want to create an SRT file automatically, you can also type one up manually. Here’s how to do it in a plain text file. You can use Notepad on Windows, or TextEdit on Mac in plain text mode.
Step 1: Open a plain text editor
Choose Notepad (Windows) or TextEdit (Mac). On Mac, go to “Format” and choose “Make Plain Text” to turn your window into a formatting-free text editor.

Step 2: Start the first subtitle block
Type “1” as your first sequence number, then hit “Enter.”
Step 3: Add timestamps
On the next line, add the start and end time codes for the subtitle in this exact format:
HH:MM:SS,mmm --> HH:MM:SS,mmm
(This shows hours, minutes, and seconds with three digits for milliseconds, and a comma as the decimal separator.)

Step 4: Add the caption text
On the next line(s), write your subtitle, followed by another blank line. Follow these formatting guidelines for a good viewing experience:
- Keep the text to 32-40 characters per line (depending on platform guidelines).
- Use 1-2 lines per subtitle block to ensure readability.
- Avoid splitting sentences unnaturally across blocks or lines.

Step 5: Repeat for additional subtitles
Continue numbering each subtitle block in order, adding timecodes and text. Avoid overlap; ensure the end time of one block is before the start of the next.
Step 6: Save your file as .srt with UTF-8
Use “Save As,” name the file with a .srt extension, and choose UTF-8 encoding in the dialog box to ensure compatibility.

Step 7: Test your SRT file
You can test your subtitles file by opening it in VLC Media Player, which works on both Mac and Windows. You can do this by:
- Downloading VCL Media Player.
- Installing it, then using it to open your video file.
- Going to “Subtitle” then “Add Subtitle File” and selecting your SRT file.
- Pressing play to view the video with subtitles
If your SRT file is properly formatted, it should appear in sync with your video. If the captions are missing or misaligned, there may be a formatting or timing issue in your file.
Pro tips for best results
- Use UTF-8 encoding: Saving your file in UTF-8 ensures every character displays properly, whether it’s accented letters, special symbols, or non-English text. Other encodings can cause garbled text (like � symbols) on platforms like YouTube and Facebook. When it’s an option, choose UTF-8 encoding “without BOM.” This refers to a tiny invisible marker some editors place at the beginning of a text file that you want to avoid.
- Keep durations reasonable: Aim to keep each subtitle visible for about 1.5 to 6 seconds. Too short, and viewers won’t have time to read it; too long, and the caption will hang on screen after the dialogue has moved on. Matching the display time to the natural pace of speech keeps captions easy to follow.
- Break at natural pauses: Readers process captions faster when the text lines up with how the words are spoken. End lines at commas, pauses, or sentence breaks so they feel natural to read. Avoid splitting phrases awkwardly.
- Limit characters per line: Stick to roughly 32-40 characters per line and no more than two lines per subtitle. Keeping captions short and snappy makes them accessible and easy to digest.
- Mark speaker changes smartly: When more than one person speaks in the same timeframe, add a hyphen at the start of each line or include a brief speaker label. This prevents confusion about who’s talking without cluttering the screen.
- Include key non-speech cues: Adding context like [laughter], [applause], or [music playing] helps viewers who can’t hear fully experience the content. These cues also give important emotional and situational context.
How to create an SRT File in MS Word
MS Word is another text-based editor that generates SRT subtitle files. Here are the steps on how to do it.
Step 1: Open a blank document
Create a new blank document in MS Word.
Step 2: Set up the font and formatting
Unlike Notepad, MS Word doesn’t offer minimal formatting for generating subtitles.
You have to choose a monospaced font like Courier New. You should also set the paragraph spacing to 0 to remove any extra spaces between paragraphs.

Step 3: Start typing each subtitle group
Add these three elements in a sequence:
- Frame number
- Timestamps
- Subtitle text
Leave a blank space after each subtitle block. Follow the same process until the end of the video.

Remember to:
- Keep the text to 32-40 characters per line (depending on platform guidelines).
- Use 1-2 lines per subtitle block to ensure readability.
- Avoid splitting sentences unnaturally across blocks or lines.
Step 4: Review and save the SRT file
As a final step, review your subtitles for any errors.
Once everything looks good, go to “File” then “Save as” to save the file in the Plain Text (.txt) format. Use the .srt extension when naming your file to create an SRT file.

Step 5: Test your SRT file
You can test your subtitles file by opening it in VLC Media Player, which works on both Mac and Windows. Open the video in VLC, then add the subtitle file by going to “Subtitle,” then “Add Subtitle File.” Play the video with subtitles to see if they work and are properly synced.
How to create an SRT file for YouTube
You can add an SRT file created using one of the methods above to YouTube. But the platform can also auto-generate captions using speech recognition that you can download for use on other platforms.
Here’s how to do it step by step.
Step 1: Sign in to YouTube Studio
Open YouTube Studio. From the left menu, click “Subtitles.”

Step 2: Choose your video
Find the video you want to add/edit captions for and click on it.
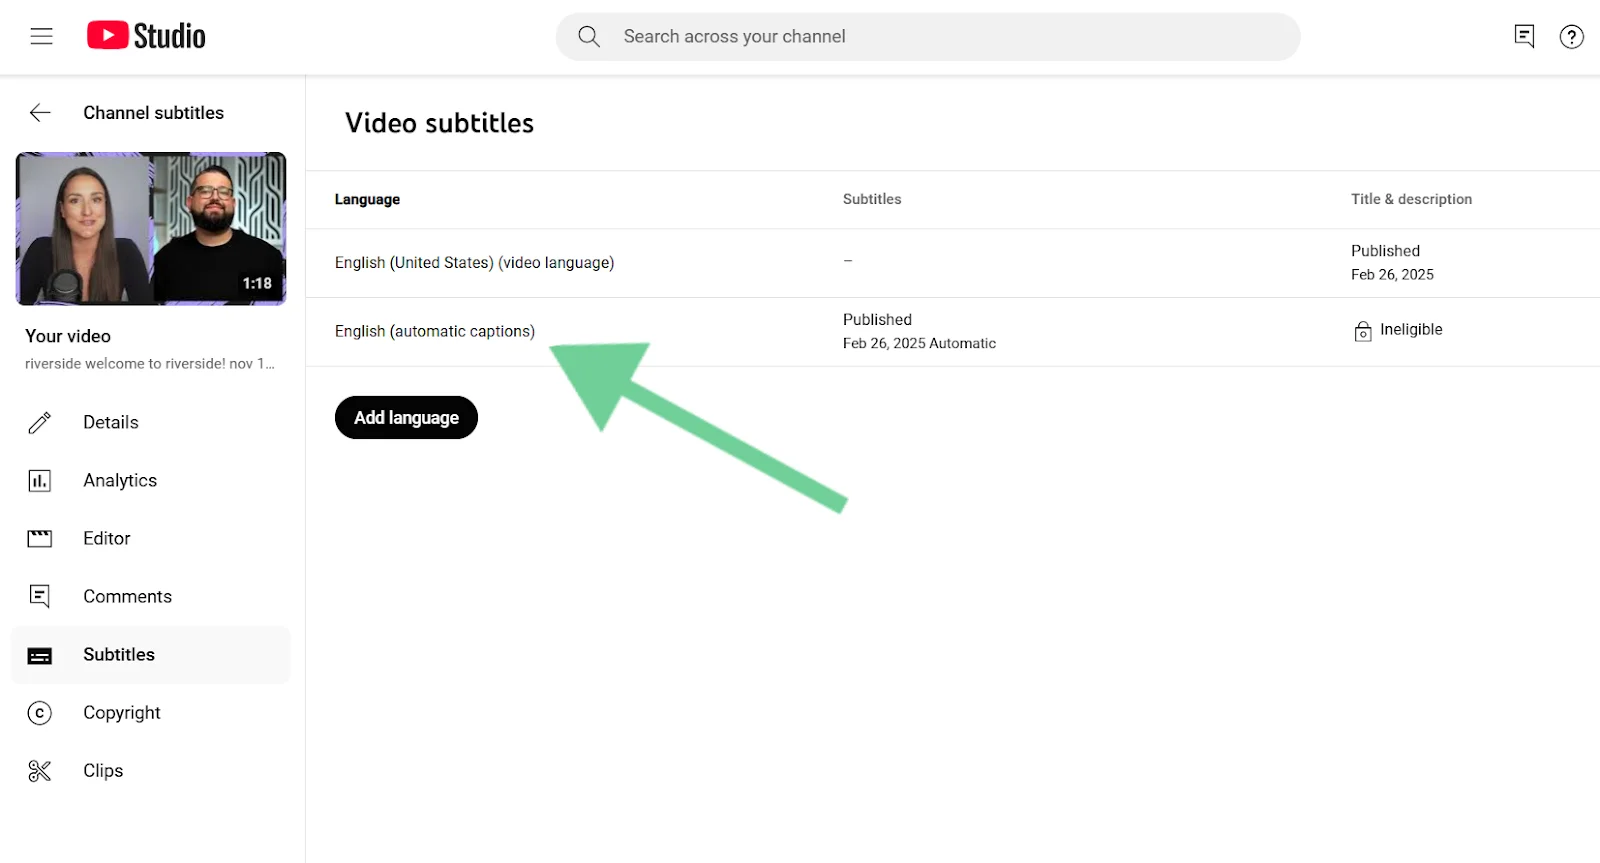
Step 3: Manage subtitles
You’ll see a list of available subtitle tracks. Automatic captions are added automatically by YouTube when you upload your video file, so you should see something like “English (automatic captions.)
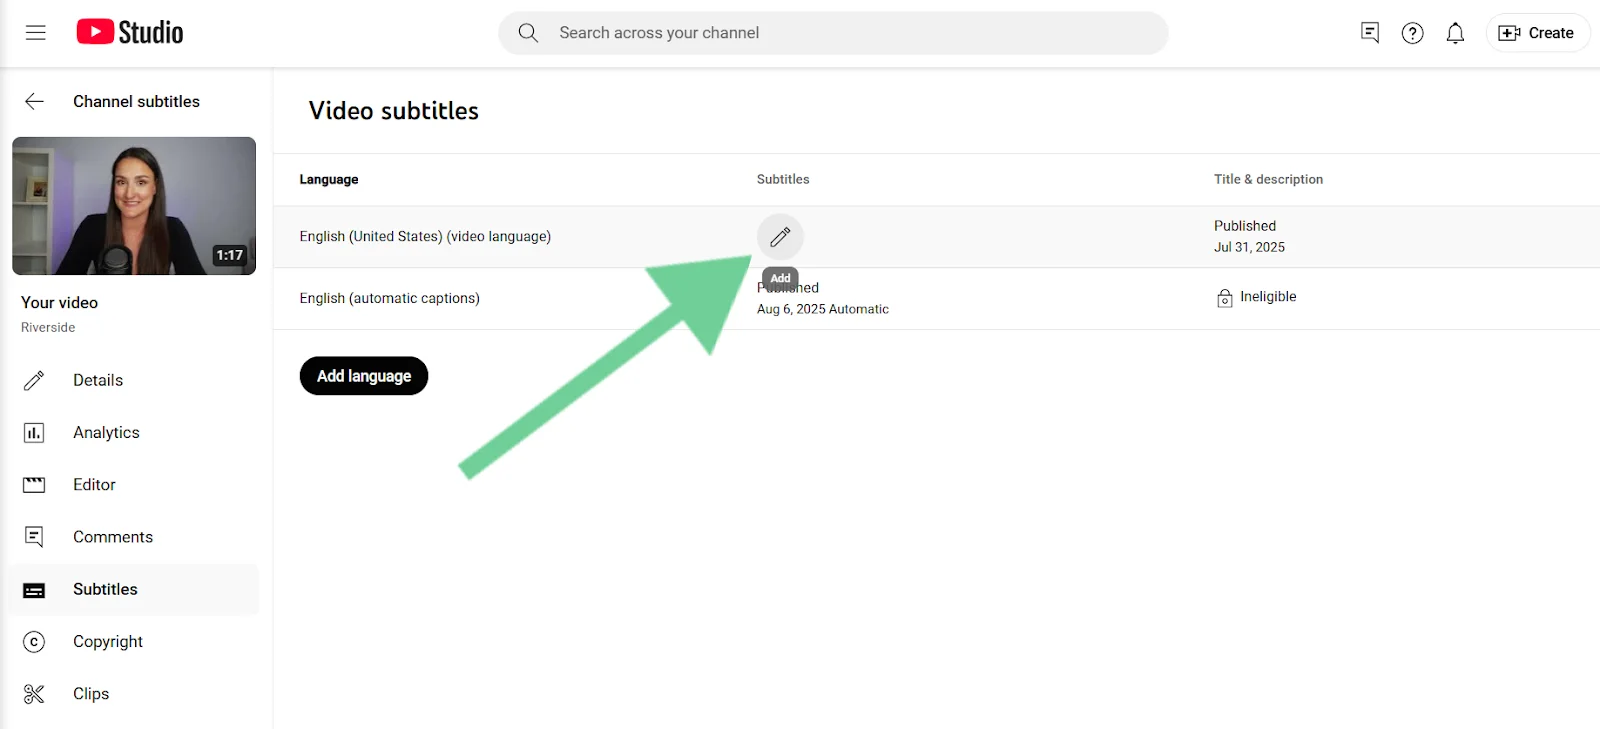
Step 4: Add or edit captions
If you want to add captions, hover over “Published” under “Subtitles” and click the “Pencil” icon. You want to do this for the file that does NOT include automatic captions.
From here, you can opt to upload an SRT file, upload a transcript to have it auto-sync as captions, or type captions manually.
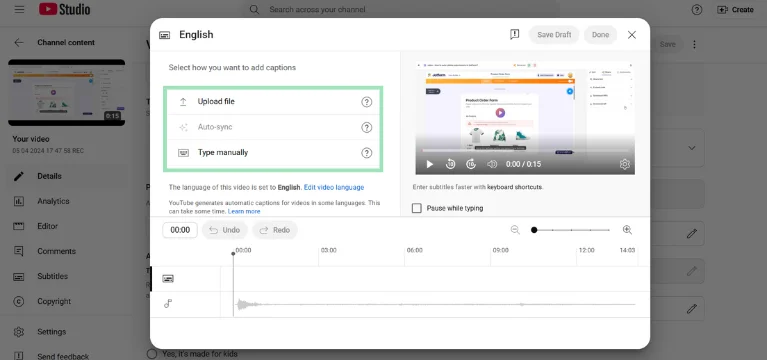
If you’ve created an SRT file using Riverside, you can upload it here and you’ll be good to go!
Step 4: Test and save subtitles
Play your video to check whether all subtitles are in sync with your video’s pace. You can publish the subtitles immediately or save the transcript as a draft to edit later.
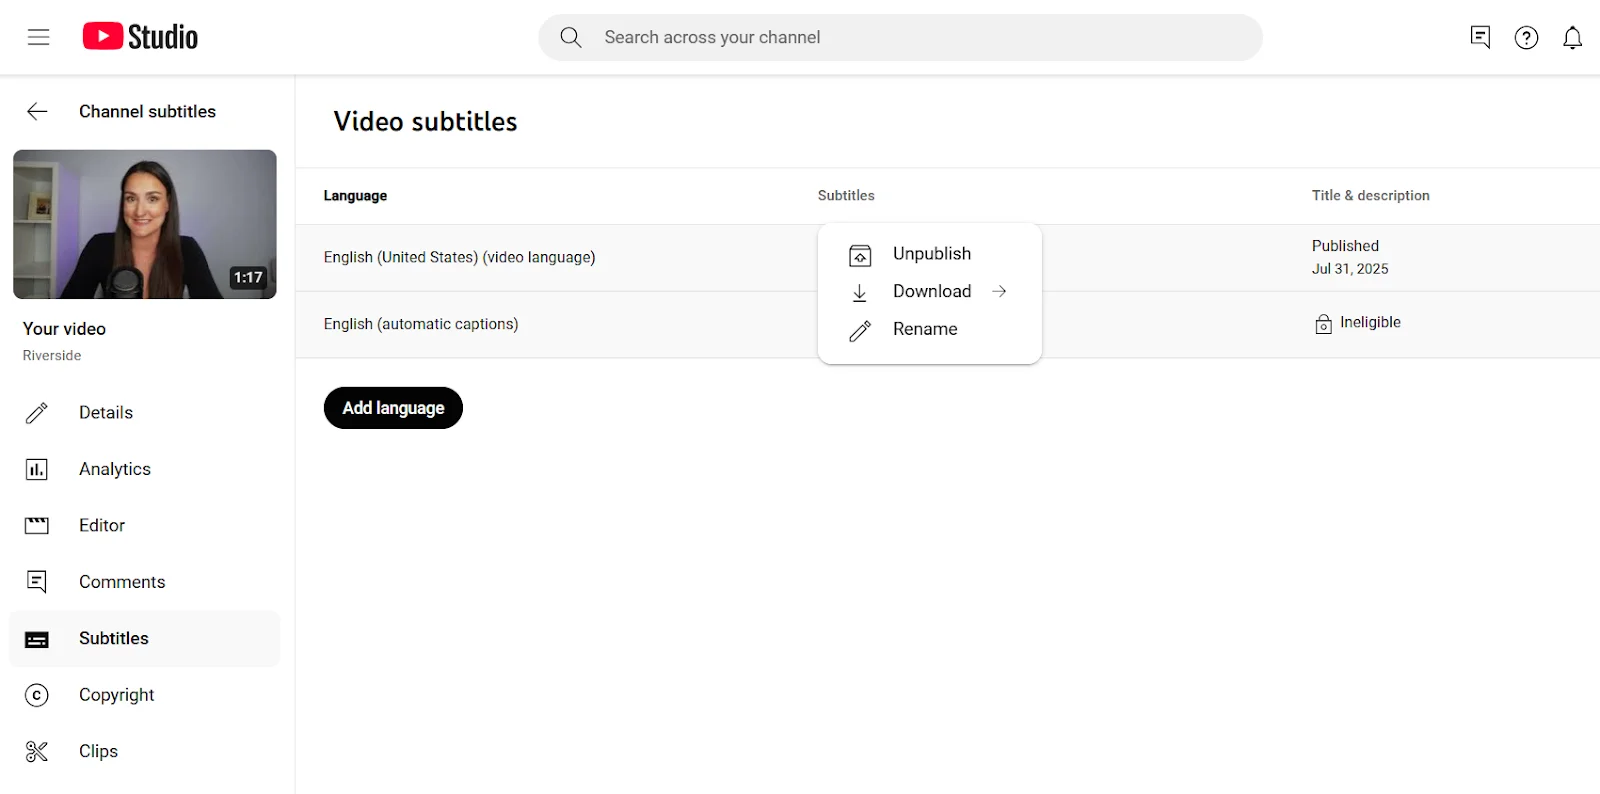
Step 5: Download your SRT file
If you want to download your SRT file, it’s easy. Just click the three-dot menu, then click “Download” and select “.srt.” You can do this even for pages with automatically generated subtitles, giving you access to an SRT file you can use on other platforms.
Tip: YouTube’s auto-transcriptions aren’t always accurate, especially in languages other than English. Riverside’s built-in transcription tool automatically transcribes content with up to 99% accuracy in 100+ languages, then creates a perfectly formatted SRT file you can use anywhere.
How to create an SRT file for Facebook
Here’s how to upload a subtitle file for videos on Facebook Pages using your SRT file (it works for both new uploads and existing videos):
Step 1: Upload or access your video in Meta Business/Facebook Page
If you're posting a new video, upload it via Meta Business Suite or start a photo/video post.
If the video you want to caption is already live, go to your “Page” → “Posts” or “Video Library” and find the video you want to caption.
Step 2: Access the video editor
Click “Edit Post” (or use the three-dot menu → “Edit Video”). In the video settings, scroll to the “Captions” or “Subtitles” section.
.png)
Note: The captions interface can look slightly different depending on whether you’re using a Facebook Page, Meta Business Suite, or a personal profile. Look for the Captions/Subtitles option within the video editor.
Step 3: Choose “Add Captions” or “Upload SubRip (.srt)”
In the Captions/Subtitles section, select “Upload .srt.” Facebook also offers auto-generation in some cases (only for Pages) – but manual uploading is the most reliable.

Step 4: Select and upload your SRT file
Choose the correct .srt file from your computer. Make sure the filename follows Facebook’s naming convention:
filename.[language_code]_[country_code].srt (for example, video.en_US.srt for U.S. English).
If your file name doesn’t match this format, Facebook will reject it.
Once the file is uploaded, specify the language of your subtitles and publish the video. You can also preview the video before publishing.
Step 5: Save / Publish your changes
Once your file is uploaded, click “Save” or “Publish” to make the captions active on the video.
Tip: Even with the correct file name and encoding, captions may sometimes fail to upload due to Facebook processing issues. If that happens, try re-saving your file as UTF-8 and re-uploading, or remove any existing auto-captions on your video before uploading again.
FAQs about SRT files
What software converts VTT to SRT?
You can convert VTT to SRT with free tools like Subtitle Edit, HandBrake, or online converters such as SubtitleTools. It’s as simple as uploading your VTT file and exporting it as an SRT. If you’re already working in Riverside, just export your transcript directly in SRT format and skip the extra step.
How do I fix SRT encoding issues?
If your captions show strange symbols (�) or broken accents, it’s usually an encoding problem. The fix is simple:
- Save the file in UTF-8 (without BOM) format.
- Check your text editor’s encoding settings before exporting.
- If issues remain, open the file in a tool like Notepad++ and re-save it as UTF-8.
Or skip the hassle - Riverside transcribes your content and creates an exportable SRT file with the right encoding automatically.
Is there an AI that can generate subtitles?
Yes. There are many AI transcription tools that can generate SRT files. Look for one that’s easy to use and transcribes with a high degree of accuracy. Riverside automatically transcribes your audio or video with up to 99% accuracy and turns it into time-synced subtitles. You can export them as SRT files in 100+ languages, complete with speaker labels, so your content is ready to share anywhere.


.webp)

