.webp)


Key takeaways:
- Tools like Riverside make it easy to record, edit, and even capture your screen and webcam together for multiple use cases.
- Built-in camera apps like QuickTime (Mac) and Camera (Windows PC) are perfect for quick, no-frills webcam recordings.
- Some upgrades, such as better lighting, framing, and an external webcam or phone, can make your videos look much more professional.
Recording a video with your webcam is easier than you think.
With some quick settings and the right recording software, you can create sharp, high-quality webcam videos straight from your computer.
In this guide, we’ll break down how to record with a webcam on both PC and Mac. Plus, we’ll share our tried-and-tested advice for creating engaging webcam videos for any use case.
How to record with your webcam (the best way)
After experimenting with a bunch of different ways to record webcam video, we found the easiest and most efficient method.
All you need is Riverside, and you can create high-quality recordings with your webcam. Here’s how.
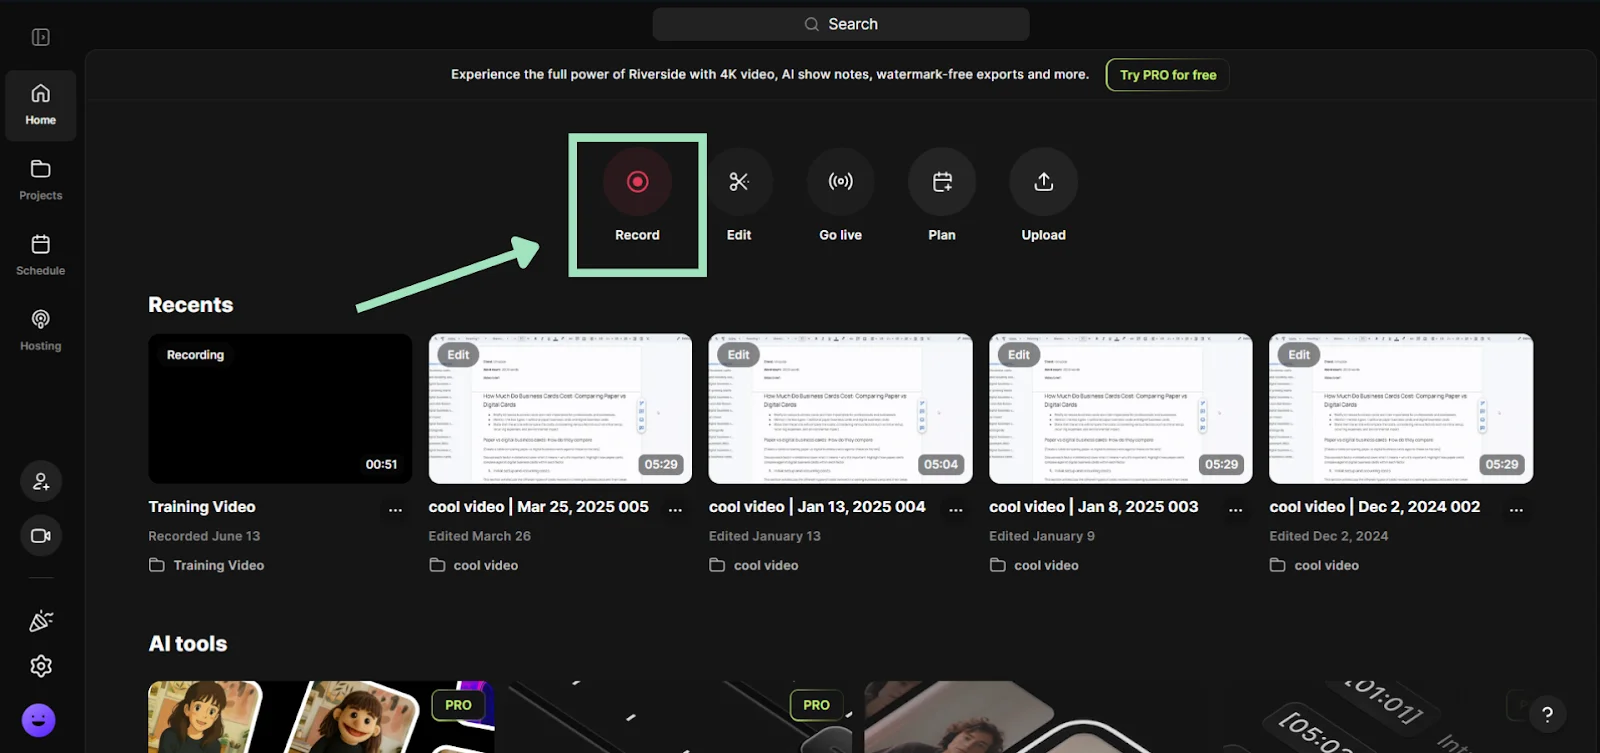
Step 1: Log in to your Riverside account and press “Record” to get started.
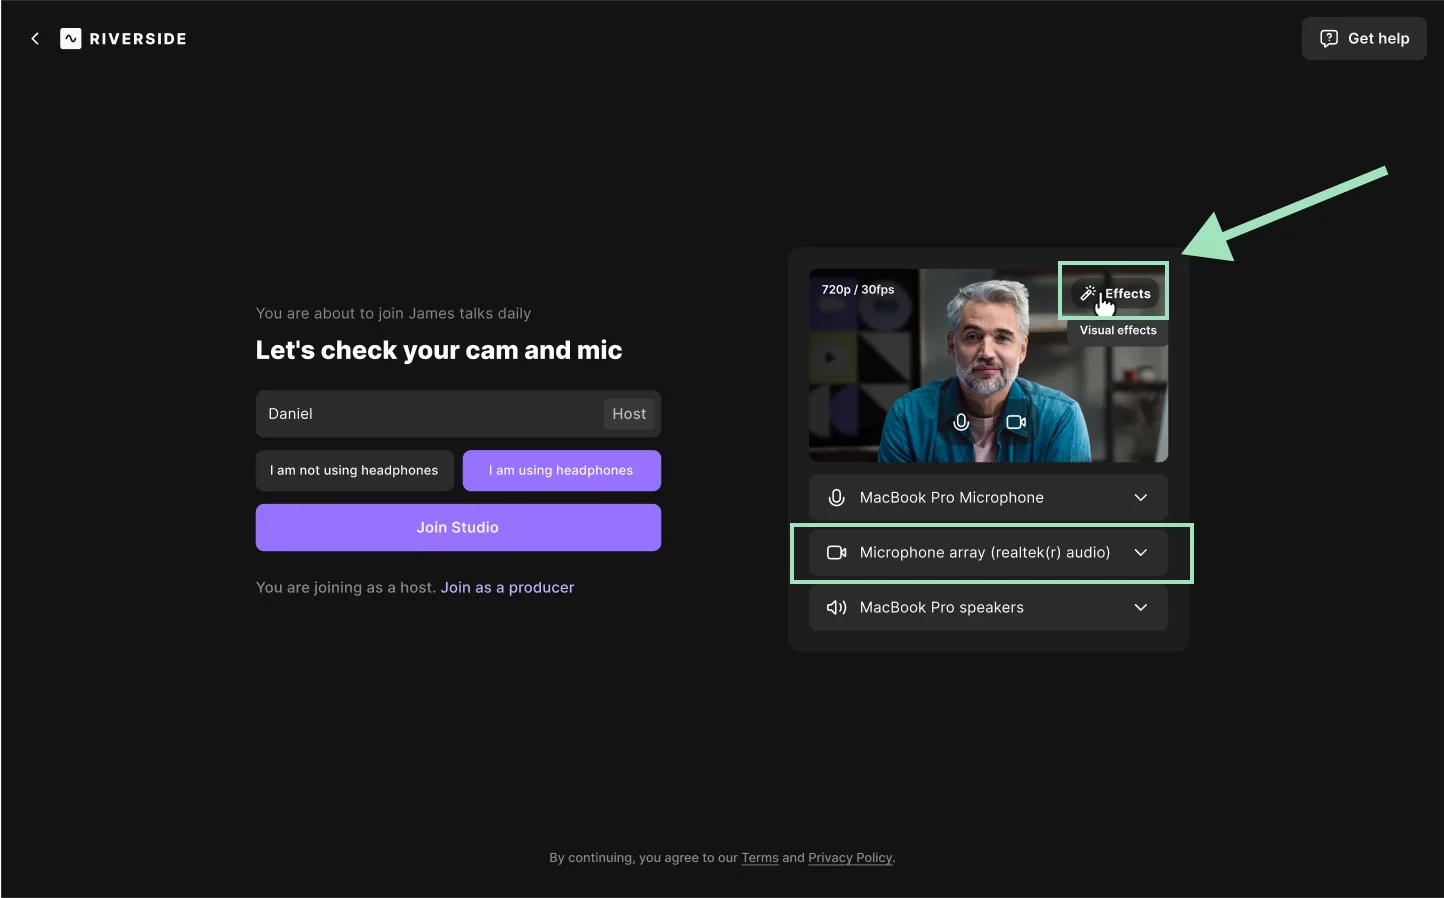
Step 2: Before entering the recording studio, Riverside will prompt you to choose your audio and video devices. Here, select your webcam as the video input, then click “Join Studio” to enter the recording studio.
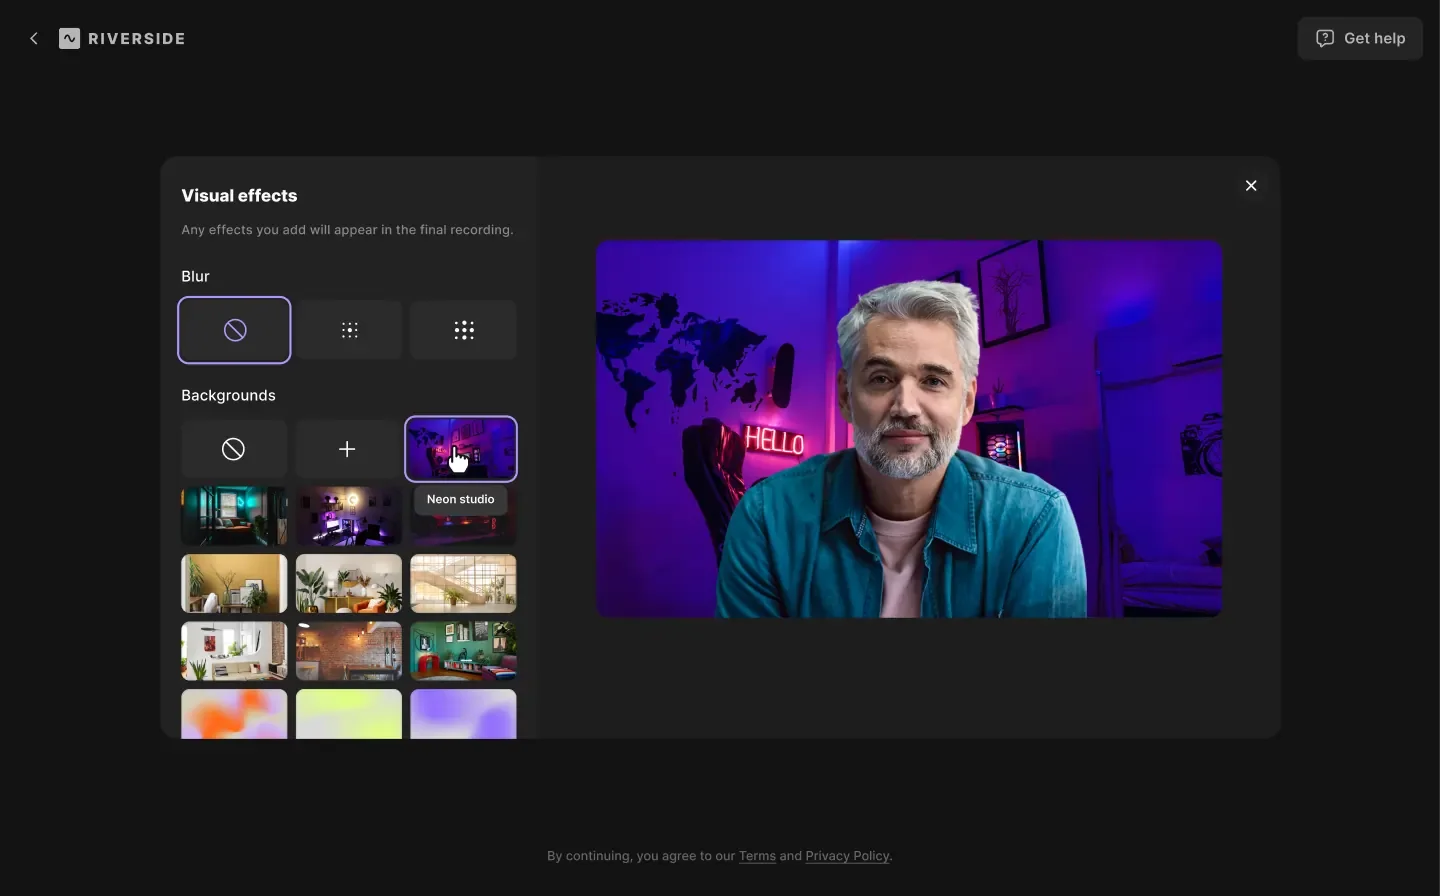
You can also cClick “Effects” to customize your look with Riverside’s built-in background images, blur your background or upload your own image.
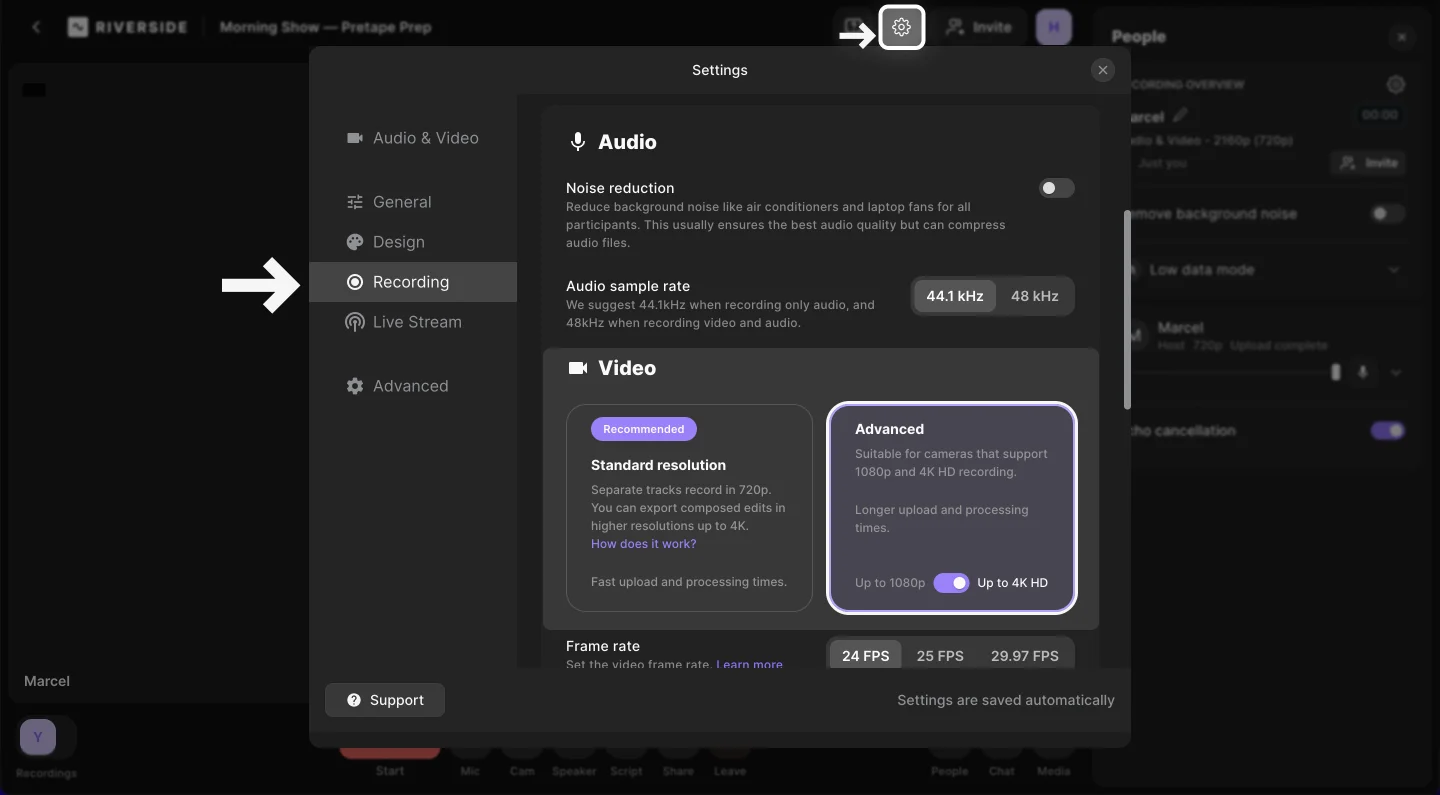
Step 3: Click the gear icon to access the settings for your recording. If your webcam supports it, you can adjust the recording resolution up to 4K Ultra HD.

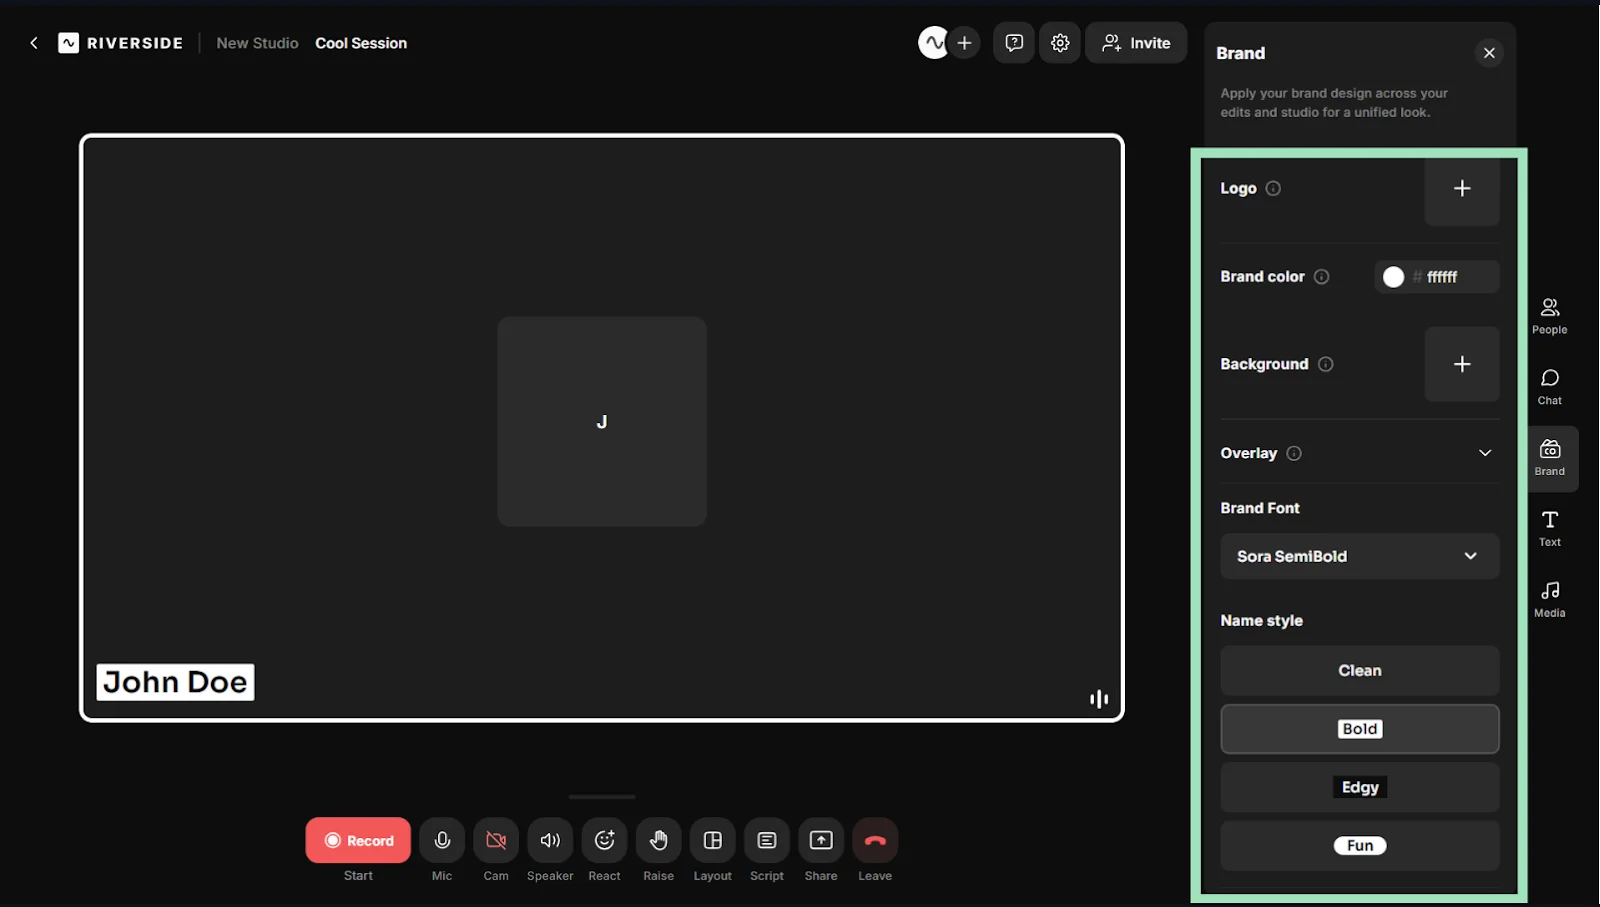
Step 4: Spruce up your video by adding some branding elements. In the customization panel on the right-hand side of the screen, go to the “Brand” tab. Then, add your logo, brand color, background, overlay, etc.
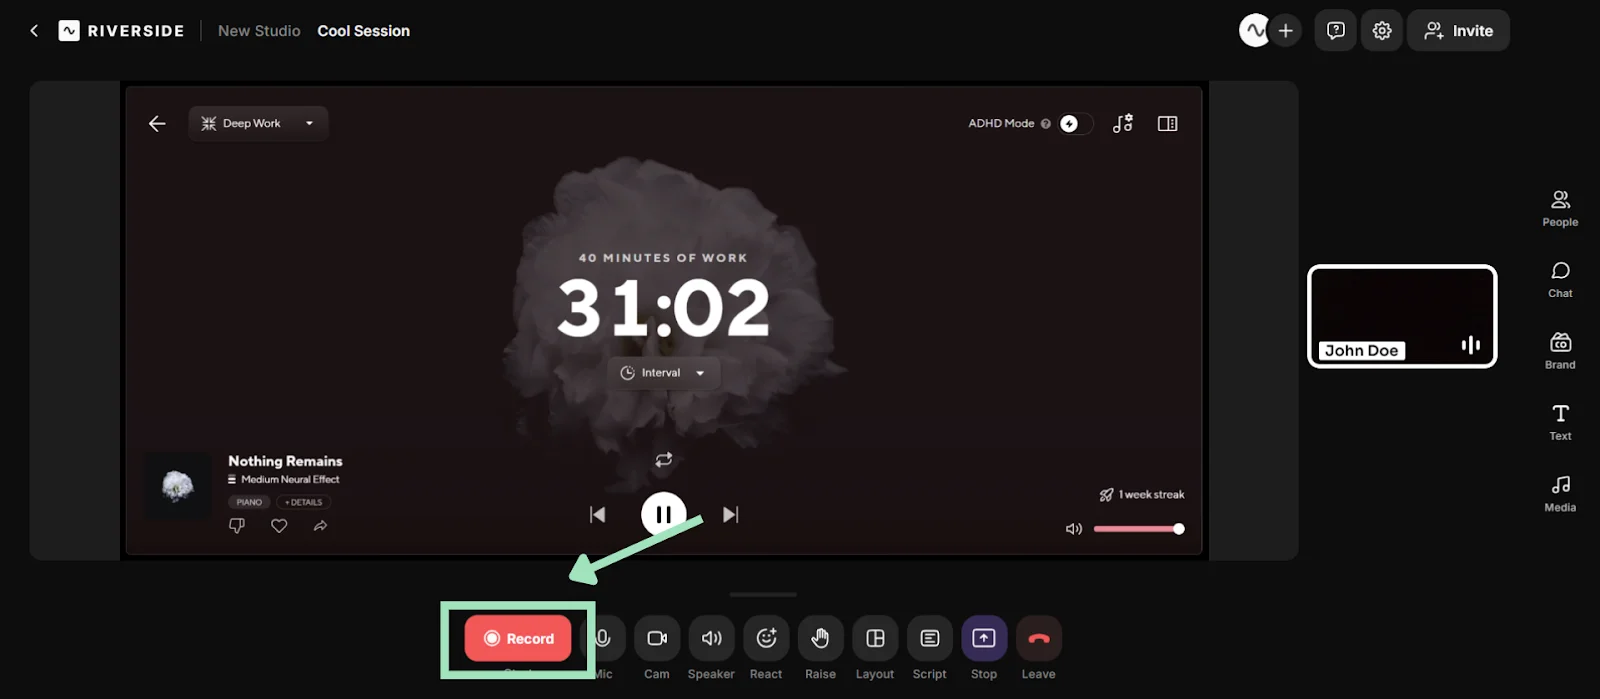
Step 5: When you’re happy with the setup, hit “Record” to start recording with your webcam.

Step 6: Press “Stop” to finish recording and wait for it to upload to the cloud.
Step 7 (Optional): You can use Riverside’s intuitive text-based editor to polish your webcam recordings with just a few clicks. You can add captions, text or image overlays, trim/split tracks, and a lot more.
.webp)
Read more: How to Edit Videos: Step By Step Guide for Any Device
How to record with your webcam and share your screen
Now you know how to record video with webcam software, but what if you want to take it a step further by recording both your screen and camera at the same time?
This is a great way to produce training videos, tutorials, demos, and more. And, it’s a breeze with Riverside.
First, follow all the steps we discussed above to record with your webcam.
Before you hit “Record” (Step 5), continue with these steps to record your camera while sharing the screen.
Step 1: Click the “Share” icon and select “Screen.” This will prompt you to choose a tab, window, or screen to share for the recording.

Step 2: Once you’ve shared your screen and checked your webcam, press “Record” to start capturing a video.
Step 3: Click on the “Share” icon again to stop sharing your screen or choose another tab/window to record.
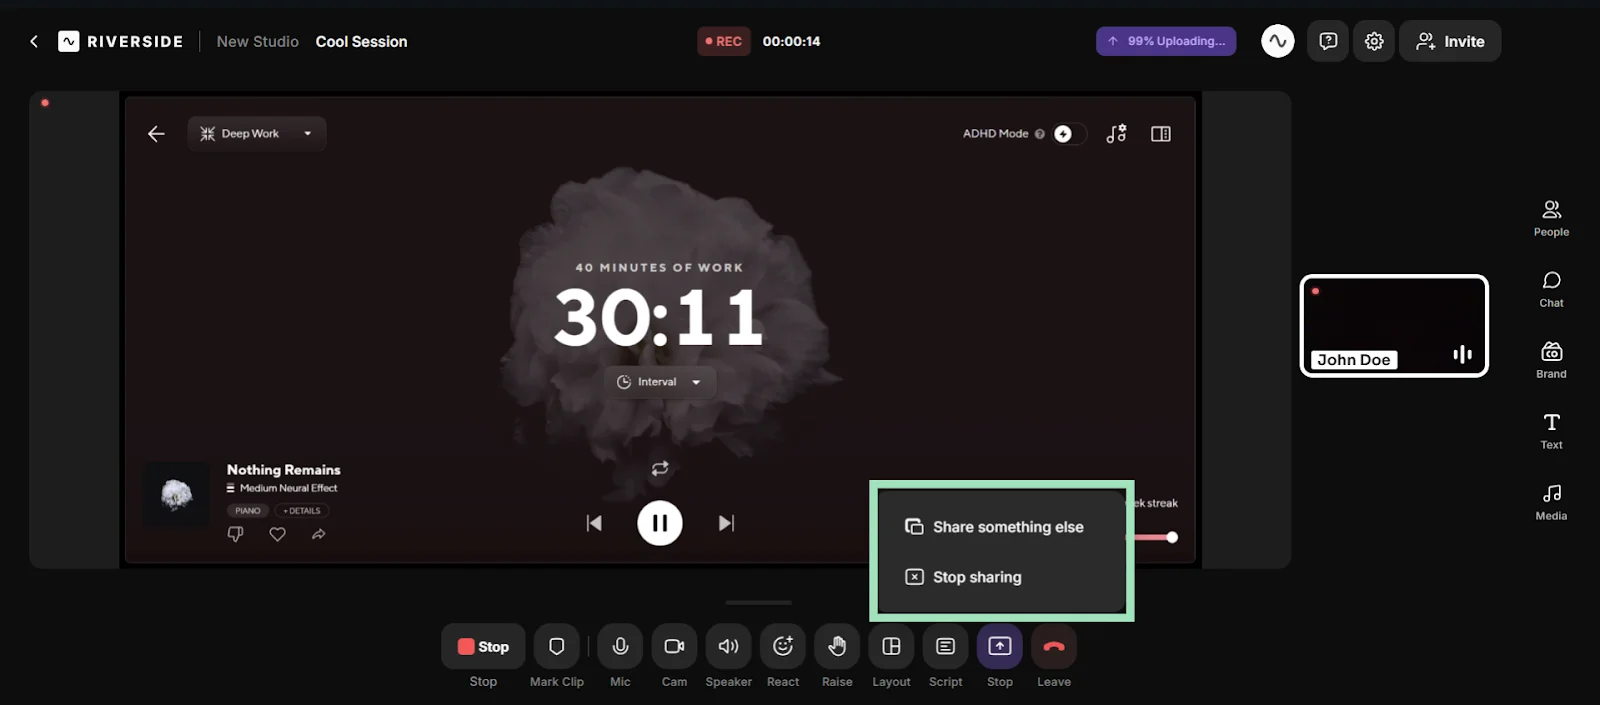
Step 4: When you’re happy with the recording, press “Stop” to finish the session and save your video.
Read more: How to Record Online Videos Easily in High-Definition
How to record with your webcam on Mac
QuickTime Player is the easiest way to record yourself on a Mac. Here’s how you can use this handy tool to create quick webcam videos.
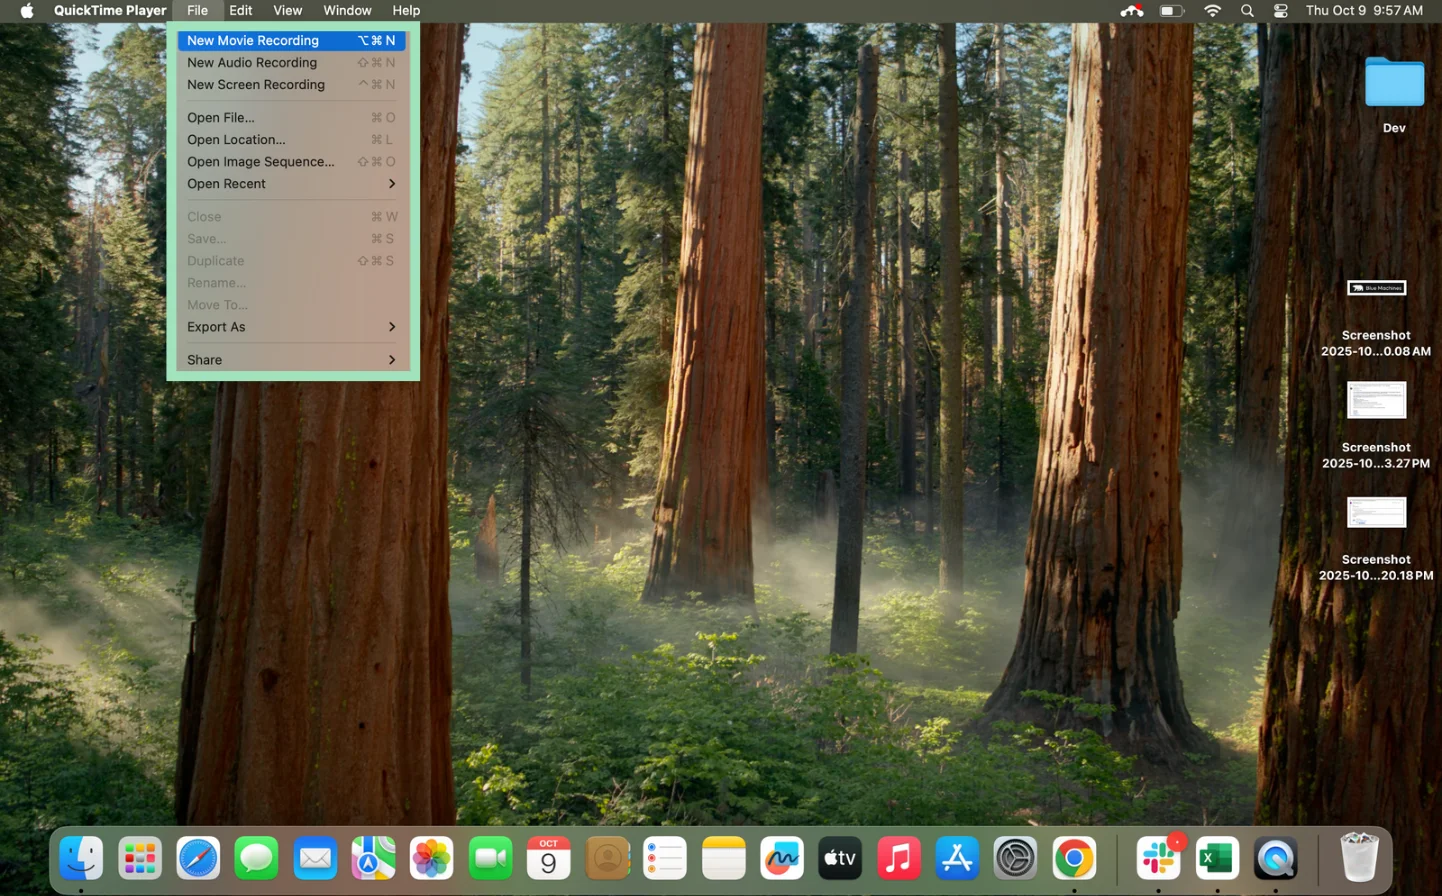
Step 1: Launch the QuickTime Player app.
Step 2: Click “File” and select “New Movie Recording” to record a video with your camera.
Step 3: Click the down arrow next to the record button. Here, you can choose a video input, whether that’s a built-in camera or an external device. Select a video quality between High (1080p) and Medium (720p) based on your use case.
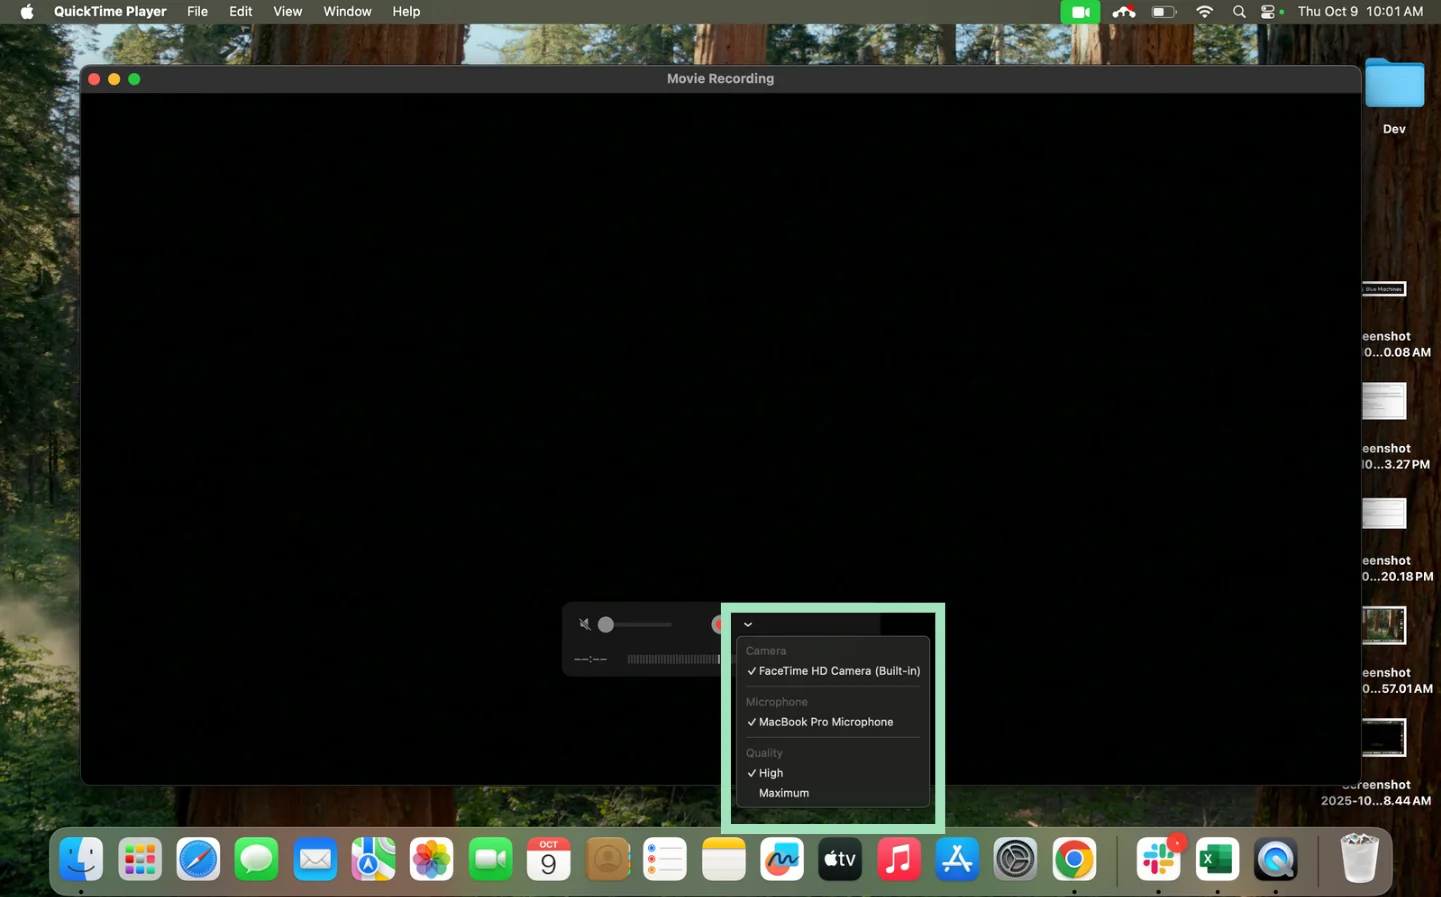
Step 4: Hit the record button to start recording a video. Press the stop button to end the recording when you’re finished.
Note: Unlike Riverside, QuickTime doesn’t let you share your screen while recording a webcam video. To record your screen on a Mac with QuickTime, you have to select “New Screen Recording.”
How to record a video on PC with your webcam
To record a video with your webcam on a Windows PC, use the built-in camera app. Here are a few easy steps to record videos on PC.
Step 1: Open the camera app by searching camera or pressing Win + S on your keyboard.
Step 2: Click the gear icon in the top-left corner of your screen to access settings.
Step 3: Adjust camera settings to display the framing grid while recording. You can also customize the video settings to set resolution quality and flicker reduction.
.webp)
Step 4: Under camera settings, go to “Open camera system settings” to get advanced options. Here, you can adjust the webcam’s picture quality through factors like brightness, contrast, etc.
.webp)
Step 5: When you’re ready, click the camera icon to start recording a webcam video.
.webp)
Step 6: Once done, click on the same button to stop the recording.
5 easy ways to record quality videos with your webcam
Simply knowing how to record a video with your webcam isn’t enough if you want to create engaging content. Ditch those low-res videos with clunky sound and follow our advice to make high-quality webcam videos worth your viewers’ time.
Use a solid camera (or your phone)
Most people blame their ‘bad lighting’ or ‘poor Wi-Fi’ when their videos look dull. But 9 times out of 10, it’s the camera.
Your laptop’s built-in camera isn’t designed for high-quality video production. It has a low resolution, fixed focus, and almost zero light adjustment. That’s why your footage often looks fuzzy or greyish, no matter how you adjust settings.
If you can, upgrade to an external webcam to capture more detail and handle lighting changes better. We have a whole list of trusted recommendations for all budgets:

Alternatively, you can simply use your phone as a webcam. Tools like Riverside let you connect an external device for audio or video input. So, you can get much better video quality without relying on your built-in webcam.
Pro tip: When recording with your phone camera, lock focus and exposure so your lighting doesn’t fluctuate mid-video.
Frame yourself well
You can have perfect lighting and audio, but still look awkward if your framing is off. Too much headroom or a tilted field of view instantly makes a video look amateur.
Position your camera (or phone) at eye level for an optimal recording view. The trick is to center your eyes roughly one-third from the top of your camera frame. This leaves enough breathing room above your head and prevents an overly tilted angle.
And if you move a lot while recording, turn on gridlines in your camera app. This will help you stay aligned and balanced.
Choose the right recording software
The tool you use to record webcam videos can make a huge difference. If your software defaults to low resolutions, your videos will always look pixelated. Plus, free camera apps often heavily compress footage, which may spoil your video’s clarity.
Good webcam recording software gives you control; not limitations.
With Riverside, you can adjust the resolution, frame rate, audio quality, compression, and even background noise. Record studio-quality webcam videos with 4K resolution and 48kHz audio to look and sound sharp.
Remember to record a 5-second test clip before every session to see if everything is in order. Adjust your physical setup or the software settings if anything seems out of place.
Optimize your lighting
You can have an expensive webcam and still look weird if the lighting isn’t right. In short, lighting can make or break your webcam video recordings.
One of the easiest signs of poor lighting is if your face looks uneven or your background glows brighter than you.
To fix this, choose a spot with ample natural light (e.g.,in front of a window). If you can’t access natural light, use a ring light at eye level to distribute brightness evenly. You can also add a small side lamp or soft light panel to reduce harsh shadows.
If you have the budget for a proper lighting setup, prioritize these three types of lights:
- Backlight for the background.
- Key light for the front.
- Fill light to fill the space.
Pro tip: If you wear glasses, place your light slightly above or to the side. This small detail will remove those distracting reflections on your glasses and make your eyes visible.
Use a clean, intentional backdrop
Your background can distract viewers if you have a pile of laundry in view or use a weird virtual filter.
A simple setup (a plain wall, bookshelf, or painting) instantly makes your video look more professional. And if your space doesn’t have a good enough vibe, use Riverside’s blur effect or virtual backgrounds.
Pick one that looks consistent with your lighting so it doesn’t ‘cut out’ your hair or any other detail.
Read more: 14 Streaming Background Ideas for a Professional Setup
FAQs about recording webcam video
How can I record a video online for free?
Use Riverside to record a video online for free. You can record a video by sharing your screen, or record both your camera and screen. Plus, you don’t even need to sign up to get started. Record for free and sign in to your account only to edit the content.
Can I use a webcam to record YouTube videos?
Yes, you can use a webcam to record YouTube videos. However, it’s best to use a high-resolution external webcam to create quality videos for your YouTube channel.
Do YouTubers use webcams or cameras?
YouTubers use both webcams and cameras to create content. Both devices serve different use cases for YouTube video production. For example, you can use a camera if you’re shooting in an outdoor setting, like documenting your trips. And you can use a webcam for recording tutorial videos from your computer.
Does Zoom allow you to record for free?
Yes, Zoom allows you to record for free. However, for free users, these recordings save directly to your computer and not in a cloud account.


.webp)
.webp)


