%20(1).webp)


Key takeaways
- Record your screen on a Mac with Riverside to create high-quality videos that include system audio.
- Use the keyboard shortcut Command (⌘) + Shift + 5 to quickly record your screen without any editing capabilities.
- Open QuickTime to record your screen for multiple audio sources and basic editing tools (e.g., trimming).
Wondering how to record your screen on a Mac to create a tutorial, demo, or training video?
You don’t have to buy pricey apps or use complicated software. In this guide, I’ll show you three simple (and free) ways to record your screen on a Mac.
How to screen record on Mac: 3 user-friendly methods
Let’s explore three easy ways to record your screen on a Mac, with a step-by-step breakdown of each technique.
How to screen record on Mac online using Riverside
Riverside is one of the easiest ways to create studio-quality screen recordings on a Mac. And since Riverside is browser-based, it may also be a bit easier for newer Mac users than the native options.
Using the free screen recorder
Use Riverside’s free screen recorder to get started without even signing up for an account. Here’s how.
Step 1: Grant permissions and select recording format
As soon as you open the site, you’ll see a pop-up to enable necessary permissions for mic and camera. This allows the app to record your system audio and video.
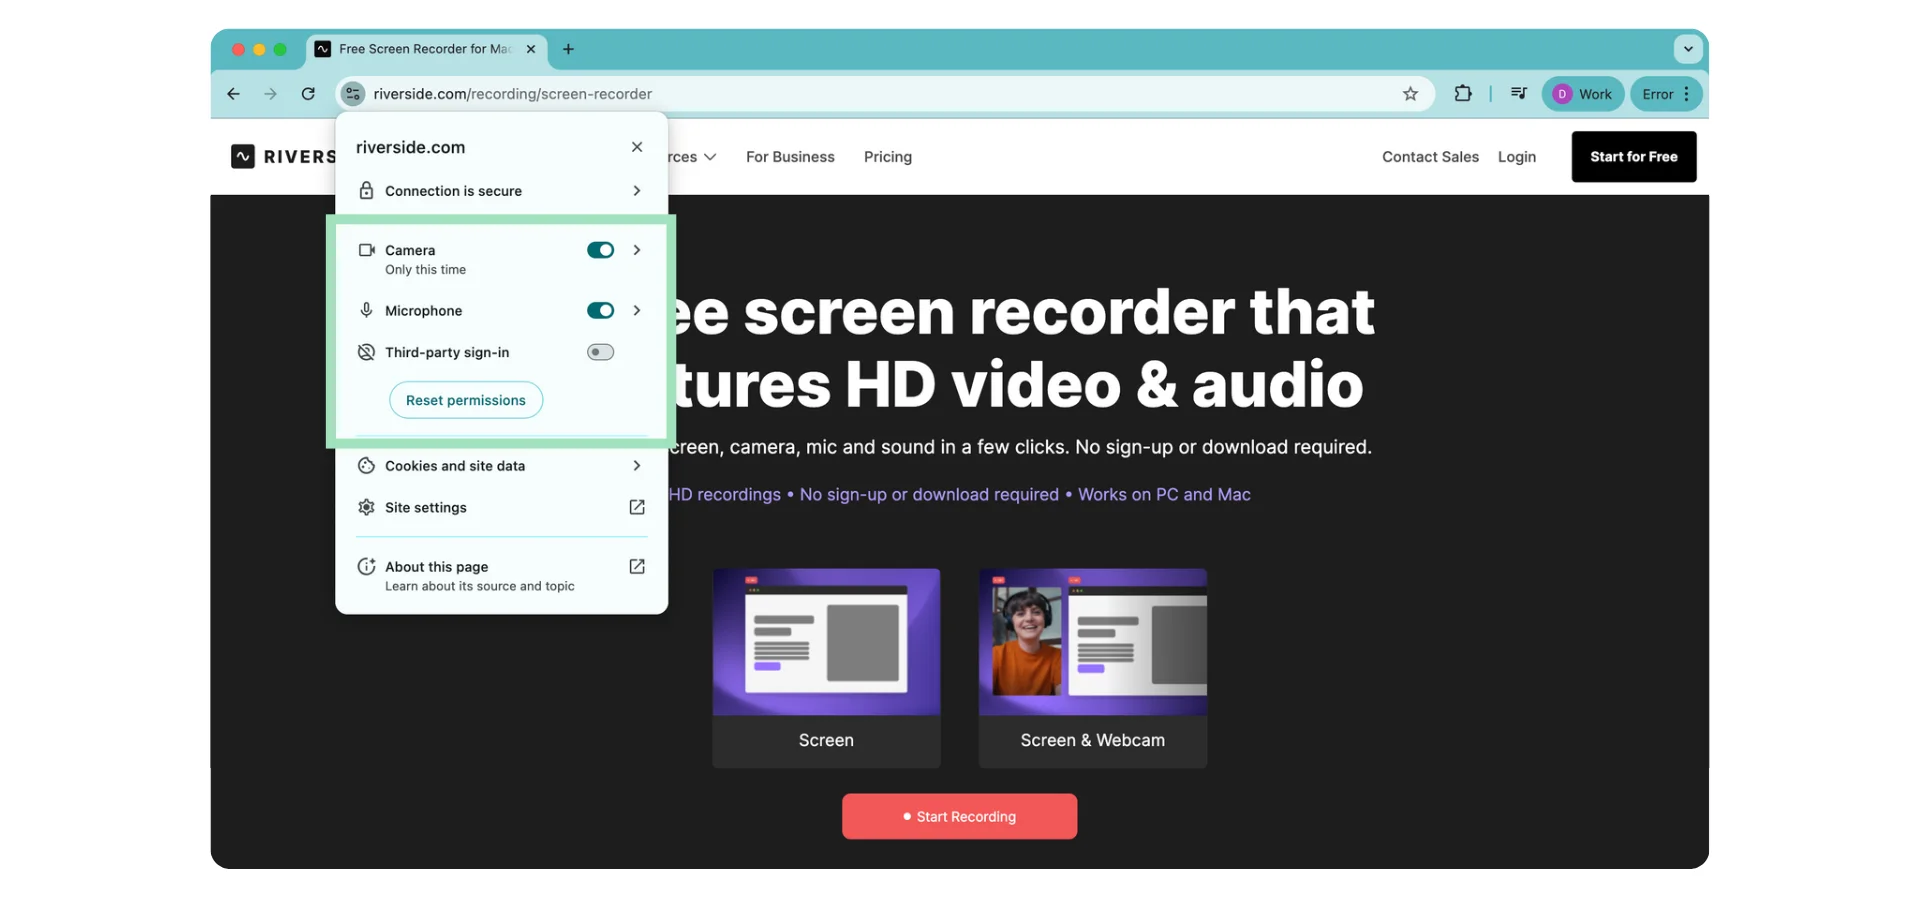
Then, choose between “Screen” and “Screen & Webcam” based on the type of video you want to make.
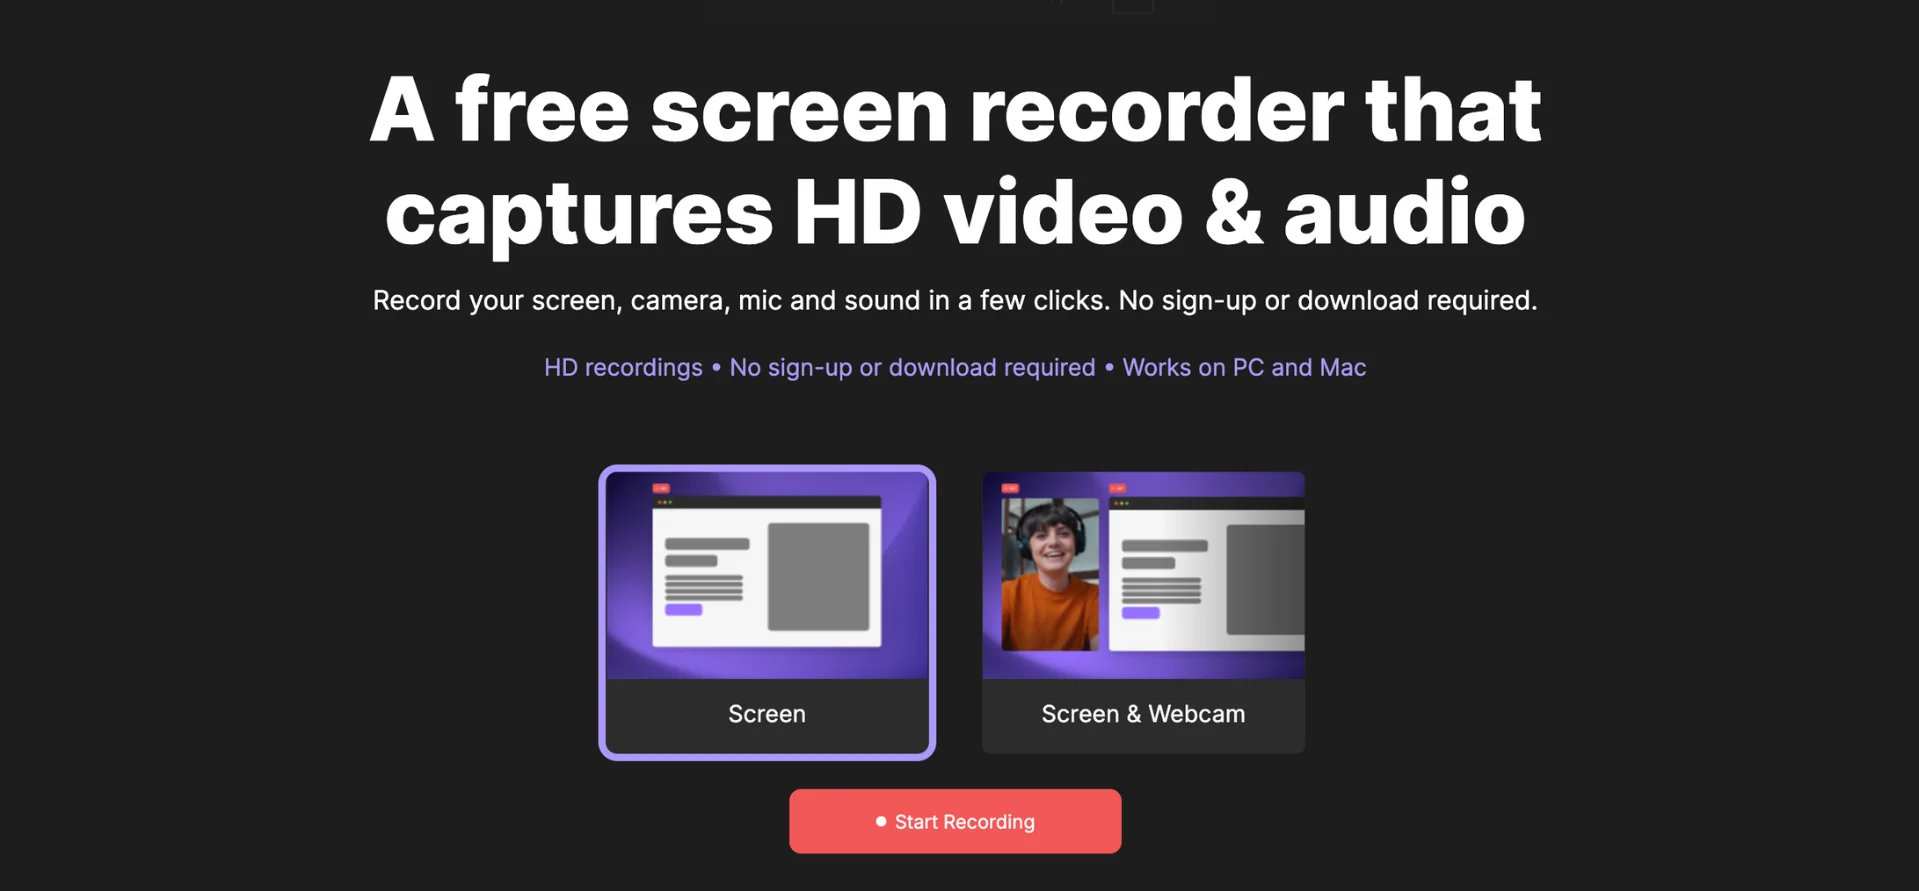
Step 2: Start recording your screen
Click “Start Recording” and select the tab, window, or screen you want to capture.

Once screen share starts, press “Record” to start the recording. A 3-second timer will let you know when it begins.

Press pause anytime and stop when you’re done.
Step 3: Download or share your video
Finally, download your recording or share it as a link.
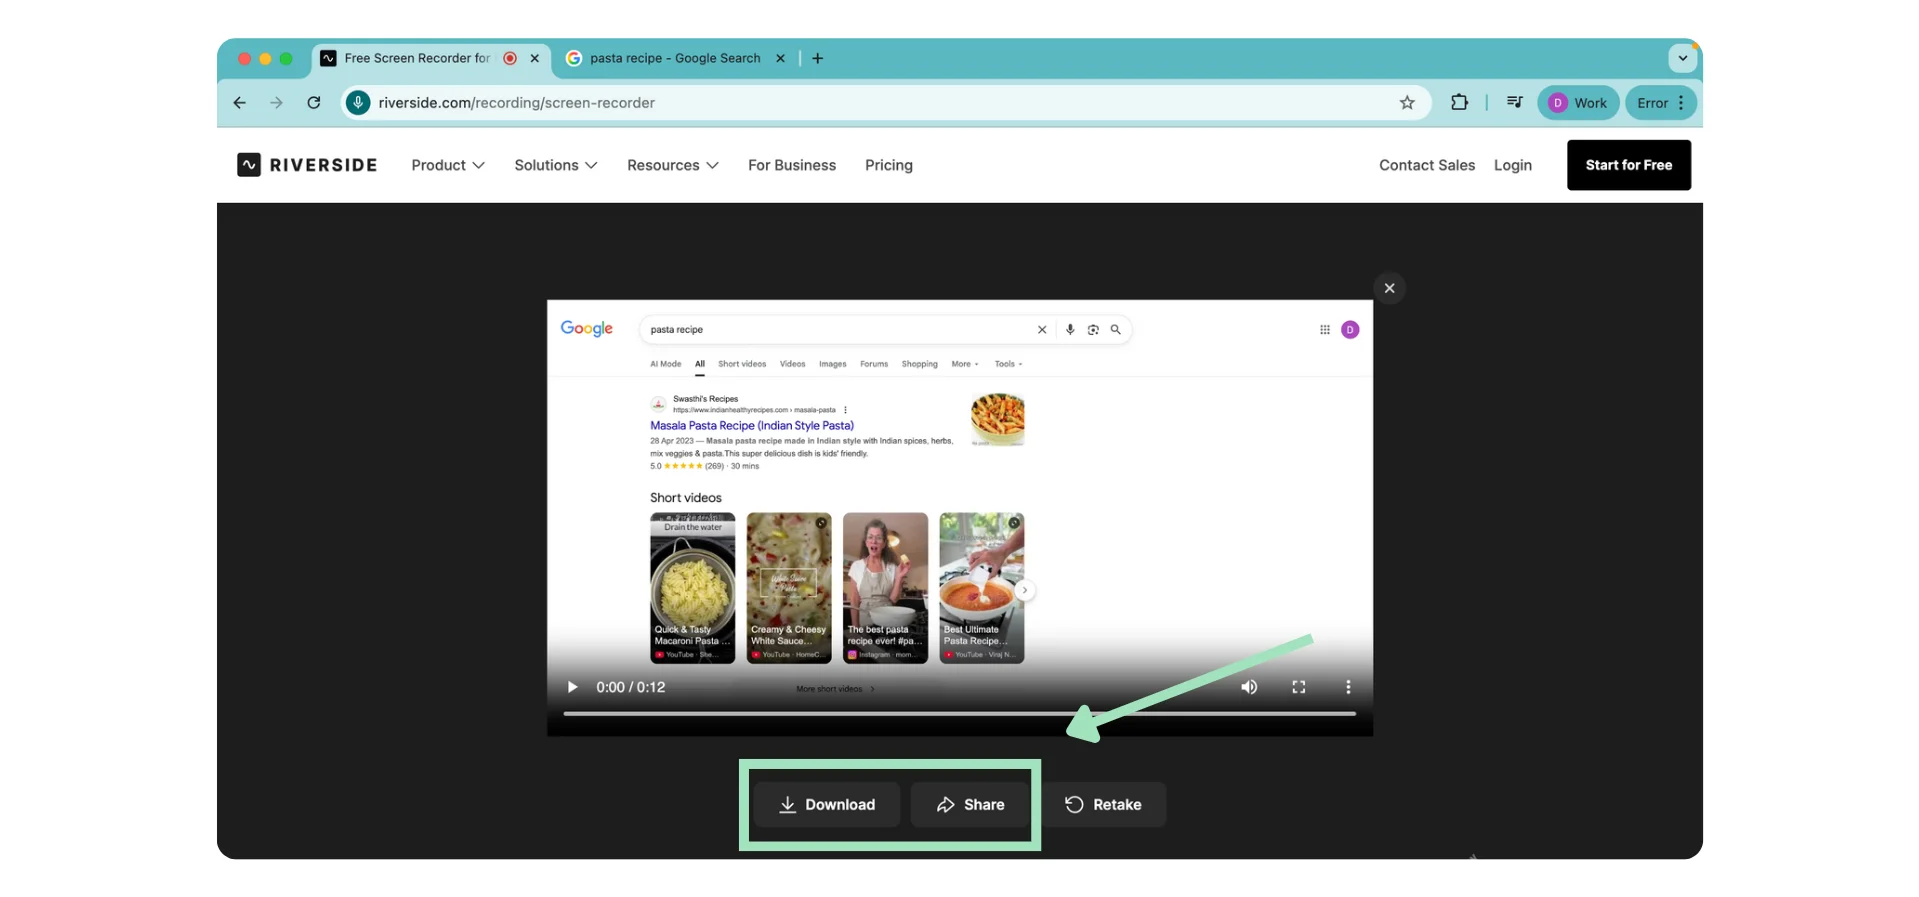
This is the quick and no-frills way to record your with the Riverside's free tool. You can also create studio-quality recordings with a more advanced setup.
Using the full Riverside recording suite
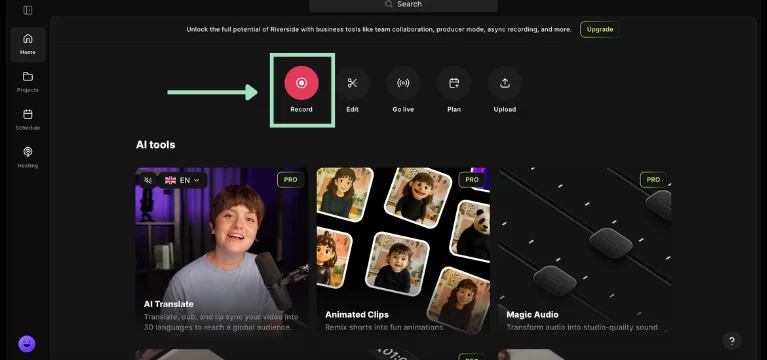
Step 1: Sign in to your Riverside account
Log in to your Riverside account, or sign up for a new account.
Then, click “Record” to start recording a new video. You can also join an existing studio in your account to make this video.
Step 2: Set up your recording studio
Grant audio and video capture permissions. Here, you can also choose the correct devices for recording the audio and video (in case you want to make a camera + screen recording).
Add your name and click “Join Studio” to get started.
.webp)
Step 3: Invite other people as hosts or audience (optional)
If you want to record a video with a few guests, share an invite link or send an email invite for anyone to join your studio.
Note that you can invite up to nine people in a session.

Step 4: Customize the settings for your screen recording
Choose the “Audio & Video” option as your recording type to record your screen with audio. You can also set the video resolution for your screen recording, starting at 720p HD and going up to 4K Ultra HD (paid plans).
Then, pick a language from 100+ options for transcribing your video once your recording is complete.

Pro tip: Enable the noise reduction option to prevent background disturbances and record a clean, crisp audio.
Click “All settings” to access more advanced settings for your screen recording. Go to the “Recording” tab to customize the audio sample rate, set the frame rate, and more.

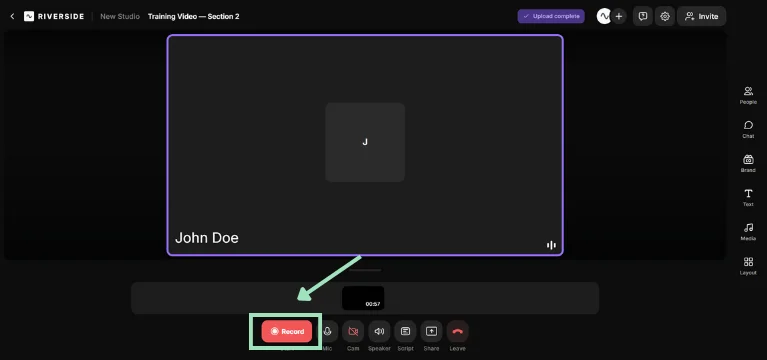
Step 5: Share your screen and start recording
Once you’re happy with the setup, press the “Share” icon to share your screen or upload a presentation (paid plans).

Then, press “Record” to start recording your screen.
Why record with Riverside?
- Studio-quality recording: Record your screen in 4K resolution with uncompressed 48 kHz audio to capture internal system audio, unlike Mac’s built-in screen recording tools.
- Webcam integration: Want to add a talking head video while capturing your screen? Record yourself with your screen through a webcam using split-view layouts and virtual backgrounds.
- Cloud backup storage: Your screen recordings are automatically uploaded to the cloud, so you can access them anytime by logging into your Riverside account. In contrast, QuickTime and hotkey recordings are saved only on your local system.
- Built-in editing tools: While Mac’s default tools offer limited editing functions, Riverside has a user-friendly text-based editor with powerful AI tools to polish the output, clean up audio, and more.
- Add transcripts and captions: Make your screen recordings more accessible to your viewers by adding captions and generating automatic transcripts in 100+ languages.
- Multiperson recording: Record your screen with multiple participants, like a meeting, webinar, or training video. Each person’s video and audio are saved on separate tracks.
How to screen record on Mac with the built-in recording tool
Mac’s built-in recording app is the quickest way to record your screen. Here’s how.
Step 1: Press Command (⌘) + Shift + 5 on your keyboard. This will open the screenshot toolbar, which provides a few different options for recording your screen.

Step 2: Hover your mouse over each of these icons to see the two recording options: “record entire screen” and “record selected portion.”
Step 3: Click “Options” to customize your screen recording setup. You can set the microphone device, designate recording length, show mouse clicks, and more.
Step 4: Press “Record” to start recording your screen.
Why use Mac’s built-in screenshot toolbar?: Pros and cons
Here’s why it’s worth considering Mac’s built-in screen recording features:
- Ease of use: Instead of downloading any software, simply press Command + Shift + 5 to get started.
- Lightweight tool: Run this built-in tool smoothly without overloading your system or facing compatibility issues.
- Automatic save and share: Save recordings on your Mac and drag the file into email, Slack, or another location.
But, tools built into operating systems are usually just to help you with the basics. Here’s where Mac’s native screen recorder falls short:
- No advanced functionality to edit screen recordings (e.g., annotations, captions).
- Basic editing features, like trimming, require another app.
- Requires third-party plugins to capture system audio.
How to screen record on Mac using QuickTime
QuickTime is another built-in tool you can use to record your screen on a Mac. It offers a bit more functionality than the screenshot toolbar.
Here’s how to record your screen with QuickTime.
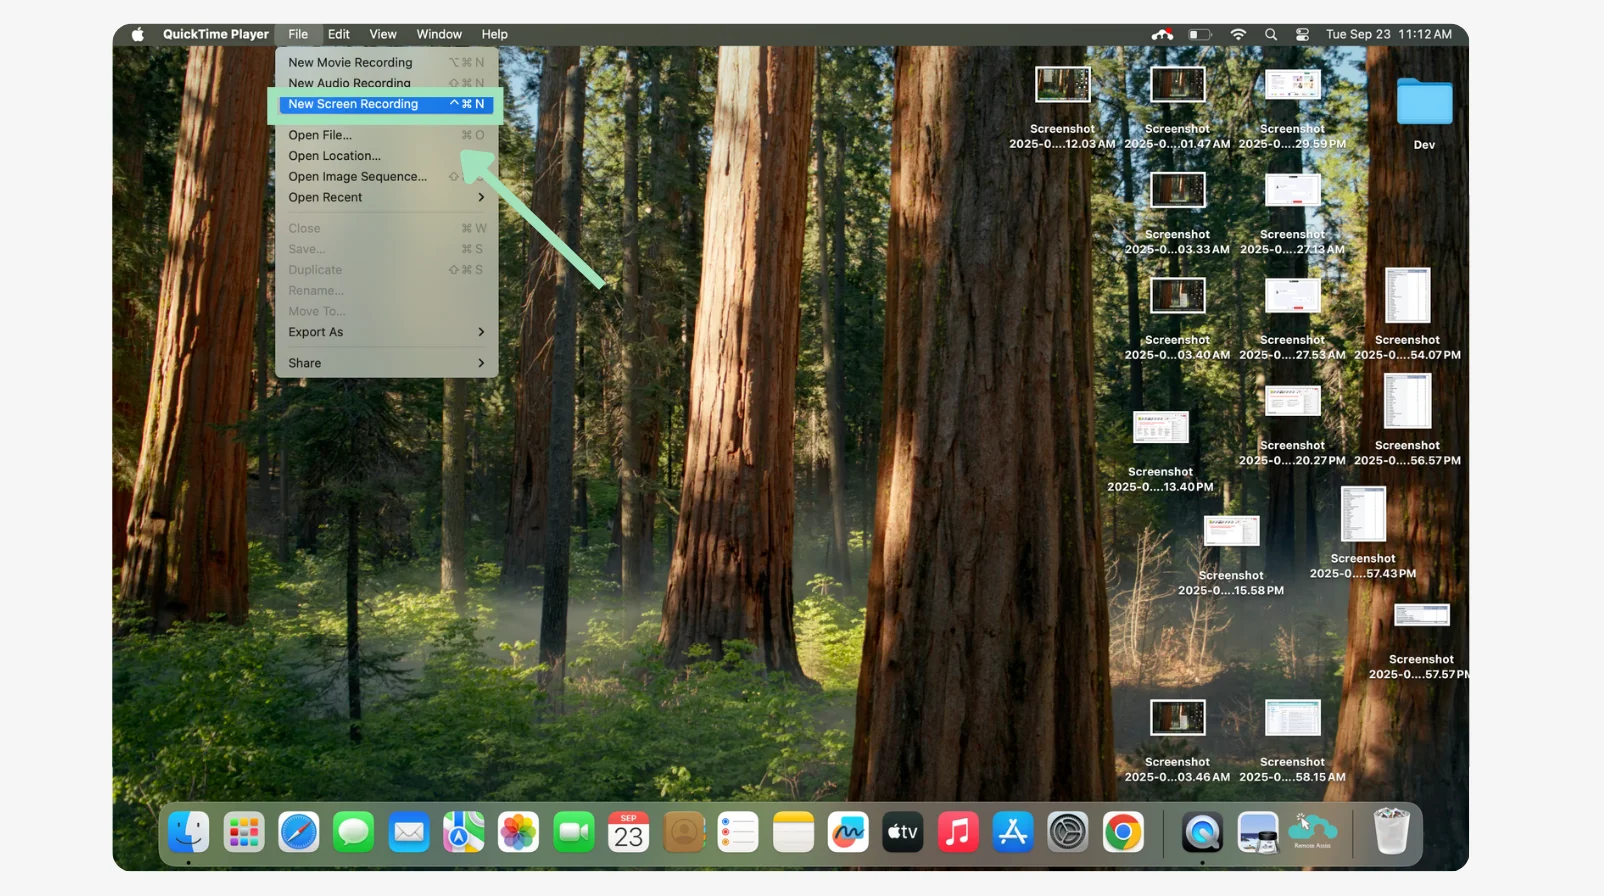
Step 1: Go to your Applications folder and open QuickTime.
Step 2: Click File > New Screen Recording to record a new video of your screen. You’ll see the same screen recording toolbar as above.
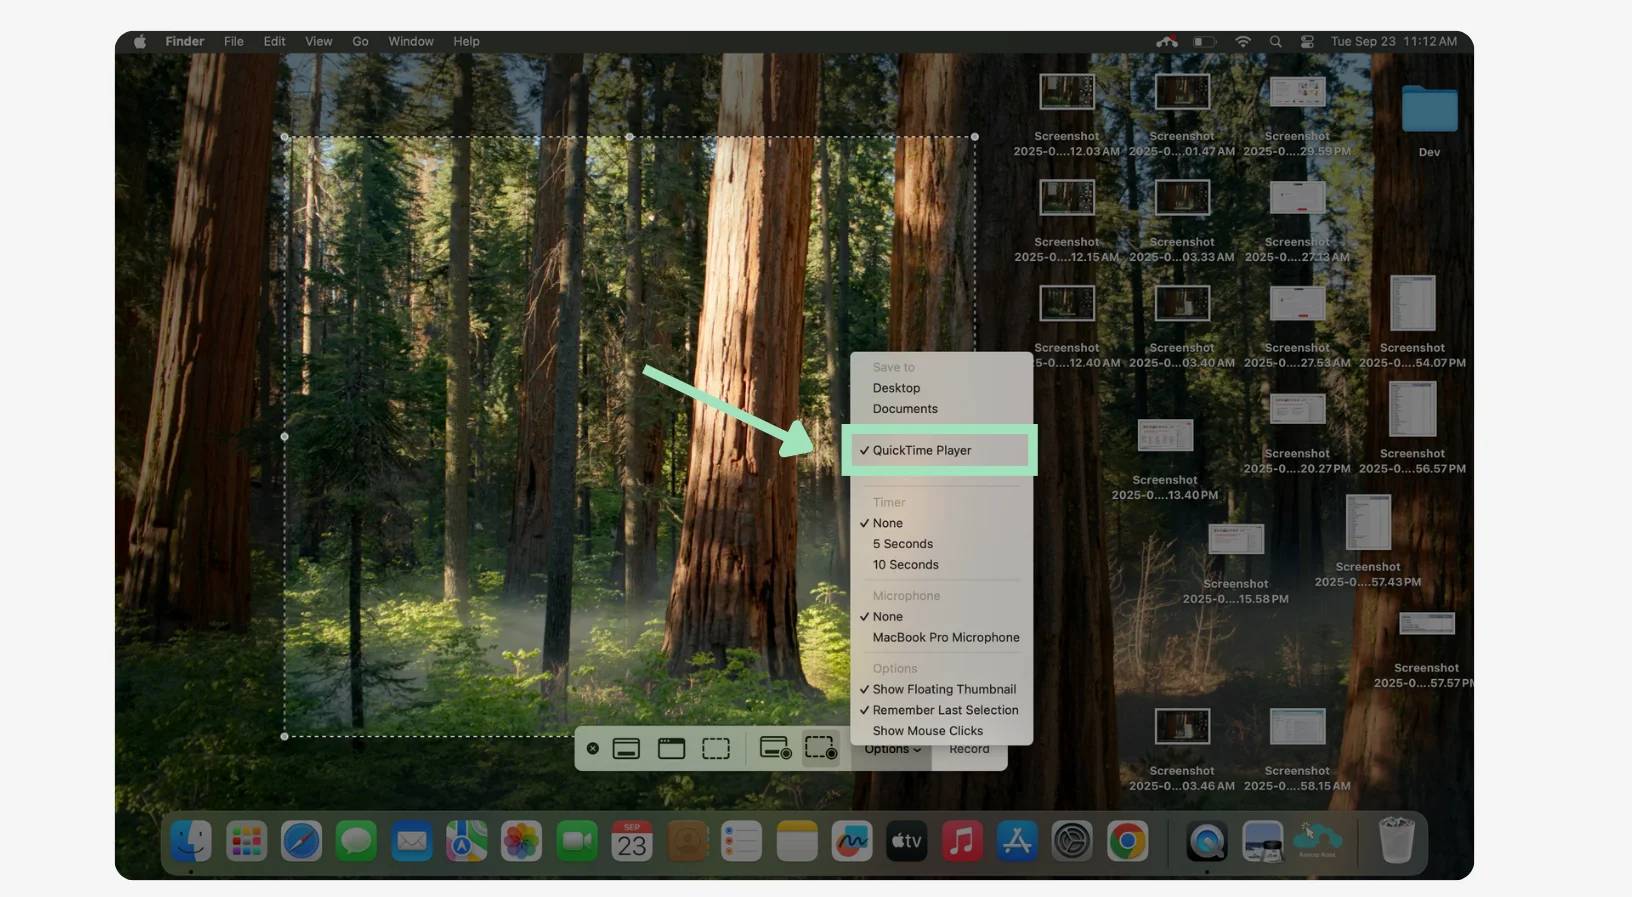
Step 3: Click “Options” to see QuickTime Player as the save location. Adjust other settings like mic device, mouse clicks, timer, etc.
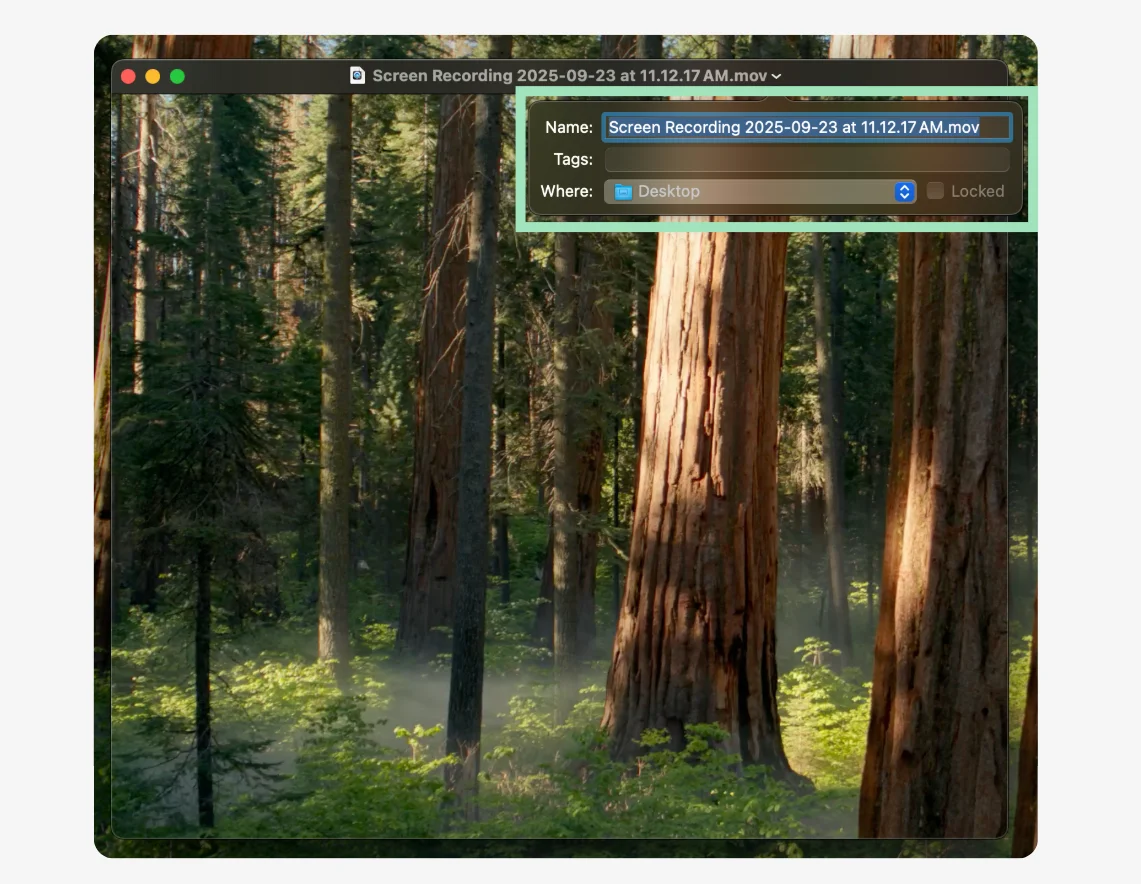
Step 4: Click “Record” to start recording, and press the stop option on the top-right corner when you’re done.

Step 5: Once your recording is ready, add a title and choose where to save it.
Why use QuickTime?: Pros and cons
Below are the benefits of using QuickTime for screen recording:
- Built-in editing: Quickly trim or split your video and make small fixes to refine the recording.
- Multiple audio sources: Select your audio input, including external USB mics.
- Flexible recording: Record the entire screen or just a single app window.
These are some of the drawbacks of QuickTime for screen recording:
- Can’t capture screen recordings with internal audio without third-party plugins.
- Only offers full-screen or window recording (not a designated portion).
- Lacks editing features like annotations, cursor highlights, or overlays.
Troubleshooting issues for screen recording on Mac
Hit a blocker while recording your screen on Mac? It’s likely one of the seven issues below.
Learn more about each problem and how to fix it quickly.
1. No system audio
This happens when you want to capture sound from the computer itself (Zoom meeting, YouTube, app sounds), but the recording only picks up your mic. Many users struggle with screen recording on Mac because macOS doesn’t capture system audio by default.
The fix: You’ll need third-party plugins (e.g., BlackHole, Loopback) to reroute system audio into QuickTime or the screenshot tool.
A better solution? Use Riverside to directly record system audio as well as your mic and other audio sources.
2. No sound recorded
You press record, finish your recording, and play the video back, only to realize there’s no sound. This usually happens when you don't select a microphone or choose the wrong audio source. Your mic might also be muted.
The fix: Click the “Options” button in QuickTime and select the right input source. You can also test audio in System Settings → Sound → Input before starting.
3. Poor video quality
If your video ends up looking grainy, pixelated, or choppy, your Mac is likely running low on storage/CPU resources. This can also happen when you record a cropped section of your screen or you’ve exported the video at a low resolution.
The fix: Record your screen in fullscreen mode when possible. Remember to close any unnecessary apps that use too many system resources, so your Mac has enough storage capacity.
Plus, make sure your display resolution is set high in System Settings → Displays.
For recording high-resolution videos, use Riverside to record in up to 4K quality. Since Riverside makes local recordings, your video quality isn’t tied to internet stability.
4. Can’t find the saved recording
You finish a recording, but can’t find it after hitting save. While Mac’s built-in tools save files to the desktop or downloads folder, your recordings will be available in a different folder if you select a new save location.
The fix: Check Options → Save before you start recording. Choose your preferred save location to easily find your files.
5. Cursor or clicks aren’t visible
Your video would be difficult to follow if it doesn’t show your mouse’s movements or clicks. Mac’s built-in screen recording tools only show clicks; it doesn’t highlight the cursor.
The fix: Use a tool like Riverside to show cursor movements and clicks. The tool shows your exact mouse navigation, whether you record a single tab or multiple.
6. Recording suddenly stops or doesn’t start
If your recording doesn’t begin (or stops midway), your Mac likely doesn’t have sufficient disk space for this file. It could also be due to a lack of relevant permissions or background processes conflicting with the recording tool.
The fix: For starters, check available storage on your device and create space for your recording.
Then, go to System Settings → Privacy & Security → Screen Recording to grant all the necessary permissions. If the issue persists, close other apps that take up space and memory while recording.
7. Can’t record a specific app or window
QuickTime limits you to recording the full screen or a single app window. The screenshot toolbar doesn’t let you record just one application at a time. This makes it tricky if you need a clean capture of a specific app without desktop clutter.
The fix: Use the keyboard shortcut to select a part of the screen and designate just the app area.
For a more polished look, record with Riverside and select the tab or window you want to record.
FAQs about how to screen record on Mac
How do I screen record on Mac with internal audio?
By default, Mac’s built-in screenshot app and QuickTime can’t capture system audio. To record internal audio (e.g., meetings, app audio), you need a virtual audio driver, such as BlackHole or Loopback.
On the other hand, Riverside offers a more convenient way to capture screen recordings and internal audio on a Mac. It directly records system audio along with your mic without any additional setup.
What are the shortcut keys for screen capture?
The shortcut keys for screen capture on Mac are Command (⌘) + Shift + 5. This opens the screenshot toolbar, where you’ll find multiple options for recording your screen.
You can also capture still screenshots using the keyboard shortcuts Command (⌘) + Shift + 3 (entire screen) and Command (⌘) + Shift + 4 (portion of your screen).
Where do screen recordings go on a Mac?
By default, screen recordings taken with the screenshot app are saved to your desktop as .mov files. You can change this location by opening the screenshot toolbar, clicking “Options,” and selecting a different save location.
When you record your screen using QuickTime, the app prompts you to choose where to save the file every time you stop recording.


.webp)


