

-(1)-(1).webp)


Key takeaways
- Captions convey dialogue and non-speech audio, whereas subtitles only communicate dialogue to the viewer.
- There are three ways to add captions: burning them in with a video editor, uploading an SRT file, or using a platform’s auto-caption tool.
- Keep text readable by limiting captions to one or two lines on screen, using high contrast, and staying inside platform safe zones.
- Adding captions or subtitles makes your content more accessible, ensures clarity, maximizes engagement, and can improve SEO.
These days, captioning your videos is pretty much mandatory. Why? Because most people watch videos on mute.
But captions aren’t just for the muted crowd. Captioning immediately makes your content more engaging, increases comprehensibility, and can improve your SEO ranking.
This article walks you through the basics of captioning and subtitling, how the process works, and the best (free) tools available.
Ways to add captions and subtitles to a video
You have three main routes to add text to your finished video file. To test these methods, we ran the same 60-second clip through a social platform's auto-caption tool, a dedicated file upload, and a video editor with burned-in capabilities.
Here is exactly how to execute each method and what actually happens when you do.
1. Adding open captions in a video editor
This route involves hardcoding the text directly into the video file using an editor before you upload it anywhere. The main advantage here is that you can style captions with your branded colors.
- Test Results:
- Accuracy test: Perfect accuracy on 99% of the text, but I had to run a quick manual text review in the editor for jargon and names.
- Limitations: The text is permanently burned in the video. The viewer can’t turn it off.
2. Uploading an SRT file
An SRT file is a plain text caption file that pairs each line of dialogue with a start and end timestamp. You can generate one using free online transcription tools or software like Riverside. Then, manually upload it to your hosting platform.
- Test Results:
- Accuracy test: Perfect accuracy on 99% of the text, but I had to manually review the SRT file for jargon and names and review some timestamps.
- Limitations: Timestamps may drift slightly if the SRT frame rate does not perfectly match the video file, and you can’t check beforehand as with an editor.
3. Using a platform’s auto-caption tool
The fastest way to caption a video is to use the native auto-caption feature on platforms like YouTube, Instagram, and TikTok.
- Test Results:
- Accuracy test: Struggled with industry jargon and misidentified two speaker names.
- Limitations: The text may occasionally cover up the video's lower third graphics.
How to add captions to a video online
Online editors like Canva and Riverside can generate captions from your video’s speech and export a video with the text burned in. You can do this in your browser without installing software.
Each tool works in a slightly different way, but the process is mostly the same: upload, caption, export.
Here’s how to add captions using Riverside:
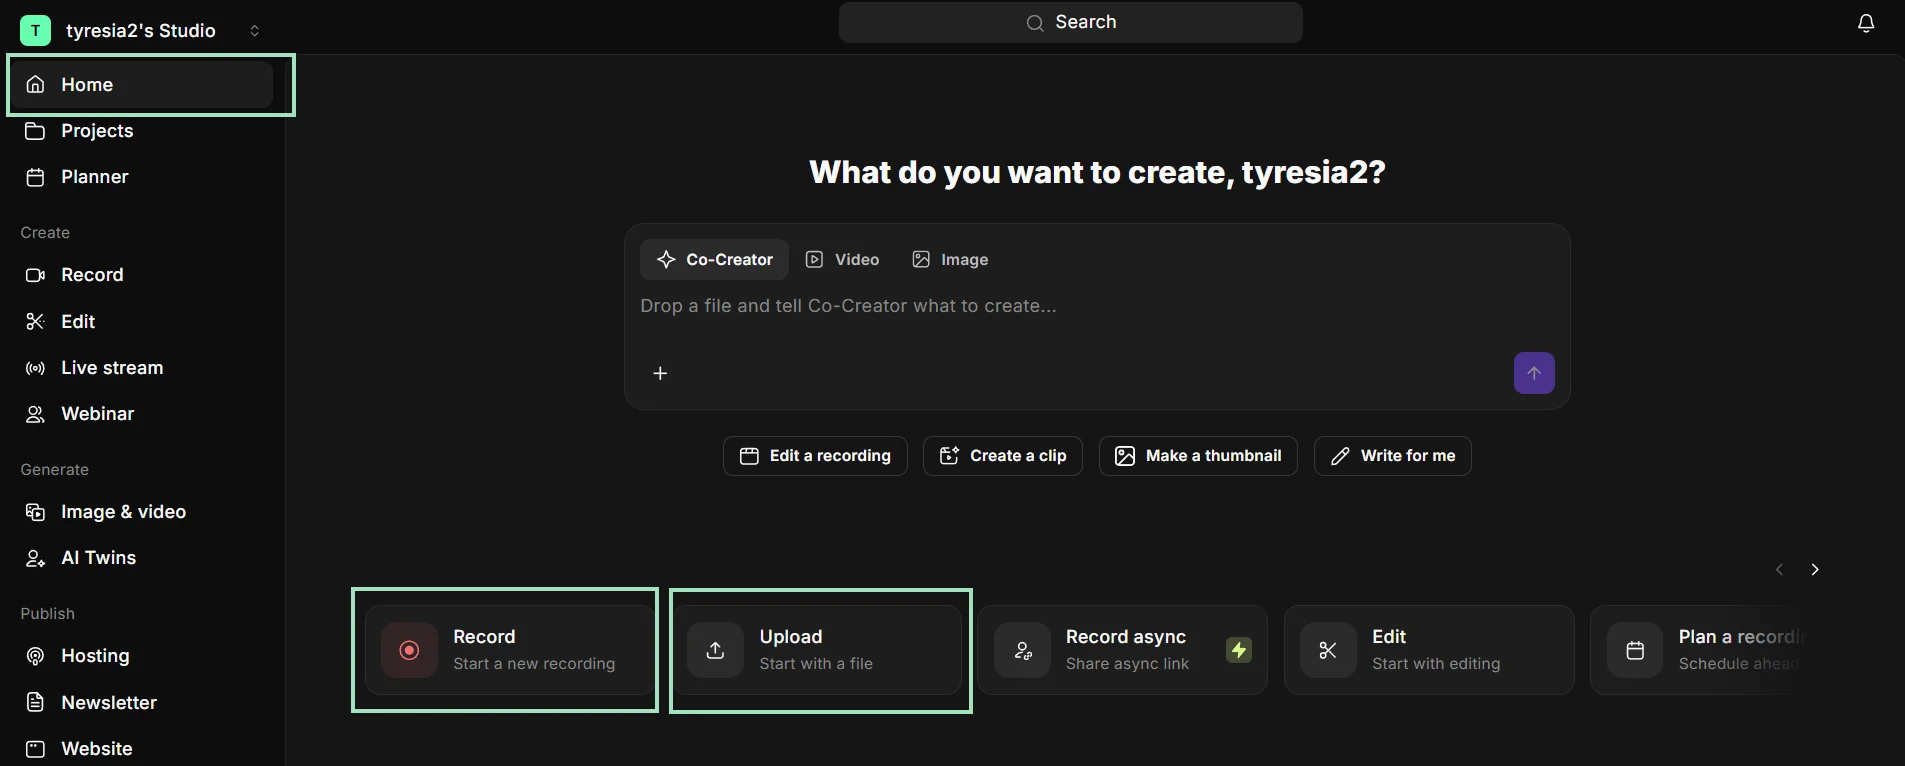
Step 1: From your Riverside studio’s homepage, upload your video or record a new one.
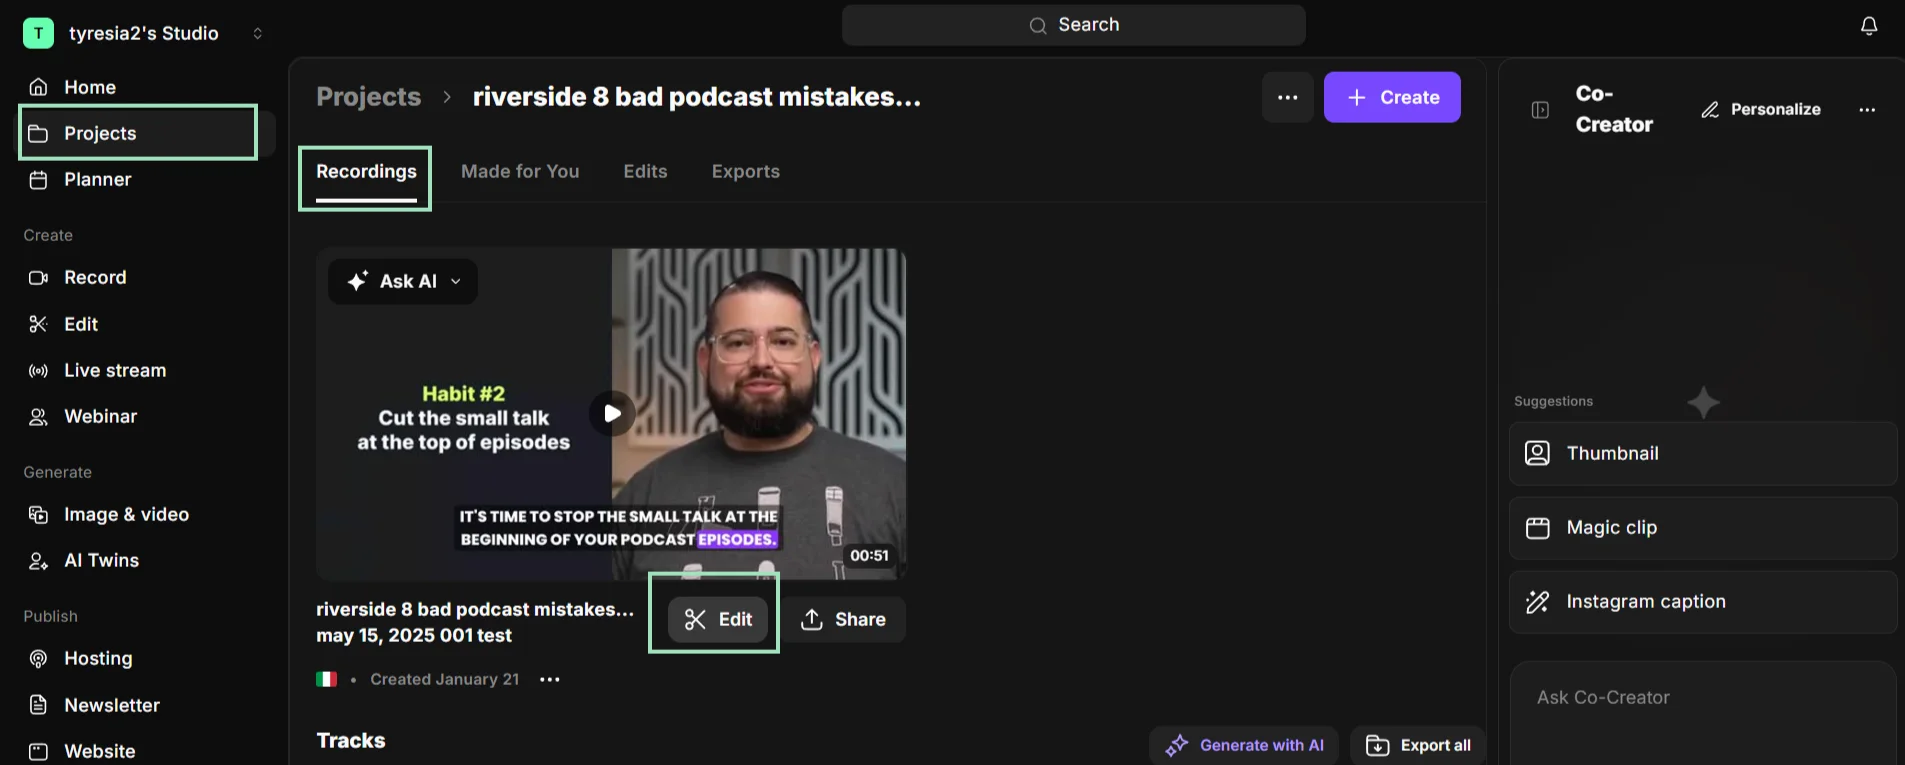
Step 2: Select the video you want to create captions for in the “Projects” dashboard. Then, from the “Recordings” tab click “Edit” to access the editor.
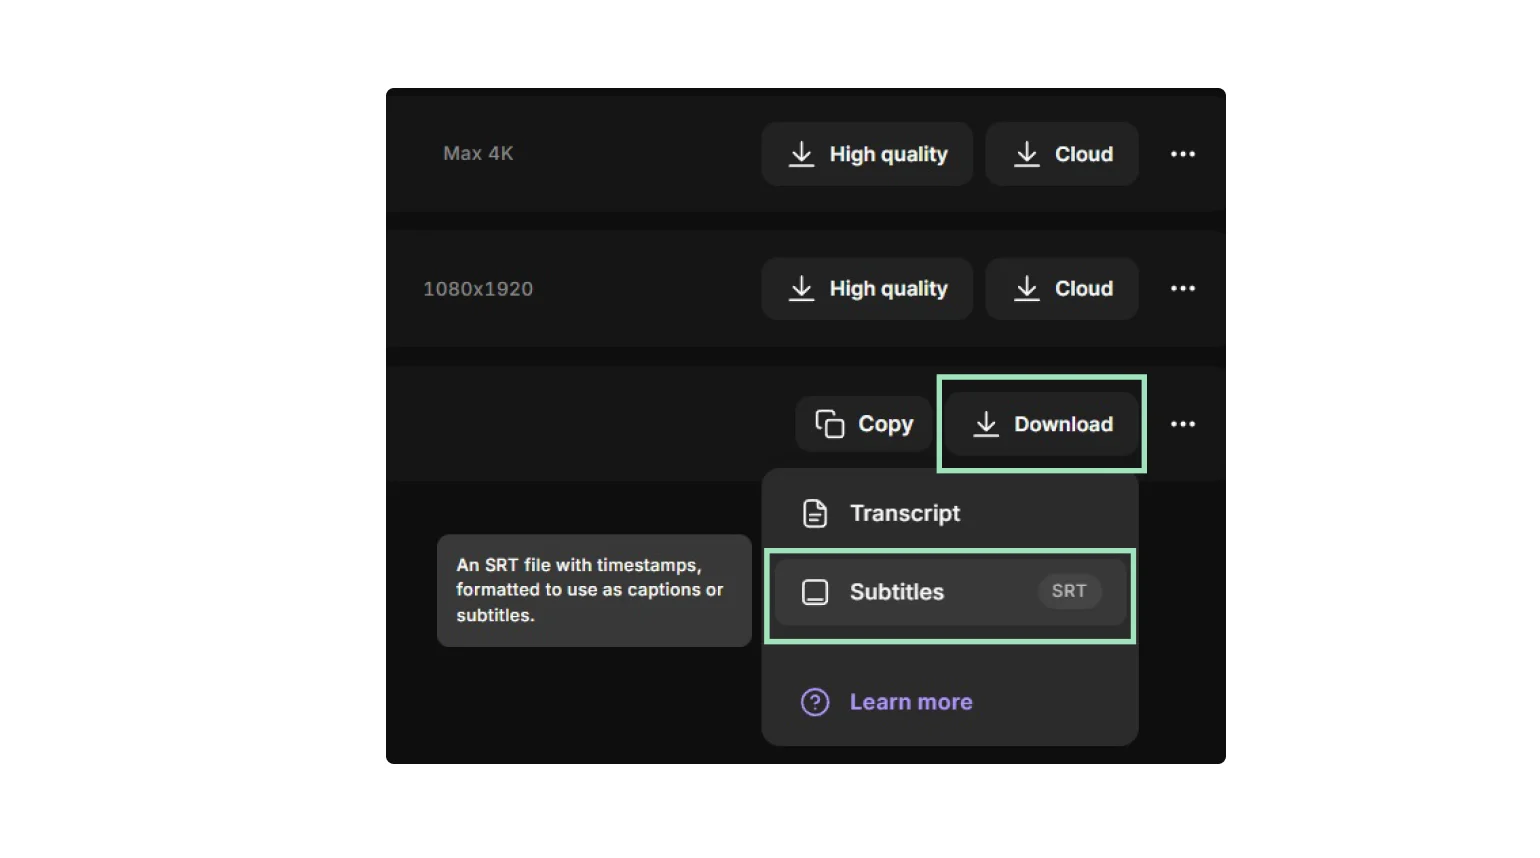
If you scroll down to “Tracks,” you can find the transcript file and download it as a subtitle (SRT) file by clicking “Download.”
Step 3: In the editor, adjust your video. You can:
- Trim your video by editing your text transcript.
- Customize your background and layout.
- Add music, images, and text overlays from our royalty-free Media Board, or upload your own.
- Fine-tune your audio and remove background noise automatically using our Magic Audio feature.
- Proof-check the automatically generated transcript for names and jargon.
- Translate and redub your video in up to 30 languages to increase your reach.
Riverside uses AI to generate highly accurate captions in many different languages.
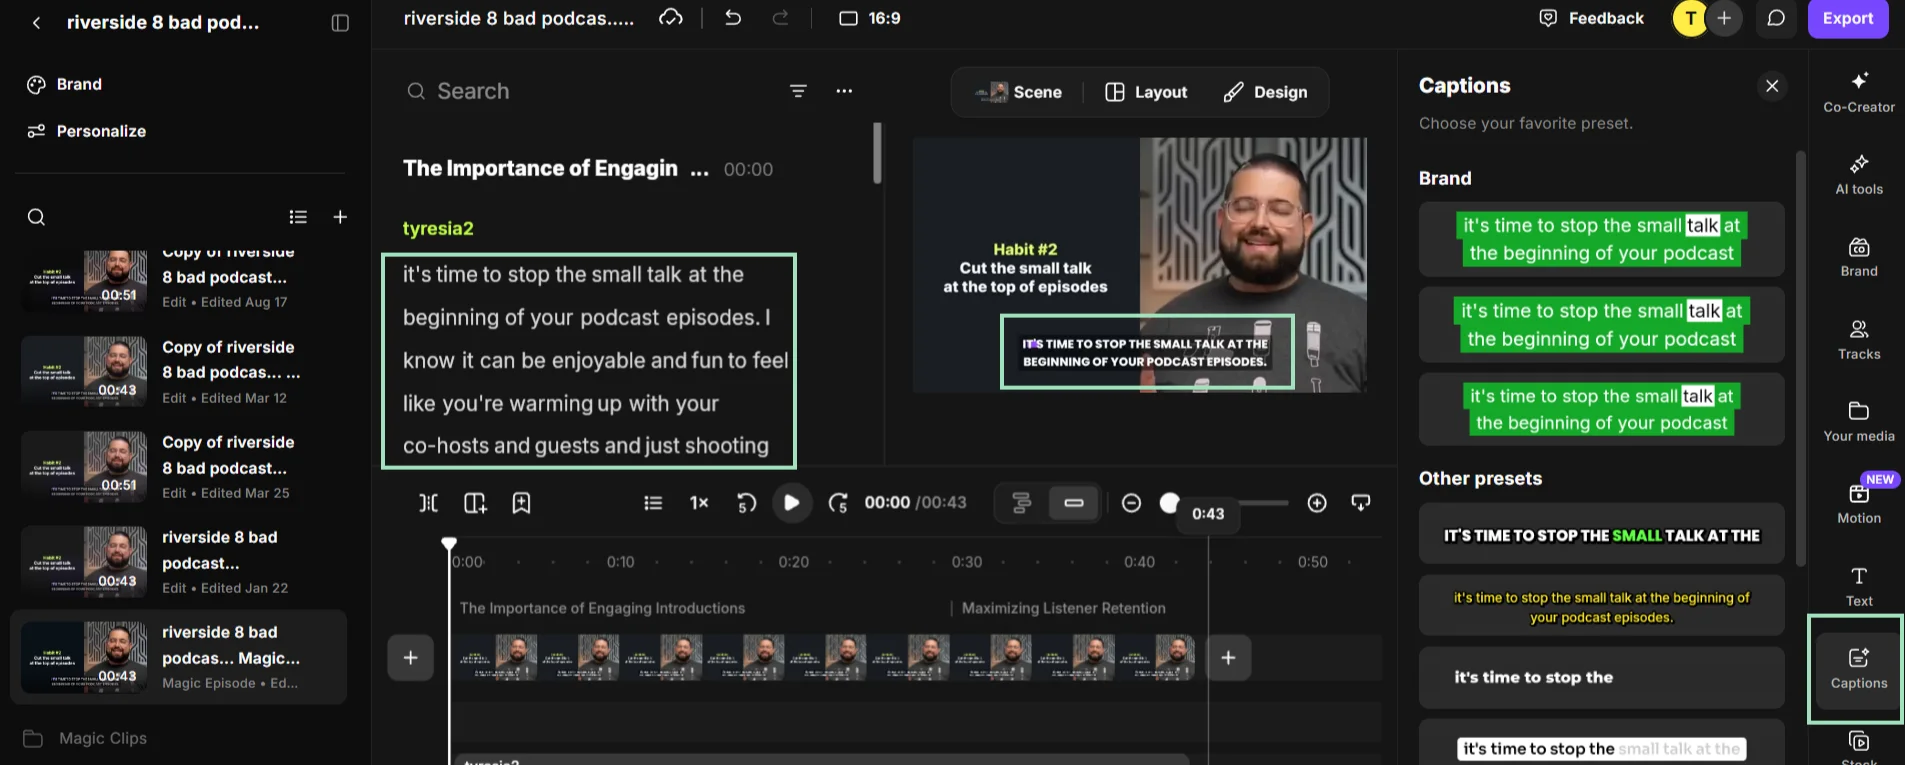
Step 4: Once you’re satisfied, select the “Captions” button from the right toolbar to instantly burn open captions directly on your video.
You can style your video captions and drag them around your video to position them as you want.
Step 5: Once you’re done, export your video with customized captions by clicking on the purple “Export” button on the top right corner of the screen.
How to add captions on your phone
If you’re on the go, you can add captions or subtitles to videos from your phone using a mobile editor like CapCut or Riverside’s app.
Follow these steps to add automated captions or subtitles on Android and iPhone using CapCut:
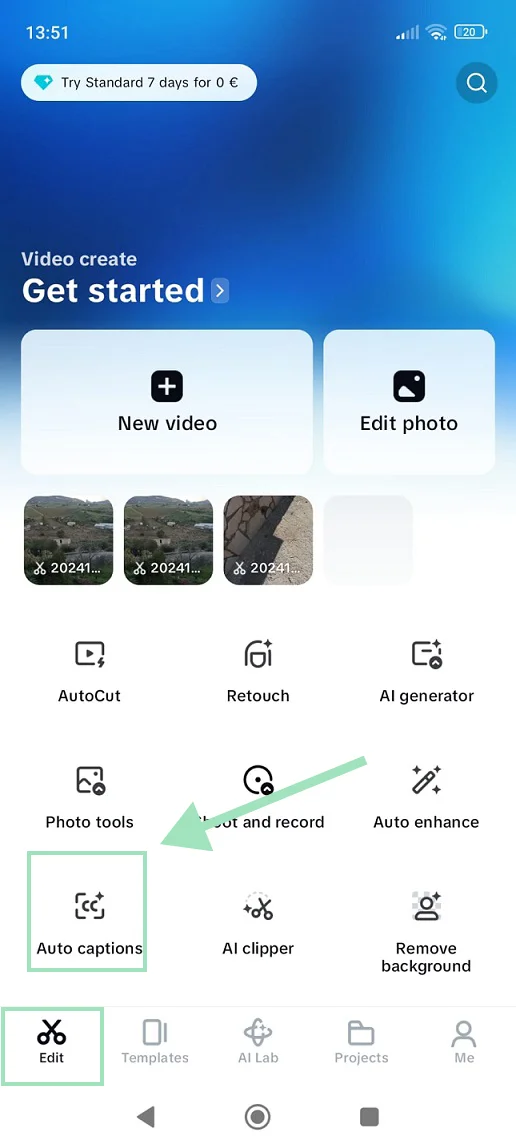
Step 1: Tap on “Edit” in the bottom toolbar to access the video editor. Then “Auto captions.”
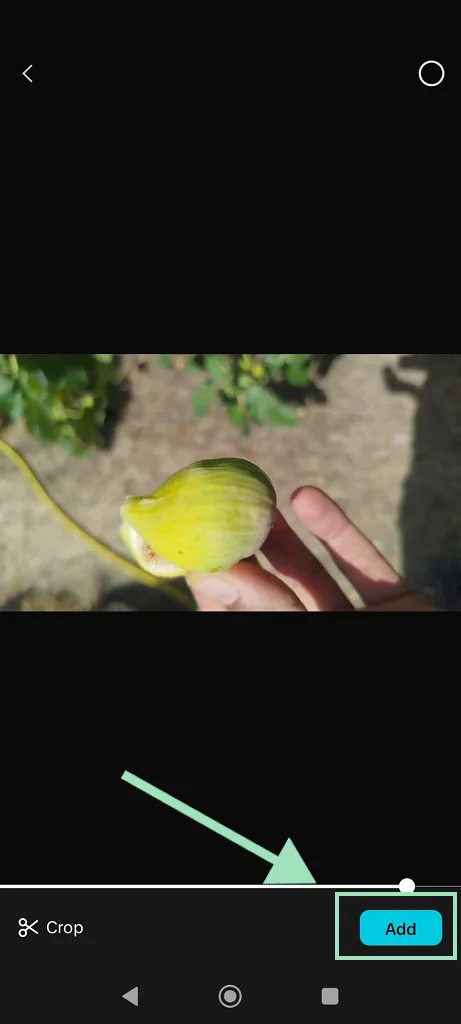
Step 2: Select the video you want to caption. Then select “Add.”
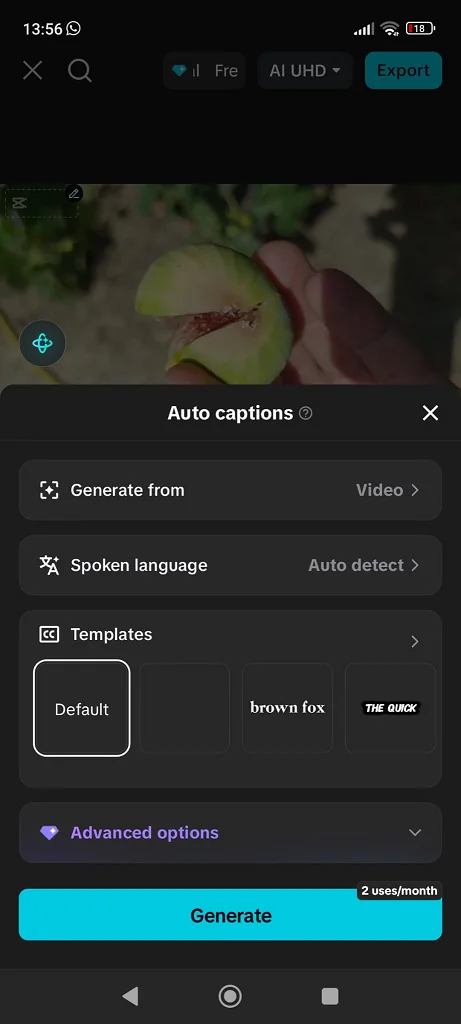
Step 3: Select your video’s spoken language and pre-set templates. Then tap “Generate” at the bottom of the screen.
Step 4: Edit and review your captions, style them, and change their font or give them effects to make them stand out.
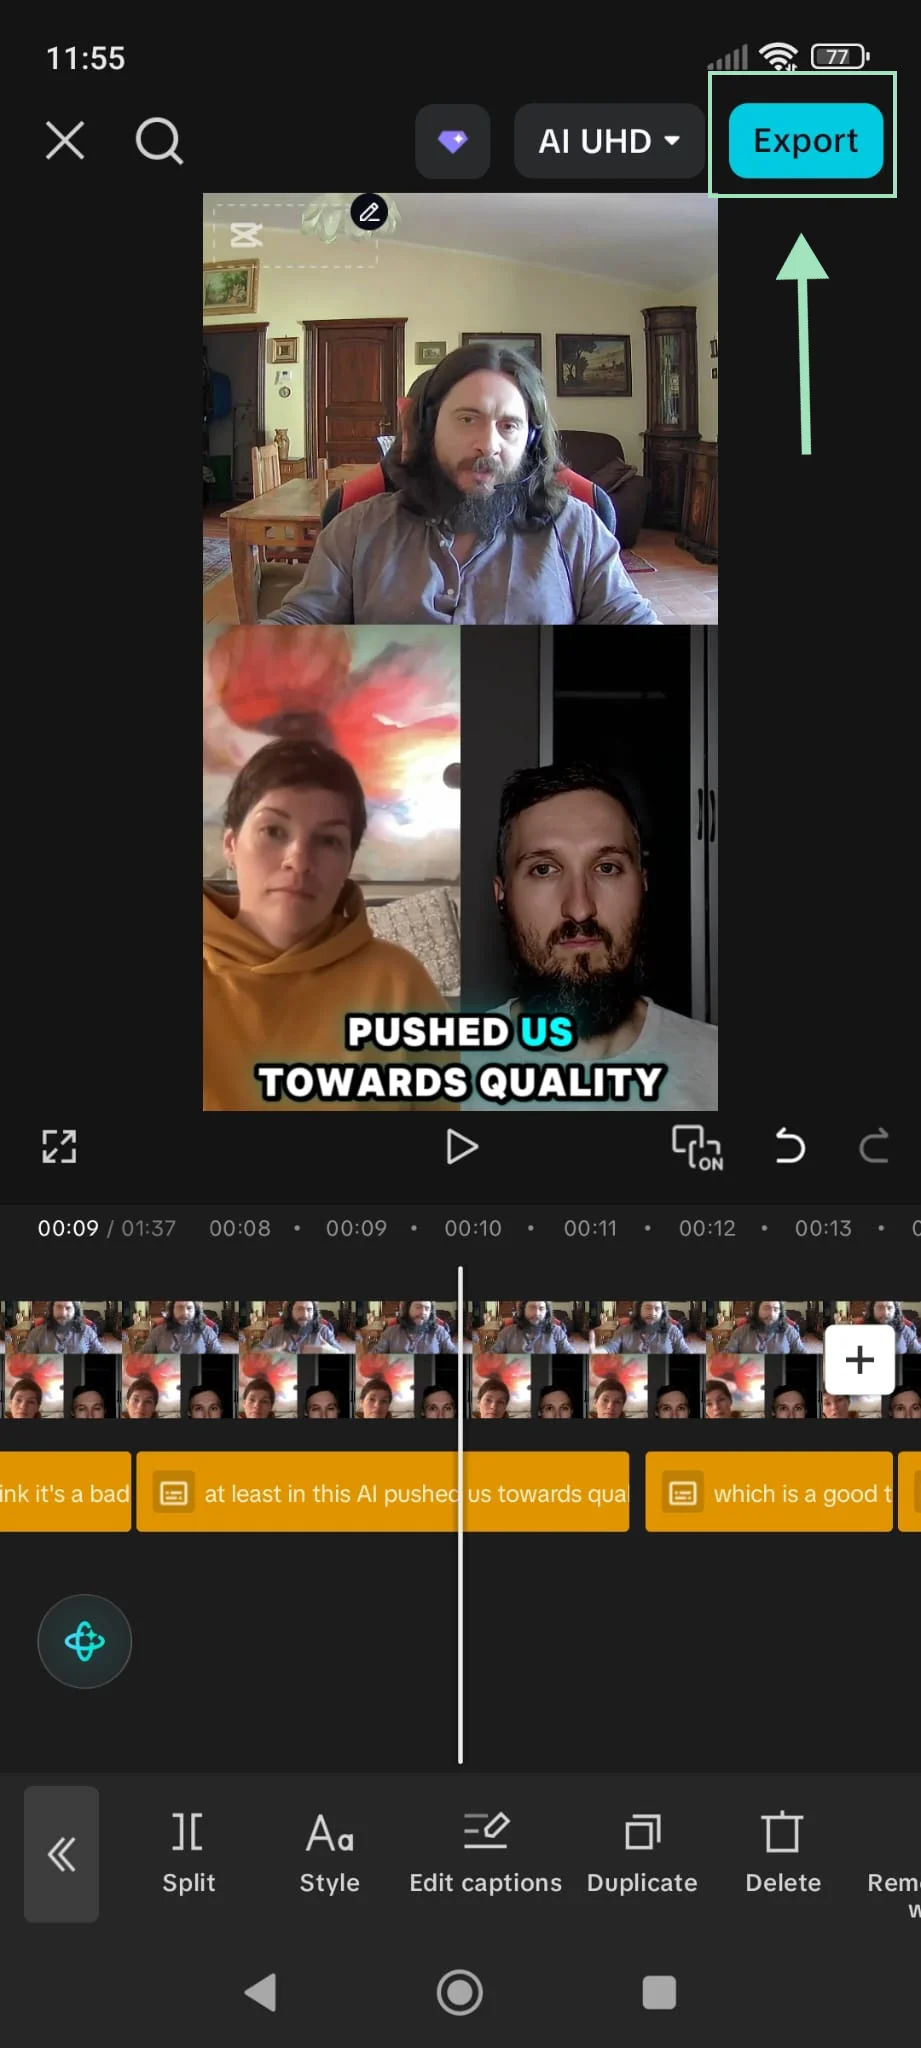
Step 7: When you’ve edited enough, press the "Export" button on the top right to download your video.
How to add captions on each platform
Every platform handles video text differently. Here is how to add captions to the top social networks, complete with step-by-step instructions and platform limitations.
YouTube
You can generate captions on YouTube directly, or you can upload your own SRT file to add them to your videos. YouTube ignores SRT styling, so your editor’s fonts and colors won’t carry over.
We also suggest proofreading automatically generated captions, as YouTube’s AI can make mistakes.
You can add subtitles to YouTube by following these steps:
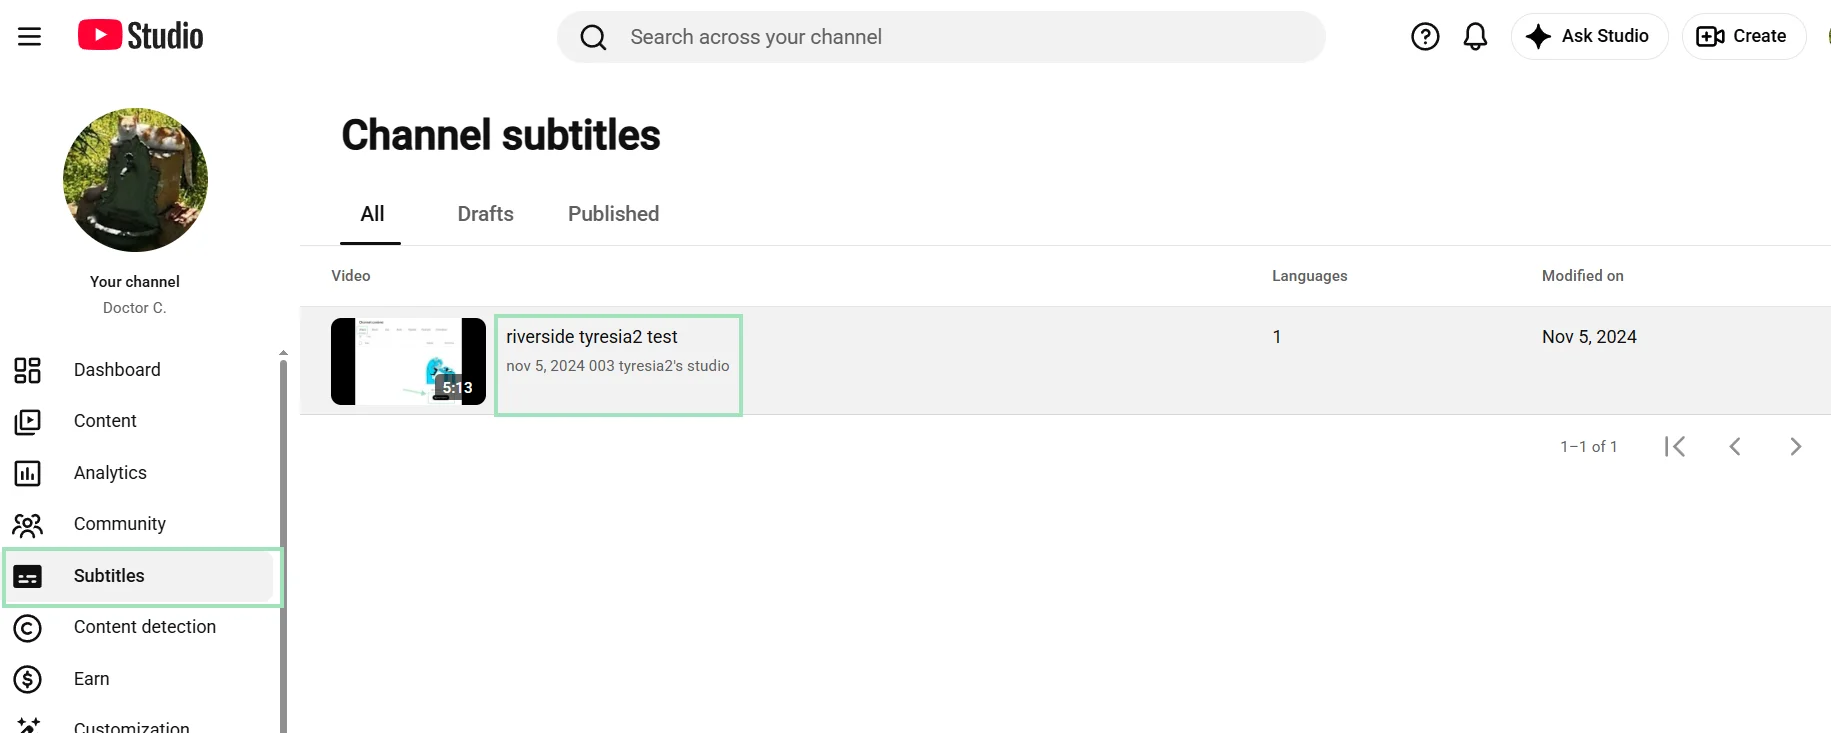
Step 1: Inside your YouTube Studio, select “Subtitles” from the left menu, then choose the video you want to caption.
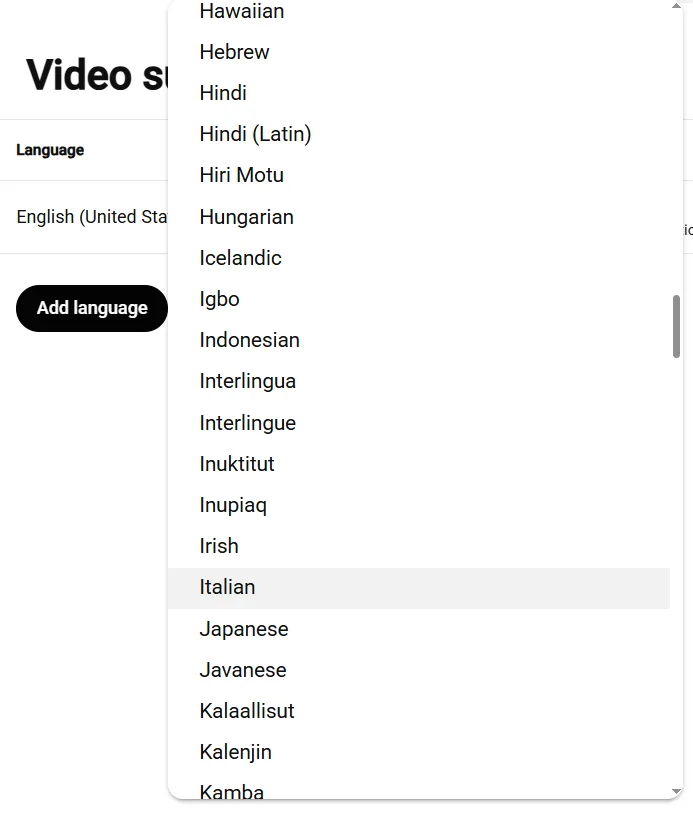
Step 2: Click “Add language” and select the caption language.
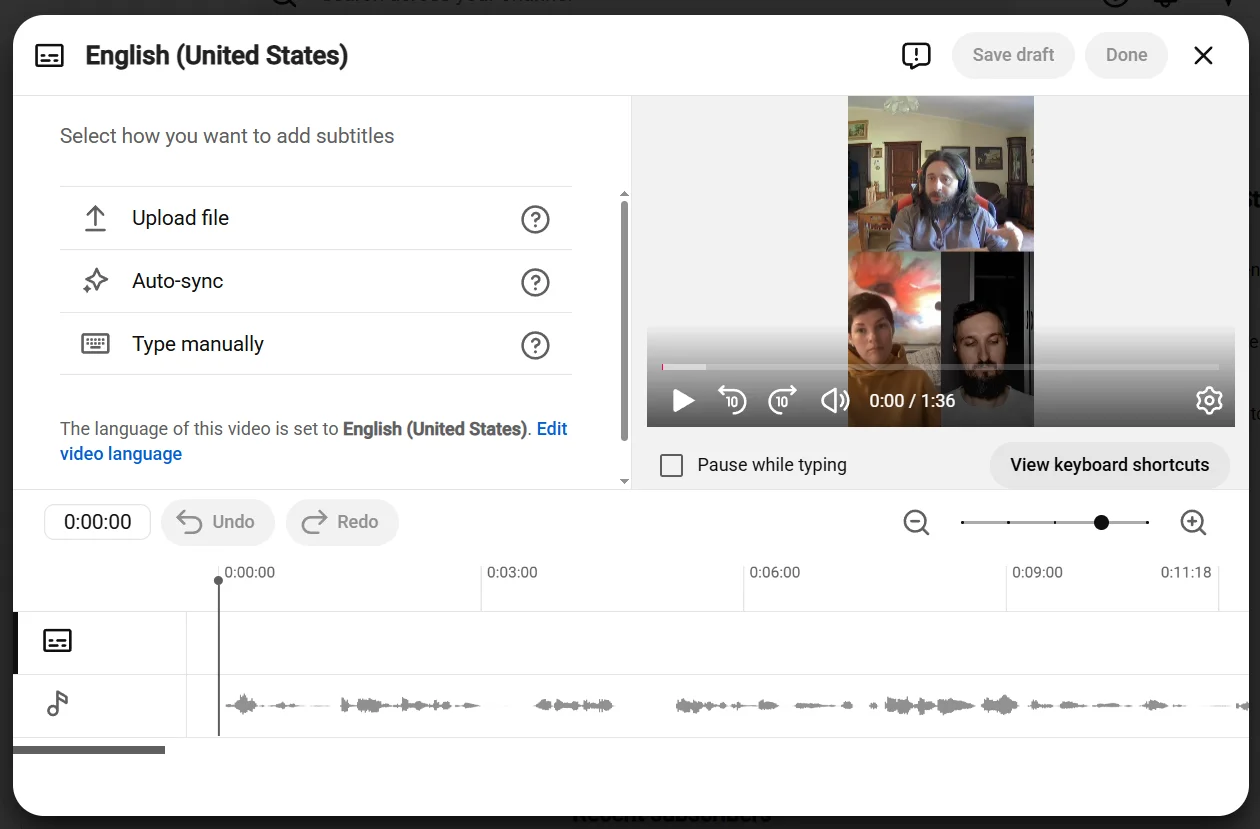
Step 3: Under “Subtitles,” click “Add.” In the new menu that appears, select “Upload file” to upload your SRT files, “Auto-sync” to automatically generate subs, or “Type manually” to type the text manually.
Step 4: Once you’re done, click “Publish” in the upper right corner.
Read more: Check our full guide on how to add captions on YouTube Shorts.
TikTok
TikTok auto-generates captions from your uploaded video but does not support custom SRT file uploads.
You can edit their wording and appearance before posting, but once you publish the video, they become permanent. If you spot a typo on a live video, you have to delete it and re-upload without the typo.
You can add subtitles to TikTok by following these steps:
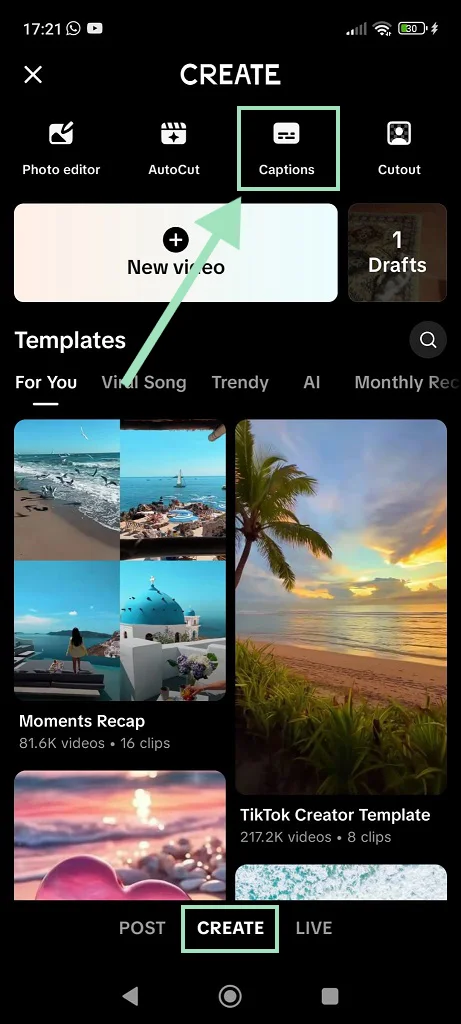
Step 1: Select the “Create” tab. Then tap the “Captions” icon on the top editing menu.
Step 2: Select the video you want to caption. Then click “Next.”

Step 3: Choose the audio language. Then wait for TikTok to transcribe the video. Preview the captions to correct any mistake, add effects, style your captions, and position them carefully.
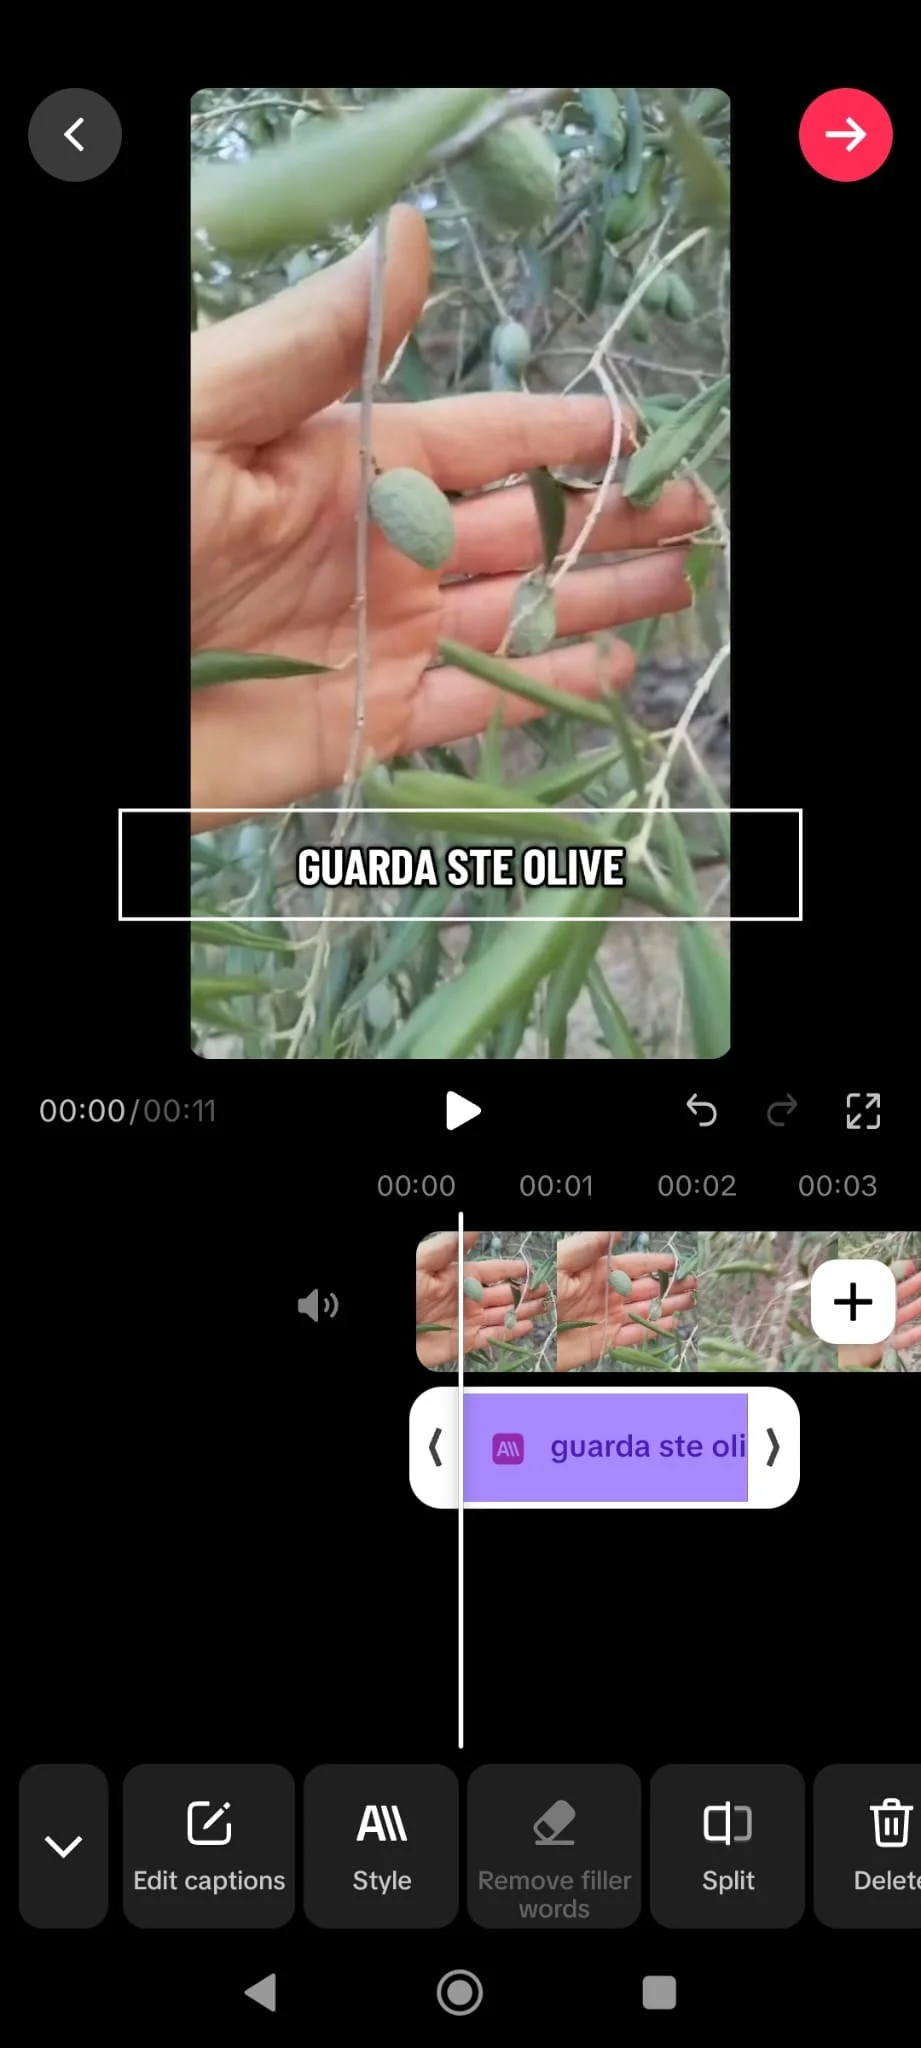
Step 4: Once you’re satisfied with the results, click on the red arrow on the upper right corner to post your video.
Read more: Check our full guide on how to add captions on TikTok.
Instagram Reels
Just like TikTok, Instagram Reels uses a dedicated Captions sticker to generate text, but it doesn’t accept SRT uploads. And you can’t edit captions once the Reel is live.
You can add subtitles to Instagram Reels by following these steps:
Step 1: Tap the “+” icon at the top of the screen. Then select “Reels” from the bottom bar.
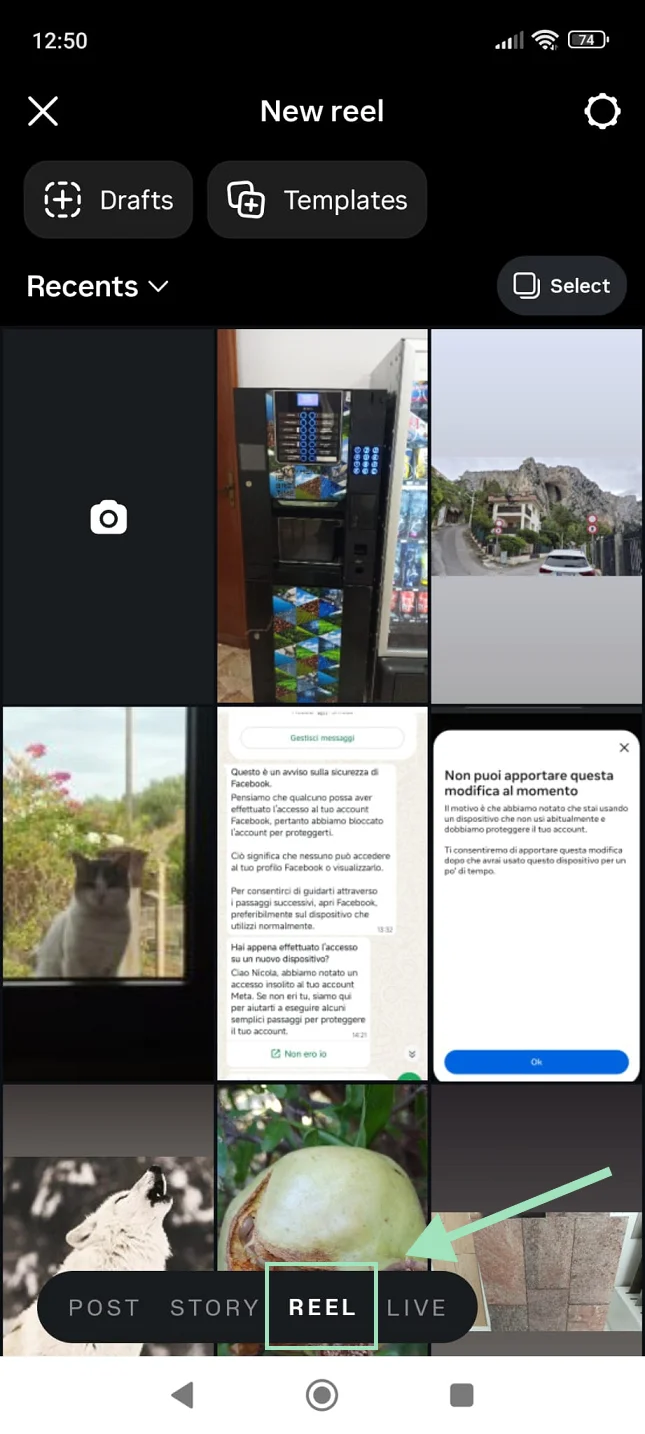
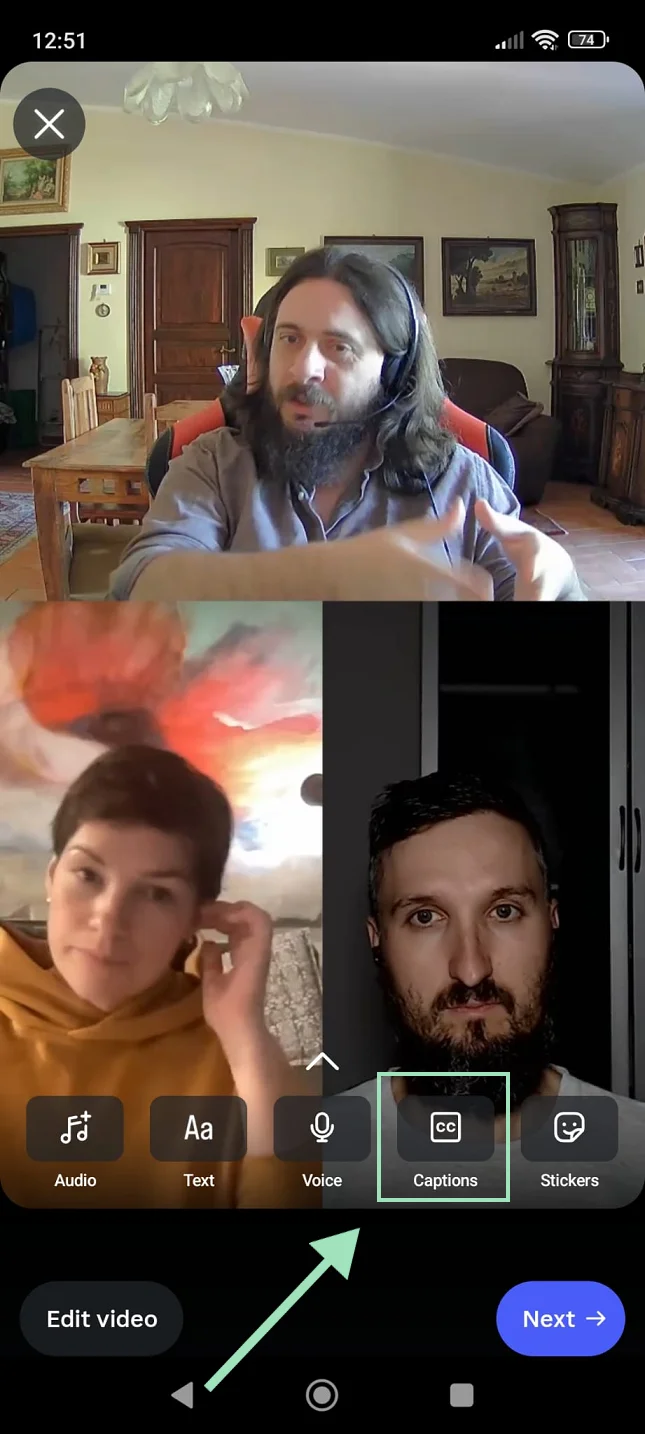
Step 2: Choose the video you want to caption. Select the “Captions” sticker to automatically generate your text.
Step 3: Tap the words on your screen to fix typos and change the font style.
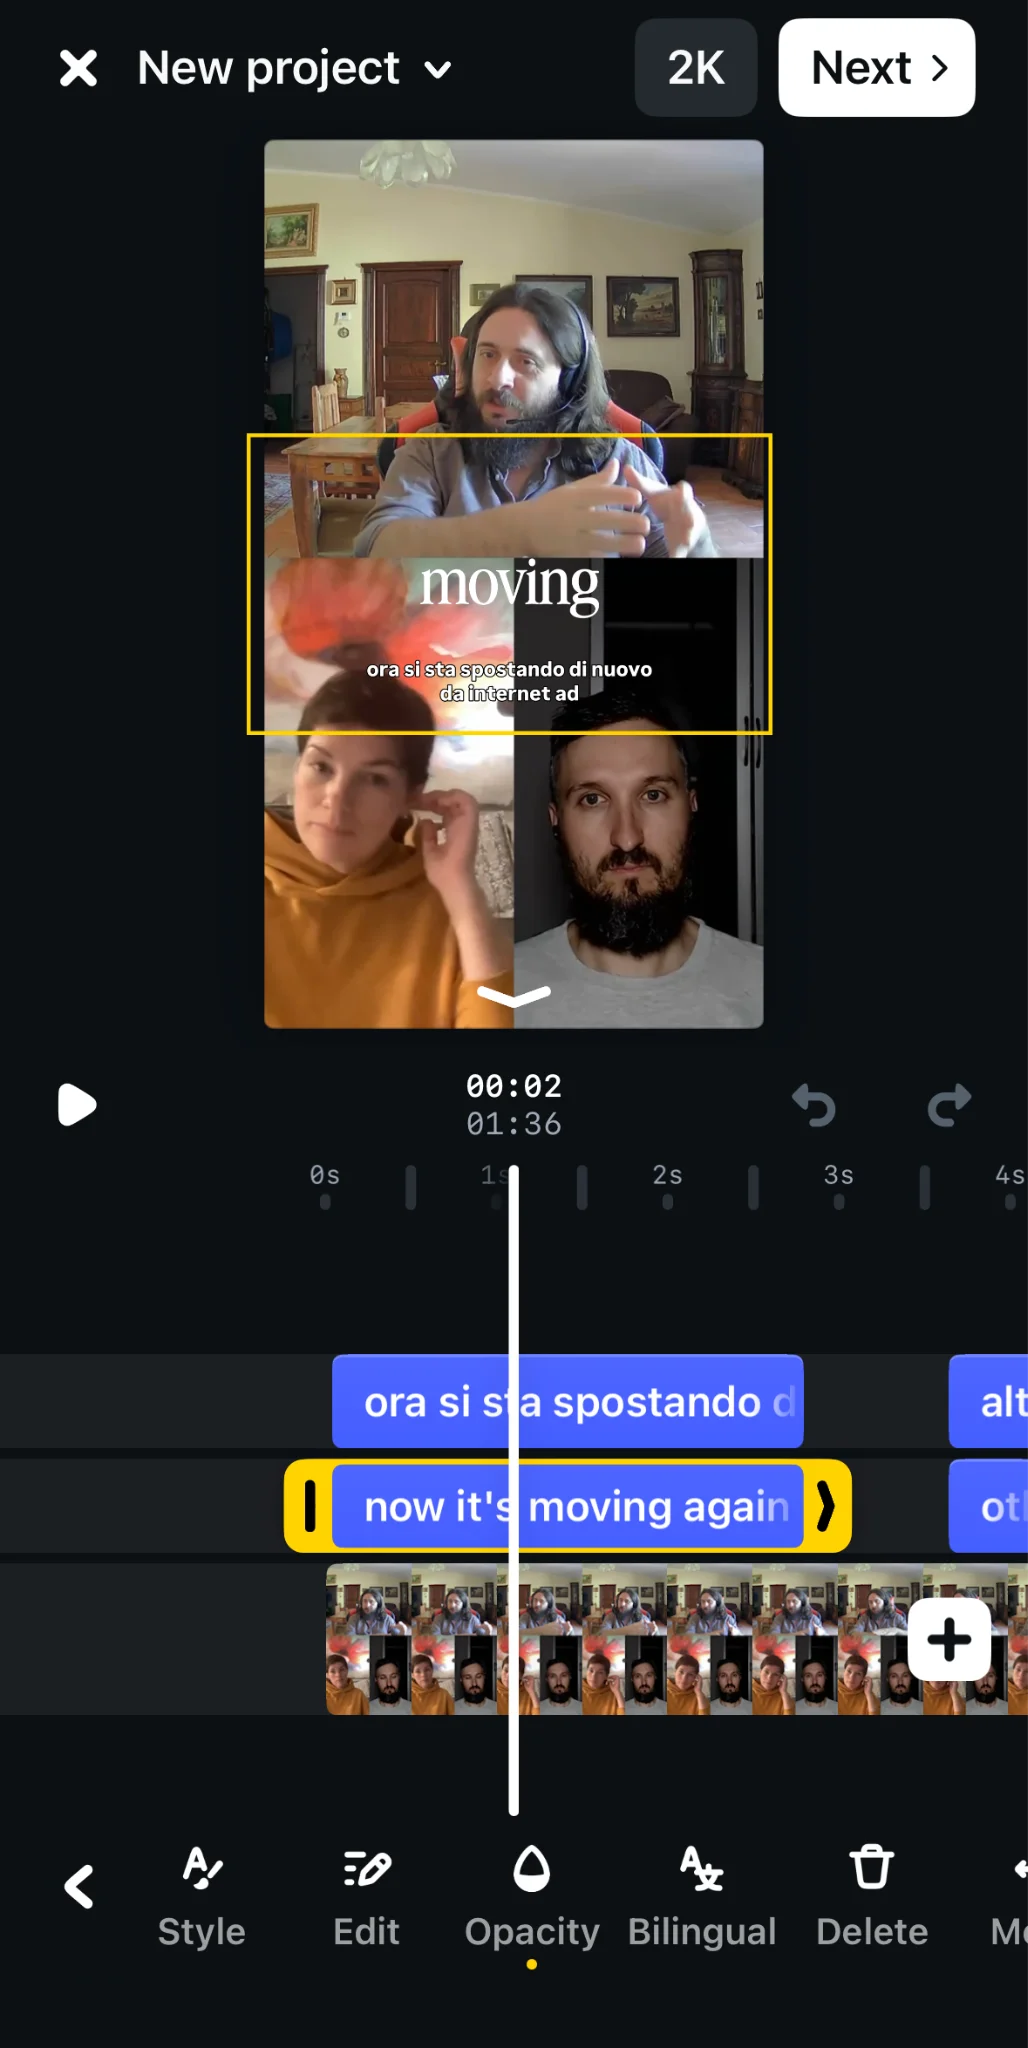
Step 4: Finish editing your Reel and share it.
Read more: Check our full guide on how to add captions on Instagram Reels.
Facebook accepts SRT file uploads for video posts from your desktop but cannot auto-generate captions.
You can add subtitles to Facebook by following these steps:
Step 1: Start a new post on your desktop and upload your video file. Then click on the "Edit" pencil icon.
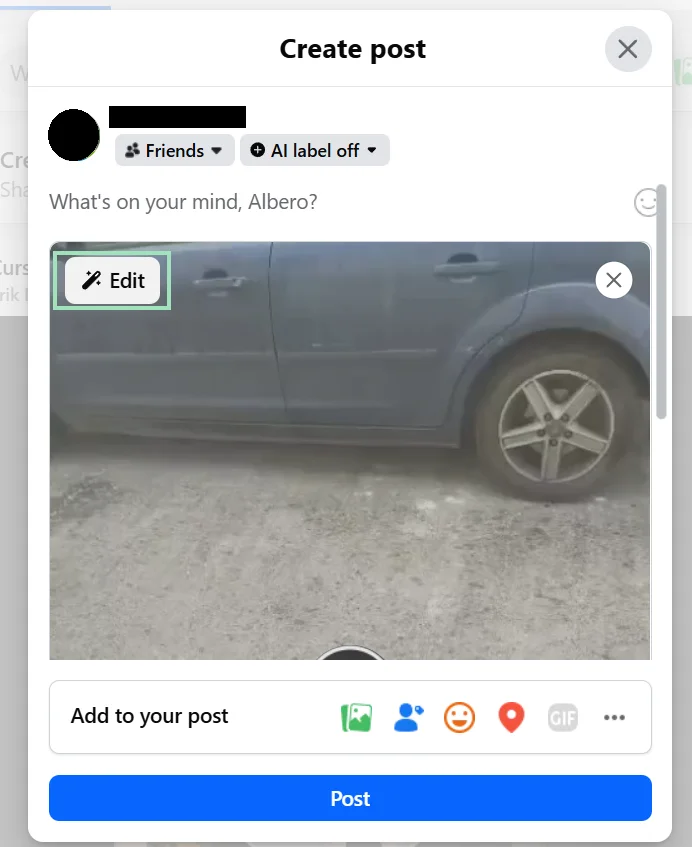
Step 2: Select “Closed captions” to upload your SRT file.
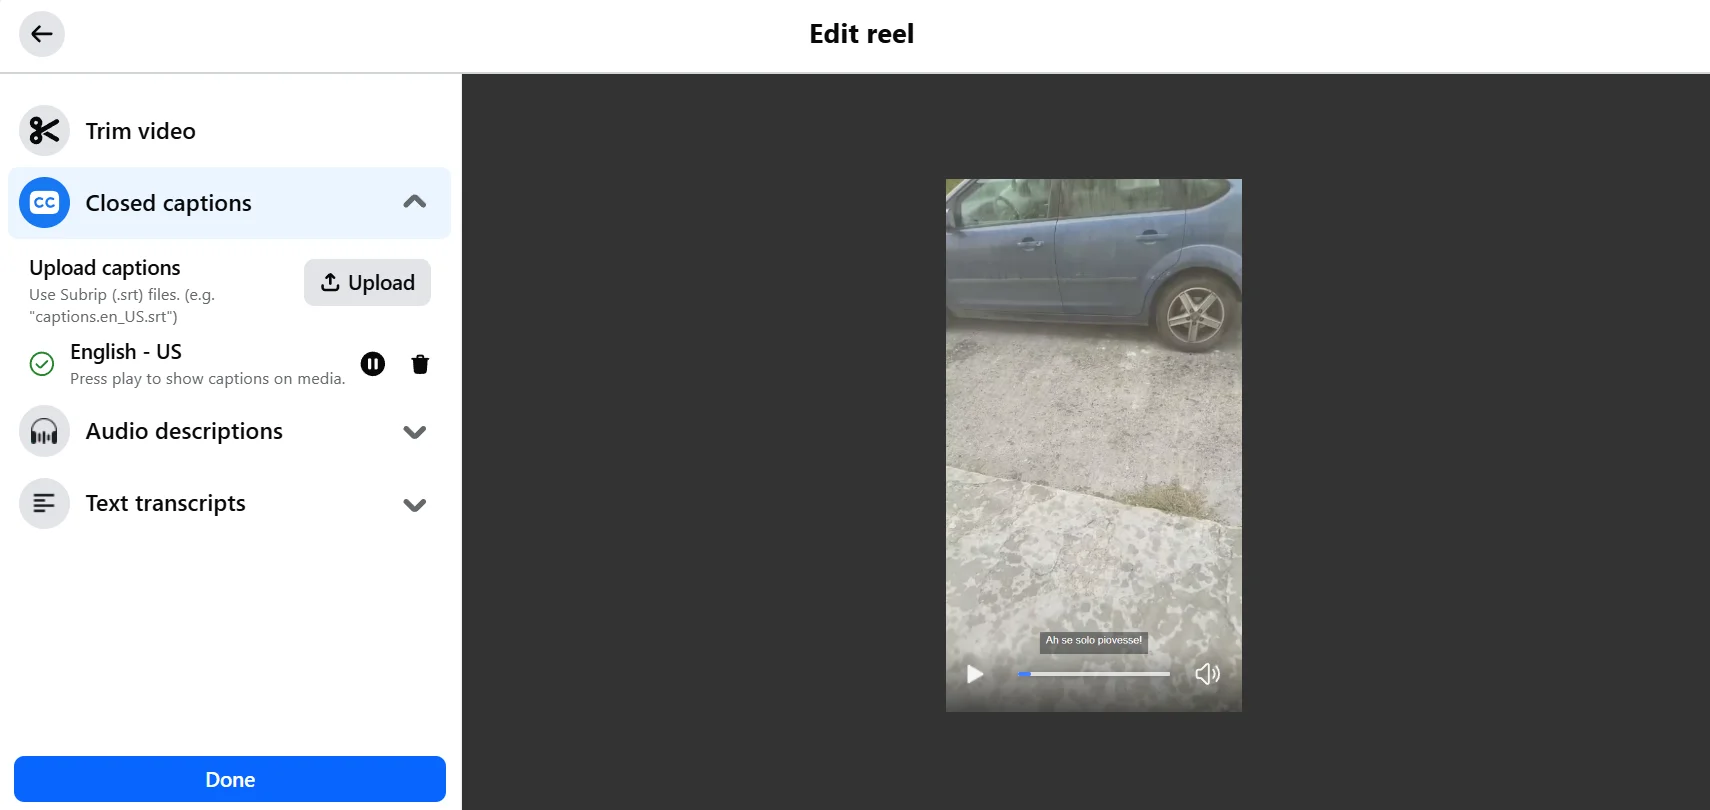
Step 3: Attach your file. Then click “Done” and “Post.”
LinkedIn video posts support uploaded SRT files and can auto-generate captions in selected languages.
You can add subtitles to LinkedIn by following these steps:
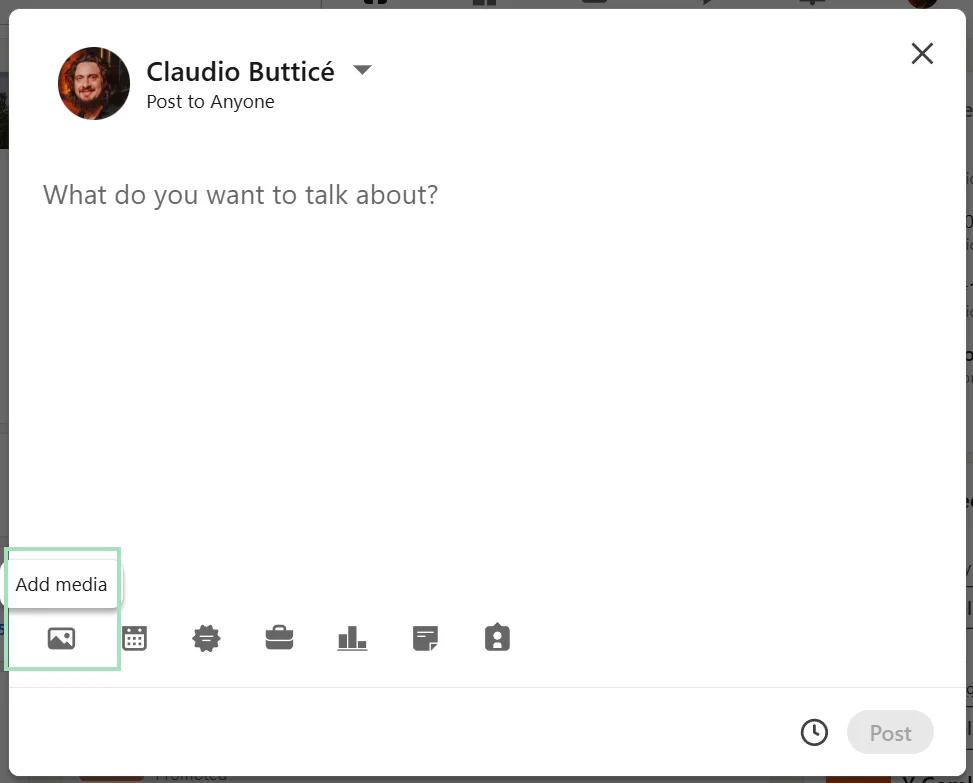
Step 1: Start a new post and click on the “Add media” icon to add a video.
Step 2: In the preview, click “Caption” to open the caption menu.
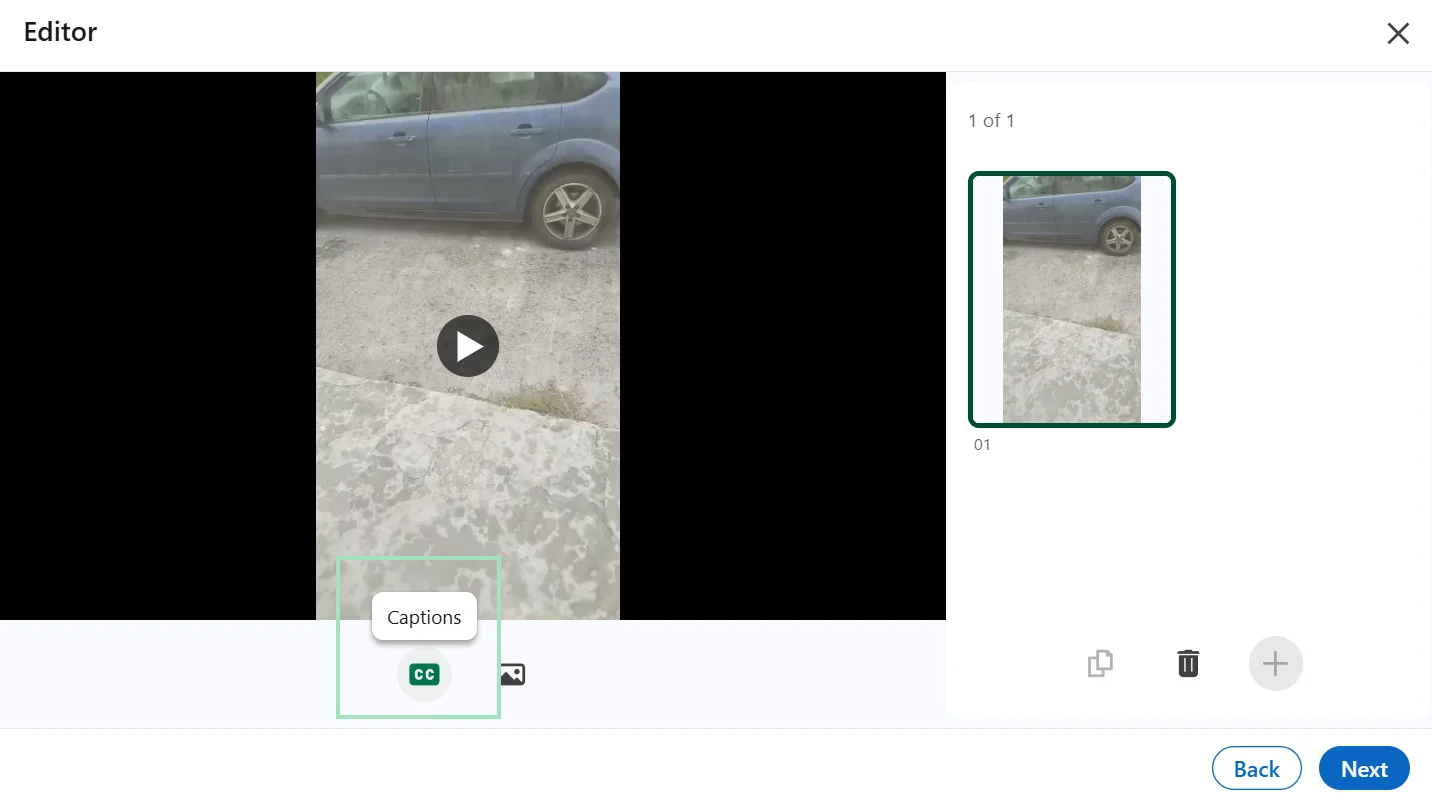
Step 3: Choose whether you want to attach your SRT file or add auto captions, as well as if you want to review them before posting. Then click “Apply.”
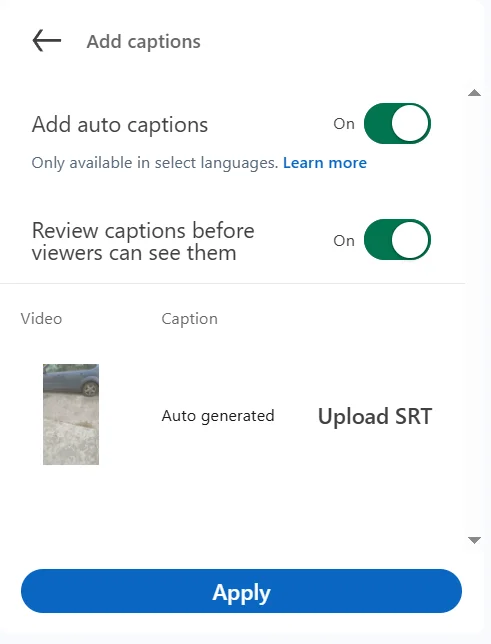
Step 3: Review your video. Then click “Next” and “Post.”
Which platforms accept caption files
Not every social network allows you to upload a custom text track in the form of an SRT file.
Use this table to check if your target platform accepts caption files, and whether formatting in that file carries over to the platform’s captions.
How to make captions that people actually read
Bad captions distract viewers. Here is how to style and position your text so it blends naturally into your videos:
Keep lines short
Limit your captions to one or two lines on screen at a time, and never fill the screen with text. Netflix caption guidelines suggest an upper limit of 42 characters per line.
Use high contrast on busy footage
If your video has a chaotic or bright background, use a strong drop shadow behind words to make your text stand out. When in doubt, use white text with a thick black outline.
Stay inside the safe zones
Place your captions in the center or upper-middle of the screen. Keep them away from the bottom and right edges. UI elements like sharing buttons, usernames, and descriptions might cover captions on the right or bottom.
Match animation to the video type
Use fast, word-by-word highlighting to match the pace of high-energy social media clips. Use standard, static text for educational content or webinars to avoid distracting the viewer.
FAQs
What is the difference between captions and subtitles?
The difference is that captions are on-screen text that include non-speech audio such as sound effects and speaker labels, while subtitles carry dialogue only.
What is the difference between open and closed captions?
The difference between open and closed captions is whether viewers are able to turn the text off:
- Closed captions are text the viewer can switch on and off. Choose these when you want optional captions and your publishing platform supports them.
- Open captions are text burned into the video frame that cannot be switched off. Choose these when you want the text to stay visible wherever you share the video.
If you want your video to rank in search results, use closed captions. Search engines can’t read open captions to understand your video's context.
How accurate are auto-generated captions?
Auto-generated captions are typically between 80% and 99% accurate, depending on the software you use. Riverside uses AI to achieve up to 99% accuracy across more than 100 languages. Free social media auto-caption tools generally offer lower accuracy and require manual edits to fix technical jargon and names.
The accuracy of auto-generated captions also depends on the clarity of the audio. Background noise, strong accents, and low-quality audio all reduce caption accuracy.
How do I add captions to an existing video?
To add captions to an existing video, import the file into an online video editor, generate the text, and then export a video with captions burned in or a separate caption file. If the video is already published, check whether the platform supports adding captions afterward.
How can I add captions to a video for free?
You can add captions to a video for free by using the native auto-caption tools on platforms like YouTube, TikTok, and Instagram. You can also use free online transcription generators or video editors to create an SRT file you can upload on platforms that support it.




.webp)
.webp)
.webp)


