---Riverside.webp)


Learning how to record a Zoom meeting is essential if you want to revisit important conversations, keep absent team members in the loop, or have an accurate record of key discussions.
This guide provides easy-to-follow, step-by-step instructions for recording Zoom meetings. We’ll cover setup, permissions, and different devices so you can hit record with confidence.
Let’s do this!
Is there a way to record a Zoom meeting?
Yes, Zoom allows recording. But whether you can do it depends on your permissions, as well as where you want recording to be saved (locally or to the cloud). You can record a meeting on Zoom if:
- Your role allows it: You’re the Host, Co-host, Alternative host, or a Participant who’s been granted “Allow record” by the host.
- Recording is enabled in settings:
- Local recording is toggled on for your user (if you’re on a free plan).
- Cloud recording is toggled on (for paid plan users only).
- You’re on a supported app/device:
- Desktop app (Mac/Windows/Linux) for local recording or cloud recording (on a paid plan).
- Web app for cloud recording (on a paid plan.)
- Mobile (iOS/Android) and web client/Chromebook are cloud only (but only on a paid plan.)
- Policy & security allow it: Your organization/admin hasn’t disabled recording (ask your Zoom admin if you aren’t sure.) Enabling enhanced encryption (E2EE) at the administrator level can also disable cloud recording.
- Storage is available: There’s enough disk space (local) or cloud quota (cloud).
- Legal consent is handled: You have permission to record per your region/company policy.
Check out our tips and tricks for hosting top-quality Zoom meetings, as well as our guide to improving Zoom video quality for more tips on how to get your recording started.
Pro tip: If you’re frustrated with Zoom’s recording controls and lower recording quality, try Riverside. It records professional quality video and audio, all recordings are automatically saved to the cloud (even on the free plan!), and it’s really easy to use. Plus, unlike on Zoom, you can record as much as you want.
How to record a Zoom meeting step by step
If you’re the host or a participant with the correct permissions, follow these steps to record a Zoom meeting using the desktop app.
Important: While you can adjust recording settings in the Zoom web app (browser), only the desktop app supports local recording. If you’re using the web app, you can record to the cloud (with a paid plan), but not to your computer.
Step 1: Open the Zoom desktop app and log in.
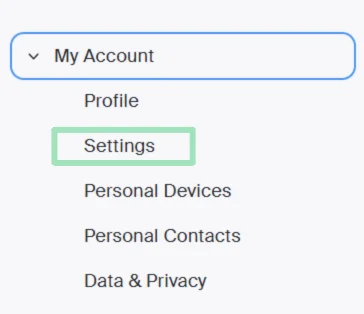
Step 2: Click “My Account,” then “Settings” from the left-hand menu.
Step 3: Go to the “Recording” tab and switch on either “Record to computer files” or “Cloud recording.” You can adjust other recording settings here as well. Note that the cloud recording option will only be available on paid plans.

Step 4: Click “Host” to start a new meeting, or “Join” to join one from the top navigation menu.
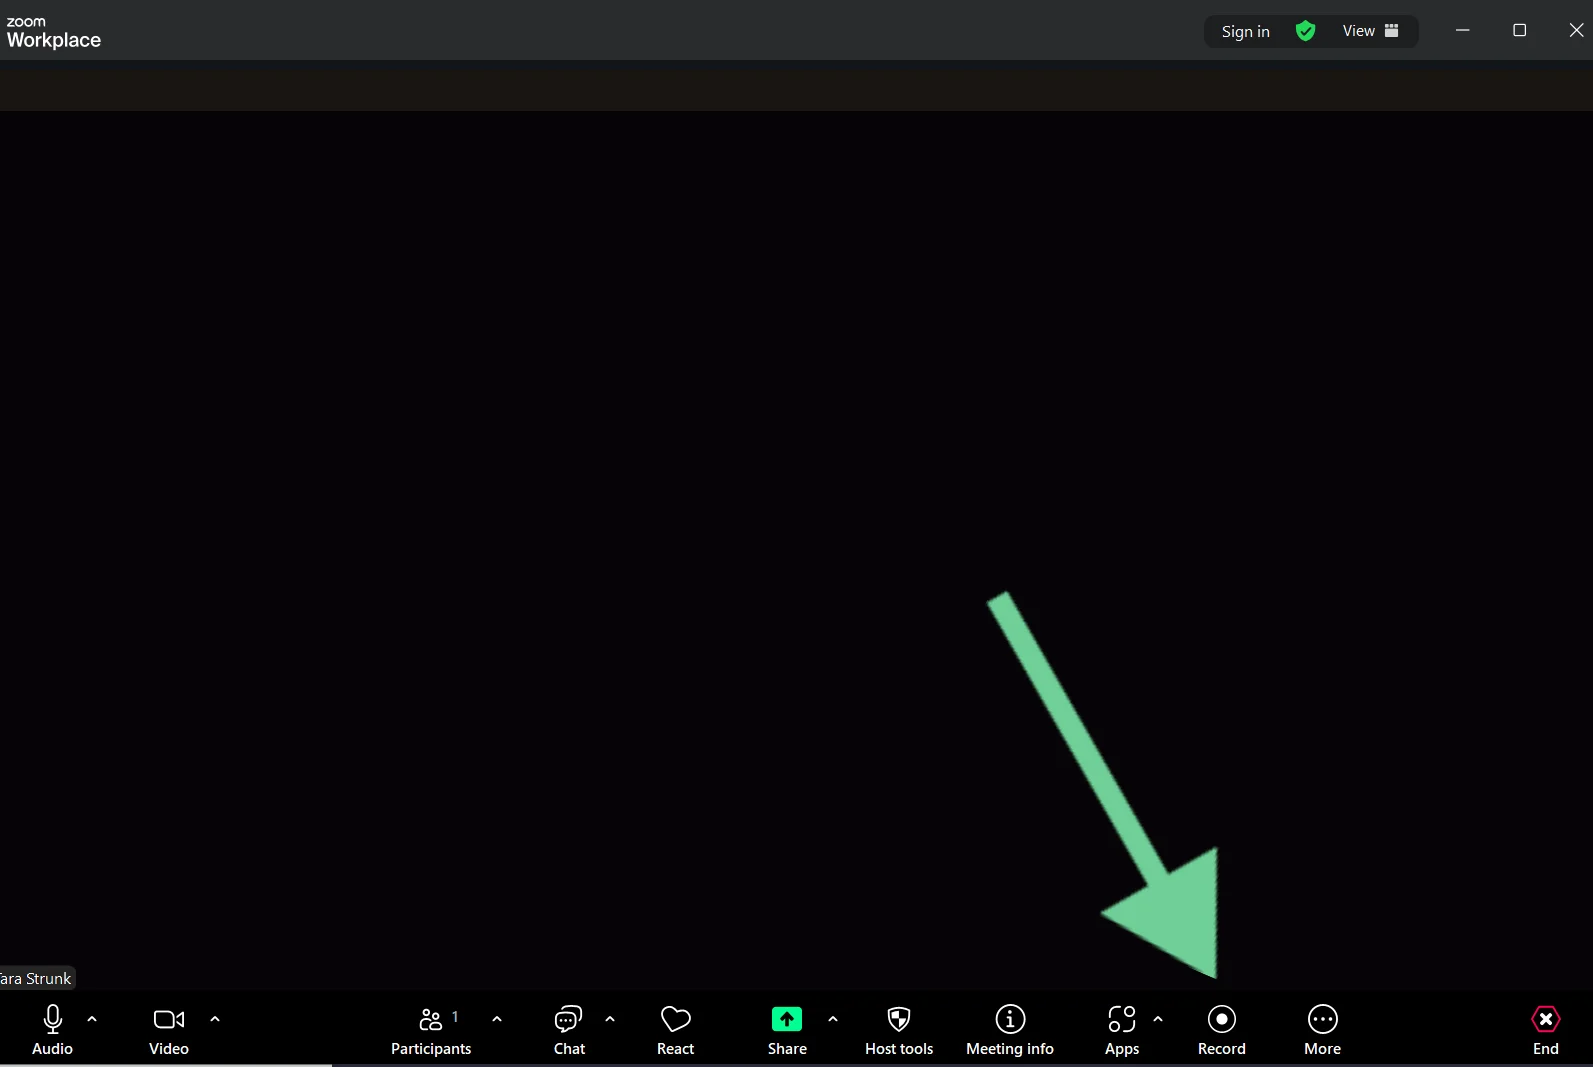
Step 5: Once your guests have joined and you’re ready to start recording, hit “Record” in the toolbar at the bottom of the screen. A “Recording” notification message will appear towards the top left of the screen. You and your guests may also get an audio notification.
Step 6: You can pause or stop the recording using the icons displayed next to the “Recording” button.

Step 7: When you’re done recording, click “Stop recording” and then “End” and then “End meeting for all.” This will close out your meeting and the recording will be saved.
Step 8: If you are recording your video locally, you will get a popup asking you where you’d like to save it. Select your folder. If you are recording to the cloud, your recording will automatically be saved to the Zoom Cloud.
How do you find your local Zoom meeting recording?
Did you choose to record locally but can’t find the file? Don’t worry, you’re not alone.
When you finish recording a Zoom video, a popup will appear that allows you to select where your file will be saved. If you don’t choose a location, Zoom creates a “Zoom” folder inside your computer’s “Documents,” organized by date and meeting title. You can locate them through the Zoom app, which shows the exact file path, or by searching “Zoom” in your “Documents.”
If you recorded to the cloud, you can find those recordings by going to “Recordings” in the left-hand menu in Zoom.
Read more: In this article, we dive deeper into where Zoom recordings go and how to find them quickly.
How to record a Zoom meeting without permission (Mac or PC)
If you want to record a Zoom meeting but you don’t have the appropriate permissions, you’ll have to use an external screen recorder. Some people opt for Xbox Game Bar in Windows or the built-in screen recorder in Mac, but these options have some serious drawbacks, including lower resolution recordings and audio problems.
That’s why Riverside is the better alternative. It’s free, easy-to-use, and there’s nothing to download. Jump right in and start recording using the following steps:
Step 1: Sign up or log in to your Riverside account.
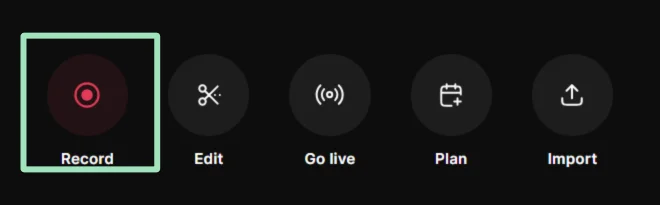
Step 2: Click “Record.”
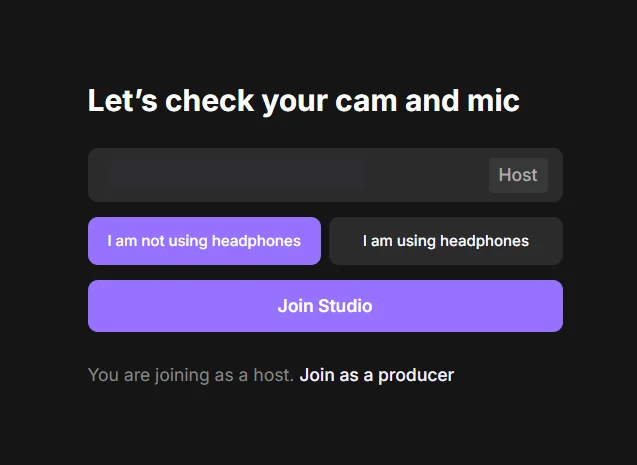
Step 3: Choose your microphone, camera, and headphones, then click “Join Studio.”
Step 4: Click the “Gear” icon to select your recording resolution, and whether to record audio only, or audio and video.

Step 5: Set up and join your Zoom meeting in a separate tab on your computer.
Step 6: Use Riverside’s “Share” feature to choose a screen to add to your recording, then select the tab for your Zoom meeting. If you are using the Zoom desktop app, you could opt to record in a window instead.
Be sure that the “Also share tab audio” is switched on.

Step 7: When you’re ready, click “Record” on the toolbar at the bottom of the screen.
Step 8: When you’re finished, click “Stop.” Wait until each participant’s recording shows it’s 100% uploaded, then you can exit the studio.

Step 8: All recordings are saved securely in Riverside’s cloud, which is accessible from the “Projects” tab on your dashboard. Open any recording to download it.
Tip: If you want the highest possible quality recording, ditch Zoom altogether and use Riverside for calls and meetings. You can invite guests with a link, it’s easy to use, and you get unlimited recording hours, even on the free plan. You can learn more in Riverside vs. Zoom.
How to record a Zoom meeting on your phone
It is possible to record a Zoom meeting on your phone using the Zoom app. As with recording on your desktop, you need to be a host or co-host. You also need to be on a paid plan to record on mobile. Just follow these steps:
Step 1: Download or locate and open the Zoom app on your mobile device.
Step 2: Start or join a Zoom meeting as the host.
Step 3: In the toolbar at the bottom tap the “Record” icon. If you don’t see this option, make sure you’re on a paid plan and cloud recordings have been enabled. Tap “More” and select “Record to the Cloud” and Zoom will capture both audio and video.
Step 4: Next tap “Start Recording” and in the top-left corner of the screen you will see a notification that you’re recording.
Step 5: Tap the “Record” icon again and choose to either “Pause Recording” or “Stop Recording.” If you wish to stop you’ll need to tap “Stop” to confirm.
Step 6: After the video has been uploaded and processed, the recording will be available in “Recordings” on the Zoom web portal.
Read more: Get a more detailed explanation and tips in How to Record a Zoom Meeting on Your Phone.
How to record a meeting on Zoom with your phone’s screen recorder
If you’re not the host, you can use your phone’s built in screen recorder to record a Zoom meeting. Here’s how to do it on both iPhone and Android.
On iPhone
Step 1: Check available storage in your phone’s settings. A one-hour screen recording usually takes about 1–2 GB (more if resolution/bitrate is high).
Step 2: Open Zoom, join your meeting, and tap “Join Audio,” then “Call using Internet Audio.”
Step 3: Tap the speaker icon in Zoom to route audio through your iPhone’s speakers so the recording captures it.
Step 4: Go to “Settings,” then “Control Center” on your iPhone and tap “Screen Recording.” Press and hold the record button, toggle Microphone Audio ON, then tap “Start Recording.” A 3-second countdown will appear before recording begins.
Step 5: When finished, open “Control Center” again and tap the red stop button. The video will automatically save to your “Photos” app under “Videos.”
On Android
Step 1: Make sure you have enough storage on your mobile device under your phone’s settings. You’ll need 3-6 GB per hour of recording.
Step 2: Join your Zoom meeting. Tap “Join Audio” then “Call via Device Audio.” Then tap the “speaker” icon on the Zoom toolbar and select “Speaker” so the meeting audio plays through your phone’s loudspeaker (instead of earpiece or Bluetooth).
Step 3: Pull down the “Quick Settings” menu (swipe from the top of the screen) and tap “Screen Recorder.”
Step 4: When prompted, choose your audio sources. You can choose either “Device Audio” (captures Zoom meeting sound), “Microphone Audio” (captures your own voice), or both.
Step 5: A short countdown will start before recording begins.
Step 6: When you’re done, pull down “Quick Settings” again and tap the “Stop” button. The video will automatically save to your “Photos” under “Screen Recordings.”
Tips for recording Zoom meetings
Follow these tips to ensure the best possible Zoom meeting recordings:
Know the law
Recording and consent laws vary by location. For example, some countries require all participants to agree, while others only need one person’s consent. As a best practice, always inform participants that you are recording.
Choose the right recording type
Make sure you have selected the right recording type, and you know whether it’s being saved locally or more securely on the cloud. Saving securely to the cloud is a paid for feature on Zoom, but is available to all Riverside users including those on the free plan.
Set up your environment
To ensure the best possible recording, make sure to set up your recording environment correctly. For example, record in a quiet room, check your lighting, and test all your equipment before hitting record.
Adjust Zoom settings
Check out your Zoom settings to control how your meetings are recorded. Go to “Settings” and select the “Recording” tab in the Zoom web portal to choose whether to record locally (desktop app only) or to the cloud (paid plans), adjust your video layout, and decide whether to save single or separate audio tracks (available with paid plans).
Use proper lighting
Good video lighting can help improve your video quality. Using a ring light, softbox light, or simply positioning yourself near natural light will brighten your video and make you look more professional and polished on camera.
Reduce background noise
Background noise is very distracting. When recording, make sure all participants are located in a quiet space, windows are shut, and any unwanted noise sources like fans are switched off. If some background noise sneaks in anyway (it happens!), you can edit it out using Riverside’s Magic Audio feature.
Check your camera and mic
Check the camera and microphone before hitting record, and do this with your participants too. It’s much easier to fix equipment issues before recording, rather than waiting to do this in post-production. Riverside’s quick mic test and webcam test make this easy.
Check your internet connection
Zoom relies on a stable internet connection. This means if yours is weak, your recording quality can suffer or even become unusable. Use a wired connection over WiFi when possible. Or, use Riverside. It records locally to ensure that you’ll get a high-quality recording, even if your internet isn’t the best.
Final thoughts
Recording your Zoom meetings is easy and straightforward. With the right setup, permissions, and a little technical know-how, you can capture important conversations that you can revisit and share with others in the future. Always make sure to notify participants and get consent before recording. And be sure to take the time to enhance and refine your recording environment - it can make all the difference in the end result!
If you want more flexibility and reliability, platforms like Riverside make it even easier. Hit record, focus on the conversation, and you’ll get a high-quality recording every time.
FAQs about how to record a meeting on Zoom
Can Zoom detect screen recording?
Zoom can only detect screen recording when the platform’s built-in recording feature is used, which will notify all participants. It can’t detect or alert participants if a third party tool is being used to record. However, many jurisdictions require participant consent for recording, so it’s best to let others know that you are recording.
How do I access Zoom recording settings?
Once logged into your Zoom account, select “Settings” located under “My Account.” Head to the “Recording” tab at the top to access the settings.
What are the different recording options for Zoom?
Zoom gives you numerous recording options depending on your plan (free or paid), role (host or participant), and device (computer or phone). Here’s a look:
Local recording options
- Choose the storage location on your device.
- Record video with Active Speaker, Gallery View, or Shared Screen.
- Record audio only (MP3 file).
- Record separate audio tracks for each participant (optional).
- Display participants’ names in the video.
- Optimize recording for 3rd-party video editor compatibility.
- Add a timestamp to the video.
Cloud recording (paid plans only)
- Choose recording layouts:
- Record audio-only (M4A).
- Record separate audio tracks for each participant.
- Generate an audio transcript (searchable text).
- Save in-meeting chat text.
- Save poll results.
- Save Q&A, annotations, and meeting reactions.
- Record shared screen only (no video).
- Optimize for video clip sharing.


.webp)

