.webp)


Key takeaways:
- Remote video refers to both virtual meetings, as well as remote recording, and livestreams.
- To record a remote video you can use a dedicated remote recording software, or opt for a double-ender solution, then stitch everything in post.
- Riverside gives you the best from both worlds: You record locally in studio-quality resolution, but all separate tracks are synced together automatically.
Remote video is everywhere in our lives, from virtual meetings and online classes to live-streamed gaming sessions. But what does it actually mean, and how can you use it?
This guide breaks down what remote video entails and shows you exactly how to record, edit, and livestream remotely.
What is remote video?
A remote video is any video recorded when participants aren’t in the same physical location. “Remote” simply means “from a distance,” but in modern terms, it refers to video communication over the internet.
If you’ve ever participated in a virtual meeting (or remote call), that’s a remote video. Other examples include remote podcasts, customer testimonials, interviews, and even remote live streaming.
The obvious benefit is that remote videos overcome geographical barriers. Whether you're on an interview call or live-streaming on YouTube, you can reach people all over the world.
How to create a remote video recording: 2 Options
With some basic equipment, you can easily record your own content remotely.
Just pick your format, find some guests and co-hosts, and choose the method that suits your needs.
There are two ways to record a remote video:
- Using dedicated remote recording software.
- A more manual method called double-ender recording.
Let’s explore both options and their pros and cons.
Option 1: Remote recording software
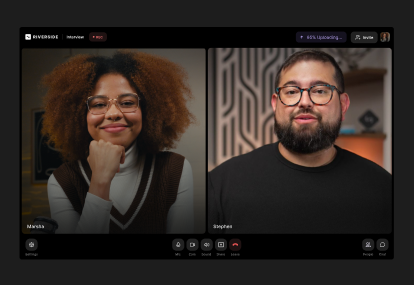
Using dedicated remote video recording software is the easiest and most common way to record a virtual conversation or interview.
If quality is your goal, then choose remote recording software with local recording.
Video calling software can compress video streams when your connection slows down to prevent lag, which often results in blurry visuals and distorted audio.
Meanwhile, local recording software, like Riverside, doesn’t depend on your internet connection. Each participant’s audio and video records directly from their device. Then everything uploads to the cloud in real time while recording, so you can have all your files in one place.
For a beginner, this means you don’t have to worry about complex setups or post-production. Just join the call and hit record.
Pros:
Studio-quality audio and video (with the right platform): A dedicated remote recording tool can record locally in up to 4K video and 48kHz audio quality, regardless of internet speed.
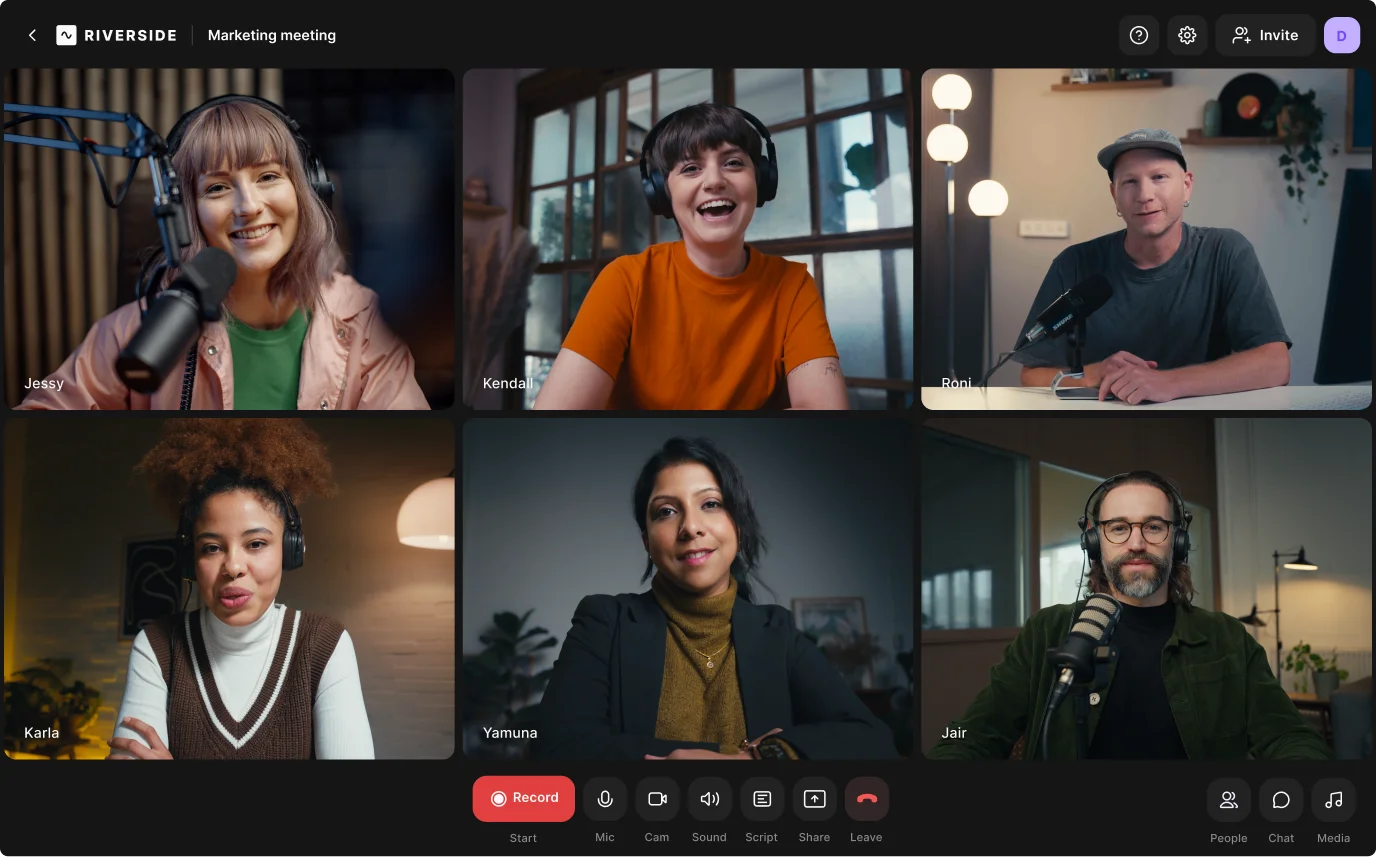
Less chaos: Riverside works through your web browser or an app, and automatically uploads every participant’s files over the cloud. You won’t have to coordinate multiple guests filming their own content or ask them to send you their large video files.
Live interaction: Since you’re recording video with participants in real-time, everyone can bounce ideas off each other. You can even take live call-ins and questions or live stream if your software supports it.
If you’re specifically recording with Riverside, you’ll also benefit from:
Separate audio and video tracks: With Riverside, you’ll receive totally uncompressed, separate audio and video tracks for each participant, giving you maximum flexibility in post-production.
All-in-one workflow: You can record, edit, and repurpose your content from a single place, saving you massive amounts of time and potentially the cost of multiple subscriptions.
Promotional clips in one click: With Magic Clips, you can effortlessly turn your long-form video into short, shareable snippets with just one click.
Automated editing: Text-based editing lets you use your auto-generated transcript to edit your recordings like a document. You can also polish your audio and video, add b-roll, or repurpose your content by simply chatting with our AI editorial assistant, Co-Creator.
Remote video on-the-go: You and your guests can download the Riverside mobile app to record video in up to 4K resolution from anywhere.
Cons:
Only one take: If you’re recording live, you won’t have the option to use everyone’s best take and mix and match them at the end. Everyone needs to be on top form at the moment of the recording, or you’ll need to set aside some extra time for additional takes.
Quality varies by platform: Not all remote video recording software is equal. Some conferencing apps, like Zoom, heavily compress video, requiring a stable internet connection during the call.
Learning curve for advanced features: While basic recording is simple, mastering all the features (like live streaming or multitrack editing) might take some time.
Subscription-based: These platforms require an investment, but it’s usually much less than the cost of using multiple other tools.
Option 2: Double-ender recording (manual)
The double-ender option is a less common and more technically challenging method for recording remote video.
In this setup, each participant needs to record their part of the webinar, presentation, or interview on their own. Afterwards, participants send their video files (which are often quite large) to you. You end up with the painstaking job of manually syncing all the separate audio and video tracks.
The advantage here is that you get high-quality footage from everyone, even with slower connections. But stitching everything together is difficult and time-consuming.
Pros:
No internet-related issues: Since every participant is recording their own offline video, there will be no glitches, muffled, robotic audio, or pixelated visuals.
Flexible organization: Rather than requiring every participant to be present at one specific time, everyone can record on their own time.
Safer backups: Each person has their own file. Even if one computer crashes, the other participants’ recordings are still safely saved on their devices.
Separate tracks by default: You inherently get separate video/audio tracks for each person so you’ve got more control in post-production.
Cons:
Not live: You can’t broadcast live, and you will miss out on real-time interaction and connections with your audience.
Complex setup: Double-ender recording is not as simple as clicking one record button. Each participant needs to have recording software or equipment and know how to use it.
Difficult to sync: Manually aligning multiple audio and video tracks is incredibly time-consuming and requires significant editing skill.
Stilted performance: Scripting your video in advance could lead to a very clinical, uninspiring video without dynamic conversations and useful tangents.
Complex file management: Recordings will take a lot of space. You have to coordinate large file transfers from multiple people, which can be slow and complicated.
No live oversight: You can't monitor your guest's audio or video quality in real-time to catch problems as they happen.
Remote video recording: A step-by-step guide
When using a dedicated platform like Riverside, recording a remote video is far easier than it seems and only takes a few clicks.
Requirements for a remote video capture setup
Let’s start with some equipment basics:
Camera: A DSLR or mirrorless camera will provide the best quality. If you have a high-end smartphone, you can also use its back camera.
Microphone: Your laptop's built-in mic won’t cut it. Investing in a dedicated external microphone (USB or XLR) can seriously improve your audio quality.
Lighting: Lighting dramatically influences how professional your video looks. If you don't have professional lights, face a natural light source, like a window.
Headphones: Closed-back headphones help you monitor audio and minimize echo or audio bleed during recording.
Pro tip: To elevate your remote video production, use a video switcher like the Blackmagic ATEM Mini Pro to switch between multiple cameras.
Step-by-step tutorial
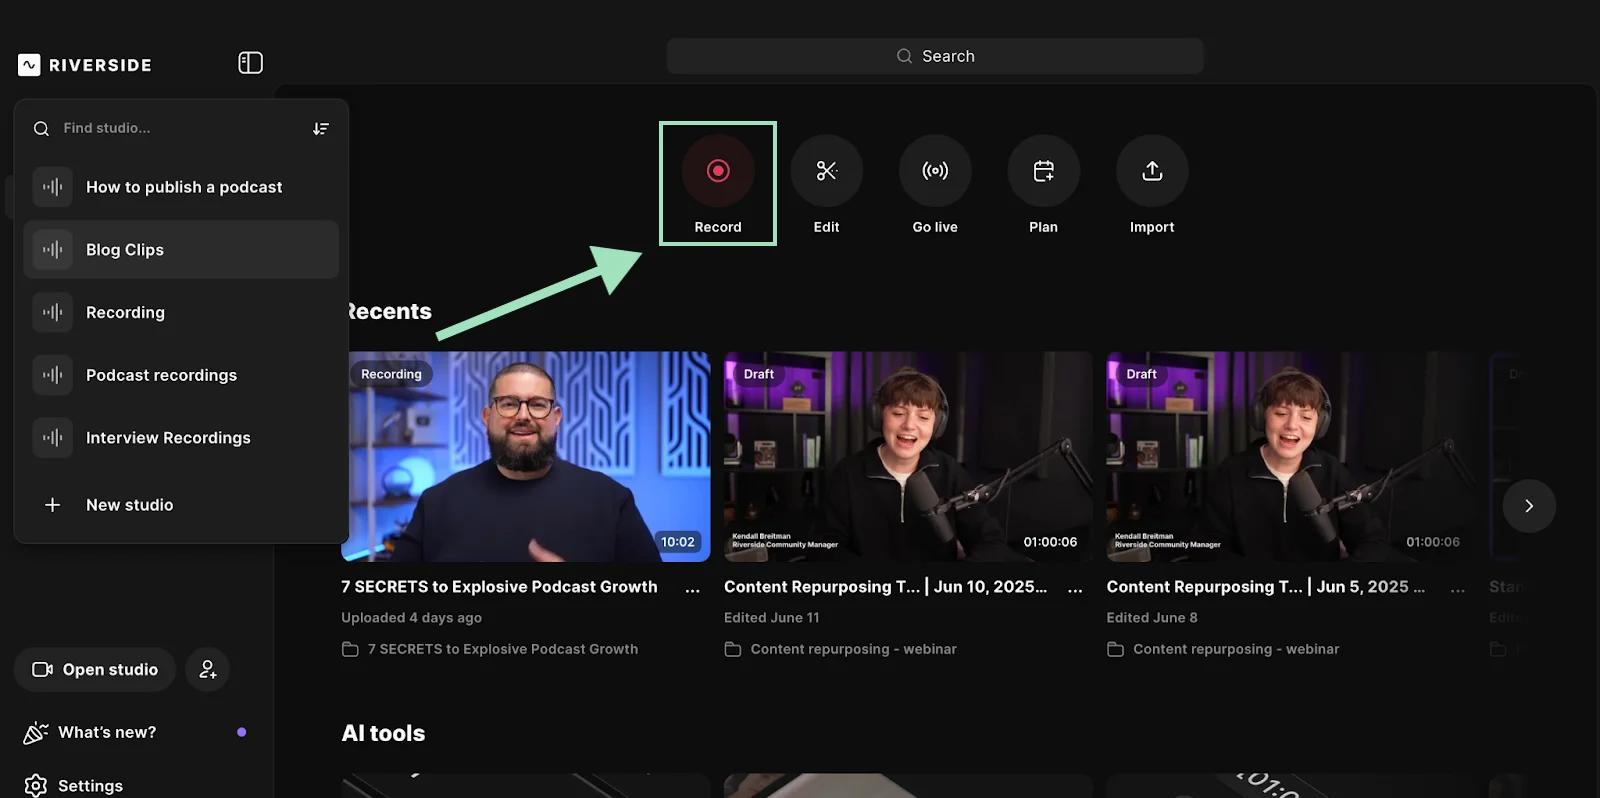
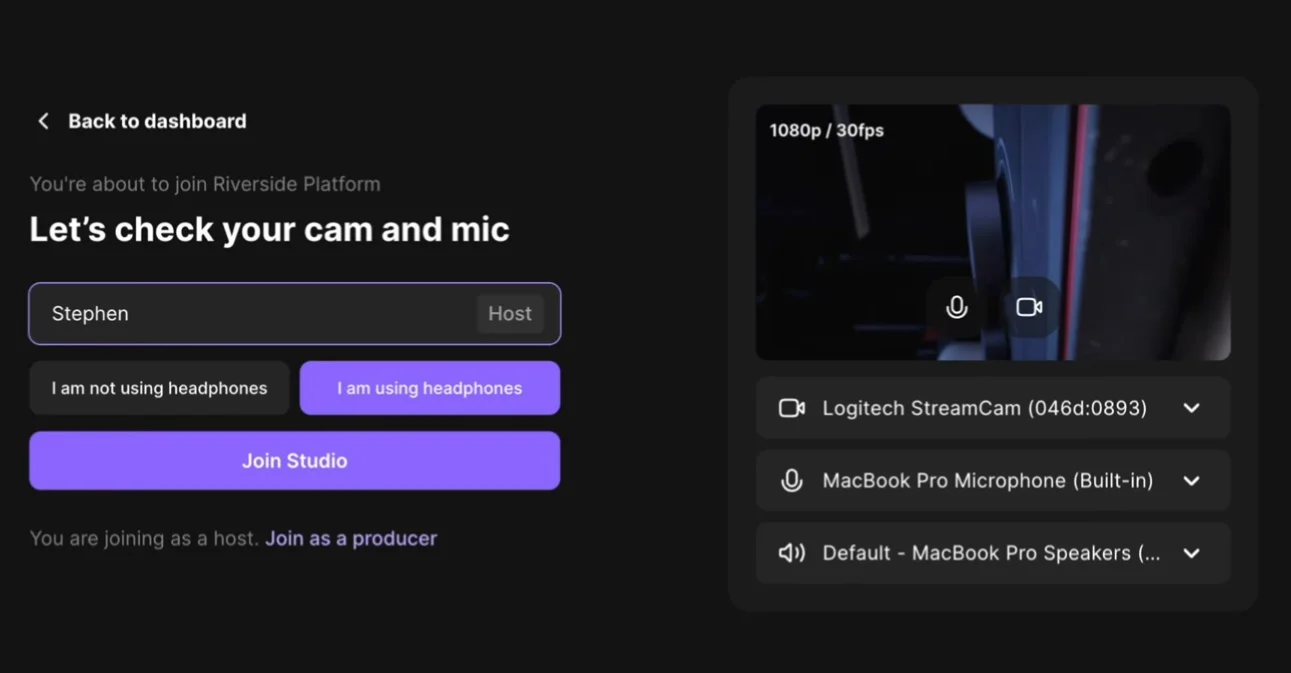
Step 1: Log into your Riverside account, and from your dashboard, click “Record” to start a new recording.
Step 2: In your lobby, you can set up your audio and video equipment and choose whether you’re going to record with or without headphones. Once ready, click “Join studio.”
Step 3: Inviting guests is really easy. Just share the invite link with them or send them an email. They can join straight on their browsers, no need to download or install anything.
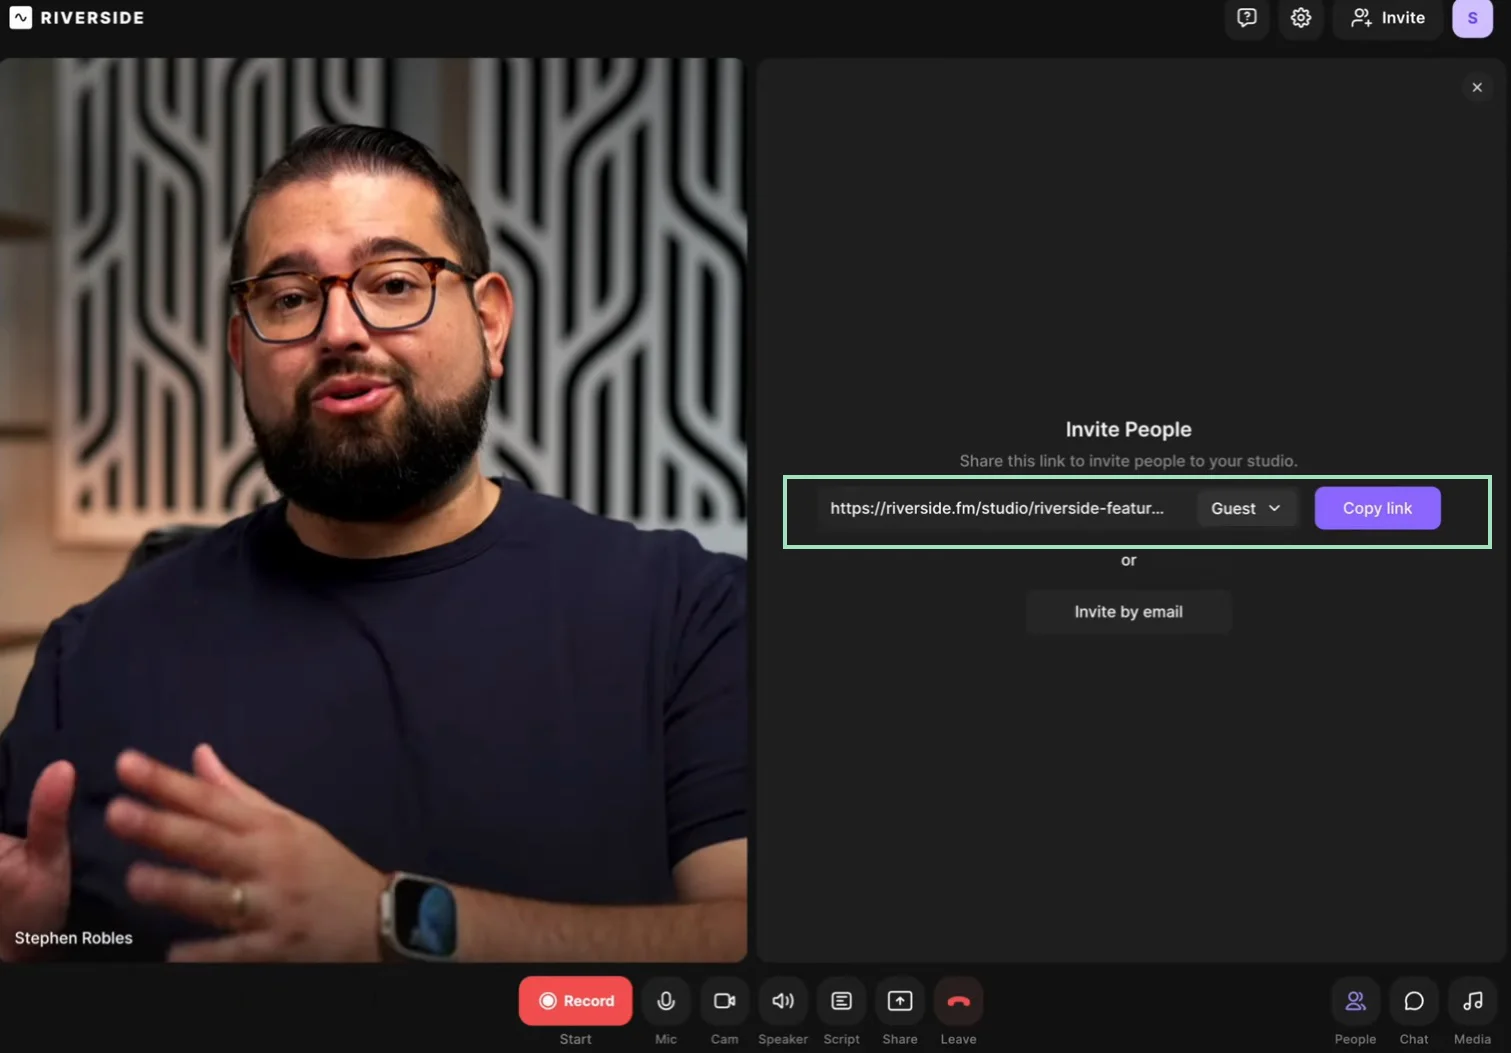
You can invite up to 10 participants (including yourself and 9 guests) and even assign a team member to producer mode to manage your session from behind the scenes.
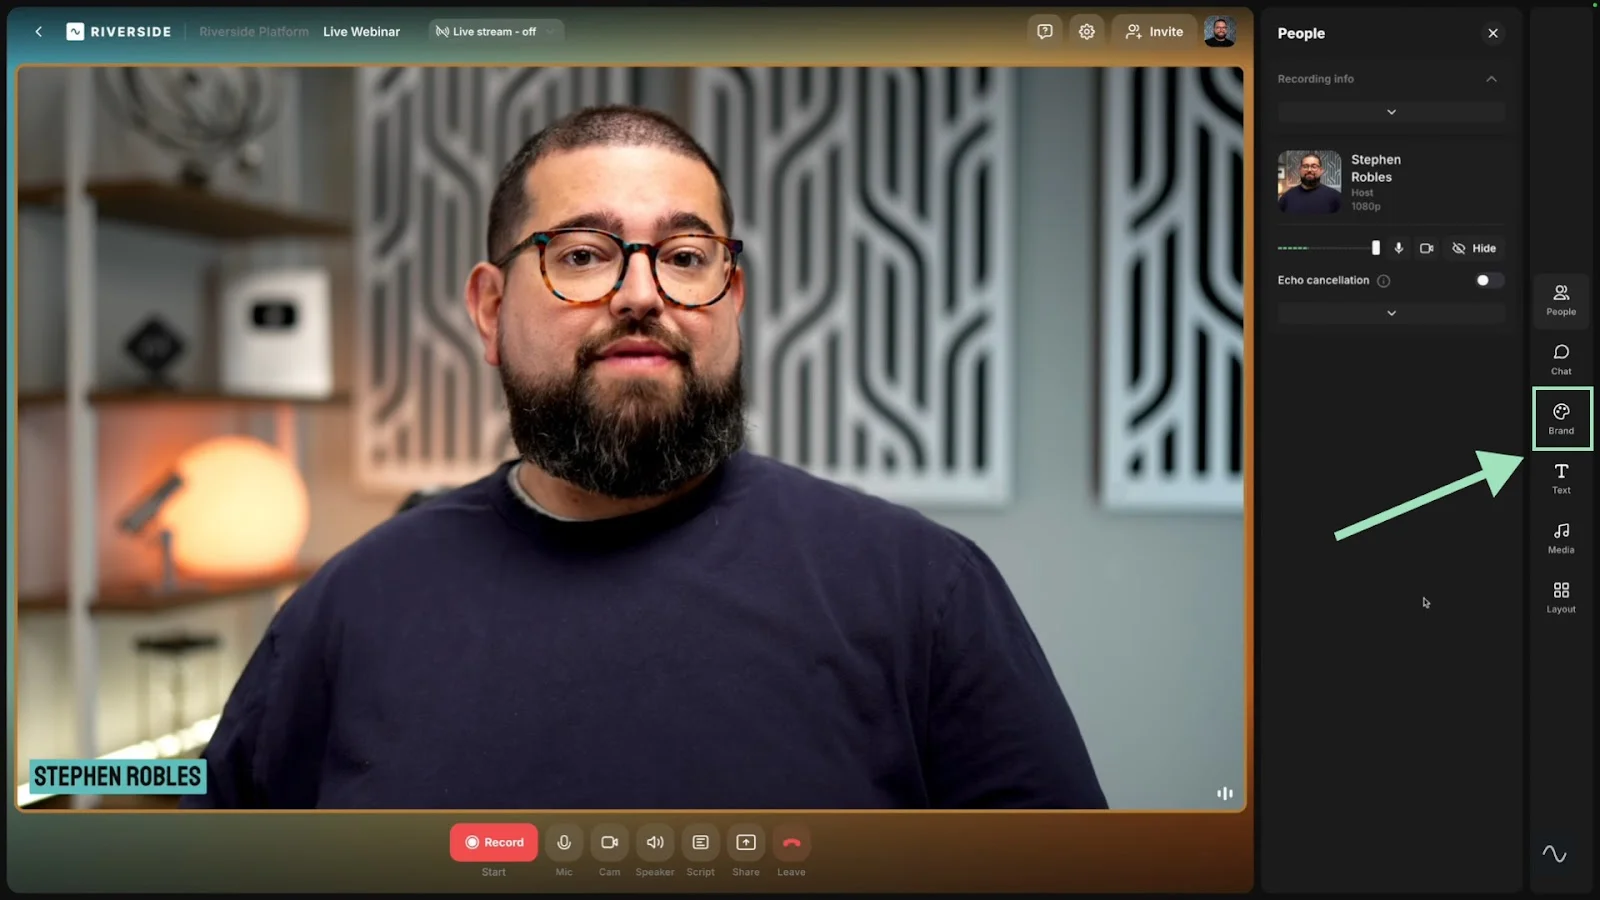
Step 4: Want to personalize your studio? With Riverside, you can. Just click on the “Brand” and “Layout” buttons on the right sidebar to customize your design and save your options as presets.
Step 5: If you want to share your screen during your remote video recording, just click on the “Share” button in the bottom bar, then select “Screen.”
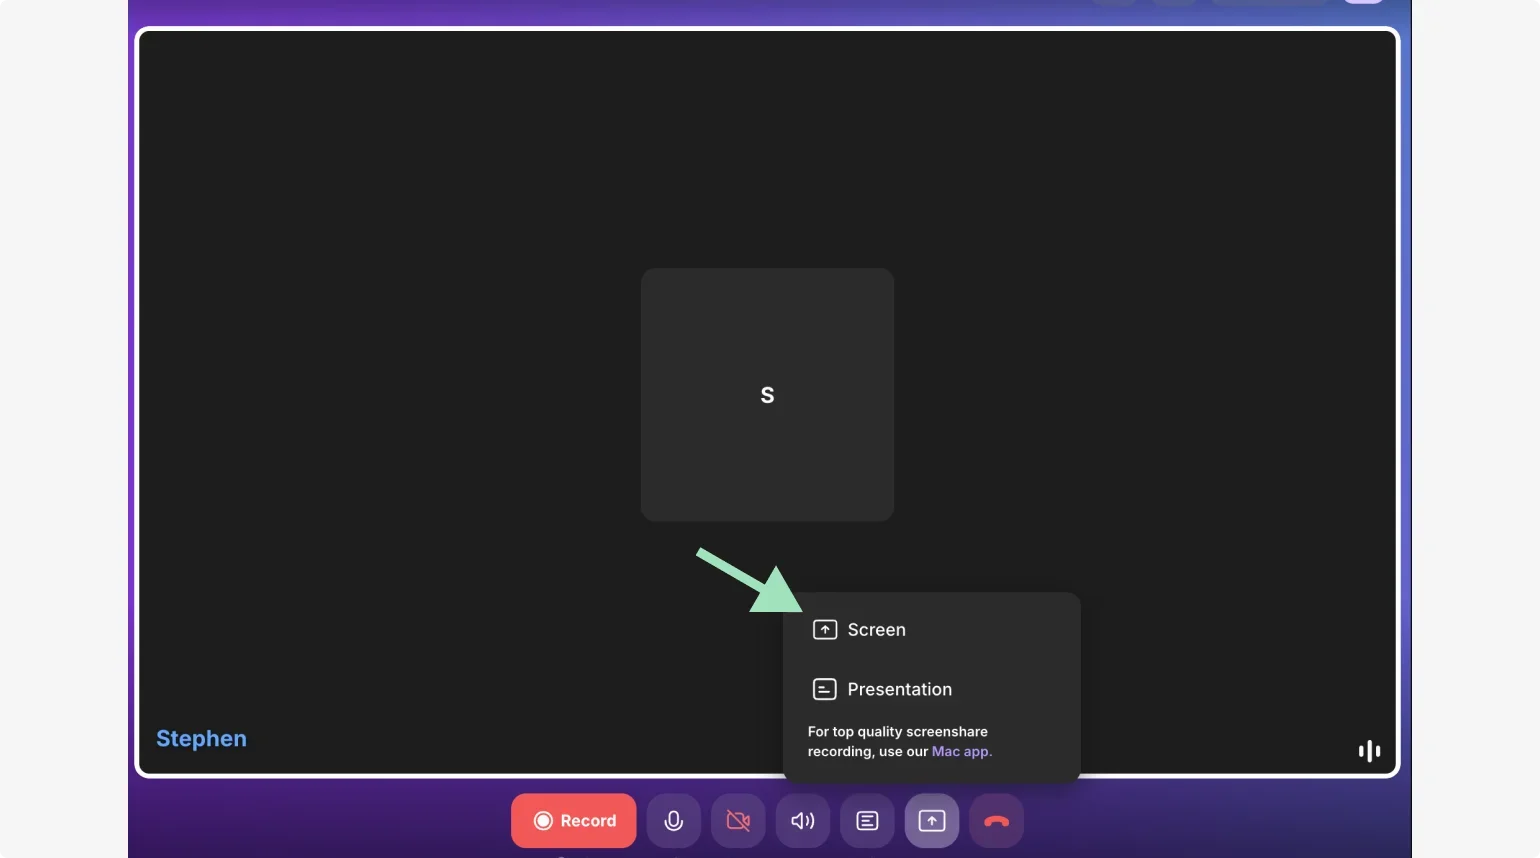
You can share your Chrome tab, your window, or your whole screen.
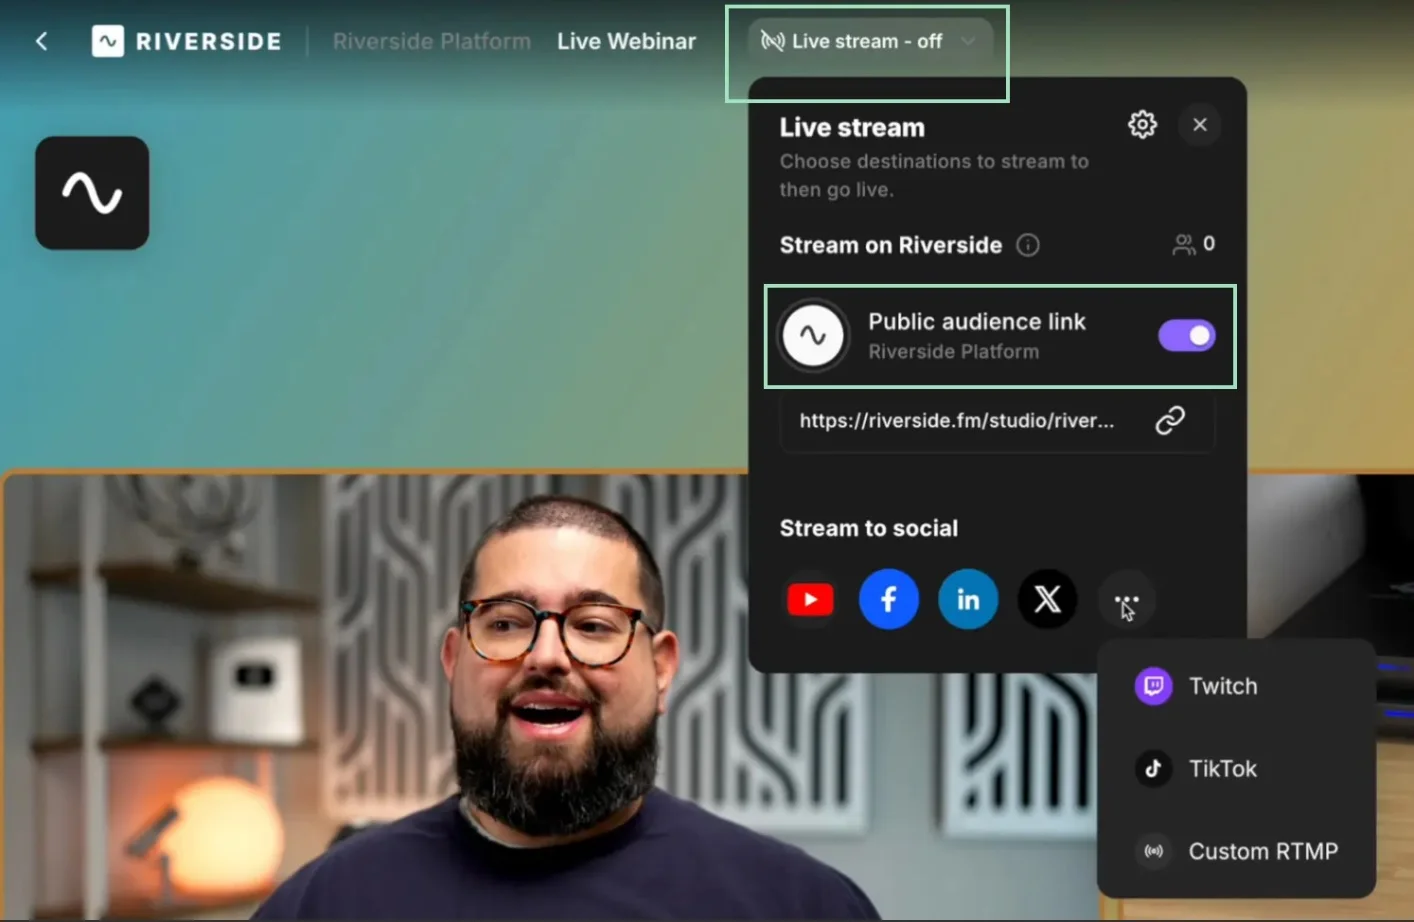
Step 6: If you want to live stream, just click on the “Live stream” button at the top and connect to platforms like X, Twitch, or LinkedIn.
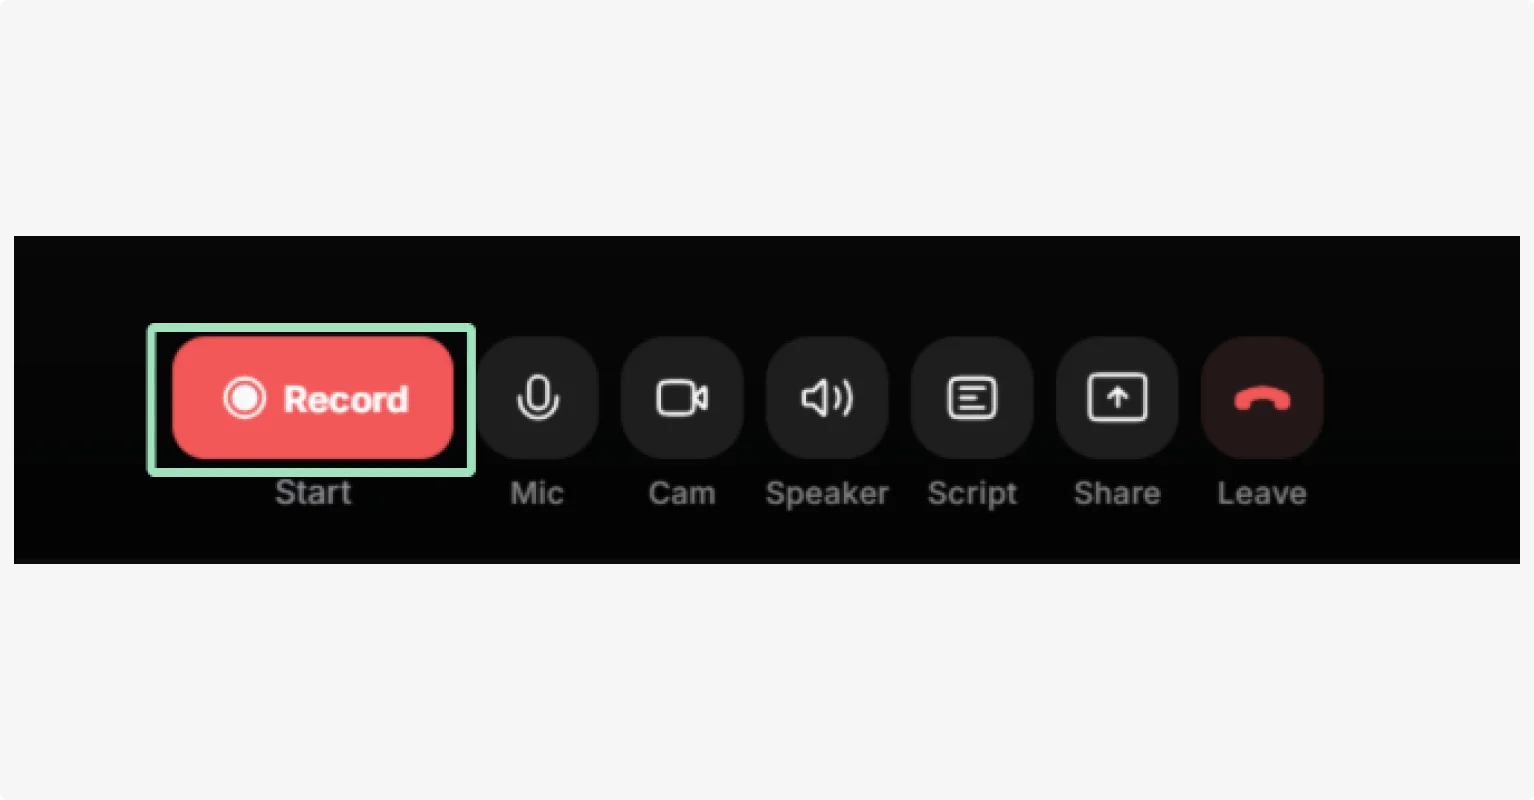
Step 7: Once you’re ready, click on the “Record” button, or “Go live” if you’re live streaming. Wait for the countdown and start recording.
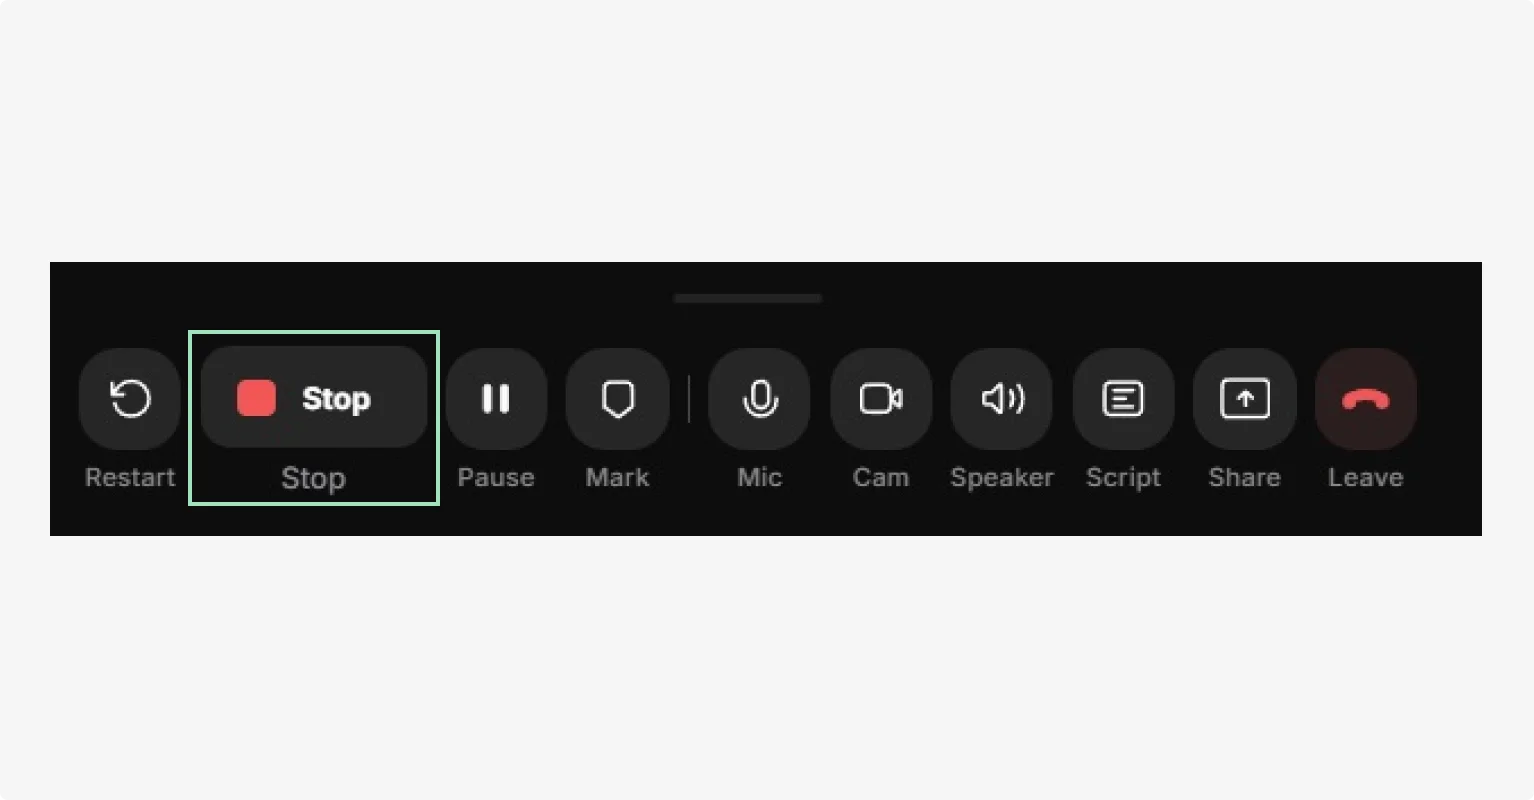
Step 8: When you’re done, click “Stop” and then “View Recordings” to access your new recording file.
Step 9: Editing with Riverside has never been so easy. You can edit your recording as a text doc to cut and trim your video, or save even more time with Co-Creator’s chat-based editing.
.webp)
You can request all kinds of edits like:
- “Clean up audio”
- “Polish for social media”
- “Add branded captions”
- “Create a clip of...”
And more, all just by prompting it.
You can even repurpose your recording into blog posts, reels, newsletter emails, or social media assets!
Read more: Want to record remote interviews like a pro? Check our full guide on how to record a video.
Best practices for recording remote videos
Here are a few expert tips to improve the quality of your remote videos.
Prep your guests: Your guests likely aren’t tech experts. Before you hit record, spend a few minutes to help them verify their equipment and confirm their settings.
Avoid low camera angles: Whether you use a webcam or your smartphone as a camera, make sure it’s elevated enough so you look good.
Properly position your mic: Place your mic about 6-12 inches from your mouth and slightly off-axis to minimize pops and plosives.
Sound treat your room: An echoey room can destroy your audio quality. Record in a small room with lots of soft furniture or sound treat your environment with some sound blankets.
“I find that the room and the space that you're in makes a bigger difference than the actual mic itself. I have the sound-dampening panels up in my office. I have a rug on the floor, and I'm even thinking about adding in curtains.” — Andréa Jones, Host of the The Mindful Marketing Podcast
Troubleshooting common remote video recording issues
Follow these troubleshooting tips to ensure you don’t fall victim to the most common remote video recording issues.
Video looks grainy or blurry: Even the most powerful camera sensor might struggle in poor lighting conditions. Adding a soft front light and locking exposure usually fixes this issue.
Dropped frames or robotic voice: This is almost always a network-related issue. Close any background apps that might eat up bandwidth and switch to a more stable, wired connection.
Audio and video are out of sync: If video moves faster than the audio, it’s probably due to CPU overload. Ensure all participants close unused browser tabs and resource-intensive applications before recording. You can also ask them to use a more powerful device (e.g., a desktop PC instead of a laptop or phone). If you’re recording with Riverside, though, you have nothing to worry, as everything will be synced on the cloud automatically.
Guest disconnects mid-recording: With Riverside, that’s not even an issue. Simply wait for them to rejoin and everything will automatically save up to the point of the crash.
FAQs on remote video
What is a remote video call?
A remote video call is a real-time conversation between two or more people in different locations. It’s an online face-to-face meeting conducted via the internet. Participants can use virtual meeting software to talk with each other via their own devices.
Many video conferencing platforms that focus on online meetings (like Teams or Zoom), heavily compress video and audio quality, especially on slower connections.
For content creation, make sure to pick a platform that records locally (like Riverside) to ensure your video is captured in high quality.
How to stream live video from a remote location?
To stream a live video from a remote location, you need a tool to broadcast your livestream and a reliable internet connection. Picking a platform like Riverside allows you to multistream on multiple social media platforms (YouTube, Facebook, Twitch, etc.) simultaneously. You can also engage with all audiences from these platforms in the unified Omnichat, and record your stream locally so you can edit and repurpose it later.
What device do I need for live streaming?
You can start live streaming with just a laptop with a built-in webcam and microphone. If you want to level up your quality without breaking the bank, get an external USB mic and use your smartphone as a webcam.
How to live stream with another person?
To live stream with another person remotely, you need dedicated remote recording software, like Riverside. Just share an invite link with your co-host or guest so they can join your session from their browser. Once they join, you can rehearse as much as you want, then go live whenever you’re both ready!
What is the best platform to record video interviews remotely?
The best option is the one that suits your needs. If you’re looking for high-quality local recordings, we suggest trying Riverside. This platform is not just an online meeting space; it specializes in recording remote video interviews. With local recording, high-resolution video and audio, and the ability to invite 9 guests to your remote video recording online, you’ve got all you need.
How do I record a remote video interview using Zoom?
To record a video interview using Zoom, follow these steps:
- Schedule your session.
- From Zoom’s settings, select whether you want to save the file on your hard drive or to Zoom's cloud storage.
- Once the call begins, start the built-in recording feature by clicking the “record” button.
- Ask every participant to send their files after the recording.
- Mix all tracks in a DAW.
Keep in mind that Zoom records compressed audio and video depending on your internet connection, and saves all participants into a single, mixed track. This makes Zoom convenient for quick interviews, but if you need studio-quality local recording or full control in post-production, use a dedicated remote video recorder like Riverside.
If you’re looking for a more complete guide, check our post on how to record Zoom meetings.